To avoid these ads, REGISTER NOW!

Anvil stand build

z-edition 006

Well-known member
Joined
Aug 27, 2011
Messages
237
Location
Norway
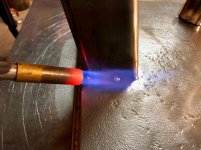
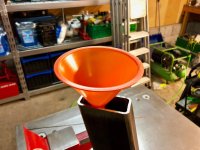
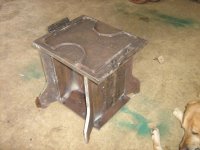
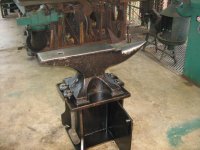
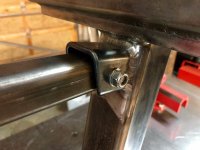
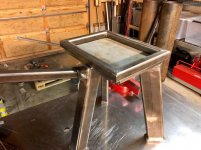
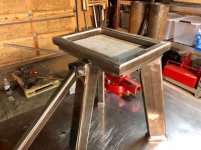
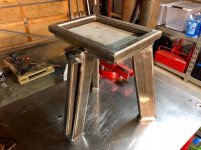
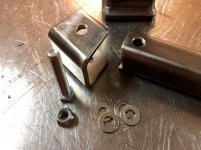
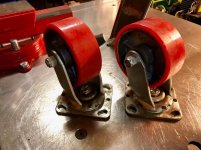
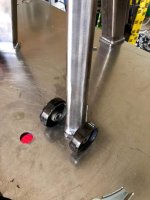
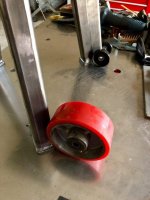
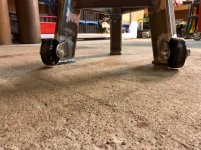
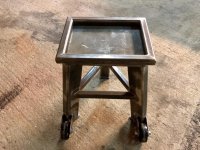
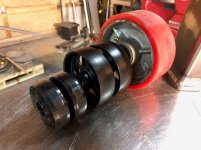
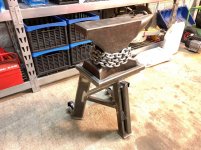
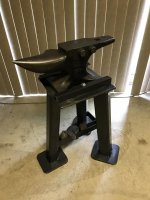
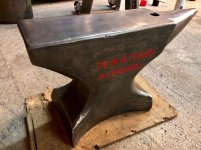
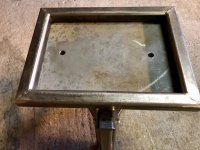
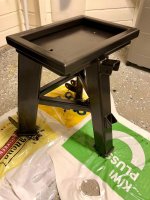
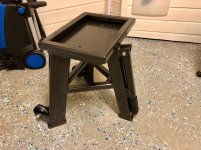
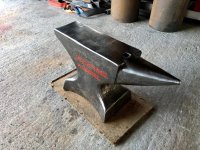
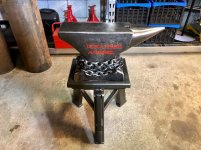
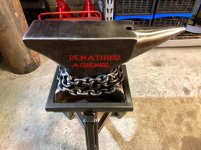
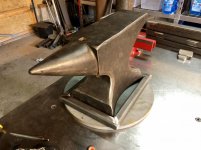
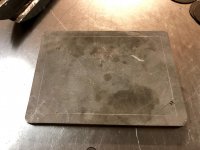
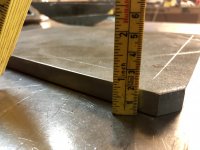
Hi, just started to build a stand for my anvil. I will use square tubing for the legs, and steel plate to be under the anvil. Mabe put some casters to make it mobile. I also plan to use sand in the legs, that is to reduse noise and so on.
 

Attachments

  • 67B4F8FE-7823-4384-8F54-13315BE96706.jpg
    67B4F8FE-7823-4384-8F54-13315BE96706.jpg
    147.3 KB · Views: 172
  • 845DE196-3BD4-4A99-A8AD-21F569D459DB.jpg
    845DE196-3BD4-4A99-A8AD-21F569D459DB.jpg
    148.2 KB · Views: 195
  • 7C84BF38-A8D6-40AB-BF44-412C767FDEEE.jpg
    7C84BF38-A8D6-40AB-BF44-412C767FDEEE.jpg
    147 KB · Views: 164
  • A2E535CA-408A-4834-BC24-4574F1F37900.jpg
    A2E535CA-408A-4834-BC24-4574F1F37900.jpg
    147.8 KB · Views: 150
  • E9A652C8-E154-4341-8648-00FF3ACBB6A5.jpg
    E9A652C8-E154-4341-8648-00FF3ACBB6A5.jpg
    139.4 KB · Views: 159
To avoid these ads, REGISTER NOW!
OP
Z

z-edition 006

Well-known member
Joined
Aug 27, 2011
Messages
237
Location
Norway

Attachments

  • A0897E0C-B071-4DC3-9510-C2A48938DBAE.jpg
    A0897E0C-B071-4DC3-9510-C2A48938DBAE.jpg
    153.2 KB · Views: 102
  • A972C6C5-E639-426F-9E49-6D6DEC4C6F22.jpg
    A972C6C5-E639-426F-9E49-6D6DEC4C6F22.jpg
    151.4 KB · Views: 108
  • ADF907F0-9BBD-4F6B-964B-1F80F265EBF4.jpg
    ADF907F0-9BBD-4F6B-964B-1F80F265EBF4.jpg
    150.6 KB · Views: 121
OP
Z

z-edition 006

Well-known member
Joined
Aug 27, 2011
Messages
237
Location
Norway

Attachments

  • AF33F80C-6BFA-4F36-8FF9-042FE0C84FAD.jpg
    AF33F80C-6BFA-4F36-8FF9-042FE0C84FAD.jpg
    146.5 KB · Views: 132
  • 31A6A042-2618-478E-ACB9-99FEA64E9E10.jpg
    31A6A042-2618-478E-ACB9-99FEA64E9E10.jpg
    146.7 KB · Views: 128
  • FC7DA796-AB48-491C-986D-A9897F55C417.jpg
    FC7DA796-AB48-491C-986D-A9897F55C417.jpg
    149.3 KB · Views: 131
  • E8C48FB5-736E-4460-8F48-C270A2BAF121.jpg
    E8C48FB5-736E-4460-8F48-C270A2BAF121.jpg
    142.8 KB · Views: 139

nelstomlinson

Well-known member
Joined
Jul 27, 2009
Messages
649
Location
Interior Alaska
Interesting. I had always heard that anvils were supposed to be put on the end grain of a chunk of log - something about absorbing vibrations?
 
OP
Z

z-edition 006

Well-known member
Joined
Aug 27, 2011
Messages
237
Location
Norway
Preheating the steel before welding.
 

Attachments

  • 6D47D3C5-9448-4E51-BCEC-94C88AE93C6B.jpg
    6D47D3C5-9448-4E51-BCEC-94C88AE93C6B.jpg
    133.2 KB · Views: 143
  • 963673E5-280C-4242-86D7-D5DFB28BBC0F.jpg
    963673E5-280C-4242-86D7-D5DFB28BBC0F.jpg
    151.6 KB · Views: 131
  • 12E9C845-3760-4A64-8D28-C0868EF78DA8.jpg
    12E9C845-3760-4A64-8D28-C0868EF78DA8.jpg
    148.5 KB · Views: 137
  • 95824924-734A-42D0-81C7-ED45FE6726A1.jpg
    95824924-734A-42D0-81C7-ED45FE6726A1.jpg
    154.7 KB · Views: 140

Jazz1

Well-known member
Joined
Jan 3, 2016
Messages
4,184
Location
Thunder Bay On.
Interesting. I had always heard that anvils were supposed to be put on the end grain of a chunk of log - something about absorbing vibrations?

Yes that stand is going to resonate some unless some rubber mat applied to bottom of anvil or at least bottom of stand.
 
OP
Z

z-edition 006

Well-known member
Joined
Aug 27, 2011
Messages
237
Location
Norway
Yes that stand is going to resonate some unless some rubber mat applied to bottom of anvil or at least bottom of stand.

I all ready have rubber mat for that purpose. I will put that on place later in the build.
 
OP
Z

z-edition 006

Well-known member
Joined
Aug 27, 2011
Messages
237
Location
Norway
Some more progress.
 

Attachments

  • 1F2B1C80-738B-4585-BE1A-944093FE1834.jpg
    1F2B1C80-738B-4585-BE1A-944093FE1834.jpg
    156.1 KB · Views: 169
  • 569E4792-14D4-4649-BD0E-2C42C9FED42C.jpg
    569E4792-14D4-4649-BD0E-2C42C9FED42C.jpg
    155.5 KB · Views: 167
  • 23B0A439-C6C3-412B-B974-32B83CB52E8E.jpg
    23B0A439-C6C3-412B-B974-32B83CB52E8E.jpg
    127.8 KB · Views: 176
  • ECD3FEF8-2049-49F4-8771-464FBCD77251.jpg
    ECD3FEF8-2049-49F4-8771-464FBCD77251.jpg
    146.7 KB · Views: 156
  • 1538DFAF-0FBD-445C-97F8-C9DF63CB4F33.jpg
    1538DFAF-0FBD-445C-97F8-C9DF63CB4F33.jpg
    129.7 KB · Views: 143
  • 306200D8-D7CA-4AC2-8A57-4E703E2B50E6.jpg
    306200D8-D7CA-4AC2-8A57-4E703E2B50E6.jpg
    150.3 KB · Views: 153

Scout Driver

Well-known member
Joined
Nov 20, 2009
Messages
4,284
Location
South Dakota
Great build!! I like the sand in the legs to add mass and absorb some of shock of hammering. Nice looking welds too!

Scott
 

Bears Fan

Well-known member
Joined
Jan 26, 2012
Messages
3,437
Location
Indiana
Great design and execution on the build!!! I have been looking for a anvil on the cheap for a while now and if I really want one I may have to pony up some big cash for one and I may have to steal some of your ideas! I really like how the anvil is recessed down in the top to keep it from moving around...top notch build :thumbup: :thumbup:
 

Oregon rock crusher

Well-known member
Joined
Jun 28, 2016
Messages
1,902
Location
West of Salem
Nice project and very nice fab work z-edition. As far as the connection between anvil and steel stand I personally prefer them to be as solidly mounted as possible. The anvil works by resisting the impact of the hammer and solid, unmovable mass under the blow is key. Any give in the support under the anvil lessens it's ability to reflect energy. With enough mass in the anvil the effect of cushioned support is minimal though...

When I anchored my anvil to the stand I went old school and used molten lead for the connection and sealed it in with Belzona. It took a lot of heat to get that lead puddle liquid. Many people have used nothing more than silicon to make the anvil/stand connection which seems to work quite well. Having a solid connection by either method takes most of the ring out of the anvil. The difference was dramatic in my anvil which rang like a bell until attached. Just another thing you might want to consider. I do prefer a steel anvil stand....many prefer wood. Ed.
 

Attachments

  • West Anvil Belzona seal at base.jpg
    West Anvil Belzona seal at base.jpg
    145.4 KB · Views: 162
  • IMG_3387.jpg
    IMG_3387.jpg
    150.9 KB · Views: 172
  • IMG_3378.jpg
    IMG_3378.jpg
    147.3 KB · Views: 187
OP
Z

z-edition 006

Well-known member
Joined
Aug 27, 2011
Messages
237
Location
Norway
Great design and execution on the build!!! I have been looking for a anvil on the cheap for a while now and if I really want one I may have to pony up some big cash for one and I may have to steal some of your ideas! I really like how the anvil is recessed down in the top to keep it from moving around...top notch build :thumbup: :thumbup:

Thanks. Just steal away.

Nice project and very nice fab work z-edition. As far as the connection between anvil and steel stand I personally prefer them to be as solidly mounted as possible. The anvil works by resisting the impact of the hammer and solid, unmovable mass under the blow is key. Any give in the support under the anvil lessens it's ability to reflect energy. With enough mass in the anvil the effect of cushioned support is minimal though...

When I anchored my anvil to the stand I went old school and used molten lead for the connection and sealed it in with Belzona. It took a lot of heat to get that lead puddle liquid. Many people have used nothing more than silicon to make the anvil/stand connection which seems to work quite well. Having a solid connection by either method takes most of the ring out of the anvil. The difference was dramatic in my anvil which rang like a bell until attached. Just another thing you might want to consider. I do prefer a steel anvil stand....many prefer wood. Ed.

Your anvil stand looks great. What’s behind the door? Do you store stuff for your anvil there?
 

Oregon rock crusher

Well-known member
Joined
Jun 28, 2016
Messages
1,902
Location
West of Salem
Your anvil stand looks great. What’s behind the door? Do you store stuff for your anvil there?


Thanks z. Because my stand started out as a large piece of I-beam it had those natural storage areas between the flanges. They are about 12" wide x 16" tall by 6" deep. I put doors with self closing hinges on both sides and keep hardies, punches, and other smaller type tooling in them. Room for a few hammers on the ends. Here are a couple pics right after I finished it several years ago. Ed.
 

Attachments

  • IMG_3427.jpg
    IMG_3427.jpg
    151.4 KB · Views: 215
  • IMG_3429.jpg
    IMG_3429.jpg
    149.4 KB · Views: 235
OP
Z

z-edition 006

Well-known member
Joined
Aug 27, 2011
Messages
237
Location
Norway
Thanks z. Because my stand started out as a large piece of I-beam it had those natural storage areas between the flanges. They are about 12" wide x 16" tall by 6" deep. I put doors with self closing hinges on both sides and keep hardies, punches, and other smaller type tooling in them. Room for a few hammers on the ends. Here are a couple pics right after I finished it several years ago. Ed.

Very nice build. Not often you see a build of this character. Well done mister :) what do you use to provent rust?

Made a handle today to make the stand mobile:
 

Attachments

  • 241FC434-E335-4487-A6DE-EB9123D31C5D.jpeg
    241FC434-E335-4487-A6DE-EB9123D31C5D.jpeg
    121.5 KB · Views: 131
  • 238B710F-B02B-4F6B-B9C0-5A4968173978.jpg
    238B710F-B02B-4F6B-B9C0-5A4968173978.jpg
    100.8 KB · Views: 126
  • 59838BAF-88CE-47CB-A49F-270F315C69E7.jpg
    59838BAF-88CE-47CB-A49F-270F315C69E7.jpg
    102.4 KB · Views: 120
  • FE2B8902-0706-4824-BD96-DD8FC545AF60.jpg
    FE2B8902-0706-4824-BD96-DD8FC545AF60.jpg
    101.3 KB · Views: 133
  • 38ACDFEA-0951-489D-9AF9-6924E567C444.jpg
    38ACDFEA-0951-489D-9AF9-6924E567C444.jpg
    104.5 KB · Views: 120
Last edited:

Oregon rock crusher

Well-known member
Joined
Jun 28, 2016
Messages
1,902
Location
West of Salem
Looking good there z-edition. With a mobile stand you'll be able to make the most of your space. For rust control on vises, anvils, and other tools that sit under the lean to fab area I use to just coat them in used oil from a diesel engine. Makes them black and last quite a while. BLO works very well too though and now that's mostly what I use now. Not a problem most of the year but when the warm wet air comes in after a cold spell everything not in an insulated area wants to sweat.
 
OP
Z

z-edition 006

Well-known member
Joined
Aug 27, 2011
Messages
237
Location
Norway
Looking good there z-edition. With a mobile stand you'll be able to make the most of your space. For rust control on vises, anvils, and other tools that sit under the lean to fab area I use to just coat them in used oil from a diesel engine. Makes them black and last quite a while. BLO works very well too though and now that's mostly what I use now. Not a problem most of the year but when the warm wet air comes in after a cold spell everything not in an insulated area wants to sweat.

Thanks. My shop is only a two car garage, thats why i made it mobile. Used engine oil is a good tip. I will try that on my anvil. I have used wd-40, but the rust come back in a few weeks.

Thanks for the tip
 
To avoid these ads, REGISTER NOW!
OP
Z

z-edition 006

Well-known member
Joined
Aug 27, 2011
Messages
237
Location
Norway
I have a dilemma about which wheels to choose. What do you guys think looks best? Big 5″ heavy duty casters or standard car jack casters?
 

Attachments

  • 8FE7B7BA-7B9A-4EC7-8EBA-28BAA3215536.jpg
    8FE7B7BA-7B9A-4EC7-8EBA-28BAA3215536.jpg
    105.3 KB · Views: 72
  • 87C4D7AE-0450-410D-B08C-D49961E619B4.jpg
    87C4D7AE-0450-410D-B08C-D49961E619B4.jpg
    80.2 KB · Views: 91
  • ED6AE70D-BFEC-40C2-9213-16B3CF2E7C33.jpg
    ED6AE70D-BFEC-40C2-9213-16B3CF2E7C33.jpg
    74.8 KB · Views: 80
  • DC6F08E5-EA8E-4D51-8749-1A7AAE7FDC0D.jpg
    DC6F08E5-EA8E-4D51-8749-1A7AAE7FDC0D.jpg
    74.8 KB · Views: 68
OP
Z

z-edition 006

Well-known member
Joined
Aug 27, 2011
Messages
237
Location
Norway
Didn’t like the car jack wheels. I think they are to small. Got some bigger cast iron wheels:
 

Attachments

  • 70CA070F-6A8F-4671-AFEB-0163C1E25393.jpg
    70CA070F-6A8F-4671-AFEB-0163C1E25393.jpg
    157.3 KB · Views: 80
  • 84F96D7F-B232-4FB1-92BF-B1C557CAD63B.jpg
    84F96D7F-B232-4FB1-92BF-B1C557CAD63B.jpg
    154.5 KB · Views: 91
  • A38405E3-2D84-4C06-8EAB-17980E61B7BE.jpg
    A38405E3-2D84-4C06-8EAB-17980E61B7BE.jpg
    156.6 KB · Views: 72
  • 6185D715-587B-4B08-ADAF-022047704CA5.jpg
    6185D715-587B-4B08-ADAF-022047704CA5.jpg
    153.3 KB · Views: 71
  • BFDA2A77-4145-483C-93B4-7010747DF652.jpg
    BFDA2A77-4145-483C-93B4-7010747DF652.jpg
    148.3 KB · Views: 68

SpiderDave

Well-known member
Joined
Feb 17, 2018
Messages
207
Man, those welds are,... like, what's the word? Delicious? Nice job on everything, my compliments.
 
OP
Z

z-edition 006

Well-known member
Joined
Aug 27, 2011
Messages
237
Location
Norway

Attachments

  • 4ABA5F16-21CF-4FC9-ADF2-CA80E8F9A653.jpg
    4ABA5F16-21CF-4FC9-ADF2-CA80E8F9A653.jpg
    154.4 KB · Views: 115
  • 0B7E48B4-15AD-4DE7-BA41-90094C1295C7.jpg
    0B7E48B4-15AD-4DE7-BA41-90094C1295C7.jpg
    158.3 KB · Views: 105

rpcraft

Well-known member
Joined
Aug 14, 2014
Messages
1,057
Location
Waco
The cast wheels are always a pain to move things across rough cast floors. I had hopes when i moved to my new garage and had smoother concrete I'd have a change of heart but they are still garbage. That said heat might not be too friendly on the softer wheels but they'll probably be a little easier to move around overall.
 
OP
Z

z-edition 006

Well-known member
Joined
Aug 27, 2011
Messages
237
Location
Norway
The cast wheels are always a pain to move things across rough cast floors. I had hopes when i moved to my new garage and had smoother concrete I'd have a change of heart but they are still garbage. That said heat might not be too friendly on the softer wheels but they'll probably be a little easier to move around overall.

I know about the pros and cons. I can live with cast iron wheels, if they ever break i have three more sets of wheels in spare.
 

LXCam

ALLIANCE MEMBER
Joined
Apr 23, 2013
Messages
19,084
Location
AZ
Great job on the stand :beer:

And I really like the security chain to keep her safe. That way nobody throws the anvil in their pocket and walks off with it :lol_hitti


Seriously, what's the significance of the chain?
 

BD1

Well-known member
Joined
Mar 18, 2007
Messages
4,602
Location
north side
Here's the one I did for mine. A Cliff Carrol wide face with turning cams. The turning cams are really handy for me. Perfect anvil for my horseshoe art.
 

Attachments

  • F725A1AC-ECD9-41CA-B547-12D18C082496.jpg
    F725A1AC-ECD9-41CA-B547-12D18C082496.jpg
    82.2 KB · Views: 96
OP
Z

z-edition 006

Well-known member
Joined
Aug 27, 2011
Messages
237
Location
Norway
Nice build you got there BD1. Some more progress on my build:
 

Attachments

  • 98EC69D9-ED39-4608-8049-5BFBE564447B.jpg
    98EC69D9-ED39-4608-8049-5BFBE564447B.jpg
    154.5 KB · Views: 51
  • 979FFC01-E065-49AD-B6A3-0C41ABA0E7FD.jpg
    979FFC01-E065-49AD-B6A3-0C41ABA0E7FD.jpg
    127.1 KB · Views: 57
  • 99ED6954-E5B8-4B81-A53B-F7D3C17A04D7.jpg
    99ED6954-E5B8-4B81-A53B-F7D3C17A04D7.jpg
    124.7 KB · Views: 47
  • 8706B5D0-00A4-4C0E-940C-C018102F15D7.jpg
    8706B5D0-00A4-4C0E-940C-C018102F15D7.jpg
    151.2 KB · Views: 48

G-ManBart

Well-known member
Joined
Jan 24, 2015
Messages
2,059
Location
Michigan
Yes that stand is going to resonate some unless some rubber mat applied to bottom of anvil or at least bottom of stand.

Not really. I've made a number of stands with a similar style build and none of them resonate. I add steel pads for the legs to distribute the force a bit, but have zero problems with any kind of resonance.

Here are three I have set up by one of my forges. 137# Soderfors, 330# Refflinghaus and 200# Fisher.
 

Attachments

  • IMG_6383.jpg
    IMG_6383.jpg
    147.8 KB · Views: 78
OP
Z

z-edition 006

Well-known member
Joined
Aug 27, 2011
Messages
237
Location
Norway
I have polished the top and horn of the anvil, and soaked it in used engine oil to prevent rust. I also put some rubber mat under the feel and a rubber handle.
 

Attachments

  • FD30B42E-BD71-4DAC-AA91-5C3E76A81BA1.jpg
    FD30B42E-BD71-4DAC-AA91-5C3E76A81BA1.jpg
    155.9 KB · Views: 40
  • 6465D6FD-9A62-463A-AF1E-EF92F01B117E.jpg
    6465D6FD-9A62-463A-AF1E-EF92F01B117E.jpg
    154.5 KB · Views: 42
  • 7230066C-3A14-40C5-9ACB-763BA359DA64.jpg
    7230066C-3A14-40C5-9ACB-763BA359DA64.jpg
    129.6 KB · Views: 42
  • 7ED43B7C-69F9-41A5-B962-ED7791EE5EE5.jpg
    7ED43B7C-69F9-41A5-B962-ED7791EE5EE5.jpg
    156.3 KB · Views: 44

iajonesy

Well-known member
Joined
Feb 8, 2009
Messages
2,467
Location
Iowa
All I can say is, WOW. Those are some very nice stands, everyone. Thanks, z-edition for the great photos of your outstanding build. I am very envious of your skills.

Mike
 
OP
Z

z-edition 006

Well-known member
Joined
Aug 27, 2011
Messages
237
Location
Norway
All I can say is, WOW. Those are some very nice stands, everyone. Thanks, z-edition for the great photos of your outstanding build. I am very envious of your skills.

Mike

Thanks.

Here is the finished product. Very happy about it :)
I have also made a video on youtube:
 

Attachments

  • 3896CEFA-D451-448B-BE94-39D94165D52A.jpg
    3896CEFA-D451-448B-BE94-39D94165D52A.jpg
    157.6 KB · Views: 37
  • 3939D628-00D1-4B41-8653-14E977568FBC.jpg
    3939D628-00D1-4B41-8653-14E977568FBC.jpg
    157.3 KB · Views: 39
  • 12B04056-86F4-4F3C-B9FD-182F7BE0EA22.jpg
    12B04056-86F4-4F3C-B9FD-182F7BE0EA22.jpg
    155.6 KB · Views: 34
  • 7AC1BAAA-E442-4620-B6C1-8460845E3719.jpg
    7AC1BAAA-E442-4620-B6C1-8460845E3719.jpg
    156.4 KB · Views: 34
Last edited:
To avoid these ads, REGISTER NOW!
Top Bottom