To avoid these ads, REGISTER NOW!

Any suggestions on this?

Shitbox

Well-known member
Joined
Nov 28, 2021
Messages
68
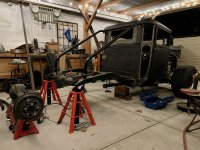
So I’m making some subrails for my 31 Chevy and having a bit of an issue with getting my bends on the rear kick up of the frame. Normally I’d sand the tubing and screw a wood buck to my bench(think big tubing bender made of wood) and use leverage to get my bends but I’ve moved so room isn’t allowing that), no one makes 2x1 dies for my actual bender and my hf tubing roller ***** for this. I have the swag extensions and 2” dies but I’m through throwing money at it so not doing the bottle Jack/pipe threader. I’d really like to do these myself so don’t want to farm it out either.
Anyhow, I did the slice and weld to get them to fit, which isn’t ideal but works for the bend that is concave but the one that is convex is a bit of a problem. I started tacking them off the frame(can’t weld it on since it’s on the frame w/o access) and just tacking the sides and middle have brought it up 3/8” and I still need to fully weld them(tacks were only the 2 sides(top/bottom, let cool fully then 2 more clamped fully on my bench securely). These are mig welds since the majority of the cuts are 1/16” and not a fan of oxy or tig for gaps. I know there’s a lot of knowledge on this board and figured I’d see what people who do this for a living would do.
How they fit before the last bend was tacked:
IMG-6162.jpg
Cuts with the first tacks:
IMG-6166.jpg
How they fit with just those tacks:
IMG-6167.jpg

Tubing is just .090 erw. I’m thinking take the tig and just strike an arc on the top of every seam and clamp them before then increase the clamping force after each or heat with a rosebud over the whole area that’s welded(top of the bend) but I’d like to hear what others have done that’s worked for their issues.
Thanks and sorry for the novel.
 
To avoid these ads, REGISTER NOW!

badmatt

Well-known member
Joined
Dec 27, 2018
Messages
148
Location
America's hat.
I'd split the tube,

Cut the tube in half down the short sides in the center and bend each piece to match, weld up the seam. The section will be the same height throughout as it now doesn't need to shrink or stretch the other side as they are independent of each other and wont collapse the tube.
 
OP
S

Shitbox

Well-known member
Joined
Nov 28, 2021
Messages
68
@badmatt thanks for the suggestion. I’ve got enough short drops I can do a test or 2.
@Jacko264 the rear section that’s notched? That actually sits flush and is just excess since I’ll be adding a cross brace over the gas tank to mount the rear valance/ quarters when the body is on. I tried heating to bend it originally but didn’t try just heating the sides. Thanks for the suggestion. I’ll give that a test as well.
 

Jacko264

Well-known member
Joined
Mar 27, 2016
Messages
947
Location
Kingston upon Hull uk
Looking at it again if you hit it taped it in the vertical parts of the box it would change the shape
clamp. It down as well

if you clamp it down in the middle what happens ??
 
Last edited:
OP
S

Shitbox

Well-known member
Joined
Nov 28, 2021
Messages
68
With clamps where the body bolts go and one in the flat between the bends it’ll go back to its original shape, just under way to much tension. About to split and weld the test piece from the inside. Hopefully that goes well. 🤞
 
OP
S

Shitbox

Well-known member
Joined
Nov 28, 2021
Messages
68
Just bumping this since I figured out a relatively easy fix for my dilemma.
Ended up leaving the top/sides and cutting the sliced part out(bending it back to fit the frame), bending some sheet to the radius and just welding that in. Was able to fit it nice and tig it.
 
To avoid these ads, REGISTER NOW!

danielbuck

Well-known member
Joined
Apr 15, 2014
Messages
931
If you have a tube roller, you can make arches like this with a bit of practice. you might have to make each arch separate in your example, and then weld the pieces together.

I used the tube roller that for parts of the structure on my 33 Chevy, replacing all of the wood structure with steel tube, a few pieces (B pillar for example) had to have some subtle arches in them, tube roller worked great. Can see it in this photo, following the curve of the door at the bottom. There's other pieces that needed some slight curves in them as well, it's been working well so far.

IMG-1374.jpg
 
OP
S

Shitbox

Well-known member
Joined
Nov 28, 2021
Messages
68
I do have a jd2 bender(no dies for 2x1 tubing made) and a horror fright tube roller with the swag extensions and 2” dies for square/rectangle tubing. It was actually the first thing I tried, unfortunately it didn’t get anywhere near the radius I needed and had compressed the tubing ~3/16” and also couldn’t get it to turn anymore(by hand). At that point I was pissed and wasn’t going to throw another $300 to make it pipe threader powered and find out it wasn’t going to do what I needed. Could sand it and cold bend it on a wood form but I’d need 3 people the get it done and my wife and kid aren’t great at helping with stuff.
 

danielbuck

Well-known member
Joined
Apr 15, 2014
Messages
931
Interesting, my tube roller is the same, HF with the Swag stuff welded on to it. I've bent rectangle tubing both ways, the easy way and hard way, normally 1/8" wall, but I've done some 3/16", just not often. I find that rolling back and forth several times while very slowly adding pressure works really well, instead of cranking down alot of pressure and trying to roll it through in less passes.
 
OP
S

Shitbox

Well-known member
Joined
Nov 28, 2021
Messages
68
Sorry I guess I worded that too vaguely. The tubings only 13 gauge but when I rolled it it compressed around 3/16” so in effect it was about 3/4” tall after I rolled it and still wasn’t at the radius I needed. I’m planning on tying the 2 sides together with stringers about every 18” so it wasn’t going to work anyhow. My old house I had enough room for a really strong wood bench that became my substitute bender on stuff I needed mellower radius or things I didn’t have dies for. I’d normally sand and cap the tubing , make a wood buck and screw it to the bench, screw a 2x4 to hold the tubing flat and square, then use the 20’ stick as leverage and walk it around to the desired radius. Unfortunately we sold that house a decade ago and my garage got significantly smaller so no room to do that now. Haven’t completely given up on the roller but just not throwing more $ at it now since I still need a shear and hop up parts for a 54 235 aren’t cheap so, it is what it is for now. I do appreciate the reply’s. 🫡

EDIT:
I did use the roller to do the 1x1 tubing to frame some of the body sheet metal and it worked fine. Yeah, I don’t just crank down ham fisted. I know it’s better to spend more time rolling and tighten in small increments.
 
Last edited:

MP&C

Well-known member
Joined
Oct 21, 2009
Messages
4,405
Location
Leonardtown, MD
As others suggested, split down the middle of the sides, radius as needed, then weld the two halves together. Unfortunately the welding the pie slices together method will seldom remain how you started as the weld shrinks. I think you'll have better luck with size/shape stability using the split down the center method. Here's a thread where we did something similar for the corners of a wagon frame:

 
Last edited:
To avoid these ads, REGISTER NOW!
Top Bottom