To avoid these ads, REGISTER NOW!

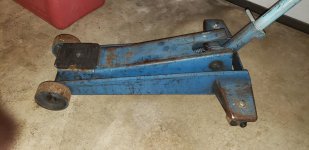
Anyone know anything about this old floor jack?

toolwarrior

Member
Joined
Dec 9, 2020
Messages
17
Location
OR
I have been a garage type guy my whole life, but only recently found this forum. Hello to all.

My parents have both passed now and I inherited a lot of my dads shop tools. One of them was a floor jack that has been around as long as I can remember and I am pretty grey myself. I believe it is many decades old. It has worked that long till now. I was jacking up my truck and all of a sudden, it would not hold the load. A pump would lift, but then settle right back down again. The truck was up on jack stands so I was in real trouble not being able to lift it up off those stands. I won't tell you how I managed to get it back down without that floor jack....lol. It is so old there is no identifying label on it anywhere. But one clue might be that guys like my dad bought tools from Sears way back then. That may be a possibility, but I am not sure of that.

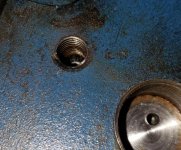
I am pretty mechanically inclined so I did some exploration of the three ports on the cylinder. Two faced up (seen in the photo) and the third faced down. The third port was the one I expected to be the fluid fill port because it has the rubber grommet type plug. But I would have expected that plug to face up not down, so not clear what it was. But I accidently changed a setting on what I think is the high pressure bypass. I thought I was loosening a cap, but turned out to be an adjustment. For sentimental reasons I would like to fix this jack. I am hoping someone can identify it and help me find a manual and exploded parts diagram. I would also love to know what the tonnage capacity is too. Thanks for your help. Lots of guys seem pretty darn smart around this forum.
 

Attachments

  • Floor Jack.jpg
    Floor Jack.jpg
    147.2 KB · Views: 166
  • Cylinder (1).jpg
    Cylinder (1).jpg
    75.9 KB · Views: 123
To avoid these ads, REGISTER NOW!

Roberts210

Well-known member
Joined
Dec 21, 2015
Messages
3,177
Location
Missouri
Both Walker and Ausco painted their floor jacks a similar shade of blue, back in the day, but Walker was not shy about identifying their jacks with raised, cast lettering, and their jacks were stylish in design. You might unbolt one of the swivel rollers and see if the nut is SAE or Metric, that would give a clue.
 
OP
T

toolwarrior

Member
Joined
Dec 9, 2020
Messages
17
Location
OR
Thanks for the reply, Roberts210. In talking with a seal supplier, they say this floor jack was manufactured in either Brazil or Sweden. They did not say much else other than the manufacturer did not label their jacks. The price they quoted for seals was 2/3's the cost of a brand new Daytona 3 ton. While this floor jack from my dad has sentimental value, there comes a point where it is not worth it. Seems to me a half dozen o-rings and a cylinder seal should be $10ish, not most of the way to a brand new one. Now if there was something rare or unique about this old jack of mine that made it worth it, then I would get the seal kit, but that still leaves me with the problem of how to bleed and make the proper adjustments. I will check the nut as you suggest too and post back. Thanks again.
 

Roberts210

Well-known member
Joined
Dec 21, 2015
Messages
3,177
Location
Missouri
That sounds outrageous. There are better hydraulic jack parts places that won't charge you an arm and a leg. If I were going to rebuild that jack, I disassemble it and go from there. You won't really know what you need until you take it apart, especially since you don't know the maker.
 

paulsomlo

Well-known member
Joined
Jul 16, 2013
Messages
3,943
Location
Northern Colorado
Seems to me a half dozen o-rings and a cylinder seal should be $10ish, not most of the way to a brand new one.

Should be, yes. First, take it apart completely and evaluate the innards. If it's only a matter of replacing seals, you have two routes - either try the place that forum member Hiball recommends (Hydraulic Parts Supply at 620-594-2247) or get calipers, measure the seals, and source them individually.
 
OP
T

toolwarrior

Member
Joined
Dec 9, 2020
Messages
17
Location
OR
Roberts210/Paulsomlo - thank you. You confirmed what I felt when I got the price for the seal kit. The unfortunate thing is that they were able to identify the jack and they apparently do have the manual for it because they provided a snippet of the exploded parts diagram and it does look exactly like what I have - except the air bleed hole is 180 degrees opposite on mine. It makes far more sense to me for that port to face upwards, but mine faces down. So clearly they know what the jack is, but they are unwilling to provide any more information unless I pay for their seal kit. I don't mind paying for this kind of thing and their time, but their price did seem outrageous and I felt like they were trying to take advantage because they knew I needed this information. Well that struck me the wrong way. In my industry we use O-rings all the time and I know they cost pennies when the material is Buna. I am not sure what the material is for compatibility with hydraulic jack oil, but it is likely Buna or similar. I do plan to take the cylinder out of the jack tomorrow and see what is going on with the innards. I can take more photos and if there is something you think I should look for in particular, please let me know. I have never torn a cylinder apart before. Thanks again.
 

Roberts210

Well-known member
Joined
Dec 21, 2015
Messages
3,177
Location
Missouri
I've used 3/4" drive sockets and an impact wrench to remove tank nuts before.
If that one hydraulic parts place that tried to overcharge you has the manual, then it's pretty likely other hydraulic parts houses have the same manual. Keep looking. You don't owe that first place loyalty.
 
OP
T

toolwarrior

Member
Joined
Dec 9, 2020
Messages
17
Location
OR
Thanks guys. Good input. Paulsomlo, you are a rock star! That link was the clue I needed. You were right, it was close. Once I had a manufacturer name, I did research on them and found that they made another version that is 2 ton that looks nearly identical to mine. Mystery solved on who made it, but disappointing to find out it is only a 2 ton jack. That is not even enough to lift the front end of my truck safely. Since you guys are really knowledgeable, is there any value in rebuilding if the manufacturer is Coats-Nike-Viking? They do not seem to be a big name in quality vintage floor jacks.
 

Roberts210

Well-known member
Joined
Dec 21, 2015
Messages
3,177
Location
Missouri
What kind of truck do you have?
It's your jack, and you should do what you want, but if I had a jack that my Pop had owned, I'd restore it and keep it.
 

paulsomlo

Well-known member
Joined
Jul 16, 2013
Messages
3,943
Location
Northern Colorado
I'll echo what Roberts said - what kind of truck do you have? A 2 ton jack of old is a pretty beefy jack.

That jack is probably at least as good as any of the import jacks being made today, so yes, I think it's worth a rebuild. Even if just for the experience, to keep it out of the landfill, and to keep it in the family. Given the drawing, the hydraulics look fairly simple - there are only one or two soft parts that are not orings. And the ram cup is probably an off the shelf part. I say, tear into it.
 

theoldwizard1

Well-known member
Joined
Feb 22, 2011
Messages
43,478
Location
SE MI
In order to get the tank nut off of one jack I rebuilt, I had to use the HANDLE OF THE JACK as a cheater ! Make sure your bench is secure !!

I can easily lift the front or back HALF of an E150 with a 1-1/2 ton jack,
 

paulsomlo

Well-known member
Joined
Jul 16, 2013
Messages
3,943
Location
Northern Colorado
In order to get the tank nut off of one jack I rebuilt, I had to use the HANDLE OF THE JACK as a cheater ! Make sure your bench is secure !

It may not be that bad - one end of the reservoir appears to be welded, the other has an oring to seal to the tank nut, vs. a metal to metal seal at both ends.
 
OP
T

toolwarrior

Member
Joined
Dec 9, 2020
Messages
17
Location
OR
lol.... I would like a little more lift capability than what is needed for an F150
 

Attachments

  • Truck.jpg
    Truck.jpg
    121.6 KB · Views: 40

Roberts210

Well-known member
Joined
Dec 21, 2015
Messages
3,177
Location
Missouri
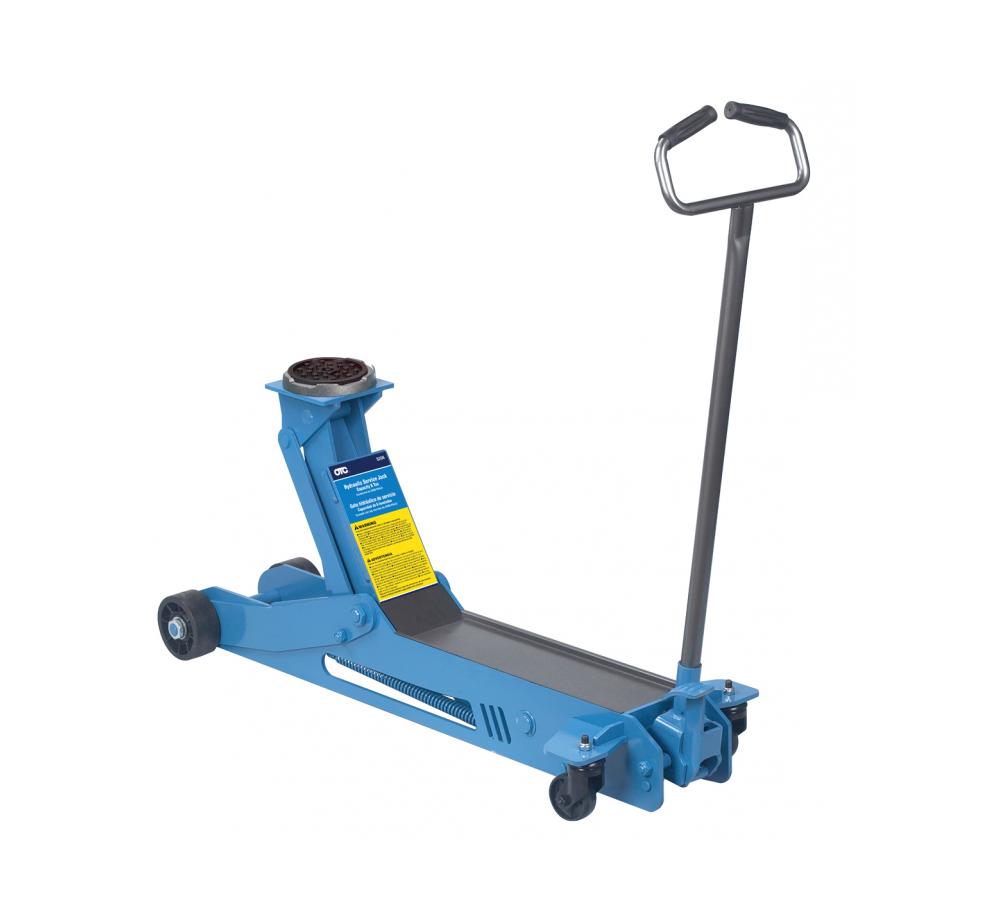
Something like this might do it. It's rated at 6 tons. But jacks like this are in the thousands of dollars, unless you can find a vintage one and rebuild it.

5206_5223_0.jpg
 

paulsomlo

Well-known member
Joined
Jul 16, 2013
Messages
3,943
Location
Northern Colorado
No, that old jack is probably not going to work for your truck. Do you have something in a smaller size, maybe something you take to the grocery store?
 
OP
T

toolwarrior

Member
Joined
Dec 9, 2020
Messages
17
Location
OR
LOL....that is why I was hoping for a 3 or 4 ton. Two of them on each side of the truck can work. But I do have more to report on the jack. Since the fill port is twards the bottom and not the top, I flipped the jack over today and popped the grommet plug out. The oil level was very low - I think (but unsure with this jack since I am not familiar with jacks that have a fill port on the underside instead of on top). Anyway, I put about 4 oz of oil in that port. I thought that was going to be the problem, but when I put the plug back in and did the normal bleed operation, the problem did not go away. It still will not pump up any kind of load. I used the Bars oil with stop leak. Perhaps it will swell the seals in time and the jack will hold load, but this seems more like a valve problem. I am just not familiar enough with these hydraulic jacks to know. If either of you have any further thoughts on what to check or look for, I am glad to do it, but fixing this old 2 ton unit may not make the most sense for the price I am seeing for the seal kits. Thanks again for all your input.
 

Roberts210

Well-known member
Joined
Dec 21, 2015
Messages
3,177
Location
Missouri
Generally a spring-loaded ball valve is what holds the pressure so the vehicle doesn't come back down after getting pumped up. The cup on the ram is what needs to be in good shape in order to pump the vehicle up. But holding it up, everything depends on that little spring-loaded ball. There is probably a piece of grit blocking it from sealing. And if there's one piece of grit, there are probably more. FLoor jacks are not difficult to rebuild. You should give it a try.
 

paulsomlo

Well-known member
Joined
Jul 16, 2013
Messages
3,943
Location
Northern Colorado
If you remove the fill plug, you'll see the OD of the cylinder wall inside the reservoir; with the jack level and the lift arm lowered all the way, the oil should be just up to the top of that cylinder wall. Admittedly, I'm kind of taken aback that the fill port is on the bottom.

If the jack was having problems before you messed with the overload, then I doubt that it's a valve problem. The two seals that are suspect are the ram and the pump. To inspect them, you'll need to take the hydraulic unit out of the jack and disassemble it. This is one of those deals where, if you don't want to spend for a seal kit, you're going to have to measure the seals yourself and source them (you'll need a caliper).

You having nothing to lose by stripping it down, unless you just don't have the time. If that's the case, and you're just gonna toss it, put an ad in the classified section here, something like "Free Floor Jack, Near *** Oregon". At least it'll go to a good home, hopefully, and continue it's working life.
 
OP
T

toolwarrior

Member
Joined
Dec 9, 2020
Messages
17
Location
OR
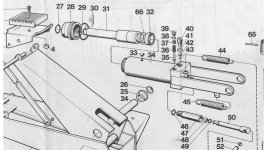
You two are right. It is worth at least tearing it down and looking for a smoking gun. I really am baffled by the fill port on the bottom, too. But if we look at the parts diagram you found for the version that is slightly smaller than mine (1 1/2 ton), you will see the same thing. See attached exploded parts graphic. The fill port (item 8) is on the bottom side of the cylinder. The only thing that made sense to me was to flip mine over (kept it level), fill with about 4 oz of oil, opened the release knob all the way and pumped it about 10 times fully. I am very certain that it was full of fluid when I was done. I put the plug back in, flipped it back over and pumped another 10 times before closing the relief knob and trying to lift a load. It was actually worse than ever. It would barely even lift the arm (with no load). I pumped far more times that I should have to get the arm to go all the way up. Once there all I had to do was put my foot on the pad and the arm lowered down easily as if the relief knob had been opened (but it was tightly closed). That made me think it was more likely the ball valve than a seal, but please correct me if my thinking is wrong.
 

Attachments

  • 1.5 ton exploded.jpg
    1.5 ton exploded.jpg
    88.6 KB · Views: 47
To avoid these ads, REGISTER NOW!

paulsomlo

Well-known member
Joined
Jul 16, 2013
Messages
3,943
Location
Northern Colorado
If the ram seal was compromised, it would be easy to push the lift arm down, even with the release valve closed. You're just pushing oil right past a busted seal.
 
OP
T

toolwarrior

Member
Joined
Dec 9, 2020
Messages
17
Location
OR
Thanks paulsomlo. Just so I am clear on what to focus on, is the ram seal item 32 or item 48 in this attached exploded parts diagram?
 

Attachments

  • 2 ton exploded.jpg
    2 ton exploded.jpg
    139.2 KB · Views: 44
OP
T

toolwarrior

Member
Joined
Dec 9, 2020
Messages
17
Location
OR
Gee....ya think this might be the problem..... lol
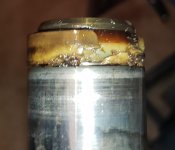
That is quite literally the worst seal I have seen in my life. You guys warned me that the cylinder cap would be hard to remove - and it was, but a 2 foot cheater bar made quick work of it. However, I was not able to loosen the pump housing (item 47) shown in the exploded parts diagram in post #22. Not sure why this will not break free.

Now the problem is where to get this seal. You guys mentioned a really helpful source for these jack hydraulic parts. Do you guys have a feel for what a rebuild kit should cost for this jack? As I mentioned earlier, I did get a price from one supplier but it was so expensive (2/3 the cost for a new Daytona jack) that I did not make the purchase from them. I have bought seals and O-rings, etc all my life and they are typically a couple bucks each - tops. O-rings for less than a buck (in Buna) are easy to get. But these two seals (items 32 and 48) are my concern in sourcing locally. Hopefully you guys have good resources for these seals. I do know the make and model now.
 

Attachments

  • Ram Seal.jpg
    Ram Seal.jpg
    80 KB · Views: 28
  • Damaged Seal.jpg
    Damaged Seal.jpg
    100.2 KB · Views: 23
Last edited:

paulsomlo

Well-known member
Joined
Jul 16, 2013
Messages
3,943
Location
Northern Colorado
Don't ask for a rebuild kit. Measure and order each one individually.

I 2nd that emotion - do you have calipers? Even cheap ones will get the job done. I'm assuming, from the pictures, that used to be a u-cup. You'll need the OD, ID and height. You can get OD off the cylinder bore, ID off the ram, and measure height directly. I think you still need to get into the pump, because with the ram cup in that condition, the pump cup may not be usable. It's possible that some kind of sealer was used on the pump threads, like loctite.

As far as sourcing the seals, start with the place mentioned in post #5. I would also try Rocket Seals in Denver: https://www.rocketseals.com/ and the o ring store: https://www.theoringstore.com/
 
OP
T

toolwarrior

Member
Joined
Dec 9, 2020
Messages
17
Location
OR
I have managed to disassemble everything except I am not sure what to do with item 55. I want to replace the O-ring item 54 for the relief valve (item 55), but when I unscrew it, it seems to come to a hard stop before coming all the way out. According to the exploded parts diagram, there are no pins or snap rings or anything I can see that would prevent item 55 from screwing all the way out, and yet is wont. I even stuck a small rod thru the hole in the end of item 55 so I could get more torque and it still does not want to unscrew past a certain point. It is not hard to turn at all up to that point. I am afraid to apply more torque to try to force it to unscrew for fear of damaging something inside. Any thoughts as to why item 55 will not unscrew all the way?
 

Attachments

  • 322 Exploded.jpg
    322 Exploded.jpg
    123.7 KB · Views: 34

paulsomlo

Well-known member
Joined
Jul 16, 2013
Messages
3,943
Location
Northern Colorado
I have managed to disassemble everything except I am not sure what to do with item 55. I want to replace the O-ring item 54 for the relief valve (item 55), but when I unscrew it, it seems to come to a hard stop before coming all the way out. According to the exploded parts diagram, there are no pins or snap rings or anything I can see that would prevent item 55 from screwing all the way out, and yet is wont. I even stuck a small rod thru the hole in the end of item 55 so I could get more torque and it still does not want to unscrew past a certain point. It is not hard to turn at all up to that point. I am afraid to apply more torque to try to force it to unscrew for fear of damaging something inside. Any thoughts as to why item 55 will not unscrew all the way?

So, you've got the hydraulic unit out of the jack, and it sounds like you've removed the roll pin #56 and removed the flexible release shaft? How does the release screw into the hydraulic body? Is the body threaded directly, or is there an insert with ID and OD threads?
 
OP
T

toolwarrior

Member
Joined
Dec 9, 2020
Messages
17
Location
OR
Yes, it is disassembled as you say, above. Here are a couple of pics showing item 55 still screwed into the back of the cylinder body.
 

Attachments

  • 20201217_175944.jpg
    20201217_175944.jpg
    76.6 KB · Views: 23
  • 20201217_180034.jpg
    20201217_180034.jpg
    74.8 KB · Views: 20

paulsomlo

Well-known member
Joined
Jul 16, 2013
Messages
3,943
Location
Northern Colorado
Looks like it's threaded directly into the block - ya' got me, can't imagine it's being held in there by design, otherwise, you couldn't replace the oring. I wonder if a piece of the ram cup got wedged in there. You might try closing the release valve and flushing the passages. You have some access through the bottom of the cylinder, through one of the small ports. I don't think that there's any access to that area from either the working valve or the overload, though.

If that doesn't do it, try sending GJ user "Hiball" a PM - it's likely at some point he's been in one of these.
 
OP
T

toolwarrior

Member
Joined
Dec 9, 2020
Messages
17
Location
OR
Thanks Paulsomlo. Here are a couple pics of the pump seal we talked about. I think this will fall into the category of "custom seal for this jack" It is not hard to get to this seal vs the difficulty of getting to the ram seal. Maybe it would make sense to just replace that really bad ram seal and wait to see if the pump seal goes at some later date.
 

Attachments

  • pump seal.jpg
    pump seal.jpg
    149.9 KB · Views: 18
  • Pump seal close up.jpg
    Pump seal close up.jpg
    101 KB · Views: 20

paulsomlo

Well-known member
Joined
Jul 16, 2013
Messages
3,943
Location
Northern Colorado
Thanks Paulsomlo. Here are a couple pics of the pump seal we talked about. I think this will fall into the category of "custom seal for this jack" It is not hard to get to this seal vs the difficulty of getting to the ram seal. Maybe it would make sense to just replace that really bad ram seal and wait to see if the pump seal goes at some later date.

I think that could be a good strategy - the requirements for the pump seal are not nearly as stringent as for the ram seal, and that pump seal looks OK.
 
OP
T

toolwarrior

Member
Joined
Dec 9, 2020
Messages
17
Location
OR
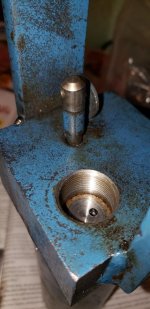
After talking with Hiball and confirming that item 55 (relief valve stem) should just unscrew, I went for it this morning. That was a stressful 15 minutes. I took it slow and went back and forth with various items stuck in the pin hole for more torque. I broke one screw driver - yes those threads were literally that tight. I thought for sure I was going to break that relief valve stem off but I kept putting WD-40 on and moving slowly back and forth. I finally worked it all the way out. It literally felt like I was cutting new threads the whole way. Here is a pic of the relief valve stem out of the back of the cylinder. Now the new challenge. The O-ring (item 54) is way down inside that small threaded hole. The picture is deceiving. You can just see the O-ring down in that hole, but that depth is around 3/4" down inside. My plastic O-ring pick is too fat to get down that small hole. Any tricks on how to get that O-ring out without scratching up the surrounding sealing surface?
 

Attachments

  • relief valve stem.jpg
    relief valve stem.jpg
    62.4 KB · Views: 23
  • relief valve seal.jpg
    relief valve seal.jpg
    157.3 KB · Views: 23

paulsomlo

Well-known member
Joined
Jul 16, 2013
Messages
3,943
Location
Northern Colorado
Any tricks on how to get that O-ring out without scratching up the surrounding sealing surface?

Can you get something plastic or wooden down there, a chopstick, a fondue stick, toothpick? Or some careful work with a dental tool, maybe "spear" the oring on it's ID, but not all the way through it.
 
OP
T

toolwarrior

Member
Joined
Dec 9, 2020
Messages
17
Location
OR
She's back online!
It took a while to get the rebuild kit parts, but I just finished putting it all together and it seems to be working correctly now. I thought I would go ahead a post this for anyone following my thread with a similar jack and/or problem. I went ahead a bought the full rebuild kit even though I really only needed the ram seal. I bought from the lowest priced online seller I could find. What a swing in prices I found. The most expensive was double the price of the one I ended up purchasing. If you are interested in who the lowest cost supplier was that I found, feel free to PM me. My reasoning for getting the whole kit was the overall age. At over 40 years old, one of the other seals was bound to go sooner or later, so it seemed to make sense to change it all. One of the kit O-rings was not the correct size, so I had to reuse the old one, but it was not a difficult one to get to, so I can always replace easily if it ever goes.

The hardest part of the rebuild was getting the two springs pulled back into place. One tip is to use a spring puller, if you have one. That is what did it for me. The are not easy to pull at all.

The only thing I am unsure of is the overpressure adjustment. I have no real clue where to set this or how. If anyone has a good tip on how to set this (Item 37 in the exploded parts view above), I would appreciate it.

I want to again thank Paulsomlo and Roberts210 for helping me along the way. I couldn't have done it without your input.

Take care all and have a Happy New Year! :beer:
 

Attachments

  • Shes fixed.jpg
    Shes fixed.jpg
    75.2 KB · Views: 32

paulsomlo

Well-known member
Joined
Jul 16, 2013
Messages
3,943
Location
Northern Colorado
I think you made the right decision - you should get many years out of that jack.

As far as the overload, I've heard things like, tighten it down all the way, then back it out 1 1/2 turns. This may provide some insight: https://www.garagejournal.com/forum/showthread.php?p=6784158&highlight=overload#post6784158. If you do an advanced search on user "Hiball" with keyword "overload", you'll get closer to an answer.

Glad this had a happy ending - stay safe; jack stands are your friend.
 
OP
T

toolwarrior

Member
Joined
Dec 9, 2020
Messages
17
Location
OR
Thanks paulsomlo. I set it to 1 1/2 turns from closed and it seems to be fine. I am going to call it good on this project and move on.

Yes, jack stands are your friend. I always have a backup for any device I use to hold up a vehicle. If I use car ramps, I put a jack under too. If I use a jack, I put jack stands too, and so on. I always have a back-up. A math teacher back at my old high school had a car fall on top of him and he was paralyzed from the waist down. I never forgot that.
 
To avoid these ads, REGISTER NOW!
Top Bottom