To avoid these ads, REGISTER NOW!

Anyone put SS top on us general boxes?

Stuart96

Well-known member
Joined
Nov 22, 2016
Messages
48
Location
Central ca
Just like the title says would love to see if anyone's done it.. Or a link if there's already something on this!


Sent from my iPhone using Tapatalk
 
To avoid these ads, REGISTER NOW!

BreeStephany

ALLIANCE MEMBER
Joined
May 19, 2012
Messages
851
Location
Oregon
I have a 72" US General box with a custom made US General 18" 'snap-on powerbank' like side box and am definitely contemplating whether to put a stainless or wood butcher block top on the entire length of the box. I definitely plan on using the top as a work space in the hanger, so I want it to be sturdy.

I too am in for the pics.
 
OP
S

Stuart96

Well-known member
Joined
Nov 22, 2016
Messages
48
Location
Central ca
I have a 72" US General box with a custom made US General 18" 'snap-on powerbank' like side box and am definitely contemplating whether to put a stainless or wood butcher block top on the entire length of the box. I definitely plan on using the top as a work space in the hanger, so I want it to be sturdy.

I too am in for the pics.


I too have thought about using some nice plywood.. And agree with above let's see the power bank!


Sent from my iPhone using Tapatalk
 

BreeStephany

ALLIANCE MEMBER
Joined
May 19, 2012
Messages
851
Location
Oregon
I too have thought about using some nice plywood.. And agree with above let's see the power bank!

Sent from my iPhone using Tapatalk

I would opt for a good butcher block top, maybe a maple glulam top or something similar?

As for the Powerbank project, you can follow the thread on it here!
 

Mr_B

Well-known member
Joined
Nov 21, 2016
Messages
5,376
Location
Reading
Quality ply works well. double it up and have top layer easily removed so can renew when worn/scruffy . Stainless is nice but need rubber matt stop stuff sliding when working on it, ply ended up my preferred method and looks good if fit well and don't go too cheap on your sheet .
 
To avoid these ads, REGISTER NOW!

bdelmar2

Well-known member
Joined
Apr 5, 2013
Messages
276
Stainless can be slippery, but sometimes that's an advantage.

My transmission build bench is stainless and it works really well, easy to keep clean and takes the constant sliding of heavy parts, plus makes it easy to spin the trans around for the final assembly steps.

I don't use any of the holding fixtures to build with as they are more hassle than they are worth for our setup.

I would tear a plywood top up fast, plus the constant soaking in trans fluid would do bad things to it as well, and it would be a lot harder to keep clean enough for trans parts.

Butcher block would be better, but still not as good as stainless.


On the other hand I guess the main point of buying a harbor freight box is to save money and stainless tops aren't cheap. Even used ones are expensive, and a new one costs as much as the box itself did, or pretty close.

Might be able to have one made, but sheet stainless isn't cheap either, plus having to pay someone to fold and weld it.
Most likely if you have the equipment to bend and weld large pieces of stainless you probably aren't working out of a hf box, though it is possible I suppose.


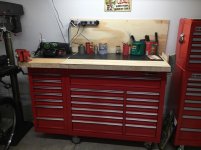
If you don't work off the top of the box a lot, or not with heavy stuff plywood might be fine, though I don't really see the practical purpose of it. It will protect the box somewhat I guess, but still going to look like a piece of plywood and its going to wear more quickly than anything other than cardboard.

Butcher block would look a lot nicer (in my opinion anyway) and hold up a lot better. I learned on this forum that ikea sells it pretty reasonably. I know they have narrower width stuff pretty cheap, and I think they may have had up to 30" width reasonably priced.
Of course you could glue or bolt a couple of pieces together after ripping one down, or maybe even just set them there next to each other.


What I ended up doing on my older snap on box is getting an old pickup bed mat and cutting it to fit.

Its heavy duty ribbed rubber, probably 5/8" thick where the ribs are and 3/8" in between. I took a little time laying it out and it looks like it belongs there, its pretty tough and easy to clean, don't have to worry about oil getting on it, and cost me $20 from a junkyard and I had enough left over to do another box plus some scraps.

That was from a short bed one, but one for a full size bed would be 8' or pretty close to that so you could do up to a 96" box.
 

boneheadgarage

New member
Joined
Dec 19, 2016
Messages
1
Location
Charlotte, NC
I have been reading the Garage Journal forum for a few years now, but I have never posted. I saw this thread and thought I could make a contribution to it. This not a SS top but someone may find it helpful.

I just moved into a new house last year, downsizing from a house with both a two car garage and a 24x30" shop into my current smaller house with a two car 20'X24" garage. When I moved I gave my 8' workbench that I had in my shop to my neighbor because it wasn't going to fit in my new garage and sold a lot of my excess equipment at garage sales. At my new house, after repositioning my garage equipment multiple times I determined that I needed to combine a workbench with my HF 44" tool cabinet with a 16" side box, and a workbench together to conserve what precious space I had in my new smaller garage.

So I built what is being discussed in this thread, I built a workbench top onto my HF General tool chest. I thought you guys might enjoy my simple bench top. I built a 2x4 frame laying flat inside the top and bolted that down using the holes already in the boxes top. Then as you can see in the picture, I built the top from 2x4's and screwed it al together with drywall screws leaving a 4" overhang in the back and a 6" overhang in the front to allow for clamping projects. I topped it off with a sacrificial plywood top, that I can change when it becomes too beat up. I added a downsized 3.5" craftsman vise, replacing my old and big 5.5" craftsman vise.

Hope you guys like it, the height came out to 42" and falls right at my belly button. I am 6'3" so it works out to be a comfortable height for me, I hate to work all hunched over.

The cost was 6 2x4's, a half sheet of plywood, and a half box of drywall screws.

Thats all for now.
 

Attachments

  • IMG_1283.jpg
    IMG_1283.jpg
    136 KB · Views: 93
Last edited:
To avoid these ads, REGISTER NOW!
Top Bottom