To avoid these ads, REGISTER NOW!

Applying RTV ( What is your preferred method? )

Wamsutta

Well-known member
Joined
Jan 8, 2014
Messages
10,867
Location
Amarillo, Texas
The auto makers have been steadily moving away from gaskets.

I've been all over YouTube trying to find some common consensus; there is none. Everybody has their own way of doing it. The main message I keep getting is don't apply so much on that it finds its way into things like the oil pump pickup screen. We're supposed to apply a uniform bead diameter that's just big enough to make the seal and no more. Excess is dangerous for the engine they say. Watching the robots do it is entertaining. I wish I could do it as well as they do.

What about applying it as a film instead of a bead? You just frost in on with your finger like you're frosting a cake; does that method work?
 
To avoid these ads, REGISTER NOW!

drmarkr

ALLIANCE MEMBER
Joined
Feb 5, 2006
Messages
4,202
Location
Tucson
M12 caulk gun. Then you frost it....

I don't know how I ever lived without this M12 gun, for a variety of purposes, lol.
 

djbmw

Well-known member
Joined
Jun 20, 2013
Messages
1,122
Location
Ottawa, Ontario, Canada
If this is for an oil pan or intake manifold then aply a fine bead, similar to a thin spaghetti noodle (cut the tip small... or buy/use caulking tips). Dont use your finger as it will likely result in areas with small gaps.
 
OP
W

Wamsutta

Well-known member
Joined
Jan 8, 2014
Messages
10,867
Location
Amarillo, Texas

L.Cheapo

Well-known member
Joined
Oct 23, 2014
Messages
5,880
I use a Valco Tube Grip


I got mine a couple years ago and use it a lot.

Valco Cincinnati 71006 Tube-Grip.jpg

I must be some kind of idiot. I've had one for years and cant make the thing work worth a damn. Either it does nothing, almost nothing, or blows the *** end out of the tube and makes a big mess. It's come close to getting flying lessons.
 

Phang

Well-known member
Joined
Jul 30, 2008
Messages
113
Location
Singapore
to dispense vermicelli size bead, it needs a substantial amount of pressure, and control

achievable with the help from these simple tools, with some practice :LOL:

20250401_182123(1).jpg
 

txvwnut

Well-known member
Joined
Jan 1, 2015
Messages
7,601
Location
Bedford, Texas
For areas where its sealant only I apply a small bead to the area and let it sit for about ten minutes to get a skin on it then mate the part to its surface. I'll use the applicator tip that comes with sealant cut to the size of bead I want. If I am wanting to add a little help to a gasket then I'll just finger paint a very thin film on.
 

gizardlizard

Well-known member
Joined
Aug 29, 2019
Messages
725
Location
Madison, WI
Doesn’t really apply to bead size or technique but one thing we do at work before applying sealant, is to thoroughly clean the surfaces involved. The finally thing we clean them with is electrical contact cleaner. Anything that helps sealant stick and not slide off is a good thing. Also, if possible, we let the sealant sit 24 hours before use or filling with any type of fluid. Doing all this dramatically enhances your chances for a leak free joint.
 

dscheidt

Well-known member
Joined
Apr 26, 2017
Messages
2,885
Doesn’t really apply to bead size or technique but one thing we do at work before applying sealant, is to thoroughly clean the surfaces involved. The finally thing we clean them with is electrical contact cleaner. Anything that helps sealant stick and not slide off is a good thing. Also, if possible, we let the sealant sit 24 hours before use or filling with any type of fluid. Doing all this dramatically enhances your chances for a leak free joint.

there's a reason most manufacturers call for a two step installation, with a wait before final torque. The initial installation gets the sealant stuck to both surfaces filling the imperfections, with a relatively thick section between. the wait lets that cure, and final torque compresses that like a face seal o-ring. That's not practical in a lot of situations, but if you can do it, it's much better.
 

dnschmidt

Well-known member
Joined
Oct 3, 2014
Messages
7,265
Location
Phoenix, AZ
1) The Tube Grip is fantastic. I use one for my toothpaste I like these so much. The reason people use the 2 1/2" is that that's the only model Amazon sells which is stupid. The smaller one is perfect for RTV tubes. The finger method works fine on cast parts with machined surfaces. as all you need is the thin film as shown in the Elring video. The Elring RTV is very good. For stampings you'll need to use more RTV and a thicker bead (1/8") works well as stampings are more flexible. 3) Apply the RTV and wait ten minutes prior to installing. This forms a thin skin on the RTV and prevents complete squeeze out where there isn't any RTV ldft in the joint. Ford makes (well actually markets - I think it's actually made by Three-Bond) a specific RTV for their PowerStroke diesels which is part number TA-31 (available at RockAuto) that's superior to any other RTV I've ever used.
 

WWheeler

Well-known member
Joined
Jun 23, 2015
Messages
4,105
Location
Middleofnowhere USA
1) The Tube Grip is fantastic. I use one for my toothpaste I like these so much. The reason people use the 2 1/2" is that that's the only model Amazon sells which is stupid. The smaller one is perfect for RTV tubes.

Amazon sells both the 2.5" and the 2", and they are usually the same price. I've never had any issue using the 2.5" for any size tube of RTV. I've often used it with the little 1 oz tubes.

. Ford makes (well actually markets - I think it's actually made by Three-Bond) a specific RTV for their PowerStroke diesels which is part number TA-31 (available at RockAuto) that's superior to any other RTV I've ever used.

Toyota has a similar FIPG (Toyota Genuine Seal Packing 1282B) also made by Three-Bond that's a bit pricey BUT is the only RTV that plays nice with Toyota's SLLC coolant. Every other RTV, like Permatex's Ultra Grey which is what they recommend for that job, will let at least a little seepage get by it, and sometimes a full-blown leak. I've done dozens of Toyota timing belt / water pump jobs where I see all the pink crusties left by those who tried to use something different. Never seen any leaks at all on any where the 1282B was used. When you wind up doing the next 80K timing belt interval jobs over and over on the same vehicles you get to know that Toyota FIPG when you see it. It looks and scrapes off different than other brand's RTVs. It's crazy to me anyone would gamble on anything different than what the service data calls for on a timing belt driven pump job. Who the hell wants to have a come back because of that?
 
Last edited:

gizardlizard

Well-known member
Joined
Aug 29, 2019
Messages
725
Location
Madison, WI
Amazon sells both the 2.5" and the 2", and they are usually the same price. I've never had any issue using the 2.5" for any size tube of RTV. I've often used it with the little 1 oz tubes.


Toyota has a similar FIPG (Toyota Genuine Seal Packing 1282B) also made by Three-Bond that's a bit pricey BUT is the only RTV that plays nice with Toyota's SLLC coolant. Every other RTV, like Permatex's Ultra Grey which is what they recommend for that job, will let at least a little seepage get by it, and sometimes a full-blown leak. I've done dozens of Toyota timing belt / water pump jobs where I see all the pink crusties left by those who tried to use something different. Never seen any leaks at all on any where the 1282B was used. When you wind up doing the next 80K timing belt interval jobs over and over on the same vehicles you get to know that Toyota FIPG when you see it. It looks and scrapes off different than other brand's RTVs. It's crazy to me anyone would gamble on anything different than what the service data calls for on a timing belt driven pump job. Who the hell wants to have a come back because of that?
Pretty sure Toyota discontinued the 1282B. There may be old stock left here and there, but my local Toyota dealership can’t get it either. I have one tube left and it’s starting to go bad.
 

WWheeler

Well-known member
Joined
Jun 23, 2015
Messages
4,105
Location
Middleofnowhere USA
I must be some kind of idiot. I've had one for years and cant make the thing work worth a damn. Either it does nothing, almost nothing, or blows the *** end out of the tube and makes a big mess. It's come close to getting flying lessons.

Hmm, it's super simple to use and works so great, your comment had me wondering. Then I remembered seeing this video when I was thinking about buying mine. This guy goes over issues he had when it was new, making sure it's set up right, and mentions that it isn't all that helpful on a brand new tube, which I've found also to be the case until you get a little bit out of it.


Pretty sure Toyota discontinued the 1282B. There may be old stock left here and there, but my local Toyota dealership can’t get it either. I have one tube left and it’s starting to go bad.

Say it aint so! now I need to go check. I wonder what their factory service data is calling for now instead then? AFAIK there's been no changes to our Mitchell or AllData. I need to see if our local dealer still has any, or go find it elsewhere. It hasn't been that long, maybe 6 months since I got a couple tubes from them.
 
Last edited:

dcoleman88

Active member
Joined
Jul 22, 2019
Messages
44
Location
TN
I have put RTV into a plastic syringe (cut tip to control bead size) when i wanted to lay down a fine bead and be precise with placement. It's probably not worth the effort though. I wish manufacturers would offer something like this as i hate the tubes.
 
To avoid these ads, REGISTER NOW!

rlitman

Well-known member
Joined
Oct 18, 2010
Messages
24,582
Location
Long Island
Why the 2.5 inch version? Aren't most sealant tubes 2 inches wide on the bottom?
I recall having GE Silicone tubes that were 1-1/2" wide too. I went with the 2-1/2" one, because then I don't have to worry if I find a tube that won't fit, but you're right, so far I haven't run into anything wider than 2".
I must be some kind of idiot. I've had one for years and cant make the thing work worth a damn. Either it does nothing, almost nothing, or blows the *** end out of the tube and makes a big mess. It's come close to getting flying lessons.
Mine came assembled improperly right in the packaging. I remember having to re-hook the spring and something else (it's been too many years). Anyway, perhaps yours has a similar issue.
 

WWheeler

Well-known member
Joined
Jun 23, 2015
Messages
4,105
Location
Middleofnowhere USA
Sure hope it’s not the case. If you find a source other than Fleabay, please let me know. Best sealant ever.

Well, my dealer doesn't have it, at least not for sale to me, and the tech I'm friends with there is in Costa Rico for the next several weeks. I wanted to ask him what he's using. I see several online dealerships do still show they have it available at prices 4x or more than I've paid. o_O

Looking around I see AISIN recommends this AB1207B1 for their WPT800 water pump, which is the most common one I've been doing. I might have to get a few tubes of it.

Aisin AB1207B1 FIPG.jpg
 

L.Cheapo

Well-known member
Joined
Oct 23, 2014
Messages
5,880
Hmm, it's super simple to use and works so great, your comment had me wondering. Then I remembered seeing this video when I was thinking about buying mine. This guy goes over issues he had when it was new, making sure it's set up right, and mentions that it isn't all that helpful on a brand new tube, which I've found also to be the case until you get a little bit out of it.

I know I didn't throw it out, but I don't remember where it is. I'll take a look for it Sunday when I stop by my workshop and see what the deal is with it. It was several years ago and I don't remember how much effort I put into it. I know it ticked me off! lol
 

Phang

Well-known member
Joined
Jul 30, 2008
Messages
113
Location
Singapore
I recall having GE Silicone tubes that were 1-1/2" wide too. I went with the 2-1/2" one, because then I don't have to worry if I find a tube that won't fit, but you're right, so far I haven't run into anything wider than 2".

Mine came assembled improperly right in the packaging. I remember having to re-hook the spring and something else (it's been too many years). Anyway, perhaps yours has a similar issue.

mine was unhooked when I first receive it, too

figured out after fiddling with it for 15 minutes

wish I watch that video WWheeler posted
 

KnurledNut

Well-known member
Joined
Jan 28, 2011
Messages
8,096
Location
n/a
What if I was to apply a bead of RTV only where the lines are at; would it still make a seal?

2000 LeSabre Pan.jpeg
3.8L. No RTV needed.

Get this:
FEL-PRO OS30699R Permadry Molded Rubber
It's on closeout at RockAuto for $6.57. Cheaper than a tube of RTV.
SFL_OS30699R_P04_TOP.jpg
 

ecotec

Well-known member
Joined
Oct 5, 2010
Messages
5,416
Where do you cut the tapered tube nozzle? They have steps in the nozzle for cutting. Obviously, the more you cut off the larger the bead.
The second line on the Permatex (I think). I can go look this afternoon, if I have a Permatex open. I don’t want a huge bead, but I don’t want to do it twice. There have been plenty of times when I haven’t given RTV anywhere near the curing time it is supposed to get.

I try to wire brush the **** out of every inch of the mating surface before I use it and then clean it with a rag and brake cleaner.
 
Last edited:

NUTTSGT

Super Moderator
Staff member
Joined
Sep 14, 2009
Messages
50,866
Location
Northern Central Ohio
If I need a small bead, I use the nozzle tip. If I want a wide thin bead, no nozzle just straight out of the tube with the tube just off the surface.
 

PeedoPie

Well-known member
Joined
Nov 16, 2017
Messages
178
Location
NJ
The Toyota black FIPG is definitely still made. Part number 00295-00103. Been ordering it and selling it for years.
 

WWheeler

Well-known member
Joined
Jun 23, 2015
Messages
4,105
Location
Middleofnowhere USA
The Toyota black FIPG is definitely still made. Part number 00295-00103. Been ordering it and selling it for years.

Toyota Genuine Seal Packing 1282B is part #08826-00100. It is not the same as Toyota FIPG 103.
The 1282B seal packing was specifically designed for Toyota's SLLC coolant. It's not made for oil pans and such.
 

gahrajmahal

Well-known member
Joined
Dec 12, 2008
Messages
2,520
Location
Cincinnati, Ohio
I must be some kind of idiot. I've had one for years and cant make the thing work worth a damn. Either it does nothing, almost nothing, or blows the *** end out of the tube and makes a big mess. It's come close to getting flying lessons.

Hi all. It makes me very happy for all the love you are showing the Valco Cincinnati “Tube Grip”. I was part of the development of this really great tool. Let me tell the story as I remember. This was in the 90’s and I was a new product development engineer for 11 years with this company. My boss and mentor Ray Haerr, was good friends with the owner Rich Santefort. This was a medium size manufacturing business of around 200 employees. We made industrial adhesive application equipment. It was privately owned by two families in partnership. Rich lived on a small farm and got interested in tractor pulling at the various fairs he attended during those years. He graduated to pickup truck, pulling trucks and rose in the ranks of class, horsepower and skills. By the time he was running an alcohol fueled big block Chevy, he was rebuilding the engine frequently during the season. It was about this time he came to Ray, explained his frustration with applying a small bead of RTV sealant, and the two of them hatched the idea for the Tube Grip.

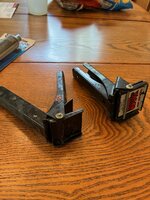
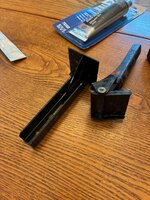
First they bought every tube squeezing apparatus they could get their hands on. Nothing worked worth a darn, especially for RTV type of adhesives. I don’t know who had the idea of two plates squeezing the tube, but the first time I saw what they had come up with it looked pretty much like what it is today. My desk was two away from Ray’s and we all were juggling five or more projects at a time and I remember spit-balling ideas about different versions to try. I still have one of the more successful prototypes that I’ll show in my photos.

Initially, Rich sold hand made models at tractor pulls and convinced our sales staff to include a small display with our regular convention booth with much grumbling from them. Why show $20 items along side $20,000 on up, gluing systems.

The “Tube Grip” gained some traction and was selling pretty well when he came back to Ray for the re-design. It was then they decided they needed to change over to a progressive die used in punch press type of manufacturing and the big investments in those dies.

Rich knew he needed a more robust sales plan and hired a dedicated sales force, assembly and packaging for hanging cards and in store displays. This was all before the internet, so word of mouth, industrial shows, store promotions were all needed. This is all stuff that was new to our factory and there was a steep and expensive learning curve. They created a new division of Valco, “The Consumer Products Group”.

By the time I left the company in 2001, Tube Grip was moving along slowly but I knew it was an awesome tool, under rated and possibly destined for greatness!

Now to troubleshoot LCheapo’s tube gripping.

WWheeler’s two you tube links are great at showing 1st, how it’s supposed to work. And 2nd, an assembly quirk I didn’t know was possible but could very well render the tool “useless”.

I actually have a RTV project coming up soon and I just bought a new tube for my job. ( but it also works awesome in re-starting a somewhat dried tube into working again).

IMG_7390.jpeg

Open your new tube of sealant, puncture the top using the pointed plastic cap rotating it so you have maximum opening in the tube before screwing on the tapered “extension nozzle”.

IMG_7392.jpeg

IMG_7393.jpeg

Next using my fingers I compress the very back of the tube if I can making a flattened area, like this.

IMG_7391.jpeg
 

gahrajmahal

Well-known member
Joined
Dec 12, 2008
Messages
2,520
Location
Cincinnati, Ohio
Now it is ready to insert into the Tube Grip Tool.

In order to eliminate the problem shown in WWheeler’s second video, separate the two sections of the Tube Grip tool so you have the handle with the top plate that swivels, and the handle with the bottom plate that doesn’t swivel.

Getting the “Top Plate Handle” insert the flattened back end of the tube so it sticks out the back.

IMG_7394.jpeg

Then, slide in the lower plate UNDER the flattened tube

IMG_7395.jpeg

IMG_7396.jpeg

You can bend up the tube in back to keep it from slipping forward ( I think the instructions with the Tube Grip show this)
The Second video mentions this, the guy says he applies some RTV by hand squeezing before switching over to the Tube Grip tool.

I haven’t found this to be the case and for me bending up the back of the tube, or squeezing out some by hand isn’t necessary. The Tube Grip tool works great for me with a full tube and only giving a small flattened area prior to using.

This is how it looks when you are getting ready to apply your bead. If it is really stiff to squeeze ( as in the winter using cold products) warm your caulking material in a hot water bath before using. You will be surprised by how less effort is required when using it.

IMG_7397.jpeg
 

gahrajmahal

Well-known member
Joined
Dec 12, 2008
Messages
2,520
Location
Cincinnati, Ohio
Thought I’d show some photos of the prototype tool I still have. It was made narrower to fit regular “Permatex” style tubes of RTV. But Ray and Rich soon discovered that the two inch wide tool didn’t work for many “tube products” like bath tub sealant, some boating stuff like grease and other things. The more folks at the factory used the Tube Grip in the factory and for all their hobbies, and there were a lot! With 200+ employees there were many interests, projects and things that got discussed around the lunch tables.

We had a full service machine shop with many manual machine tools. A few CNC machining centers and a small amount of welding.

There was a large electronics department with electrical engineering, design and development. Making and stuffing electronic boards.

There were lots of assembly departments and all engineers were required to take a shift of a week or month in the quality control department, so we were familiar with products from all divisions and knew how to read a print and use precision measuring tools.

IMG_7386.jpeg

IMG_7387.jpeg

IMG_7388.jpeg
 

Attachments

  • IMG_7386.jpeg
    IMG_7386.jpeg
    953.7 KB · Views: 4
  • IMG_7387.jpeg
    IMG_7387.jpeg
    1.1 MB · Views: 4

L.Cheapo

Well-known member
Joined
Oct 23, 2014
Messages
5,880
Now it is ready to insert into the Tube Grip Tool.

In order to eliminate the problem shown in WWheeler’s second video, separate the two sections of the Tube Grip tool so you have the handle with the top plate that swivels, and the handle with the bottom plate that doesn’t swivel.

Getting the “Top Plate Handle” insert the flattened back end of the tube so it sticks out the back.

IMG_7394.jpeg

Then, slide in the lower plate UNDER the flattened tube

IMG_7395.jpeg

IMG_7396.jpeg

You can bend up the tube in back to keep it from slipping forward ( I think the instructions with the Tube Grip show this)
The Second video mentions this, the guy says he applies some RTV by hand squeezing before switching over to the Tube Grip tool.

I haven’t found this to be the case and for me bending up the back of the tube, or squeezing out some by hand isn’t necessary. The Tube Grip tool works great for me with a full tube and only giving a small flattened area prior to using.

This is how it looks when you are getting ready to apply your bead. If it is really stiff to squeeze ( as in the winter using cold products) warm your caulking material in a hot water bath before using. You will be surprised by how less effort is required when using it.

IMG_7397.jpeg
Thanks for the detailed write up. I'll give it a try.
 

gahrajmahal

Well-known member
Joined
Dec 12, 2008
Messages
2,520
Location
Cincinnati, Ohio
Why the 2.5 inch version? Aren't most sealant tubes 2 inches wide on the bottom?

As I mentioned, Rich and Ray noticed that too wide of a clamping surface was never a problem, but too narrow of a clamp surface made it unusable. Here I am showing a small (1” dia.) tube fitting comfortably in the 2-1/2” wide model.

IMG_7398.jpeg

IMG_7399.jpeg
 
Last edited:

lolaetype

Well-known member
Joined
Dec 11, 2019
Messages
2,077
Location
North Western Arkansas
I keep a supply of 5cc plastic syringes on hand. I buy them at the farm and ranch store, they come without needles, which I don't need anyway. When I want a very narrow bead of RTV, say around 1/16" diameter, I squirt some from the tube into the syringe then use the syringe to place the RTV. IMO, it's much easier to handle the syringe than a tube. It's also easier to fill in any narrow spots or gaps in your bead.
 
OP
W

Wamsutta

Well-known member
Joined
Jan 8, 2014
Messages
10,867
Location
Amarillo, Texas
Open your new tube of sealant, puncture the top using the pointed plastic cap rotating it so you have maximum opening in the tube before screwing on the tapered “extension nozzle”.
Where do you cut the tube nozzle? They give you a choice of 5 'steps' to cut the nozzle at. I'm assuming Step-2 would be the most universal place to make the cut, but was interested in hearing where you cut yours at and what your personal preference is.
 

WWheeler

Well-known member
Joined
Jun 23, 2015
Messages
4,105
Location
Middleofnowhere USA
Where do you cut the tube nozzle? They give you a choice of 5 'steps' to cut the nozzle at. I'm assuming Step-2 would be the most universal place to make the cut, but was interested in hearing where you cut yours at and what your personal preference is.

Often, depending on the usage, the service data / repair guide you are following will specify how large the bead should be. General use I cut the nozzle to a 2mm-3mm opening so I can lay a thin bead is all it takes for machined surfaces. Sometimes something like a stamped steel oil pan will need a bit thicker. I don't pay attention to any steps in the tube. It's the diameter of hole. Start too small and slice off a couple mms at a time until I get the size hole I want. If you see a lot of RTV squeeze out you put way too large of a bead.

And as far as scraping old gasket material off, I like to use gasket remover spray, like CRC or Permatex. I spray it and let it sit on there for a few minutes, then I can usually scrape a surface clean with a plastic razor blade. Only if that isn't working do I resort to a carbide scraper, and I hesitate to even mention that because used wrong you can ruin the parts you are working on, especially aluminum, but used right they are the bee's ****. Oh, and I never use a roloc disc for mating surfaces that need a gasket of any type. Then I make sure to clean surfaces really well with brake clean and a shop towel.
 
Last edited:
To avoid these ads, REGISTER NOW!
Top Bottom