To avoid these ads, REGISTER NOW!

AR51 Buggy Build

Griff93

Well-known member
Joined
Jul 25, 2009
Messages
1,121
Location
Huntsville, AL
I've wanted a single seat rail buggy with a motorcycle drive train for years. Something like a honda pilot on steroids. We ran across the plans for building AR51 buggies. My brother in law, Jason, decided he wanted to build one as well so he purchased the plans. I managed to buy a complete CBR900 as a donor for my buggy. It's late enough to be a fuel injected bike. It should move along a 900lb buggy plenty. Jason managed to find a ZX1000 engine.

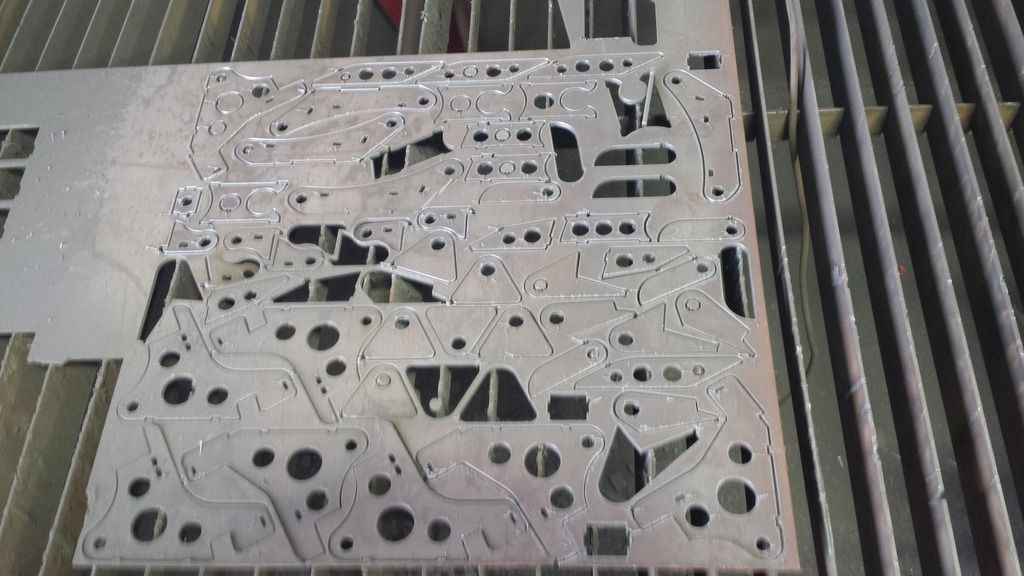
After we got the plans in hand, we started cutting out parts on my CNC plasma table. Nesting parts together like this lets you minimize the wasted plate. There's a lot of weigh reducing holes in these parts.


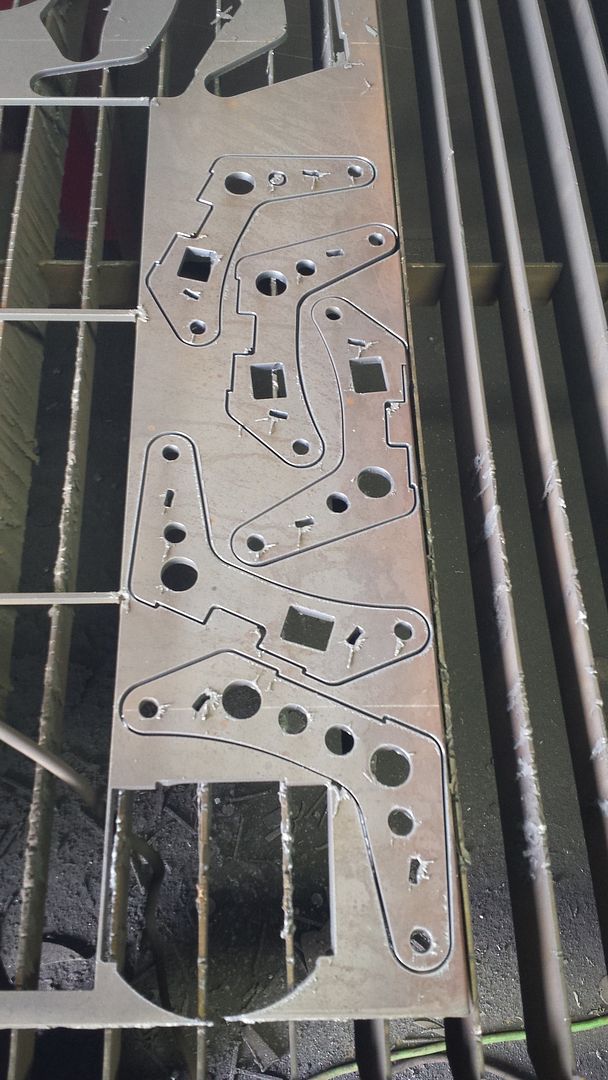
Here's some more parts cut out. These are for the rear suspension upright. I apparently neglected to take a picture of them completed. I'll go dig them out and take a picture shortly.


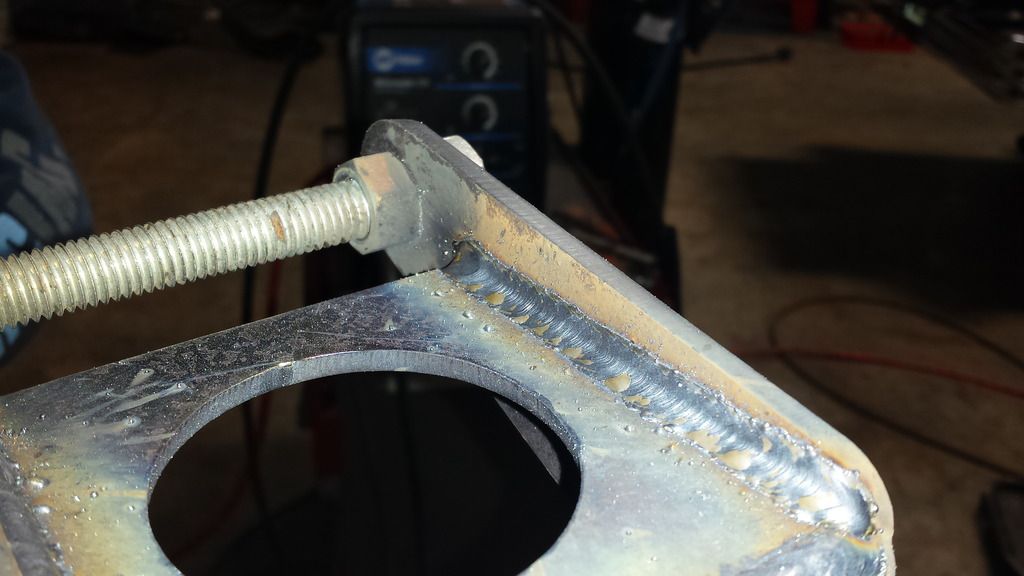
I do have a close up of welding them up. We used some all thread through the holes to make sure they lined up and keep the sides far enough apart.

 
To avoid these ads, REGISTER NOW!
OP
G

Griff93

Well-known member
Joined
Jul 25, 2009
Messages
1,121
Location
Huntsville, AL
We cleaned the slag off of all those parts. It was a time consuming pain. This made me start looking for a better way.


The next thing we started working on was building the front spindles. Apparently I take to many close up pictures and not some of the whole part. We turned down the back of the spindle pins in the lathe. These are a standard off the shelf spindle. Probably made for a trailer or something along those lines.


I managed to cut out the sprockets on the plasma table. I think they will work just fine but I don't have any of the right chain laying around.


Sometimes its kind hard to get the plasma dialed in. I think I got this pretty good. It's 5/16 a-36 plate.

 
OP
G

Griff93

Well-known member
Joined
Jul 25, 2009
Messages
1,121
Location
Huntsville, AL
We have been making a bunch of the parts such as the pedals but I'm bad about not taking pictures. I'm going to try to remember to take them while I'm working on this buggy project. We have spent hours cutting tubing on the bandsaw for these. Building two of them at the same time seems to help as you just make twice as many parts on each setup. Two definitely aren't taking twice the amount of time vs building just one. We finally got the tubing in the other day that was holding us up from putting the floor of the frame together. We laid it out on my welding table. This table makes it really easy to get things nice and square.


OP
G

Griff93

Well-known member
Joined
Jul 25, 2009
Messages
1,121
Location
Huntsville, AL
Are using a stick to weld that??? If so that would seem to take awhile with all the parts. Looks good so far though!

The really dirty picture is a mig weld. The plates were dirtier than I realized. I won't be stick welding any of this. It will be all Mig and Tig. The front spindles are fully tig welded.
 
Last edited:

CJM8515

Well-known member
Joined
Mar 8, 2014
Messages
9,291
Location
NJ
Word to the wise about the sprockets-make sure they are made of heat treated high strength steel. The amount of power those engines will make will ruin the sprockets in short order if they arent heavy duty enough.

Friend ruined steel atv sprockets on a honda 450r atv that made 70hp! I mean literally 6 rides they were done.
 

1wook

Active member
Joined
Feb 22, 2014
Messages
42
Location
Central MN
Cool build, thanks for posting. I'd love to buy Ricks plans and build one but I have way to many other projects going on to even think about it!

Looks like you have a great fab set-up, and those are some really nice mig welds. Did you end up tumbling the remaining parts to clean off the slag?
 
OP
G

Griff93

Well-known member
Joined
Jul 25, 2009
Messages
1,121
Location
Huntsville, AL
Thanks for the compliments guys. I wondered about the sprocket. If it doesn't work out, I'll get somewhere like sprocket specialties to make me one. I have the drawings so it shouldn't be to bad.

I can't put into words how much better it is doing this on that layout table than my old not flat welding table.

Here's the rear suspension upright. It uses a dodge intrepid front hub bolted to it for a wheel bearing.


Here's one showing the whole front spindle.


We did the actual welding and final fit up the other day. We had previously been using the table to fit the tubes. We clamped it all over the place then tack welded it all together. We put all these stops on the table so we could easily and quickly line up the second frame. Jason commented that this is where this table really shines. It took us about 15 minutes to put the second one together. Most of that was me dressing the ends of some of the tubes to make them fit tightly.


I almost ran out of clamps. There's only one more on the end of the table where I have been keeping them. I'll be getting some more shortly. I also used all the ball lock bolts that hold stuff down to the table.


I'm excited to see these. Up to this point all we have been doing is making parts and pieces. This actually is beginning to look like something.

 
Last edited:
To avoid these ads, REGISTER NOW!
OP
G

Griff93

Well-known member
Joined
Jul 25, 2009
Messages
1,121
Location
Huntsville, AL
Glad you guys like seeing all this stuff. Makes taking the time to post it worthwhile. I probably wouldn't have done a build thread without Ironhorse74 nudging me that way in the welding thread. Hopefully I'll get some more time next weekend to work on it.
 

Playwme

Well-known member
Joined
Sep 13, 2012
Messages
2,032
Location
The Lucky Country Down Under
Excellent!
That build table is freaking awesome. Did you guys make it or is it a commercially built thing.

I've got a full k7 GSXR1000 driveline sitting under my bench waiting for some time and inspiration.
 
OP
G

Griff93

Well-known member
Joined
Jul 25, 2009
Messages
1,121
Location
Huntsville, AL
Jason and I got some time to work on the buggy Sunday afternoon. I've been extremely busy in the shop so things are probably going to progress slowly until things slow down. I can only work on this when I have room in the shop. As a result, we will probably do some things in a weird order. We want to make progress when we have the opportunity. I received an order of material this week that had some of the od sizes of tubing used to make these buggies. We decided to go ahead and turn out the rear bearing carriers. The spool will pass through this that holds the rear brake rotor and sprocket as well as hooks up to the cv joints. We cut the material to rough length with the bandsaw then threw it in the lathe to face the ends. This is 3" .188 wall DOM.


These were good for Jason to be involved in making. He's learning to use the lathe. We didn't take a bunch of pictures as we were kinda trying to concentrate on what we were doing. Doing this kind of work without a digital read out is pretty tedious. I really should outfit this lathe with a DRO. The end result was good. These should work fine.


That's all we had time to work on this round.
 

GT350Mike

Well-known member
Joined
Jan 16, 2006
Messages
89
Location
N. Alabama
I know you've been itching to get this project going for a while.....can't wait to see the next update!
 

ilovevocs

Well-known member
Joined
Jun 26, 2009
Messages
1,966
Location
Toledo, Ohio
Your lathe looks massive. Have some pics? Been enjoying your progress. Thanks for posting.


Sent from my iPhone using Tapatalk
 

kbs2244

Well-known member
Joined
Nov 11, 2006
Messages
14,065
Just a thought.
The big, heavy Honda bikes use a little electric motor for reverse.
 
OP
G

Griff93

Well-known member
Joined
Jul 25, 2009
Messages
1,121
Location
Huntsville, AL
My lathe is pretty good sized. It's an 18" swing Reed Prentice weighing in around 6000 lbs. It's great for big stuff but it's kinda cumbersome when doing smaller work. I'd like another lathe at some point. I'd really like a haas tl 1. I do a lot of smaller spacers and bushings that it would be great to have something like that for.

Here's an old picture I dug up of it. I really should take some more pictures of my machinery.


An electric reverse has been discussed at length. It's probably what I'm going to try first. I mainly just need it to turn around or back out of somewhere I have parked. Another thought has been to do a planetary gearset in place of the rear spool. Packaging that is going to be a huge challenge.
 

ilovevocs

Well-known member
Joined
Jun 26, 2009
Messages
1,966
Location
Toledo, Ohio
My lathe is pretty good sized. It's an 18" swing Reed Prentice weighing in around 6000 lbs. It's great for big stuff but it's kinda cumbersome when doing smaller work. I'd like another lathe at some point. I'd really like a haas tl 1. I do a lot of smaller spacers and bushings that it would be great to have something like that for.


Here's an old picture I dug up of it. I really should take some more pictures of my machinery.


An electric reverse has been discussed at length. It's probably what I'm going to try first. I mainly just need it to turn around or back out of somewhere I have parked. Another thought has been to do a planetary gearset in place of the rear spool. Packaging that is going to be a huge challenge.


That thing is a beast! Thanks for sharing. It's odd how machine tool purchases go. You think if I get this lathe I'll be all set, next thing you know your looking for another one.

Personally wish I had room for a piece of iron that size.


Sent from my iPhone using Tapatalk
 
OP
G

Griff93

Well-known member
Joined
Jul 25, 2009
Messages
1,121
Location
Huntsville, AL
This all started with me buying a Bridgeport. Then I bought a 10" swing Logan lathe. Sold it and bought the big lathe. To give an idea of actual size, I've had a whole ford full width 9" axle housing swinging in it before. This stuff multiplies. We now have a 4x8 CNC plasma table, a 6x12 surface grinder, a 30" Doall vertical saw, an Emerson 10x20 horizontal saw, and a bridgeport 40x20 VMC. It's a slippery slope.
 

Brad Beam

Well-known member
Joined
Jan 5, 2010
Messages
343
Do the plans come with the CAD files for all the plasma cut parts, or did you have to draw them?
 
To avoid these ads, REGISTER NOW!
Top Bottom