To avoid these ads, REGISTER NOW!

Armorcoat Epoxy and First Timer

Zaemo

Banned
Joined
Jan 29, 2010
Messages
25
Location
Decatur, GA
Hello All,
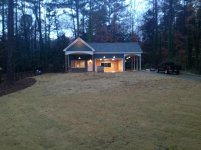
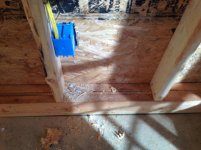
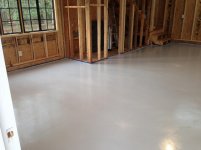
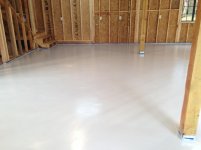
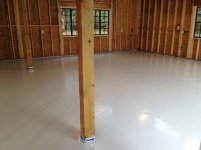
I thought I would give my honest opinion and experience with applying Armorcoat's Epoxy Base Paint and Poly top coat. This is my first experience doing this. I did the entire thing by myself. I have around 950 sq.ft. of floor to be covered in my new garage. The slab has been done for months. The outside temps were around 50 degrees during the day and low 40's at night here in the Atlanta area. I couldn't wait for warmer weather, we are trying to get moved in. I would never get to this if I filled the garage.
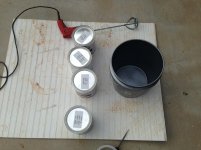
I chose Armorcoat after asking for a quote and recommendation as to what to use. I was surprised when David Frost got back to me right away with a quote that was in the $500 range....... for base and top coating! I bought brushes and rollers at Lowe's.
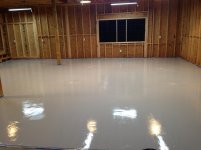
I chose light gray so as to reflect light in the space. I don't want flecks because I want to be able to find whatever it is I dropped, again. I work on hot rods and such so this isn't a large display case for a shiny weekend car. I have no interest in disposable flooring squares. I want to weld here and roll a floor jack around.
David recommended they tint the top coat gray also which turned out to be a saving grace.
Here's my project.
 

Attachments

  • IMG_5311.jpg
    IMG_5311.jpg
    141 KB · Views: 113
To avoid these ads, REGISTER NOW!
OP
Z

Zaemo

Banned
Joined
Jan 29, 2010
Messages
25
Location
Decatur, GA
I prepped the floor like everyone says. I watched videos and read instructions. I washed and scrubbed and rinsed and swept and scrubbed. Damn red dirt. Georgia Clay they call it.
I vacuumed everything to reduce contamination.
I had no oil spots to worry about until one of the painters pulled his truck in and dripped 6 or 8 nice circles. I had had the idea to try to burn the oil out of the concrete. That sort of worked until the dime sized screaming hot top layer of concrete popped like Reddenbocker's at my face. Maybe the MAPP was too intense. I masked the edges and used a little fast drying concrete patch the evening before.
 

Attachments

  • IMG_5338.jpg
    IMG_5338.jpg
    121.7 KB · Views: 100
  • IMG_5340.jpg
    IMG_5340.jpg
    100.9 KB · Views: 97
  • IMG_5348.jpg
    IMG_5348.jpg
    120.1 KB · Views: 104
OP
Z

Zaemo

Banned
Joined
Jan 29, 2010
Messages
25
Location
Decatur, GA
Day two;
I left the fan on overnight after the prep to help dry the floor. I also used a propane space heater. I forgot to mention that I etched the floor as well.
I made a quick sweep and vac around.
I got the roller and handle together along with the everything I thought I would need. I didn't want to fumble with anything after I mixed the product.
David sent me 4 gal total, two of Part A and Two of Part B. I poured everything into a new bucket and scraped the cans clean. I let the mix stand for 15 minutes in order to let it cook. I had knee pads on and edged the place fairly quickly.
After all of that, rolling the paint on with the 18" roller was very easy and very gratifying. I should have laid it on a little thicker to begin with but I had no idea how much I would have in the end. It was a nice wet coat that flowed out very nicely, even given the lower temps. (I stored the product inside so it was cold to mix)
I had no real problems with witness lines between earlier and later application. I could tell it was getting only slightly different felling towards the end. I had a lot left over and ran an extra coat over the entrance ways where heavy wear would occur. Day two - done. Major improvement. It's pretty wet in these pics.
 

Attachments

  • IMG_5355.jpg
    IMG_5355.jpg
    72.1 KB · Views: 133
  • IMG_5353.jpg
    IMG_5353.jpg
    96.6 KB · Views: 95
  • IMG_5352.jpg
    IMG_5352.jpg
    124.8 KB · Views: 78
OP
Z

Zaemo

Banned
Joined
Jan 29, 2010
Messages
25
Location
Decatur, GA
The first pic below shows the floor after the first coat. The next pictures show the floor after the final top coat.

David recommended that since this was a working garage, I should add the powdered densifier to the mix. The top coat was 2 to 1 mix so three small cans of this fine white powder was added. This was for strength, NOT anti-slip. I did notice that the grit would sink pretty quickly in the pan. I ended up using smaller amounts in the roller pan, and mixing the bucket every time I went back for more. This results in a slightly less glossy finish but David assured me that the glossy Airplane Hanger look scratches easily!
I had a small crack in the slab that I thought would fill in with the material. I should have pushed something in there. I ended up using the edging brush to put a heavy coat over the crack and any other cut in the concrete that I could now see. Here's where the gray topcoat saved my ***. If I had happened to get thin somewhere, the second coat would surely cover it where clear wouldn't
I could also drizzle extra product in low imperfections to help smooth out the floor.
I had to stop myself from trying to make the floor perfect. It wasn't going to be. I rolled on the topcoat and was done. Unfortunately, I had to leave town so I can't tell you how it looks today on day 4. We also got some light rain and while my garage door is on back order, I hope moisture hasn't settled into all of my hard work!
I can't wait for the first annual Garage Rock Sock Hop in the Spring!
I'm happy thus far and feel like I've invested about half of what I would have with a different company, no offense to any involved here.
Good luck with your project,
Chad
 

Attachments

  • IMG_5361.jpg
    IMG_5361.jpg
    97 KB · Views: 165
  • IMG_5365.jpg
    IMG_5365.jpg
    90.7 KB · Views: 136
  • IMG_5366.jpg
    IMG_5366.jpg
    83.9 KB · Views: 148
  • IMG_5367.jpg
    IMG_5367.jpg
    95.9 KB · Views: 131

jaye944

Banned
Joined
Nov 26, 2013
Messages
1,077
Location
GTA, Ontario, Canada
very nice, kinda exactly what I want.

got some questions

1> any ideas on how to deal with dried oil
2> there are SMALL gaps where the walls meet the floor, can I load it up with topcoat, or should i put some kinda crack caulking in?
3> whats that blue lines around the edges?
4> Whats the coverage (mine is only a single garage)
5> how many coats of part a&B mix
6> how many coats of top coat
7> how long to leave between coats for 5 & 6
8> and how long before walking then driving

sorry for so many questions, but really nice job

cheers
 

trigd

Active member
Joined
Jan 5, 2013
Messages
29
Location
Gilbert, AZ
How well is this supposed to hold up to fluids/oils? How about hot tire pickup? Looks VERY nice so far! Cant wait to see after the poly top coat
 
To avoid these ads, REGISTER NOW!
OP
Z

Zaemo

Banned
Joined
Jan 29, 2010
Messages
25
Location
Decatur, GA
Hey Guys,
Internet is very difficult where I am right now. I masked off the edges with blue painters tape. Yes, that will eventually be covered by something, I just don't know when.

As I mentioned, the Poly is already on top. The poly is supposed to be the chemical and hot tire protectant.

jaye - just one coat of each layer. I did spread it a little thicker at the entrances.
you will not be able to cover any gaps by loading up those areas. I would use a caulk I guess.
Day one was clean and etch. Day two was epoxy topcoat. Day three was poly topcoat. Done. I believe you can walk on it the next day, 24 hours after last application. They recommend a week before driving on it if I remember correctly.
Z
 
OP
Z

Zaemo

Banned
Joined
Jan 29, 2010
Messages
25
Location
Decatur, GA
I etched then let it dry overnight with the help of fans.
I then applied the first coat. The epoxy coat was left to dry for 24 hours. They say you can walk on it, which I did.
The Poly top coat was applied the next day after 24 hour dry time.
These were the instruction.
Perhaps I don't understand the "dry time" question.
Z
 

jaye944

Banned
Joined
Nov 26, 2013
Messages
1,077
Location
GTA, Ontario, Canada
Hey Zaemo !

Long time, well weather is starting to get better and I'm out looking for materials.

Being in Canada, trying to locate the Armourcoat Epoxy base and top.

Now are they 2 SEPARATE products?
also what exactly is the densifier? is that an armourcoat thing and is ther another name for it.

only Canadian tire "seems" to do an AC product, they call it garage floor paint and its a 2 part epoxy, nothing else.

also you said that you tinted the top coat? was it a "clear coat",

if I can't get an AC product will ANY type of poly top coat work

thankxs !
 

shauneg

New member
Joined
Dec 25, 2012
Messages
1
Location
Niagara Region, ON Canada
Hi, Jaye944,

Out of curiousity, did you ever consider the EpoxyShield line of Rust-oleum products, also available at Canadian Tire for your floor?

I had been wanting to do it to our 2 car garage since we bought our house almost 4 years ago, and finally ready to do it in another week or two.

I ask because last week CTC had both the floor coating,
and the clear coat kits on sale for $30 off each.

Rust-oleum EpoxyShield garage floor kit

Rust-oleum Premium Clear coating kit

I ended up buying two floor kits covering 250 sq.ft each (reg: $99.99, sale: $69.99)
and one premium clear coat kit covering 500 aq.ft (reg: $125.99, sale: $95.99)
 
Last edited:

jaye944

Banned
Joined
Nov 26, 2013
Messages
1,077
Location
GTA, Ontario, Canada
Hey Shaun;
I had looked at it and the price point is very good.
However zaemo got back to me and advised the armourcoat.

am going to be doing that, will be starting my own thread on my Garage project; so I'll keep you advised;

thankxs for the feedback
 
To avoid these ads, REGISTER NOW!
Top Bottom