

srmcnamara
New member
So after lots of research and reading over this site I chose to go with an ArmorPoxy install on my ~38'x24' Pole Barn. My winter project was going to be insulating, updating electrical and etc inside. But with the weather starting to turn I decided to get the floor down, since I was still contemplating my heating situation in there. One of the bays is already enclosed and heated as a workshop (I use it as a gym) while the other 2 bays are more of a standard garage. I decided to go with Racing Blue with flecks in the main car bays and then the medium gray with flecks in the workshop bay. I like blue, I know it’s not for everyone. And the pictures don't really do it justice, they make it look like a swimming pool when in person it’s not that deep/bright of a blue. The close-up shots are more realistic.
Products: Master Kit Armorclad Racing Blue w/Black, White, Gray Fleck (Options: Primer and Military Top Coat)
Add On Kit Armorclad Gray w/Black, White, Light Blue Fleck (Options: Primer and Military Top Coat)
-This add on kit will be used in my third bay, yet to be accomplished.
Epoxy Repair Putty
6-Pack of 18" Epoxy Rollers
Various Containers and Buckets
2 Paint Roller Poles
Spike Shoe Attachments
9"-18" Roller Attachment
Prep:
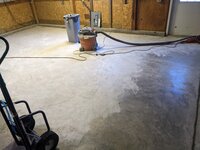
After reading some negative stories of people using the floor grinder rentals I decided to go with a 7"/9" Milwaukee hand grinder with the vacuum shroud/grinding wheel from Harbor Freight. My floor was heavily stained but it did have some type of sealer on it, and I was pleasantly surprised that the all the stains were relegated to the top sealer, they all disappeared with the sealer being ground off. This ended up being a great choice for my situation, but man was my back sore afterwards. I never realized just how not smooth/level my floor was until even my 7" grinding wheel was revealing so many low spots / high spots like waves everywhere. Even using the hand grinder I got down to aggregate quickly in some spots trying to get it all smooth. So I ended up just being okay with making sure I hit all the spots with the grinder, and it wasn't going to be smooth. Grinding really did help smooth it out, but it was never going to do enough to fix the larger dips / hills. And again, I didn't really even realize they were there through normal use of my garage. Having the vacuum shield really really helped keep control of the grinding disc, I had also got a 4" wheel for some tighter spots and immediately abandoned that idea because of how wild it was without the vacuum shield to help with stability. It probably took me 16 hours of grinding to get it all done, broken up between 3 or 4 days after work. I had to take the filter out of my shop vaccum and beat it inside of a trash can probably every 20 minutes. Luckily the vacuum survived no issues, can't say the same for the filter. I ended up putting in a fresh filter for the very last vacuum step before crack fill / primer.

Crack Fill:
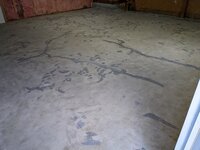
Grinding off the sealer also revealed just how many spider cracks I had in the floor. Seemed like they were everywhere. The shop was built sometimes in the late 90s / early 2000s I was told by a neighbor. I got the ArmorPoxy Crack Repair Putty to help seal the cracks and around where the slab meets the block foundation wall. I also used it in about 3 parts where the grinder got away from me and left a gouge. According to the instructions the putty was essentially good to be covered immediately. I went a bit overboard and spent about 6 hours filling cracks, then got the primer down around 4pm. I’ll go into the results in the primer section.
The Plan:
I had a good 5 days before rain was going to start and not being insulated/air sealed, I needed to get everything down and curing before the humidity jumped up. Temps were also barely in my favor, my lows were around 50 and highs around 70. I think one of the nights got down 45. Because I had a semi small window to get things down before it got cold, my plan was to get the primer down a little later in the day right before the temp peaked. Then let it cure overnight and get the next layer down around noon the next day. Then finally the top coat earlier in the morning on the 3rd day. Instructions I believe said don’t go longer than 20 hours between coats, I definitely flirted with that line and hoped that the low temps meant realistically that 20hr time limit was longer given the slower time to cure. Given dry/recoat times I was a little stuck with this schedule. During that week humidity levels were flirting with max allowed in the mornings and at night, when I would need to be putting down the product to get 2 layers done in a single day. And I’d be putting them down when the temps were near the lowest levels allowed. So I think my plan was the best I could do.
Primer:
I mixed up 1.5 gallons of primer at a time, which allowed me to do one bay then do the second bay with the second mix. I poured the primer down in in rows and then used the supplied squeegee to help move the primer around followed by an 18” roller to back roll it. Honestly you could probably get away with not using the squeegee, but it did help. I was a little disappointed with the crack filler. It had shrunk slightly between putting it down and the primer curing overnight. I really forced it into the holes/gouges when applying it and used a metal putty night scrape it clean even with the surface. I don’t know if the concrete absorbed some of it, or if it really did just shrink a little while curing. Again timing was important, the instructions for the epoxy mentioned something about more work if you wait too long between the filler curing and getting the primer down. So I opted to get the primer down a few hours after finishing the crack repair. I hoped that later the Armorclad was going to be thick enough fill in the imperfections and hide it. Ultimately most of the cracks were hidden, but the gouges weren’t given they were larger. I can just barely grab the edge with a finger nail, so it’s apparent when the light hits it just right. This I not a big knock on the crack repair putty, knowing what I know now I would have done a second application of it before putting the primer down. Honestly at this point all the grinding work had me just wanting this process to be over lol I’m still happy with the results. This floor was in rough shape and it was never going to be perfect short of ripping it all out and pouring new concrete.


Armorclad: Racing Blue
Now the fun really began. I decided to break this up into 4 parts, so half of a bay at a time. I also got the spike shoe setup from ArmorPoxy. I highly recommend getting some Locktite on the nuts holding on the spikes, its not really possible to get them tight because they slip in the plastic holding the head of the bolt/spike flush the surface. So can’t get a wrench on that side and tightening the nut on the bottom easily rotates the head in its cutout. I did the Loctite the night before. It’s definitely a learning experience working those spikes, given that my floor had low/high spots the spikes slipped in the epoxy constantly until I got the hang of it. I basically had to walk like I was in a full body cast keeping my legs directly under me as much as possible. Even then, if I hit the side of a high spot, my foot was sliding down no matter what, then I had to backroll it again.
I finished the first section and coming back for the second, I then found about 9 dead spiders on the ground, so FYI the fumes are strong enough to kill spiders up in the rafters. Luckily none of them fell in the epoxy, so quick cleanup.
I highly highly recommend the 18” rollers if doing larger areas, greatly cut down on how much time it took to get things covered. I was doing this solo so timing was important getting everything done. My tempo was roll out section, throw the flecks, then go out and mix more, and repeat. The spikes helped throwing the flecks further in, but I was terrified of having to back roll over the flecks if my spikes slid. So I never went very far into the epoxy for that part. I learned it really helps to act like you are about the throw some dice with the fleck in your hands before tossing it up in the air. I had some clumps survive even 9 feet in the air tosses. After I started doing the dice move, no more issues and I tossed it up just above my head height. I ended up not using all the fleck, I had weighed it out and broke it into 4 sections. I want to say it weighed in at 6lbs and I had almost exactly 1lb left over from each section. So I only used 0.5lbs per section and ended up with 4lbs extra. To each their own on how much fleck to use. I was scarily consistent with how much I used, I just went until I liked the spread. And honestly, there are definitely some areas with more coverage than spots next to it, but once stuff is moved in its not going to be noticeable. Always a learning experience. I unintentionally ended up going a little too heavy on areas where 1 section met another. And later I did find one spot where a few spikes slid a little and left a gap in the epoxy. I’ll call that a win given the floors unevenness, nobody will ever notice.
I was also pleased to see that the epoxy was did fill in the cracks that were still visible after the putty and the primer. Just some of the gouges remained visible from certain angles. There was only one small spot that it looks like the epoxy wrinkled up a little bit, no idea what caused it. I grinded everything down and saw no stains left before starting. All I can think is maybe some sweat dripped in that area or something. No idea.


Top Coat:
I went with the 2-Part Military Top Coat. I used the minimum amount suggested for the anti-slip stuff, which I’m super glad I did after my results (my mess-ups). I mixed up all of it up at once and carried the bucket around with me with the mixer and drill. I would mix it up for 20 to 30 seconds then pour some into the paint pan, basically just enough for the roller to soak up and then rolled it onto the floor. Rinse and repeat. This is where I had 2 mess ups, 100% my fault. I thought I was doing good enough mixing it up constantly, but some of the anti-slip did stay in the bottom of the pan where on the next go a clump of it would get stuck on the roller where it would then get deposited down on the ground with clomping going on. This isn’t necessarily bad if you properly roll the hell out of it, but I didn’t. I treated it like paint, each part of the floor probably got 2 maybe 3 passes with the roller. This left those clumps in place. My 2nd screw-up, I missed a 4” wide by 2’ section completely. It’s hard to see your coverage when putting it down and apparently I messed up with my points of reference while working across the bays.
The next morning I went out to look at floor and the clumping was apparent in many locations. Know how water kind of beads up on smooth surfaces? It looked sort of like that, but the places between the beads were heavily concentrated with the anti-slip stuff. So it wasn’t just that the clumps existed, it’s that they stuck out because the top coat kind of beaded up around those clumps making a low spot where the clumps were. Luckily I had bought the add-on kit to do my 3rd bay and they had given me another full order of top coat, enough to do another 600 sq ft. After lots of going back in forth in my head, I quickly got my stuff back together and used the rest of my top coat to do another coat. I was quickly approaching the deadline to do another coat. I’ll now sadly need to order more when I do the 3rd bay, which will be around $270 plus shipping last I looked. But it was my fault, lesson learned.
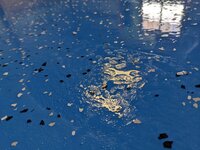
I quickly got the second coat down and this time I went a bit nuts with it. I mixed in the minimum recommended amount of the anti-slip stuff. I used my laser level to shoot a line across the floor. I rolled it back and forth with overlapping by 50% going the length of the floor. Then I rolled it perpendicular, to previous direction. And then finished up by rolling it back and forth with 50% overlap a couple more times. Then I moved my laser line back half of my reach and repeated. This guaranteed that I overlapped the previous line by about half again. So every part of the floor probably got rolled over more than 8 times. And the results were awesome, it looks super uniform and no issues with clumping. The previous clumping is still there but, but it’s not apparent because it isn’t a low spot anymore. I’m very happy I used the minimum amount of the anti-slip because after the second coat I essentially put down the max recommended, having done the minimum twice.
The only real mess up I had with the second top coat was due to my dog. While I was deep in thought surveying the floor the morning after the first attempt, she had crept in behind me. When I realized I put her out and cleaned up a couple paw prints, well turns out I missed a couple and didn’t catch it before putting down the second top coat. So her prints are now definitely there for the lifetime of the floor, but honestly I wasn’t even mad. I love the crazy lady and it’ll be a nice reminder years down the road. There was also one bug that got into the top coat and left some tracks, but I’m sure they’ll disappear with use.


Final Thoughts:
I’m happy with the floor, and due to my mess-up I’ve got two coats of the military top coat. When the light hits the floor just right I can see a lot of imperfections in the floor, but the flecks really help hide a lot of it. And given the floor was crazy bad to begin with, I’m more than happy with how it turned out. Using the large floor grinder machine probably would have caused more problems given my circumstance. And for less than the cost of the rental, I got a new big grinder to show for it. I still need to do my 3rd bay, so that is on my list next. But first I need to get around to ordering more top coat, I’ve got enough anti-slip to last me that last bay. The floor has now been done a week and I’ve started moving my tool boxes and random junk back in. Any marks left from the tool boxes disappeared just rubbing it with a finger. So far, looks like it’ll last.
Final Advice: Roll the hell out of the top coat to get a good uniform appearance of the anti-slip. If using the repair putty, be aware when filling larger areas it may shrink a bit requiring a second coat to really get it level.
Products: Master Kit Armorclad Racing Blue w/Black, White, Gray Fleck (Options: Primer and Military Top Coat)
Add On Kit Armorclad Gray w/Black, White, Light Blue Fleck (Options: Primer and Military Top Coat)
-This add on kit will be used in my third bay, yet to be accomplished.
Epoxy Repair Putty
6-Pack of 18" Epoxy Rollers
Various Containers and Buckets
2 Paint Roller Poles
Spike Shoe Attachments
9"-18" Roller Attachment
Prep:
After reading some negative stories of people using the floor grinder rentals I decided to go with a 7"/9" Milwaukee hand grinder with the vacuum shroud/grinding wheel from Harbor Freight. My floor was heavily stained but it did have some type of sealer on it, and I was pleasantly surprised that the all the stains were relegated to the top sealer, they all disappeared with the sealer being ground off. This ended up being a great choice for my situation, but man was my back sore afterwards. I never realized just how not smooth/level my floor was until even my 7" grinding wheel was revealing so many low spots / high spots like waves everywhere. Even using the hand grinder I got down to aggregate quickly in some spots trying to get it all smooth. So I ended up just being okay with making sure I hit all the spots with the grinder, and it wasn't going to be smooth. Grinding really did help smooth it out, but it was never going to do enough to fix the larger dips / hills. And again, I didn't really even realize they were there through normal use of my garage. Having the vacuum shield really really helped keep control of the grinding disc, I had also got a 4" wheel for some tighter spots and immediately abandoned that idea because of how wild it was without the vacuum shield to help with stability. It probably took me 16 hours of grinding to get it all done, broken up between 3 or 4 days after work. I had to take the filter out of my shop vaccum and beat it inside of a trash can probably every 20 minutes. Luckily the vacuum survived no issues, can't say the same for the filter. I ended up putting in a fresh filter for the very last vacuum step before crack fill / primer.
Crack Fill:
Grinding off the sealer also revealed just how many spider cracks I had in the floor. Seemed like they were everywhere. The shop was built sometimes in the late 90s / early 2000s I was told by a neighbor. I got the ArmorPoxy Crack Repair Putty to help seal the cracks and around where the slab meets the block foundation wall. I also used it in about 3 parts where the grinder got away from me and left a gouge. According to the instructions the putty was essentially good to be covered immediately. I went a bit overboard and spent about 6 hours filling cracks, then got the primer down around 4pm. I’ll go into the results in the primer section.
The Plan:
I had a good 5 days before rain was going to start and not being insulated/air sealed, I needed to get everything down and curing before the humidity jumped up. Temps were also barely in my favor, my lows were around 50 and highs around 70. I think one of the nights got down 45. Because I had a semi small window to get things down before it got cold, my plan was to get the primer down a little later in the day right before the temp peaked. Then let it cure overnight and get the next layer down around noon the next day. Then finally the top coat earlier in the morning on the 3rd day. Instructions I believe said don’t go longer than 20 hours between coats, I definitely flirted with that line and hoped that the low temps meant realistically that 20hr time limit was longer given the slower time to cure. Given dry/recoat times I was a little stuck with this schedule. During that week humidity levels were flirting with max allowed in the mornings and at night, when I would need to be putting down the product to get 2 layers done in a single day. And I’d be putting them down when the temps were near the lowest levels allowed. So I think my plan was the best I could do.
Primer:
I mixed up 1.5 gallons of primer at a time, which allowed me to do one bay then do the second bay with the second mix. I poured the primer down in in rows and then used the supplied squeegee to help move the primer around followed by an 18” roller to back roll it. Honestly you could probably get away with not using the squeegee, but it did help. I was a little disappointed with the crack filler. It had shrunk slightly between putting it down and the primer curing overnight. I really forced it into the holes/gouges when applying it and used a metal putty night scrape it clean even with the surface. I don’t know if the concrete absorbed some of it, or if it really did just shrink a little while curing. Again timing was important, the instructions for the epoxy mentioned something about more work if you wait too long between the filler curing and getting the primer down. So I opted to get the primer down a few hours after finishing the crack repair. I hoped that later the Armorclad was going to be thick enough fill in the imperfections and hide it. Ultimately most of the cracks were hidden, but the gouges weren’t given they were larger. I can just barely grab the edge with a finger nail, so it’s apparent when the light hits it just right. This I not a big knock on the crack repair putty, knowing what I know now I would have done a second application of it before putting the primer down. Honestly at this point all the grinding work had me just wanting this process to be over lol I’m still happy with the results. This floor was in rough shape and it was never going to be perfect short of ripping it all out and pouring new concrete.
Armorclad: Racing Blue
Now the fun really began. I decided to break this up into 4 parts, so half of a bay at a time. I also got the spike shoe setup from ArmorPoxy. I highly recommend getting some Locktite on the nuts holding on the spikes, its not really possible to get them tight because they slip in the plastic holding the head of the bolt/spike flush the surface. So can’t get a wrench on that side and tightening the nut on the bottom easily rotates the head in its cutout. I did the Loctite the night before. It’s definitely a learning experience working those spikes, given that my floor had low/high spots the spikes slipped in the epoxy constantly until I got the hang of it. I basically had to walk like I was in a full body cast keeping my legs directly under me as much as possible. Even then, if I hit the side of a high spot, my foot was sliding down no matter what, then I had to backroll it again.
I finished the first section and coming back for the second, I then found about 9 dead spiders on the ground, so FYI the fumes are strong enough to kill spiders up in the rafters. Luckily none of them fell in the epoxy, so quick cleanup.
I highly highly recommend the 18” rollers if doing larger areas, greatly cut down on how much time it took to get things covered. I was doing this solo so timing was important getting everything done. My tempo was roll out section, throw the flecks, then go out and mix more, and repeat. The spikes helped throwing the flecks further in, but I was terrified of having to back roll over the flecks if my spikes slid. So I never went very far into the epoxy for that part. I learned it really helps to act like you are about the throw some dice with the fleck in your hands before tossing it up in the air. I had some clumps survive even 9 feet in the air tosses. After I started doing the dice move, no more issues and I tossed it up just above my head height. I ended up not using all the fleck, I had weighed it out and broke it into 4 sections. I want to say it weighed in at 6lbs and I had almost exactly 1lb left over from each section. So I only used 0.5lbs per section and ended up with 4lbs extra. To each their own on how much fleck to use. I was scarily consistent with how much I used, I just went until I liked the spread. And honestly, there are definitely some areas with more coverage than spots next to it, but once stuff is moved in its not going to be noticeable. Always a learning experience. I unintentionally ended up going a little too heavy on areas where 1 section met another. And later I did find one spot where a few spikes slid a little and left a gap in the epoxy. I’ll call that a win given the floors unevenness, nobody will ever notice.
I was also pleased to see that the epoxy was did fill in the cracks that were still visible after the putty and the primer. Just some of the gouges remained visible from certain angles. There was only one small spot that it looks like the epoxy wrinkled up a little bit, no idea what caused it. I grinded everything down and saw no stains left before starting. All I can think is maybe some sweat dripped in that area or something. No idea.
Top Coat:
I went with the 2-Part Military Top Coat. I used the minimum amount suggested for the anti-slip stuff, which I’m super glad I did after my results (my mess-ups). I mixed up all of it up at once and carried the bucket around with me with the mixer and drill. I would mix it up for 20 to 30 seconds then pour some into the paint pan, basically just enough for the roller to soak up and then rolled it onto the floor. Rinse and repeat. This is where I had 2 mess ups, 100% my fault. I thought I was doing good enough mixing it up constantly, but some of the anti-slip did stay in the bottom of the pan where on the next go a clump of it would get stuck on the roller where it would then get deposited down on the ground with clomping going on. This isn’t necessarily bad if you properly roll the hell out of it, but I didn’t. I treated it like paint, each part of the floor probably got 2 maybe 3 passes with the roller. This left those clumps in place. My 2nd screw-up, I missed a 4” wide by 2’ section completely. It’s hard to see your coverage when putting it down and apparently I messed up with my points of reference while working across the bays.
The next morning I went out to look at floor and the clumping was apparent in many locations. Know how water kind of beads up on smooth surfaces? It looked sort of like that, but the places between the beads were heavily concentrated with the anti-slip stuff. So it wasn’t just that the clumps existed, it’s that they stuck out because the top coat kind of beaded up around those clumps making a low spot where the clumps were. Luckily I had bought the add-on kit to do my 3rd bay and they had given me another full order of top coat, enough to do another 600 sq ft. After lots of going back in forth in my head, I quickly got my stuff back together and used the rest of my top coat to do another coat. I was quickly approaching the deadline to do another coat. I’ll now sadly need to order more when I do the 3rd bay, which will be around $270 plus shipping last I looked. But it was my fault, lesson learned.
I quickly got the second coat down and this time I went a bit nuts with it. I mixed in the minimum recommended amount of the anti-slip stuff. I used my laser level to shoot a line across the floor. I rolled it back and forth with overlapping by 50% going the length of the floor. Then I rolled it perpendicular, to previous direction. And then finished up by rolling it back and forth with 50% overlap a couple more times. Then I moved my laser line back half of my reach and repeated. This guaranteed that I overlapped the previous line by about half again. So every part of the floor probably got rolled over more than 8 times. And the results were awesome, it looks super uniform and no issues with clumping. The previous clumping is still there but, but it’s not apparent because it isn’t a low spot anymore. I’m very happy I used the minimum amount of the anti-slip because after the second coat I essentially put down the max recommended, having done the minimum twice.
The only real mess up I had with the second top coat was due to my dog. While I was deep in thought surveying the floor the morning after the first attempt, she had crept in behind me. When I realized I put her out and cleaned up a couple paw prints, well turns out I missed a couple and didn’t catch it before putting down the second top coat. So her prints are now definitely there for the lifetime of the floor, but honestly I wasn’t even mad. I love the crazy lady and it’ll be a nice reminder years down the road. There was also one bug that got into the top coat and left some tracks, but I’m sure they’ll disappear with use.
Final Thoughts:
I’m happy with the floor, and due to my mess-up I’ve got two coats of the military top coat. When the light hits the floor just right I can see a lot of imperfections in the floor, but the flecks really help hide a lot of it. And given the floor was crazy bad to begin with, I’m more than happy with how it turned out. Using the large floor grinder machine probably would have caused more problems given my circumstance. And for less than the cost of the rental, I got a new big grinder to show for it. I still need to do my 3rd bay, so that is on my list next. But first I need to get around to ordering more top coat, I’ve got enough anti-slip to last me that last bay. The floor has now been done a week and I’ve started moving my tool boxes and random junk back in. Any marks left from the tool boxes disappeared just rubbing it with a finger. So far, looks like it’ll last.
Final Advice: Roll the hell out of the top coat to get a good uniform appearance of the anti-slip. If using the repair putty, be aware when filling larger areas it may shrink a bit requiring a second coat to really get it level.