blacksporty
Well-known member
Background:
I am the 2nd lucky winner of the contest Armorpoxy ran a few months back, for a free water based low VOC epoxy 2 car garage floor kit. With that said, I did receive the product and most of the installation tools for free, just had to pay shipping which is more than fair.
I have had some Armstrong VCT tiles and glue in my garage for 2 years, still in the boxes because I never got around to installing them so now, I have to get this done.
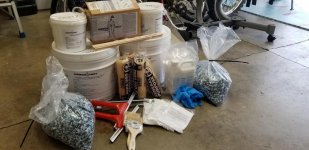
When I was notified that I won, I was surely surprised, I haven’t won anything since 1980, so I figured I wouldn’t win. I let Armorpoxy know that I actually have a 3 car (small 640 sq/ft) garage and was willing to pay for the additional product needed. They graciously sent me the additional material at no charge. This included a two-part (A and B) water based low VOC epoxy base coat in light grey. I also received a two-part (A and B) water based low VOC epoxy top coat. Also included were 2 large bags of flecks in black/white/blue color, Armorpoxy floor etch and 4 bags of Armorgrip anti-slip topcoat additive. Along with that, I received all the tools necessary, stirring sticks, gloves, rollers, 2 stirrers to attach to a drill, 2 hand squeegees to complete package. They also threw in a half gallon kit of Armorpoxy crack patch/ filler. The additional items I bought were some small pails or buckets with measurements on the side from Home Depot so I could get the measurements right.
The Garage:
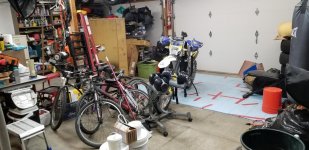
My garage is your California standard 1973 smallest 3 car you can get 27 x 22, I have seen 2 garages larger than this. It is used for working on cars, dirt toys and storage. We don’t have basements or attics here so I don’t keep cars inside. As you can see it is pretty packed so the pre-prep was getting everything out. Took a few hours a day for a week to empty it.
Prep:
I had some plastic tiles that my son used to practice hockey. A few months ago, I had spilled about ½ quart of oil on them. I put down oil dry within 30 seconds thinking I was good; little did I know when I removed them, I had a big surprise waiting for me. So, I put down more oil dry and let is sit for a couple days, redistributing it every few hours. I proceeded to degrease the entire floor with Zep and repeated it at full strength on the oil-soaked area. I then power washed the floor and used a scraper to get off small paint drips and other contaminants left over the last 47 years. After that I used the Armorpoxy etch. I considered renting a grinder but I figured that Armorpoxy said that this product didn’t need it and also the reason for this free product is so that they could get feedback and based on that I decided not to. The etch I mixed it with warm water per the instructions and broomed it onto the floor. After letting it sit for 15 minutes, I scrubbed it some more then rinsed it, following with another session with the power washer and squeegee.
After drying for 24 hours, I started filling in the cracks. My garage does not have saw cuts, more like expansion cracks. In fact, the middle of the 2-bay part of the garage is about 1.5 inches taller than the sides. I applied the 2-part Armorpoxy crack filler. After that curing for 24 hrs. I sanded down the imperfections with a belt sander and 80 grit. I vacuumed the entire floor then filled a few low spots with the crack filler and was ready to tackle the job at hand.
First Coat:
A couple days before I started, I sent Armorpoxy a couple pics and we talked on the phone. They were going to send me some spike shoes so I could apply larger sections but we decided that they would not get across the country in time. I ended up buying some locally.
I mixed the grey product 4:1 in small batches, with only 1 hour pot life I didn’t want to mix too much at once. I probably was too conservative on this because the whole job took just a little over 2 hours. I poured the mixture directly on the floor in small sections and rolled it out with the supplied roller. Temp was 69F when I started and 73F when complete. I check the surface for dryness every 2 hours, per advice from Armorpoxy and it was dry to the touch after 6 hours.
The color flakes…. this was my downfall. At first, I was not going to do any color flakes, I already lose enough nuts, bolts, screws and washers on a standard floor so I was going to go with solid grey. Then I decided that my floor has so many flaws that in order to camouflage them I would go ahead and to the flakes. The first section I was going for full broadcast and it was going well until I realized that the product provided was not going to cover my whole floor. I spread the rest lighter but made many mistakes where some areas had too much and some too little. That was all on me, rookie errors. I figure that by the time I have everything back in to garage it won’t matter much.
Top coat:
After letting the coating dry over night, I scraped the floor with a drywall knife to remove the excess and break off the flakes that were standing. I then swept the floor, then vacuumed the floor with a shop vac. Ended up getting a lot of excess flakes.
I mixed up the material and poured it into a roller tray, Armorpoxy recommended this so it goes down thinner and reduces the amber hue that is can leave if applied too thick. Most of the floor dried in a clear semi-gloss, there were a few places where I should have rolled it out a little thinner. I did not use the anti-slip additive; I felt the flakes would provide adequate slip protection and with southern California being relatively dry I didn’t see the need.
The topcoat also seemed to dry to the touch after about 6 hours, it was 85F when I applied it at around 1:00pm. I waited 24 hrs. before stating to put all the stuff back in. Rolling floor jacks and rolling bins seem to have no effect on it. At about 40 hours I rolled in the tool box and did leave some slight wheel marks, the refrigerator did leave some very noticeable marks on the floor.
As far as low VOC goes, this product does not smell as all, paint has a much stronger odor than this.
Conclusion:
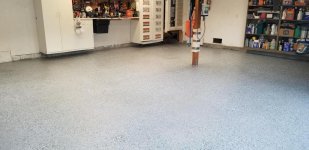
Been 3 weeks now, most of the stuff has been moved back in. When moving the dirt bikes around there are tire marks left behind but they come off about 90% using a magic eraser. I have cleaned up spilled oil with simple green. I have used brake cleaner to degrease an oil leak and wiped it up off the floor with seemingly no ill effects. Overall happy with the coating, if it weren't for my rookie mistakes.
I am the 2nd lucky winner of the contest Armorpoxy ran a few months back, for a free water based low VOC epoxy 2 car garage floor kit. With that said, I did receive the product and most of the installation tools for free, just had to pay shipping which is more than fair.
I have had some Armstrong VCT tiles and glue in my garage for 2 years, still in the boxes because I never got around to installing them so now, I have to get this done.
When I was notified that I won, I was surely surprised, I haven’t won anything since 1980, so I figured I wouldn’t win. I let Armorpoxy know that I actually have a 3 car (small 640 sq/ft) garage and was willing to pay for the additional product needed. They graciously sent me the additional material at no charge. This included a two-part (A and B) water based low VOC epoxy base coat in light grey. I also received a two-part (A and B) water based low VOC epoxy top coat. Also included were 2 large bags of flecks in black/white/blue color, Armorpoxy floor etch and 4 bags of Armorgrip anti-slip topcoat additive. Along with that, I received all the tools necessary, stirring sticks, gloves, rollers, 2 stirrers to attach to a drill, 2 hand squeegees to complete package. They also threw in a half gallon kit of Armorpoxy crack patch/ filler. The additional items I bought were some small pails or buckets with measurements on the side from Home Depot so I could get the measurements right.
The Garage:
My garage is your California standard 1973 smallest 3 car you can get 27 x 22, I have seen 2 garages larger than this. It is used for working on cars, dirt toys and storage. We don’t have basements or attics here so I don’t keep cars inside. As you can see it is pretty packed so the pre-prep was getting everything out. Took a few hours a day for a week to empty it.
Prep:
I had some plastic tiles that my son used to practice hockey. A few months ago, I had spilled about ½ quart of oil on them. I put down oil dry within 30 seconds thinking I was good; little did I know when I removed them, I had a big surprise waiting for me. So, I put down more oil dry and let is sit for a couple days, redistributing it every few hours. I proceeded to degrease the entire floor with Zep and repeated it at full strength on the oil-soaked area. I then power washed the floor and used a scraper to get off small paint drips and other contaminants left over the last 47 years. After that I used the Armorpoxy etch. I considered renting a grinder but I figured that Armorpoxy said that this product didn’t need it and also the reason for this free product is so that they could get feedback and based on that I decided not to. The etch I mixed it with warm water per the instructions and broomed it onto the floor. After letting it sit for 15 minutes, I scrubbed it some more then rinsed it, following with another session with the power washer and squeegee.
After drying for 24 hours, I started filling in the cracks. My garage does not have saw cuts, more like expansion cracks. In fact, the middle of the 2-bay part of the garage is about 1.5 inches taller than the sides. I applied the 2-part Armorpoxy crack filler. After that curing for 24 hrs. I sanded down the imperfections with a belt sander and 80 grit. I vacuumed the entire floor then filled a few low spots with the crack filler and was ready to tackle the job at hand.
First Coat:
A couple days before I started, I sent Armorpoxy a couple pics and we talked on the phone. They were going to send me some spike shoes so I could apply larger sections but we decided that they would not get across the country in time. I ended up buying some locally.
I mixed the grey product 4:1 in small batches, with only 1 hour pot life I didn’t want to mix too much at once. I probably was too conservative on this because the whole job took just a little over 2 hours. I poured the mixture directly on the floor in small sections and rolled it out with the supplied roller. Temp was 69F when I started and 73F when complete. I check the surface for dryness every 2 hours, per advice from Armorpoxy and it was dry to the touch after 6 hours.
The color flakes…. this was my downfall. At first, I was not going to do any color flakes, I already lose enough nuts, bolts, screws and washers on a standard floor so I was going to go with solid grey. Then I decided that my floor has so many flaws that in order to camouflage them I would go ahead and to the flakes. The first section I was going for full broadcast and it was going well until I realized that the product provided was not going to cover my whole floor. I spread the rest lighter but made many mistakes where some areas had too much and some too little. That was all on me, rookie errors. I figure that by the time I have everything back in to garage it won’t matter much.
Top coat:
After letting the coating dry over night, I scraped the floor with a drywall knife to remove the excess and break off the flakes that were standing. I then swept the floor, then vacuumed the floor with a shop vac. Ended up getting a lot of excess flakes.
I mixed up the material and poured it into a roller tray, Armorpoxy recommended this so it goes down thinner and reduces the amber hue that is can leave if applied too thick. Most of the floor dried in a clear semi-gloss, there were a few places where I should have rolled it out a little thinner. I did not use the anti-slip additive; I felt the flakes would provide adequate slip protection and with southern California being relatively dry I didn’t see the need.
The topcoat also seemed to dry to the touch after about 6 hours, it was 85F when I applied it at around 1:00pm. I waited 24 hrs. before stating to put all the stuff back in. Rolling floor jacks and rolling bins seem to have no effect on it. At about 40 hours I rolled in the tool box and did leave some slight wheel marks, the refrigerator did leave some very noticeable marks on the floor.
As far as low VOC goes, this product does not smell as all, paint has a much stronger odor than this.
Conclusion:
Been 3 weeks now, most of the stuff has been moved back in. When moving the dirt bikes around there are tire marks left behind but they come off about 90% using a magic eraser. I have cleaned up spilled oil with simple green. I have used brake cleaner to degrease an oil leak and wiped it up off the floor with seemingly no ill effects. Overall happy with the coating, if it weren't for my rookie mistakes.