

vavet
Well-known member
I wrote this several months ago, but never posted it. I've had the ArmorPoxy floor now for about 9 months. It's great. I have one chip in it where I dropped a rear Mazda5 brake rotor about 5 feet onto the floor. It is not indestructible, but it's pretty darn nice.
A lot of people won't be happy with white. I love it. My garage is a working shop. It's not a showplace. It looks dirty. I'm ok with that. If you're not OK with that, then order tan or gray. I love the reflectivity of the white.
I ordered my white ArmorPoxy UltraArmor job-on-a-pallet Oct 4. It was delivered less than a week later. I had many questions as I went through the preparation and application of the 3 layers. ArmorPoxy always answered my email questions quickly, even on Saturdays. I opted for the 3-layer UltraArmor system. Color choice: white, no flakes.
A couple points of criticism:
1. A job-on-a-pallet should be exactly that. Mine did not include the notched squeegee they recommend or the roller pans you need for 18” rollers.
2. I had to call back to order additional UltraArmor epoxy (the second and thickest layer). I think the recommendation to pour it onto the floor, spread with a notched squeegee, and then backroll lightly is a bad idea. Perhaps it works if you know what to expect. I didn’t. That was a costly mistake in time and money. The UltraArmor applied to the second half of my garage with a roller and only a roller was much more even than the first half and I was never in danger of running out. To their credit, they discounted the second order. I should’ve stopped after I applied the first gallon and it was clearly not going far enough. That would’ve saved me some of the expense.
A few things to watch out for, especially if you’re a first-timer:
1. Three days max between layers. Life gets in the way. It’s not the end of the world, but you have to scuff with sandpaper if you wait more than 3 days. It’s another time consuming step to sand, sweep, and vacuum and it’s boring to scuff 700 square feet.
2. Wear a ventilator and disposable gloves. I hate painting. This is why. The cleanup *****. It’s worse when it’s on the floor and you have to plan your escape. The gloves will inevitably get the product on it, which transfers to your roller handle, drill (mixing next batch), door knob, etc. I forgot the proper way to wear my ventilator when I was doing the initial ArmorPoxy II as the primer coat. The fumes about knocked me out by the time I was done.
3. I had several spiders and other bugs die during the process. I’d finish a coat one day. There’d be 3 spiders with their legs half-embedded in this beautiful white floor the next day. Dead bugs sand away with 220 grit pretty nicely though.
4. Use a brush, not a pad for the edges. This is especially true on the topcoat with the grit. The instructions warn you to stir the product frequently because the grip additive will settle out. I adhered to those instructions, except around the edge. I can definitely see a difference. If I’d used a brush, I could’ve dipped that into my mixing bucket to give it a stir before applying the product.
5. If you wear glasses, have a plan for them. Mine don’t fit with my ventilator real well. I ended up with paint on my glasses because they almost fell off a few times.
6. I bought the plastic buckets from Home Depot with the graduations on the side to make sure I mixed things in the correct ratios. This worked well.
7. Temperature is key. When I started this process, I was in the sweet spot of 60 to 90F. By the time I got to the final coats in the last week, I had to wait for a warmish day and then use my propane bullet heater to help raise the temp.
A few points of praise:
1. Great email response from ArmorPoxy. Typically less than 2 hours, even on Saturday. They certainly exceeded my expectations here.
2. The spike shoes are an absolute must-have. As you move and glare from the light moves, you notice thin areas. It’s nice to be able to walk on a wet floor to reach them.
3. The 18” rollers are amazing. Use a broom handle to attach to the roller frame so you’re not stooping to apply.
Overall, I’m happy with the product and the company. Time will tell how it holds up.
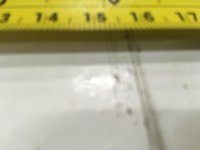

 That's definitely a stuck caster wheel under weight or something similar. That's difficult for any type of coating to prevent scratching.