To avoid these ads, REGISTER NOW!

Atlas 4 Post Lift Leaning

Zedder

Well-known member
Joined
Jul 21, 2005
Messages
100
Location
Oakville, Ontario
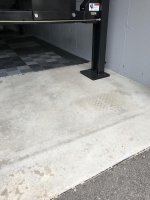
I had a 4 Post Lift installed a few weeks ago and not bolted down. I mentioned to the installer that I didn’t like how the rear post was leaning due to the floor being uneven and he said that it was fine as is. I didn’t have a car to put on it at the time, but when my 67 Camaro got delivered a few weeks later and I put it up, I didn’t feel comfortable at all (see pic below without a car on the lift).

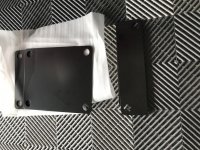
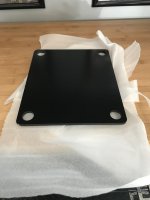
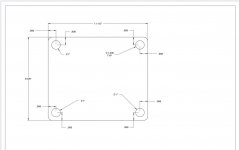
I measured my floor and there is a 3.5 inch drop between the columns from front to Back and there is 3/4 inch difference between the 2 rear columns with the low column furthest from the wall. So, I am getting it bolted down by another installer in a few weeks. I’ve read the manual and it appears to me that I simply have to fix the 2 rear columns do they are on the same plane and I can leave the 3.5 inch drop front to rear as long as it is bolted down. Can anyone more experienced confirm this?
 

Attachments

  • 253ED0AE-0BCC-4B00-80BF-E22A6FAD8DA0.jpg
    253ED0AE-0BCC-4B00-80BF-E22A6FAD8DA0.jpg
    99.4 KB · Views: 548
To avoid these ads, REGISTER NOW!

infinkc

Well-known member
Joined
Jan 19, 2012
Messages
862
I would try and have it leveled out. 3.5” is a pretty big slope.
 

MrSurly

Well-known member
Joined
Jan 15, 2014
Messages
1,671
Location
East Texas
Check the install manual. I’m fairly certain that it says words to the effect that the floor must be level.


Sent from my iPhone using Tapatalk
 

Chevy-SS

Well-known member
Joined
Feb 11, 2010
Messages
1,492
Location
Rhode Island
I put a Challenger 4-poster in my garage a few years ago by professional installers (not bolted down). I had a small issue where one of the safety latches hung up and I almost lost my truck off the lift. I had it bolted down the very next day. They used small wedges under the posts to level them out where necessary.

These things (lifts) are dangerous. You can search on the internet and see episode after episode of bad things happening, so it's best to be extra careful.

You may be able to make some sort of adjustment to level the ramps out, by using blocks or other method(s) to raise the lower end(s). I would think this would be OK so long as it was securely bolted in place. Of course, check with a qualified installer.

Main thing is - be safe!!!!! You want that thing rock-solid.
 

66Caprice

Well-known member
Joined
Nov 15, 2009
Messages
905
Location
Stanwood, Washington
Yes you need to get something under those back legs to level them out. My 4 post is on a 1/2 inch thick plate for the front legs to level it up. Like mentioned already. It will go up and down. But eventually those locks and legs will bind up and get stuck. Try to level it up as much as possible on all four legs. Your installer sounds like a lazy *** d___!
 

glentre

Well-known member
Joined
May 21, 2016
Messages
909
Location
Gloucester, Virginia
My three year old four post Eagle lifts are installed unbolted on a floor with a slope front to back but level side to side. When first set up, the front locks would engage well before the rears and if raised higher so the rears would engage and then let down on to the locks, the ramps would be sloped to match the slope of the floor. Adjusting the cables in the two rear columns fixed the problem and now the lifts raise level and the locks all engage at the same time. Maybe not all four post lifts have this kind of adjustment at each of the columns and would require shims to resolve the slope condition.

Glen
 
OP
Z

Zedder

Well-known member
Joined
Jul 21, 2005
Messages
100
Location
Oakville, Ontario
Thanks Guys!

Dakota...I’ve read your thread a number of times. Nice job! I’m having 1/4 inch base plates laser cut this week to fix most of the front to back slope and all of the side to side slope.
 

Attachments

  • D94C57D8-5559-45EA-BF6C-992269648CC0.jpg
    D94C57D8-5559-45EA-BF6C-992269648CC0.jpg
    52.5 KB · Views: 162

Dakota00

Well-known member
Joined
Mar 9, 2008
Messages
1,078
Location
Woodbridge, Ontario
Thank you!

Smart move on getting some base plates made. My buddy was dealing with a similar situation as yours. He got some base plates made up as well, plus some metal shims too. The shims were used to straighten up the posts that were leaning. With that said, I was able to get his lift nice and true, once everything was bolted down.
 
OP
Z

Zedder

Well-known member
Joined
Jul 21, 2005
Messages
100
Location
Oakville, Ontario
Hey Dakota, do you think you could get your buddy to send you some pics of his instal with the plates so you could post them here? Would love to see them!
 

logical

Well-known member
Joined
Aug 31, 2005
Messages
2,465
Location
Northern fringe of the Motor City Suburbs
I had almost that much slope because my garage is L shaped and to get both doors to the same level outside it just kinda had to be that way. It was the right thing to do since in MI we need melting snow on vehicles to drain toward the outside. It was even as much as 1/2 inch off within one of the plates.

I did shims out of glass reinforced composite material. The layers are glued and drilled for the bolts and aren't moving. Compressive strength is actually higher than concrete....kind of like big square, four hole washers. By using partial layers I could sort out the overall slope and the issue within the 4 plates. I know not everyone has a big stack of composite lab test plaques laying around but I did so why not. The downside is the runways are about 8 inches above my driveway so I had to get long ramps...and had to bolt it down, which I planned to anyhow because it really wont fit anywhere else and is too tall to move outside.

Id rather deal with those things than have a wonky, wiggley lift.77fea0ef26034016f4d7052b456ab7a7.jpgb5d0b17d9c42b6661444192edc209583.jpg

Sent from my garage.
 

Attachments

  • 77fea0ef26034016f4d7052b456ab7a7.jpg
    77fea0ef26034016f4d7052b456ab7a7.jpg
    29.7 KB · Views: 12
  • b5d0b17d9c42b6661444192edc209583.jpg
    b5d0b17d9c42b6661444192edc209583.jpg
    294 KB · Views: 12
Last edited:
OP
Z

Zedder

Well-known member
Joined
Jul 21, 2005
Messages
100
Location
Oakville, Ontario
Thanks Logical...that is very helpful! Did you assemble your lift and then put the spacers in? If so, how did you raise the column foot that high? My casters only raise the foot about 1/2-3/4 inch and I'm not sure how I go about lifting higher since it is fully assembled? Thanks!
 

logical

Well-known member
Joined
Aug 31, 2005
Messages
2,465
Location
Northern fringe of the Motor City Suburbs
Thanks Logical...that is very helpful! Did you assemble your lift and then put the spacers in? If so, how did you raise the column foot that high? My casters only raise the foot about 1/2-3/4 inch and I'm not sure how I go about lifting higher since it is fully assembled? Thanks!
Honestly I forget the order I did things in. I did the install myself using a cherry picker/engine hoist. If I had to do what you need to do with that I'd probably wrap and clamp a sling around the post midway up and use the cherry picker to lift one corner. I think I made my stacks first and probably placed the posts on them early in the process.


Sent from my garage.
 
To avoid these ads, REGISTER NOW!

boatshoes

Well-known member
Joined
Feb 20, 2019
Messages
126
Location
Atlanta
Thanks Logical...that is very helpful! Did you assemble your lift and then put the spacers in? If so, how did you raise the column foot that high? My casters only raise the foot about 1/2-3/4 inch and I'm not sure how I go about lifting higher since it is fully assembled? Thanks!

I strapped my crossbeams to the posts and was able to lift an entire end with a floor jack and some wood as seen here on the left
 
OP
Z

Zedder

Well-known member
Joined
Jul 21, 2005
Messages
100
Location
Oakville, Ontario
I had some time yesterday to investigate a little further. I bought a 360 degree laser level and measured the slope at my columns. At the front I have 1/4 inch From the wall column to center column. At the rear it is 3/4 inch wall to center. Front to back slope is 3 3/8 inches between the columns. My manual states that columns must be on the same plane and that the slope can’t be more than 1/8 inch per foot, which would be 1.6 inches between columns, or it must be bolted down.

I had these full size 1/4 inch thick base plates laser cut and I’ll use them to take the size-to-side slope away. Since I am bolting it down, I don’t have to take the front to rear slope away, but will use 1 1/2 inches on each rear post to make it more level front to back.

I also need to move the lift away from the wall so that the bolt holes are 6 inches from the slab edge. As you can see, this cuts into the bay a good amount, but still leaves me about 4 inches of clearance on each side of my SUV when entering the garage.
 

Attachments

  • 9874A92D-DF9D-4AF1-88B3-FCB5400FDF23.jpg
    9874A92D-DF9D-4AF1-88B3-FCB5400FDF23.jpg
    108.2 KB · Views: 128
  • 5FCB2F60-2518-41B9-BE22-49F7A1EEFAEE.jpg
    5FCB2F60-2518-41B9-BE22-49F7A1EEFAEE.jpg
    139 KB · Views: 117
  • 58835F0F-5E0E-461D-9561-DAFEFF5DF240.jpg
    58835F0F-5E0E-461D-9561-DAFEFF5DF240.jpg
    142.4 KB · Views: 129
  • 6900C54F-C03B-4B42-B0ED-29BE0783269C.jpg
    6900C54F-C03B-4B42-B0ED-29BE0783269C.jpg
    90.3 KB · Views: 143

infinkc

Well-known member
Joined
Jan 19, 2012
Messages
862
Nice, lift manufacturers should really sell those spacer plates. If it were me I wouldn’t be too concerned if you move the lift closer to the wall, since 4 post are designed not to be bolted down. The bolts are there for just securing it down and not for major support like a 2 post. My garage I would move it.
 

napa68

Well-known member
Joined
Mar 12, 2011
Messages
51
Location
Wisconsin
Mark,

FWIW, you should contact the company you bought that from. I'm sure they'd like to know about the installer and his advice. It's a liability to say the least.

How 'bout some pics of your Camaro on that new lift?;)

Tim
 
OP
Z

Zedder

Well-known member
Joined
Jul 21, 2005
Messages
100
Location
Oakville, Ontario
Hey Tim!

Yeah, once the new installer checks it over I will for sure. I’m still pretty pissed off about the whole thing. Too afraid to put the Camaro up there again! How about one of it under the lift!
 

Attachments

  • 5B85C485-F6F2-420D-8CE4-B8D3F5181987.jpg
    5B85C485-F6F2-420D-8CE4-B8D3F5181987.jpg
    147.8 KB · Views: 109

muckdp

Active member
Joined
Aug 26, 2011
Messages
44
If it were me I wouldn’t be too concerned if you move the lift closer to the wall, since 4 post are designed not to be bolted down. The bolts are there for just securing it down and not for major support like a 2 post. My garage I would move it.

Yeah, same here. It wouldn't bother me to have it closer to the edge of the slab in this scenario.
 

glentre

Well-known member
Joined
May 21, 2016
Messages
909
Location
Gloucester, Virginia
For those who install spacer plates under their columns on a four post lift that is not bolted down, it might be wise to tack weld the spacers to the columns. My four post lifts show signs of the columns moving on the floor after a few years of loading cars on and off them. I think this is caused by the front wheels of the car bumping the ramps while loading in the full down position.

Glen
 

king nero

Well-known member
Joined
Dec 27, 2010
Messages
1,469
Location
Belgium
I'm just afraid that if I get too close to the edge, the slab will crack or break off.

Do you have the same concern if you would drive your vehicle at that location, that the slab would break?

Remember that that you're basically talking the same weight ( the car + the weight of the lift), but with a substantial larger footprint (4x the baseplate of the lift vs. 4x the contact patch of the tire).
 
OP
Z

Zedder

Well-known member
Joined
Jul 21, 2005
Messages
100
Location
Oakville, Ontario
Do you have the same concern if you would drive your vehicle at that location, that the slab would break?

Remember that that you're basically talking the same weight ( the car + the weight of the lift), but with a substantial larger footprint (4x the baseplate of the lift vs. 4x the contact patch of the tire).

I'm not concerned with the load on the floor itself. It is the stress cone created by the anchor that is the issue. Too near the edge of the slab and you do not have enough material to handle the stresses and the concrete cracks or breaks away.
 

Attachments

  • GB_AnchorDesignImg11d2.png
    GB_AnchorDesignImg11d2.png
    9.5 KB · Views: 53
Last edited:

king nero

Well-known member
Joined
Dec 27, 2010
Messages
1,469
Location
Belgium
Then only use the bolt holes on the "inside" of the base plate if that's your concern. This will give you an additional few inches of margin.
The primary function ofthe anchors is shear, not tensile forces, and using only 2 of 4 (?) anchors will be more than sufficient.
 
OP
Z

Zedder

Well-known member
Joined
Jul 21, 2005
Messages
100
Location
Oakville, Ontario
Thanks...I thought about that. I should have enough room even with it 6 inches from the wall.
 

Attachments

  • 2A520788-8DF8-497B-AECB-564B74B1C6C9.jpg
    2A520788-8DF8-497B-AECB-564B74B1C6C9.jpg
    96 KB · Views: 51
  • 2DE5F3C2-BB24-44DD-8944-9DBED254B138.jpg
    2DE5F3C2-BB24-44DD-8944-9DBED254B138.jpg
    62.3 KB · Views: 50

jferrante

Well-known member
Joined
Nov 18, 2015
Messages
49
I just installed mine, garage slopes to center and decent slope front to back. They sell wedges to level the legs as well which is what I used and will now bolt it to the floor.38c7b014f5ed2f431716597dcf2122f2.jpg

Sent from my SM-N975U using Tapatalk
 

Attachments

  • 38c7b014f5ed2f431716597dcf2122f2.jpg
    38c7b014f5ed2f431716597dcf2122f2.jpg
    205.1 KB · Views: 10
OP
Z

Zedder

Well-known member
Joined
Jul 21, 2005
Messages
100
Location
Oakville, Ontario
Got the plates powder coated and put some in place today. This set-up gets the front and back posts on the same plane and reduces the slope from front to back to 3 inches. I have more plates, but I’m going to wait until the installer weighs in on whether I need to lessen the slope given that I am bolting it down.
 

Attachments

  • F8272252-3903-4EFE-A3ED-39E7982A26D3.jpg
    F8272252-3903-4EFE-A3ED-39E7982A26D3.jpg
    74.3 KB · Views: 44
  • C6BFC988-9616-42B5-989A-09AC0C6C436A.jpg
    C6BFC988-9616-42B5-989A-09AC0C6C436A.jpg
    161.2 KB · Views: 41
  • F7ACBE42-1007-41BA-B137-96CD82BD88C4.jpg
    F7ACBE42-1007-41BA-B137-96CD82BD88C4.jpg
    52 KB · Views: 42
  • 16650292-A57D-4801-A408-BFBBFEBA84FB.jpg
    16650292-A57D-4801-A408-BFBBFEBA84FB.jpg
    91.4 KB · Views: 55
To avoid these ads, REGISTER NOW!
Top Bottom