
You are using an out of date browser. It may not display this or other websites correctly.
You should upgrade or use an alternative browser.
You should upgrade or use an alternative browser.
Atlas 64 restoration
- Thread starter GeorgeG2
- Start date
bmw57isetta
Well-known member
GeorgeG2:
You're making progress. Now I need one of those spanners.
Let's start back at square one. Prior to disassembling your DP, did the spindle turn freely? Could you lower it and raise it easily? If not did you feel it binding up? If so, you might be dealing with a bent spindle. If it moved up and down (what you're trying to manually do now) and spun around, I can't see why you would have trouble removing it from the quill, much less having to pound on it. Maybe I'm missing something here.
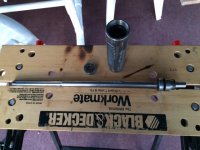
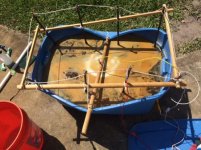
Since you're going to have to address it at some point, clean that ring of grease and crud the blue arrows on the attached pic indicate. You might also loosen or remove the set screw the red arrow points to. I'd bet that collar is the lower retainer that's lives at the bottom of the quill.
Stay on it with the penetrating oil as previously mentioned. It can only help. You're about one click away from being an Atlas drill press guru.
You're making progress. Now I need one of those spanners.
Let's start back at square one. Prior to disassembling your DP, did the spindle turn freely? Could you lower it and raise it easily? If not did you feel it binding up? If so, you might be dealing with a bent spindle. If it moved up and down (what you're trying to manually do now) and spun around, I can't see why you would have trouble removing it from the quill, much less having to pound on it. Maybe I'm missing something here.
Since you're going to have to address it at some point, clean that ring of grease and crud the blue arrows on the attached pic indicate. You might also loosen or remove the set screw the red arrow points to. I'd bet that collar is the lower retainer that's lives at the bottom of the quill.
Stay on it with the penetrating oil as previously mentioned. It can only help. You're about one click away from being an Atlas drill press guru.
Attachments

The quill did move freely when the DP was assembled. The spindle rotated pretty freely but the bearings are a bag of rocks so it was a little grumbly. The quill is cleaned up since that picture and there is no set screw it that red arrow opening even though it looks threaded so I don't know if one existed originally. During operation, the quill and spindle move vertically together as they are locked together with the locking collar above the threaded locking ring near the top of the quill. With the collar and ring removed the spindle should be able to move out of the quill but the spindle and quill share two bearing races that are as I understand it, are an interference fit. I guess its normal to need some force to slide the spindle out, as I have seen a couple of videos of guys pounding them out on other brands. I have done a couple of marine water pumps where this is the process but those all had very short and stout shafts that did not need to move much to come out. I will look everything over one more time before I start pounding to make sure that I am not missing a set screw or something. I also really loaded the whole thing up with penetrating oil last night and will let it sit for another day.
Does anyone know if the collar at the bottom of the spindle is supposed to be able to be removed? There is a pin through it and the spindle but it looks more permanent than the others. Every disassembly I have seen shows that part still in place but then the lower bearing has to go all the way up the spindle if it does not stay in the quill upon separation.
When I am finished with this project I intend to summarize the areas that need some guidance so that anyone who follows me might have an easier time. I also have my eye on another, smaller Atlas press for another garage because number two would be a breeze (famous last words).
Thanks,
George
Last edited:
bmw57isetta
Well-known member
That lower collar (see post #22, diagram part number 60-17) is a separate, removable part. The three DP's I've had experience with all had set screws holding them into the quill. It wouldn't surprise me if the Allen head of the screw got buggered up at some point. You mentioned that it appeared to be threaded. Perhaps a small Torx head driver will get it out of there.
That alone shouldn't stop the spindle from coming out though. Perhaps a good soaking and some coaxing is the solution after all. Please document your adventures at some point. Someone down the line will thank you for it.
That alone shouldn't stop the spindle from coming out though. Perhaps a good soaking and some coaxing is the solution after all. Please document your adventures at some point. Someone down the line will thank you for it.

Success!
You need a lot of force to get the spindle out of the quill. There are two bearings with a wicked interference fit. Additionally, the spindle is the same 0.625" its entire length (except the chuck taper) so the bearings have to move their entire travel against that fit. BTW, the two bearings in the top pulley assembly are metric - one each, 6204 and 6205 and the two bearings in the quill are SAE - both are 5/8 x 1 3/8 x 7/16 = 1623. The first two are easy to find but I am still researching the quill variety. I can find them but I may not be able to be picky about country of origin.
The top bearing stayed in the top of the quill and was easy to pound out from behind with a dowel but the lower bearing stayed on the spindle near the bottom just above the chuck collar. Does that lower bearing need to be moved the entire length of the spindle or do I need to unpin the collar and move it and the bearing down and off of the taper?
DO NOT, I repeat, DO NOT pound on the splined end of the spindle, even a little even though every you tube video shows this. Did I mention not to pound on the splined end of the spindle? Ask me how I know why that's bad? Think markem, triangle file and 2 hours to reshape all of the spline channels. Think oak blocks and pounding on the quill with the spindle immobilized with a vice and wood blocks.
Thanks,
George
Attachments


Last edited:
Starting wire wheel cleanup of the hardware. Ansen AN305 6" from Amazon on the grinder - excellent wheel
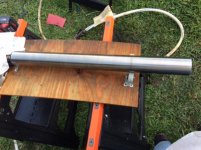
Based on ideas elsewhere on this site, rigged up a makeshift "lathe" and cleaned up the post. Cherne 269913 2 1/2" plug from Amazon and your drill of choice. Cheap HD casters, zip ties and drywall screws. Wet sanded with 60 grit, then 120 then 320, then Collonite paste wax. Unlike what I did, move the pole so that the rollers bear on the part that will be buried permantly in the base so you wont see the line.
Decided on electrolysis for the cast parts, the first piece is in the vat as a trial. It looks pretty good after a few hours so I will probably start the big pieces tomorrow. Rust is gone and the paint just falls off when you touch it. Pretty cool. 1Tbsp washing soda per gallon water, rebar electrodes all tied together with wire, 12v power supply from electronics bench (you can also use a battery charger but it has to be dumb and have an ammeter) - positive to anode bars, negative to part suspended in electrolyte solution. You want 1 - 5 amps. If not, check the connections and contact to the part. No stainless, no copper, no clip leads in water. DO NOT reverse the leads!
George
Attachments


Last edited:


jakemac
Well-known member
I don't use an E-tank, but when I take items out of the de-rusting bucket I dry then wire wheel them and prime the part quickly. If paint isn't an option at the time, you can give it a THIN coat of BLO (boiled linseed oil) to keep the rust away until you can get to it.
Rust happens.
Rust happens VERY quickly on newly bare metal.
Rust happens.
Rust happens VERY quickly on newly bare metal.
Last edited:
jrodell27
Member
That electrolysis bath does wonders - looks amazing GeorgeG2! All those clean shiny small parts gave me a little jingle inside.
The E tank is a nice low toxicity option. No paint stripper, no nasty lead paint dust, etc. The main body of the drill is in the tank now. Everything just hosed off after 24 hours but the removal is somewhat line of site between the item and the rebar rods so a big piece has to be repositioned to get finished. On my next project I may try the rebar grid approach where there are some rods welded to the uprights at the bottom to cover all areas in one shot. For now it just adds another 24 hour cycle per big piece. Also I have seen some guys use carbon rods which is an even cleaner process but now were getting fancy and I kinda like the garbage can, wood scraps and spare parts approach.
George, I used chicken fence wire to do a large vise. I wrapped it all the way around it in a large tote making sure it did not make contact with the vise and it worked great. It was totally one time use though, the chicken wire was toast after one round.
George, I used chicken fence wire to do a large vise. I wrapped it all the way around it in a large tote making sure it did not make contact with the vise and it worked great. It was totally one time use though, the chicken wire was toast after one round.
That's interesting. Concrete reinforcing mesh might be a good upgrade for that idea.
bareass172
Well-known member
Obviously you're far from it still, and you'll be painting so I'm not sure if it will be a concern at all, but on my old cast stuff if I don't paint the underside or inside areas of castings but I'm concerned about rust I use this product from Amsoil:
http://www.amsoil.com/shop/by-produ...s-and-protectants/heavy-duty-metal-protector/
I am an Amsoil dealer, but I'm not trying to push that particular one as there are other "spray waxes" available out there. What I like about this one is, I can spray it through a "spray straw" if I need to get into tight spots and it contains rust inhibitors so it does more than just protect against future rust. When I took my Delta DP apart and washed it I found the original paint to be in great shape, so rather than repaint I used that stuff to coat the inside of the head casting and the underside of the base and table.
Looking great so far - good luck, I'll be following your progress!
Lessons learned during badge/emblem removal
I had no luck with pulling out the two pins or putting a slot in the top of the "rivet" and turning the rivets out with a screw driver. No amount of prying from under the badge worked either.
The best approach (and this requires a very steady hand and a lot of patience) is to take a dremel tool with a fiber wheel. Run the edge of the wheel back and forth across the top of the pin/rivet with your hand resting on the piece until the domed top is ground flat close to the plate. Then take a small drill bit and your drill of choice and drill a pilot hole in the center of the pin. Then go to a bigger bit and work carefully until the shoulder of the pin is almost gone. Keep checking with a thin object under the badge until it will pop up and off of the pin remains. Hopefully all of this will happen without any badge damage. By the time I did my third I was error free so don't start with the most visible one first (ask me how I know)?
Then repeat on the badge remains going into the cast piece to open up the holes.
What do you guys use as replacement "pins" to reattach the badges (we don't need no stinkin' badges)?
George
Last edited:
E tank update.
When your working a big, complicated and/or really degraded part - take the part out after 12 - 24 hours and scrub it with a brush and green scrubby pad. Then reposition it and put it back in the tank. You will notice that the activity picks up and the part can finish up faster and more completely.
Also, more voltage is not necessarily better. The ion solution and dissimilar metals in effect acts like heavily discharged battery that clamps the supply output to 4 - 8 volts. If you use a very high voltage source, the source will have to dissipate a lot of heat inside the power supply/charger. The key is current so make sure that you can supply 2 amps at no more than 12 volts. Lower also works.
Last edited:
That spindle collar does have a removable thru pin. Pound it out starting on the side not flush with the spindle and as for all of these pins, use a flat punch as close to the pin diameter as you have that will be a little loose in the bore. Once that collar comes off then you can remove the last bearing off the short end.
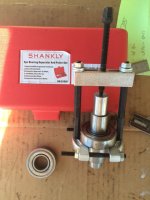
Shown is the little bearing puller that I got on Amazon for the rest of the disassembly. It works great.
https://www.amazon.com/gp/product/B01LFHNW6A/?tag=atomicindus08-20
Note the round stock used to back up the hollow tube for removal. Also you should use this for the spindle end even though its solid or you will put a divot in the spindle end (ask me how I know?). That last spindle bearing was also a bear to get off. The top pulley bearings were a much looser fit and came off easier. They were pretty easy to tap back on with the wood blocks with proper holes in them. Spindle reassembly will require some more thought.
George
Attachments


Last edited:
The E tank process is really interesting - low toxicity, relatively cheap, fun to watch. The biggest drawbacks are that each piece goes in the tank one after the other for 1 - 2 days each and then they come out wet and start rusting immediately and the first piece was started over a week ago.
I have talked to a couple of paint shops and the standard practice is blasting followed by etching primer usually that same day. Then final painting when they can schedule it. I am going to put together a small blasting set up and try that as a final dress up of these parts and send them off after that if it works well. I am thinking of having the parts shot with Imron at a local shop.
If you are going to rattle can the project then a rust inhibitor primer may be fine right after you get the part out and dry it but then you would have to do each part in sequence. One could also oil the parts as suggested here but then you have another step after that.
Attachments
Craptain
Well-known member
The E tank process is really interesting - low toxicity, relatively cheap, fun to watch. The biggest drawbacks are that each piece goes in the tank one after the other for 1 - 2 days each and then they come out wet and start rusting immediately and the first piece was started over a week ago.
I have talked to a couple of paint shops and the standard practice is blasting followed by etching primer usually that same day. Then final painting when they can schedule it. I am going to put together a small blasting set up and try that as a final dress up of these parts and send them off after that if it works well. I am thinking of having the parts shot with Imron at a local shop.
If you are going to rattle can the project then a rust inhibitor primer may be fine right after you get the part out and dry it but then you would have to do each part in sequence. One could also oil the parts as suggested here but then you have another step after that.
Many of us use BLO after the parts come out of the e-tank. This protects against rust and is also a good base which doesn't need to be removed prior to painting. Of course the machined surfaces are a different story. And for those a coat of wax, grease or oil as appropriate.
Sent from my SM-G900T using Tapatalk
bubinga
Well-known member
OH really, you can paint right over the BLO then?Many of us use BLO after the parts come out of the e-tank. This protects against rust and is also a good base which doesn't need to be removed prior to painting. Of course the machined surfaces are a different story. And for those a coat of wax, grease or oil as appropriate.
Sent from my SM-G900T using Tapatalk
I was wondering about that, When Jake mentioned it.
Craptain
Well-known member
I don't usually bake BLO but that is a good practice. As for wax, well any kind of wax polish works. I use Minwax because that's what I have.
Painting over BLO is OK as it is traditionally the basis of oil based paint. I guess it is not so good if you use lacquers.
Sent from my SM-G900T using Tapatalk
Painting over BLO is OK as it is traditionally the basis of oil based paint. I guess it is not so good if you use lacquers.
Sent from my SM-G900T using Tapatalk
The only thing left to break down is the motor and I can't get the pulley off of the motor shaft. I have removed the set screw and used a lot of penetrating oil. I have tried tapping the shaft out while suspending the pulley by hand but no luck. I don't want to get too aggressive with a metal punch and risk mushrooming the shaft. Because of the tight fit to the motor case and the inverted pulley, non of the usual puller approaches will work without risk of breaking the pulley. Any ideas?
Thanks,
George
Thanks,
George

