To avoid these ads, REGISTER NOW!

Attempting my first exoxy floor.

tmcb25

Member
Joined
Aug 15, 2010
Messages
6
Hi all. Great forum with lots of great info. I'm new at this but wanted to give it a shot without spending a lot. I'm going to go with Quickrete mainly because it seems when people have had issues Quikrete takes care of them and price as well.
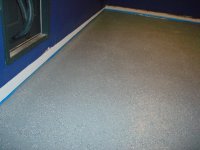
I've cleaned the floor as best as I can. I put concrete caulk between the floor and stem wall in attempt to make it watertight. I was a little nervice about the acid etching but it wasn't bad at all. I used Bond Lock twice. I had a nasty oil stain but I think I've got it up enough to work. Its probably a 30 year old floor single car garage. I was a little nervous about would see that when I rinsed the water looked a bit sandy so it must have worked. I am hoping for it to be dry enough in 2 days to paint. The stem wall has blocks and they seem to take forever to dry. Before I paint, I'm going to blow it out with a leaf blower to remove any remaining dust. I have a few questions that maybe someone could help me with:
-Has anyone done just a single coat and had it look good?
-For painting the stem wall, what do you think about using block primer first so I don't waste too much of the epoxy paint?
-I really wish they had more in depth instructions mainly about prepping and how to best deal with the different things that come up. Thanks
 
To avoid these ads, REGISTER NOW!

rugerlady

Well-known member
Joined
Aug 15, 2008
Messages
1,378
Location
Michigan
Usually I recommend referring to the manufacturer, but you say the instructions are not very in depth.
If you do a single coat, it probably will not look that good. You are using a water based epoxy. When you apply the coating about 35-60% of it is water that will evaporate, leaving you with a much thinner coating.
Speak to a rep from Quikrete and see what products can be used as a primer on the stem wall. I know our product can go over drylok and some other primer products, but we are a different type of epoxy.
let me know if there are other questions I can help with.
 
OP
T

tmcb25

Member
Joined
Aug 15, 2010
Messages
6
Re: Attempting my first epoxy floor.

A few days have gone by and I have done some more reading. In the instructions it says you can paint over previously painted surfaces if the paint has excellent adhesion. I had emailed Quikrete before and they said that you don't need a primer coat, but it makes more sense to me to at least use block filler/primer on the stem wall. If it doesn't work, then it is just a stem wall that I would have to fix. I also think I might try a single coat, with a medium to heavy disbursement of flakes. If it doesn't look good I could always go over it with another coat. When painting walls I've gotten one coat coverage if I use good paint, so I'm confident I can do it if the product can. Either way I plan to use the clear coat on top with half of the bag of anti-skid material. I also noticed at Lowes they had an epoxy primer by SealCrete, but it was only 1 part so I'm staying away from that. Also was looking to see if you could buy just the part a and part b epoxy mix rather than the whole kit (for second coat if needed), but I didn't see that. I'm going to post pics soon especially if the one coat does not look right.
 
OP
T

tmcb25

Member
Joined
Aug 15, 2010
Messages
6
Well, the base coat is down. This is just one coat with clear coat to follow in the coming days. It took me 1hr 46 minutes. A few things I learned was that you have to be really stingy with the paint. I applied too thick at first, then I had to really conserve but I did make it. If I had to do the stem walls there is no way I would have had enough paint, so I elected to skip. So far the coverage looks ok with just a single coat, but it had only been about 2hrs so I"ll really know tomorrow. I will point out that the roller and tray began to stick together towards the end, and it became more difficult to apply and spread as time went on. If I were to do it again a second person would be good, or at least new roller and tray about half way through. The flakes did an excellent job of hiding imperfections. I did my best to roll both ways and keep overlapping, but it was tough to do with so little paint to work with.
 

Attachments

  • floor closeup.jpg
    floor closeup.jpg
    147.8 KB · Views: 190
  • floor1.jpg
    floor1.jpg
    146.9 KB · Views: 197
  • floor2.jpg
    floor2.jpg
    145.5 KB · Views: 181

graffix000

Well-known member
Joined
Nov 23, 2007
Messages
872
Location
Philly
Looking good! Did you have any issues with seeing sections now that it has had a chance to dry? There have been several people who indicated that you can see the separate 2x6 sections after applying.

Just curious as I have the same epoxy sitting at home along with the clear coat. I'm anxious to see pictures after the clear coat is applied.

From the pictures, the floor looks great!
 
To avoid these ads, REGISTER NOW!
OP
T

tmcb25

Member
Joined
Aug 15, 2010
Messages
6
When I say "stem wall" I am referring to the part just above the floor that is 1 high cinder block, and the drywall meets the cinder block, not the floor. I'm probably going to paint that with regular paint, and then change the bottom wall color to something that goes better with the floor.

About 24 hours later the floor dried nice and even. When I applied I split the garage in half longways, did probably more like a 4x6, then the next side 4x6, and then 2 rolls over the whole 4x12 section to blend. Then when I did the next set of 4x6 sections and blended, I rolled as far back as I could reach to blend everything together. Also, when cutting in what I did was do the 2x6 section, as close to the wall as possible, then I had a $2 really small roller (little blue plastic one that comes with the tray), which got me right up against the wall, then, just filled in any small spots with a brush, and then rolled everything again to blend. I did not cut in the whole garage, just the section I was working on at the moment. Also, I rolled both ways for the most part. Where I couldn't reach, I would roll diagonally. It seemed to blend everything in quite well. The light reflecting at different angles is what I noticed the most.

What I am seeing when looking closely is imperfections in the concrete being brought out. In certain sections I can see the tiny pours, and in other sections I can see almost waves or slight humps in the concrete. Again, this is a 3o year old garage. If there is one thing I would do better next time it would be to fix that. It is like a drywall that needs a skim coat. Not sure what the solution would have been. Any ideas? Grinding?

All in all, for a single car garage in a townhouse I think it is a nice upgrade. I would highly recommend starting off with a simple job like this before doing a large garage in your dream home where you want it perfect.

Gonna give it a few days then blow out any loose flakes and clearcoat.
 

graffix000

Well-known member
Joined
Nov 23, 2007
Messages
872
Location
Philly
the time between epoxy and clear coat for the quikrete is 24 hours of drying where the temperatures are 50 degrees plus.

I actually called as I had the same question and when i told them where I lived (PA) and the temperature around here at night, they told me to wait until the spring to do the epoxy.

Please post pics after the clear coat. I am anxious to see!!
 
OP
T

tmcb25

Member
Joined
Aug 15, 2010
Messages
6
graffix000:
I had heard 24-48 hours, but I wanted to give it an extra time since nights have been a bit cool. I live in NJ and had no problem if you catch the weather at the right time. 60s-70's for the next few days. If you already have the kits I'd be more worried about them sitting around all that time if you wait till spring. Mixing the paint required enough effort as it is!! Going to do clearcoat tomorrow, and will post pics.
 
OP
T

tmcb25

Member
Joined
Aug 15, 2010
Messages
6
Re: Attempting my first epoxy floor.

Not good...Well I applied the clear coat. Everything seemed to be fine that day and the day after. A few days later, I noticed moisture on the floor although it felt only a bit tacky. 6 Days later, the moisture is gone but it did not cure correctly. The day I applied it and for 3 days after it was above 50 degrees for the low and dry. It rained later in the week, but noticed the moisture before it rained. Quikrete said probably moisture trapped inside and suggested a heat gun or hair dryer to speed up process. I tried the hairdryer on a spot and it did seem to help, but I can't do the entire floor!
I'm just going to play the waiting game and see if it eventually fixes itself. If the product is that sensitive to humidity and temp, it would be nice if they would be more clear about it. I was within temperature specifications, but right on the line.
 

Attachments

  • clearcoat1hr.jpg
    clearcoat1hr.jpg
    151.3 KB · Views: 68
  • clearcoat6days1.jpg
    clearcoat6days1.jpg
    146.9 KB · Views: 79
  • clearcoat6days2.jpg
    clearcoat6days2.jpg
    147.4 KB · Views: 98

Pac-Man

Active member
Joined
Feb 19, 2010
Messages
28
Location
The Frozen Tundra of the North, MN
Yep that's all caused by moisture leaching out of the concrete. There were plenty of warnings and instructions about how to check for moisture levels before starting in the Quikrete kits that I used a couple years ago.

I still have small amounts of "cloudy" areas in my clear coat, but I did find if I use my heat gun to go over the areas it does dry out; however, even after 2+ years I haven't bothered to go around and heat gun everything.

View media item 3491
A couple of interesting points;

1.) I only noticed this with the clear coat, and it didn't occur with the base coat.
2.) The cloudy clear coat only showed up after the first winter started and temps dropped below freezing...

Photo album of my installation is here: http://www.garagejournal.com/forum/album.php?albumid=485
 

vtx531

Well-known member
Joined
Jan 6, 2010
Messages
208
Location
Kalamazoo, MI
Re: Attempting my first epoxy floor.

Not good...Well I applied the clear coat. Everything seemed to be fine that day and the day after. A few days later, I noticed moisture on the floor although it felt only a bit tacky. 6 Days later, the moisture is gone but it did not cure correctly. The day I applied it and for 3 days after it was above 50 degrees for the low and dry. It rained later in the week, but noticed the moisture before it rained. Quikrete said probably moisture trapped inside and suggested a heat gun or hair dryer to speed up process. I tried the hairdryer on a spot and it did seem to help, but I can't do the entire floor!
I'm just going to play the waiting game and see if it eventually fixes itself. If the product is that sensitive to humidity and temp, it would be nice if they would be more clear about it. I was within temperature specifications, but right on the line.

What does it look like now?
 

Pac-Man

Active member
Joined
Feb 19, 2010
Messages
28
Location
The Frozen Tundra of the North, MN
Around the engineered cracks in the floor you can see the clouds the most. I took this picture with my camera phone at night so the color is off a bit, but I think this shows what you are looking for.

When I take a heat gun to the cloudy areas they clear up permanently. Most of the floor is fine, but there are cloudy areas where I believe cold weather (40's) may have hurt me.

View media item 6386
 
To avoid these ads, REGISTER NOW!
Top Bottom