To avoid these ads, REGISTER NOW!

Aus 2 car attached mini garage

minidriver

Member
Joined
Mar 29, 2015
Messages
21
Location
brisbane.au
Hi All,

We have recently settled in at a new 270m2 house which is for life apparently, and have increased from a single car shed to a two car (barely) attached. Trying to cram as much in as possible, as efficiently as possible!

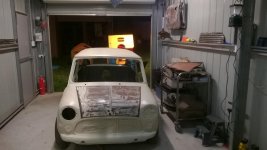
garage houses my 1971 project mini, and work areas. Want to have dedicated areas for metal and wood. the second bay will be used for wood working tools. Would love to be able to cram a metal lathe in there but with a drop saw and table saw planned, can't see it fitting anywhere, especially with the desire being strong for a cnc router table!

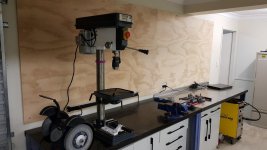
most of the work benches/cabinets are freebies from previous job. benches have 5mm steel tops, weigh a ton. I put 2mm stainless sheet on one of them as a clean work bench.

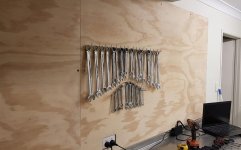
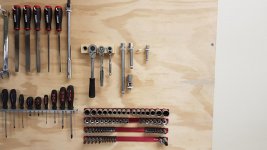
just finished putting 17mm ply on the wall ready to hang tools and some more cabinets on.

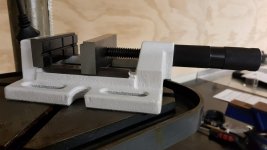
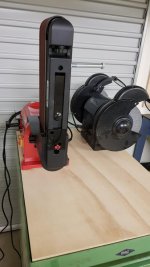
New bench drill just arrived and been installed, bit bigger than I expected! might have to revisit its location, might have to get a lower drill bench in somewhere!

Have installed the first of two 15 outlet power boards, one will be on each tool wall. Was going to go full width, but that would just be overkill surely. Am going to build a shelf over the power boards to stop them getting covered in ****. Doubt I'll ever have half of them utilised (especially with battery hand tools so good nowadays), but it's just handy!

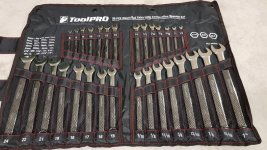
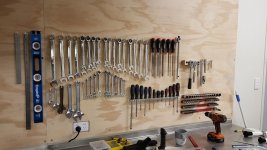
new set of metric and imperial spanners arrived also, I have a mismatch of brands at the moment and these were cheap (aud $53) for 30 spanners. go up to 24mm and I think 1". They're the in-house brand for an automotive shop here in aus called supercheap autos. They are incredibly similar to the kincrome spanners which cost 2 - 3 times as much. Time will tell.

Now to get stuff on the wall!

Tim
 

Attachments

  • 20180708_192021.jpg
    20180708_192021.jpg
    105.4 KB · Views: 80
  • 20180711_190853.jpg
    20180711_190853.jpg
    71.8 KB · Views: 71
  • 20180713_210829.jpg
    20180713_210829.jpg
    117.3 KB · Views: 73
  • 20180713_210802.jpg
    20180713_210802.jpg
    96.6 KB · Views: 65
  • 20180711_191547.jpg
    20180711_191547.jpg
    151 KB · Views: 71
  • 20180711_191034.jpg
    20180711_191034.jpg
    104.7 KB · Views: 56
  • garage tool wall.jpg
    garage tool wall.jpg
    86.8 KB · Views: 50
To avoid these ads, REGISTER NOW!

Terrick down Under

Well-known member
Joined
Jul 2, 2015
Messages
1,904
Location
Royalla, NSW, Aust.
Welcome to the best place for info gaining and sharing around the world.
Love your black and white theme, my favourite colour scheme.

What state is the mini in?
yes we need more pics!!!
 

Theodulf

Well-known member
Joined
Jul 2, 2017
Messages
410
Location
Goulburn, NSW, Australia
That looks like the beginning of a nice work space.

ToolPro have a good reputation, as far as I'm aware. They're made by Stanley, the same as Sidchrome tools. The price you paid was much less than the regular retail price too, they've been redesigning the ToolPro line and the "old" versions have had their prices dropped exceptionally low. I've got the same spanner set as yours, also bought after the big drop in price. I'm yet to use them but the long handles look to be good for stubborn fastenings.

Where did you get your drill press vice?
 
OP
M

minidriver

Member
Joined
Mar 29, 2015
Messages
21
Location
brisbane.au
Terrick, the mini causes a constant state of depression. was meant to be a quick fixer upper, turned into a nut n bolt resto, interior, engine bay, underside etc are all complete, just needs paint on the outside. but after putting the engine back in it decided to smoke, so it needs to come out for a re-ring or re-bore. So for the last couple of years or so it's sat pretty dormant which is a shame considering the amount of work and $$ gone into it! Stripped back to bare metal, all rust cut out, new metal welded in, new wiring loom from scratch, electronic ignition system, new brakes and suspension.

Surprise twins 2.5 years ago also put a hold on pretty much everything, along with moving house twice within 6 months.

Haven't had much time to continue on the new garage fit out. did manage to get the spanners on the tool wall, make it look even barer having just those up there!

The drill press vice came from red fox machinery https://www.redfoxmachinery.com.au/product/metex-100mm-drilling-vice/

They have some reasonably nice stuff, I think mid-quality chinese stuff mostly judging by the drill press I got! It runs great, nice tolerances, but one of the grub screws securing the head to the post stripped out very easily, will just helicoil it. Speaking of helicoils, last time I bought a set it was around $100 for one size (3/8" I think). To fix the drill I picked up a metric set 5 - 10mm with all tools and taps from ebay for $50! Don't know how they do it for the price.
 

Attachments

  • 20180721_202552.jpg
    20180721_202552.jpg
    78.5 KB · Views: 36
  • 1P0TUHP.jpg
    1P0TUHP.jpg
    90 KB · Views: 35
  • Ua5vtST.jpg
    Ua5vtST.jpg
    97.8 KB · Views: 36
  • SYv50xf.jpg
    SYv50xf.jpg
    156.8 KB · Views: 35
  • sEOO4KK.jpg
    sEOO4KK.jpg
    112 KB · Views: 37
OP
M

minidriver

Member
Joined
Mar 29, 2015
Messages
21
Location
brisbane.au
minidriver
I did notice you are rewiring the car, thats a big job and well done so far.:thumbup:

Wiring is actually a job I enjoy! sourced all the wire from autosparks in the uk, and bussed fuse/relay boxes from swe-check in australia. The original mini had a total of 2 main fuses and a couple of inline ones behind the dash I think, mine has around 20, much more like a modern car, and relays for horn, heater, headlights, etc.

It will get there one day!
 
To avoid these ads, REGISTER NOW!
OP
M

minidriver

Member
Joined
Mar 29, 2015
Messages
21
Location
brisbane.au
they are pretty simple, not much to go wrong, just check the mounting brackets, some set the power board back a bit so it wont mount easily.

was going to buy another for the other side of the tool wall, but neglected to remember this when I was mounting the screw driver rack....

anyway, got the screwdriver rack made and mounted, and hung some shifters. hate shifters, but I have them, so need to put them somewhere!

ratchet stuff will go to the right of the screw drivers.
 

Attachments

  • 20180722_211206.jpg
    20180722_211206.jpg
    138.5 KB · Views: 23
Last edited:
OP
M

minidriver

Member
Joined
Mar 29, 2015
Messages
21
Location
brisbane.au
nothing exciting. mounted sockets/ratchets. granted it is wife's birthday today, so should be glad I got away with doing that!
 

Attachments

  • 20180803_184949.jpg
    20180803_184949.jpg
    118.1 KB · Views: 27
  • 20180803_184857.jpg
    20180803_184857.jpg
    145.7 KB · Views: 29
OP
M

minidriver

Member
Joined
Mar 29, 2015
Messages
21
Location
brisbane.au
Great work, I like the ratchet holders!

Warren

Cheers.. not sure if I pinched that idea from here, or came up with it myself. I'm sure it's not the latter! Only time will tell if I like it... it does my ocd in if the handles aren't vertical and you have to flick the ratchet direction sometimes to get them to line up! I should have over sized the holes for the sockets, machined a groove in them, put a grub screw in through the wood to hold them in place in the groove, and let the sockets spin. I just superglued the sockets in to press fit holes.
 
OP
M

minidriver

Member
Joined
Mar 29, 2015
Messages
21
Location
brisbane.au
To save valuable bench space, and to stop me piling up **** on my BAC Systems roll cabinet, I decided to turn it into a rolling bench grinder/belt & sander set up.

Bought some 30mm plywood from Bunnings, and a bargain (compared to makita and festool) Ozito track saw for the grand total of $179. Worked great, needs a better blade to reduce chip out but for my needs it will be perfect.

The sander is a cheapo from aldi. it's a rebranded scheppach, it gets good reviews on amazon where it is sold as a bucktools brand. little bench and mitre gauge are a little flimsy, might make up something a bit sturdier if required.

The grinder/sanded are attached to the plywood - there are some nuts glued and pressed into the underside of the ply. need some longer bolts for the sander.

set the grinder/sander towards the back of the cabinet so hopefully wont get too much dust in the drawers!

minidriver that's a great layout.:thumbup:

Thanks! lots of thought going into the layout of the wall. still need to mount pliers, clamps, vice grips, saws, plus some other stuff I imagine. I've left 400mm above the tools to put some ikea metod cabinets in. each plywood sheet is 1800 long, the cabinets are 600 so 3 on each side.. except the bench drill gets in the way! so 2 + 3.
 

Attachments

  • 20180805_195205.jpg
    20180805_195205.jpg
    61.6 KB · Views: 11
  • 20180805_195132.jpg
    20180805_195132.jpg
    113 KB · Views: 12
  • 20180805_195031.jpg
    20180805_195031.jpg
    120.2 KB · Views: 12
  • 20180805_195002.jpg
    20180805_195002.jpg
    62.5 KB · Views: 13
  • f7629808-e9b1-4e07-a4dd-4ff386ce983a.jpg
    f7629808-e9b1-4e07-a4dd-4ff386ce983a.jpg
    141.4 KB · Views: 11
Last edited:
To avoid these ads, REGISTER NOW!
Top Bottom