
You are using an out of date browser. It may not display this or other websites correctly.
You should upgrade or use an alternative browser.
You should upgrade or use an alternative browser.
Aussie Garage starts this week!
- Thread starter Mudnut
- Start date


1/2 Cup
Member Emeritus
Ken thank you for the update.
Getting there..
Getting there..
Grumblebum
Well-known member
It is looking good ken, I happened to be up your way again last week for work (cairns-port douglas), very comfortable weather at the moment. (ie shirt and shorts vs jumpers and beanies ") )
)
You must be getting itchy to start working on your fit out ?
cheers GB
)You must be getting itchy to start working on your fit out ?
cheers GB


1/2 Cup
Member Emeritus
Ken you are making some great progress there.
1/2 Cup
Member Emeritus
Thanks mate,
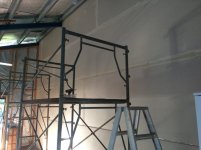
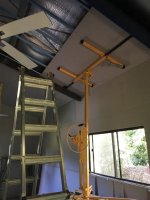
Had some help from some great friends to get the sheets up to 7m high.
Ken you certainly would need an extra hand or two at that height
Quick update.
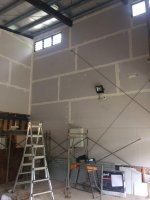
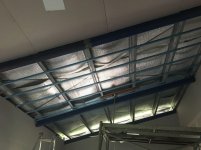
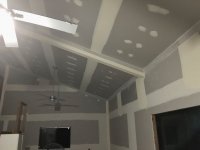
Signed off by the council, after having to get the engineer out to confirm that the outside sheeting is bracing. (10mm cement sheet 1.2m x 3m. Fixed at manufacturers specs).
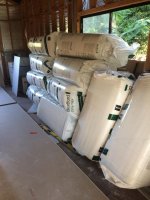
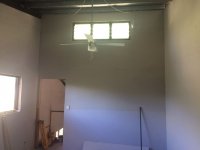
Have been plastering the inside of the office. Fun by myself! Have most of the base coat over the joins done in the office. Might hire a plasterer to do the top coat, and hang cornice.
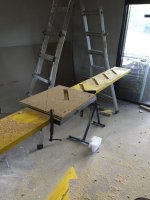
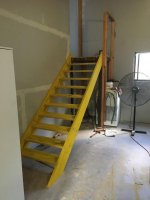
Got tired of climbing a ladder to get upstairs, so built some stairs. Will take apart to fit the timber risers, and will glue together along with the screws. Plan on making a wall hand rail that matches the stringer angle, and 900mm high. Want to get all the plaster upstairs before I do that though.
Slow progress, but progress just the same.
Cheers,
Ken
Signed off by the council, after having to get the engineer out to confirm that the outside sheeting is bracing. (10mm cement sheet 1.2m x 3m. Fixed at manufacturers specs).
Have been plastering the inside of the office. Fun by myself! Have most of the base coat over the joins done in the office. Might hire a plasterer to do the top coat, and hang cornice.
Got tired of climbing a ladder to get upstairs, so built some stairs. Will take apart to fit the timber risers, and will glue together along with the screws. Plan on making a wall hand rail that matches the stringer angle, and 900mm high. Want to get all the plaster upstairs before I do that though.
Slow progress, but progress just the same.
Cheers,
Ken
Attachments


Terrick down Under
Well-known member
Looks ****** fantastic.
Bob Heine
ALLIANCE MEMBER
X2!Looks ****** fantastic.
Ken, I like the plaster work, including wrapping the beams. I assume the gypsum board is glued. The staircase is my favorite. Mortised, screwed and glued is like belt, suspenders and Velcro holding up your pants! For the first time I feel bad not having a staircase in the house (now that I have decent routers).
1/2 Cup
Member Emeritus
Ken what you have achieved is just awesome
hewey
Well-known member
That's coming along really nice. Hell of a job by yourself. And congrats on the Council inspection.
Hell of a job by yourself. And congrats on the Council inspection.X2!
Ken, I like the plaster work, including wrapping the beams. I assume the gypsum board is glued. The staircase is my favorite. Mortised, screwed and glued is like belt, suspenders and Velcro holding up your pants! For the first time I feel bad not having a staircase in the house (now that I have decent routers).
Bob,
For 22 years I was involved in Cardiac Surgery. Became familiar with the belt and suspenders kind of mentality.
Plaster is screwed and glued. When removing old plaster, the glue is the strongest part.
The thing I liked about the jig, is I only had to be precise once when I made the jig!
Cheers,
Ken
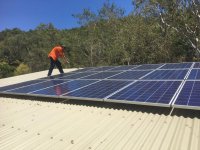
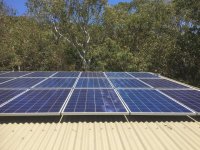
Well an other milestone has happened today. I had a 6.6 kw solar array installed. On top of my shed is the only place on my block that gets decent sun for any panels.
It is a great feeling seeing the meter run backwards, putting power back into the grid. I don't really care if I make any money on my quarterly bill (but just might). I just want my power bill close to zero! Currently only feeding into one meter, (shed, and cottage) but once the supplier changes over to a "smart" meter, will feed into both power supplies, which includes our house.
Price was fantastic, and should pay for itself in just over a year. The following years will be money in my pocket.
Eventually would like to have battery backup, and give Ergon the flick with some rude gestures, but that is in the future.
Just one step in becoming more carbon neutral. If I were really green, I would get rid of 4 cars, but that is not going to happen anytime soon. It just lets us live the way we want with a clear conscience that we are doing something.
Cheers,
Ken
Attachments

1/2 Cup
Member Emeritus
Nice one Ken, you won't know your self.
HOTFR8
Banned
You will not regret having Solar. It may or may not get you to zero but it will get the costs down once it has paid for itself.
hewey
Well-known member
A 1 year payback period is pretty awesome! Nice work.
Well spent some time working in my garage, vs working on my garage.
Land Rover had a warped exhaust manifold, and was blowing out around the 1st and 5th cylinders. Was getting worse, so decided to tackle the project before it gets too hot here. Had a good friend come around to give me a hand also.
Lots of ancillary bits to be removed before I could even get to it, but not too hard. Spent a few days spraying the nuts with penetrating spray. Finally could put off the dreaded removal of the bolts any longer, so dove in. Front top sheared off immediately at the surface of the cylinder head. The #5 cylinder bottom stud sheared off at the surface of the manifold, leaving about 8 mm of stud sticking out. That one was able to get out with two nuts locked down tight, and unscrewed from the cylinder head.
Was able to use a punch and mark the centre of the sheared one on the top of cylinder #1. Drilled a small pilot hole through the stud, and then progressively larger. Finally used a star bit and tapped it into the hole. Was able to back out the rest of the stud on the end of the star bit. Big sigh of relief!!!
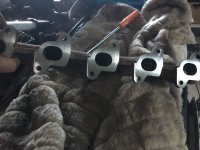
On inspection of the manifold, it was warped by at least 3.5 mm. Too much to hand sand down, so off to an engineer to get skimmed. 2.5 hours later, was on my way home, and a nice flat surface on the manifold.
Planning on getting it put back together on the weekend. Hope no issues with the rebuild.
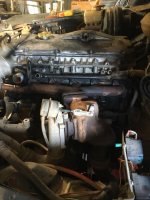
1st photo: Manifold still in place, and attached to turbo.
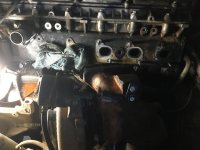
2nd photo: Drilling out the broken stud. Note the carbon on the cylinder head from blowing out from the #1, and #5 cylinders.
3rd photo: What I had to do to hold ancillary items out of the way.
4th photo: Flat surface on the manifold again!
Land Rover had a warped exhaust manifold, and was blowing out around the 1st and 5th cylinders. Was getting worse, so decided to tackle the project before it gets too hot here. Had a good friend come around to give me a hand also.
Lots of ancillary bits to be removed before I could even get to it, but not too hard. Spent a few days spraying the nuts with penetrating spray. Finally could put off the dreaded removal of the bolts any longer, so dove in. Front top sheared off immediately at the surface of the cylinder head. The #5 cylinder bottom stud sheared off at the surface of the manifold, leaving about 8 mm of stud sticking out. That one was able to get out with two nuts locked down tight, and unscrewed from the cylinder head.
Was able to use a punch and mark the centre of the sheared one on the top of cylinder #1. Drilled a small pilot hole through the stud, and then progressively larger. Finally used a star bit and tapped it into the hole. Was able to back out the rest of the stud on the end of the star bit. Big sigh of relief!!!
On inspection of the manifold, it was warped by at least 3.5 mm. Too much to hand sand down, so off to an engineer to get skimmed. 2.5 hours later, was on my way home, and a nice flat surface on the manifold.
Planning on getting it put back together on the weekend. Hope no issues with the rebuild.
1st photo: Manifold still in place, and attached to turbo.
2nd photo: Drilling out the broken stud. Note the carbon on the cylinder head from blowing out from the #1, and #5 cylinders.
3rd photo: What I had to do to hold ancillary items out of the way.
4th photo: Flat surface on the manifold again!
Attachments

Terrick down Under
Well-known member
Yep, this is what happens when you have excessive horsepower to burn. I know of a sedate little 502 conversion that will do a nice job.
Danshell
Well-known member
I only just found this thread, great shed build, thanks for sharing.
1/2 Cup
Member Emeritus
Ken that looks like a mongrel of a job to do, you have done well.
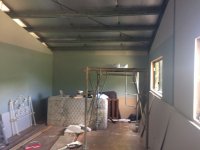
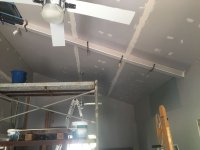
Well to keep things moving along, got a plasterer in to do the top coat, and cornice downstairs. Could have done it, but working over my head puts me flat on my back for a few days. Plus, would have to spend many days sanding my joins (something I hate doing). Best $500 bucks I have spent in a while.
Different colour joins are from two different brands of top coat.
I did get to be the apprentice and push the mobile scaffold around though.
Cheers,
Ken
Different colour joins are from two different brands of top coat.
I did get to be the apprentice and push the mobile scaffold around though.
Cheers,
Ken
Attachments


Just got out of hospital for undiagnosed abdominal pain. 4 days of drugs, and dozing. Have more tests planned, but all on hold as clinics shut down due to Cyclone Owen.
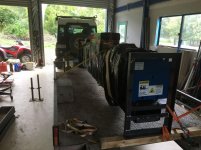
Well can't go to work, so got busy with my Christmas present.
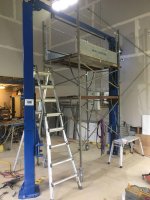
1. Arrival after picking it up at the depot.
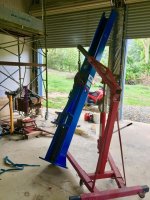
2. As I am by myself, disassembled on the trailer, and lifted it off in pieces with the engine hoist.
3. Could get it close to vertical with the engine hoist. Got our boarder to help stand them up from there.
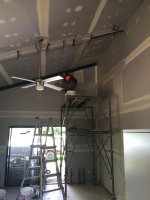
4. Mobile scaffolding much easier to work off than ladders.
5. Still have power, and hydrolic lines to fit, but coming along nicely.
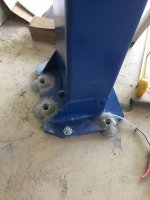
Good thing I only attached one column to the slab, because the measurements supplied are off by 150mm. Had to unbolt the top beam a few times to get it to fit. It is a bit further out in the garage than I would have liked, but will give more working room around vehicle on the hoist.
More updates to follow.
Ken
Well can't go to work, so got busy with my Christmas present.
1. Arrival after picking it up at the depot.
2. As I am by myself, disassembled on the trailer, and lifted it off in pieces with the engine hoist.
3. Could get it close to vertical with the engine hoist. Got our boarder to help stand them up from there.
4. Mobile scaffolding much easier to work off than ladders.
5. Still have power, and hydrolic lines to fit, but coming along nicely.
Good thing I only attached one column to the slab, because the measurements supplied are off by 150mm. Had to unbolt the top beam a few times to get it to fit. It is a bit further out in the garage than I would have liked, but will give more working room around vehicle on the hoist.
More updates to follow.
Ken
Attachments

Bob Heine
ALLIANCE MEMBER
Ken, that's what I call a Christmas Present! Well done.
1/2 Cup
Member Emeritus
Ken I have to agree that is one awesome Christmas present.
All the best with your abdominal pain issues.
All the best with your abdominal pain issues.
Terrick down Under
Well-known member
The pain might subside now that the yearning for a hoist is over, LOL, hope you feel better soon.
BTW, you will never regret buying the hoist. NEVER!


BTW, you will never regret buying the hoist. NEVER!
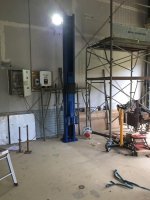
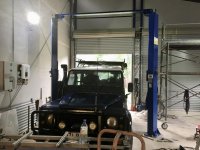
Spent some more time on the install today. Only waiting on a "sparky" to wire it up. Pretty happy with the results.
1. Burned out my old hammer drill. Borrowed a mates, and job done quickly. Great to have the right tools for the job. If you can see the line on the floor in the upper left hand corner. This is where the instructions said to place the post. Good thing I bolted the power side in and then tried to install the cross beam. Too short, so had to move the other column closer. Gives me more room to work on that side anyways.
2. arms on, and everything ready to be wired up.
3. Plenty of parking still when not in use.
Cheers,
Ken
Attachments


1/2 Cup
Member Emeritus
Nice one Ken
Grumblebum
Well-known member
Awesome, it looks right at home.
GB
GB


1/2 Cup
Member Emeritus
Just awesome..
All the best for Christmas and have a great New Year.
All the best for Christmas and have a great New Year.
Terrick down Under
Well-known member
So how many hours are you allowed in the shed over the holidays???, My wife has said I have responsibilities to the family. If I get all of it done then should get some time in the first week in the new year.
The hoist looks great, and Merry Christmas.
The hoist looks great, and Merry Christmas.
hewey
Well-known member
Hoist looks great. Merry Christmas mate!
So how many hours are you allowed in the shed over the holidays???, My wife has said I have responsibilities to the family. If I get all of it done then should get some time in the first week in the new year.
The hoist looks great, and Merry Christmas.
Just finished off 3 night shifts. Few days off, and back on to more, so only the odd hour in the shed at the moment. Thanks for the kind words.
Ken