
You are using an out of date browser. It may not display this or other websites correctly.
You should upgrade or use an alternative browser.
You should upgrade or use an alternative browser.
Aussie Garage starts this week!
- Thread starter Mudnut
- Start date
Well it is time to start showing projects "in" my shed instead of working on my shed.
She Who Must Be Obeyed (SWMBO) wanted me to be down the bottom of the block to sign for a package being delivered, so thought I would tinker in the shed until it arrived.
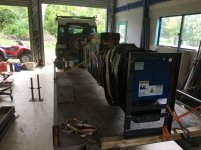
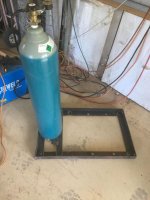
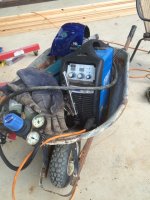
I had 2 x 50mm x 4mm angle iron brackets that were used to secure my car hoist during shipping lying around, so thought I might make a welder and gas bottle stand out of them. In the past used a wheel barrow to move them around, but not very satisfactory.
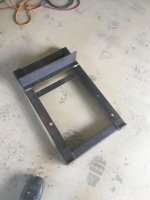
The footprint was too big as is, so ended up cutting them up. Cut off several pieces and re used them to make the frame.
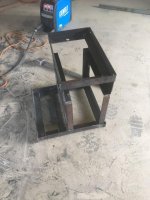
Keep in mind, that not all the welds are mine, and it was just a shipping frame, but I am pleased with the outcome.
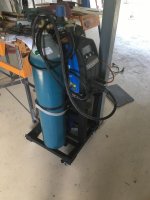
Just need some wheels, tie down straps, and a lick of paint.
Cheers,
Ken
She Who Must Be Obeyed (SWMBO) wanted me to be down the bottom of the block to sign for a package being delivered, so thought I would tinker in the shed until it arrived.
I had 2 x 50mm x 4mm angle iron brackets that were used to secure my car hoist during shipping lying around, so thought I might make a welder and gas bottle stand out of them. In the past used a wheel barrow to move them around, but not very satisfactory.
The footprint was too big as is, so ended up cutting them up. Cut off several pieces and re used them to make the frame.
Keep in mind, that not all the welds are mine, and it was just a shipping frame, but I am pleased with the outcome.
Just need some wheels, tie down straps, and a lick of paint.
Cheers,
Ken
Attachments


Bob Heine
ALLIANCE MEMBER
Recycling at its finest!
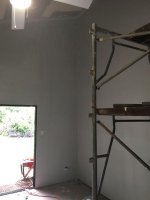
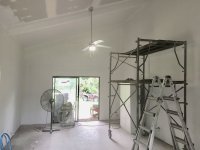
Well the bungalow on our block has been cleaned, painted, and ready for some family to stay. Thought I had better get on to painting the office side of the shed. Used a sealer coat, tinted to "Mountain Grey" Turns out two different companies have a Mountain Grey in their data. Ended up getting the wrong colour mixed up, and started to seal the plaster. Way too dark! Went back today and got the right colour. Much better, but lots of work in the heat. Will change the top coats to a cream base colour, to match the oak flooring we have.
First photo, raw plaster.
Then too dark.
Re coating the paint and plaster with proper colour.
First photo, raw plaster.
Then too dark.
Re coating the paint and plaster with proper colour.
Attachments


Notgrownup
Well-known member
Nice progress Mud...I like that Welding cart... So how is the solar array working for you?
1/2 Cup
Member Emeritus
Mudnut, great progress
good luck bro ! i wish you all the best for your progress
Thanks
Nice progress Mud...I like that Welding cart... So how is the solar array working for you?
Welding cart came out well. Will post photo of finished product. The Solar is brilliant. This is the season where it is overcast, so output is lower, and power consumption is high with air cons running. Can put up an other array, as I have two power lines running into the property. Currently producing about what I use. With two arrays will be selling back to power company any excess. Will take a few years to pay off the second set up, as they buy back at I think 10 cents per Kw. I buy from them at 22 cents per Kw.
Mudnut, great progress
Slow but steady. Thanks everyone.
Attachments
Well an other rainy day in FNQ thanks to Cyclone Trevor hitting the coast about 300 km north of us. Hope all in the path fair well.
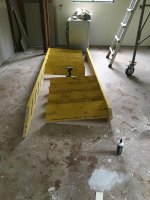
Finished the painting in the office side main room. Before floor goes down, had to finish the stairs. Pulled them down, and dis-assembled them. Cut 10mm off each tread, to enable the plaster to fit when I build the balustrade. Then routed a 12.5mm grove on the bottom of each tread to allow the riser to be glued in, and attached to the lower tread. This gives much more structural integrity to the stairs. Then had to glue, and re assemble them, and lift back into place.
About 5 hours work to source the materials, and mill them to size. Pull apart and re-assemble, and install. Good afternoons work. Can now tackle the flooring tomorrow.
Photo 1. Painting complete. Stairs still open tread.
Photo 2. Stairs down.
Photo 3. Disassembly, treads cut 10mm, and you can see the routed groove in the closest tread (stairs upside down).
Photo 4. Everything assembled, and risers in place.
Photo's of that to follow.
Cheers,
Ken
Attachments


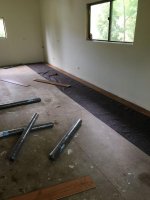
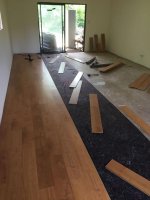
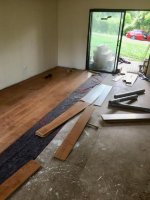
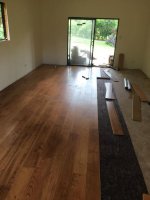
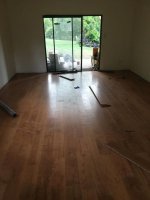
Well a productive weekend. Flooring is down except for the end run of boards, but need to come up with a device to pull the outside boards in without hitting the wall. Area 4.5m by 8m. The underlay is Bunnings moving wrap at $2.50 a roll instead of $60 a roll for felt underlay. Works really well.
Flooring was second hand, so had to pick and choose which boards to lay. Not a big fan of engineered flooring, but price was right, and have enough to sell to someone else.
Hardest part was getting up and down from my knees. Being 56 is tough on the body!
Normal people go and do something fun on their holidays. Not me, I paint, rebuild stairs, and lay flooring.
Cheers,
Ken-
Attachments

Last edited:
hewey
Well-known member
Floor came up great, nice work. Nothing wrong with some productive time off.
Terrick down Under
Well-known member
The floor looks great and should be easy to keep clean.
Bob Heine
ALLIANCE MEMBER
Ken, you've probably already figured it out but I used a piece of aluminum against the wall as a lever point. And the engineered floor looks great. It's not as cool as real wood but it's less attractive to termites.
I wouldn't worry about normal people (I also spent holidays doing projects). Besides, normal people rarely visit the Garage Journal.
I wouldn't worry about normal people (I also spent holidays doing projects). Besides, normal people rarely visit the Garage Journal.
1/2 Cup
Member Emeritus
Ken the floor looks a treat.
There is nothing wrong with using your holidays to do projects like yours.
There is nothing wrong with using your holidays to do projects like yours.
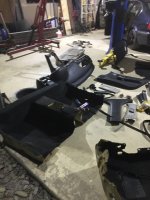
Been a busy few days. Finally got around to working on my son's car. Would not idle, or stay running. Found some vacuum leaks, and a stuck idle control valve. Those sorted, runs great for a 17 year old car.
He then sourced an E46 BMW being parted out locally, and scored the interior, brakes, rotors, and coil overs.
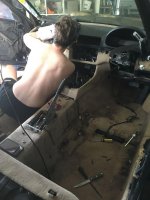
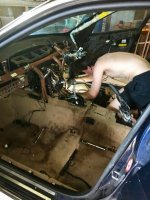
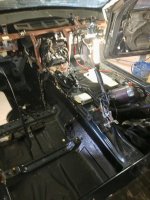
The cream interior of his looked like a crime scene, hence the reason it was cheap. Spent 5 hours pulling the donor interior, brakes, and suspension out, and got it home. Alex then started to gut his car, and was up until 0300 doing so. I won't go into some of the things we found in his car, but now is clean inside.
Spent better part of the day getting the interior of his car out, and so far have the new carpet, dash, centre console in that we got. Taking our time, to ensure we don't break pieces, however some pieces just crumble when touched. Will look much better when the black interior is in place. Will post photo's as we progress.
Cheers,
Ken
He then sourced an E46 BMW being parted out locally, and scored the interior, brakes, rotors, and coil overs.
The cream interior of his looked like a crime scene, hence the reason it was cheap. Spent 5 hours pulling the donor interior, brakes, and suspension out, and got it home. Alex then started to gut his car, and was up until 0300 doing so. I won't go into some of the things we found in his car, but now is clean inside.
Spent better part of the day getting the interior of his car out, and so far have the new carpet, dash, centre console in that we got. Taking our time, to ensure we don't break pieces, however some pieces just crumble when touched. Will look much better when the black interior is in place. Will post photo's as we progress.
Cheers,
Ken
Attachments


1/2 Cup
Member Emeritus
Ken
It is a big job to part out a car properly and not destroy things as you go. Typically, I have found cars of a similar age have wear and tear with the same bits that should be considered consumables and best brought new in some cases.
PS I know what you mean in regards your sons cars looking like a crime scene
All the best with it.
Ken
It is a big job to part out a car properly and not destroy things as you go. Typically, I have found cars of a similar age have wear and tear with the same bits that should be considered consumables and best brought new in some cases.
PS I know what you mean in regards your sons cars looking like a crime scene
All the best with it.
Thanks for that. Yes there are some parts he will order as the plastic shatters when touched, but considering what he got for $400, was worth pulling out and salvaging. The seats alone are worth more.
The car was purchased looking like a crime scene. Seats were ripped, door panels falling apart, no centre console, carpets that were originally tan stained with god knows what. Very neglected car by last owner.
Alex is very meticulous, with nothing out of place. Odd for a 17 yo boy, but he is thrilled with the results. This is his first car, and we wanted something we could work on together.
I believe if he puts time into it, he will look after it better!
3 weeks ago, my ride on mower motor went bang. Pretty poor for less than 300 hours running. Ended up dragging it into my shed, and investigating what went wrong. Found a hole the size of a golf ball in the side of the block, and what ever exited from the motor took out the mounts for the starter motor also.
In my search for replacement parts for the motor, found no one that would sell the casing alone, but had to buy bottom half of the motor.
Found a company in Victoria that imports motors from China, and has the same mounting holes, and output shaft diameter as my previous. 3 year warranty also. Purchased a 19 HP one from them, for less than half price of the bottom half of the 15 HP Kohler that I was replacing.
Arrived in Far North Queensland a week later. Out of the box, looked to fit, but had to remove the muffler that came with it. Once removed, exhaust lined up perfectly with the existing muffler set up. Only problem was the position of the exhaust flange holes were rotated.
Had to cut the existing exhaust, and re weld in place with the proper angle to get the flange to line up with the holes. Came out really well, and once again I am really happy having a welder.
So glad for the internet to provide schematics for wiring so that I could connect the proper wires together.
First pic. Hole in block, and starter motor broken off.
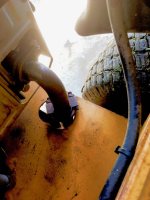
Second pic. Motor upside down, and trying to get electric clutch off. Note all covered with oil from motor.
Third pic. Exhaust manifold cut and re welded in place to fit holes on motor.
Fourth pic. New motor in place.
Mowes great, and seems quieter than the last motor.
In my search for replacement parts for the motor, found no one that would sell the casing alone, but had to buy bottom half of the motor.
Found a company in Victoria that imports motors from China, and has the same mounting holes, and output shaft diameter as my previous. 3 year warranty also. Purchased a 19 HP one from them, for less than half price of the bottom half of the 15 HP Kohler that I was replacing.
Arrived in Far North Queensland a week later. Out of the box, looked to fit, but had to remove the muffler that came with it. Once removed, exhaust lined up perfectly with the existing muffler set up. Only problem was the position of the exhaust flange holes were rotated.
Had to cut the existing exhaust, and re weld in place with the proper angle to get the flange to line up with the holes. Came out really well, and once again I am really happy having a welder.
So glad for the internet to provide schematics for wiring so that I could connect the proper wires together.
First pic. Hole in block, and starter motor broken off.
Second pic. Motor upside down, and trying to get electric clutch off. Note all covered with oil from motor.
Third pic. Exhaust manifold cut and re welded in place to fit holes on motor.
Fourth pic. New motor in place.
Mowes great, and seems quieter than the last motor.
Attachments


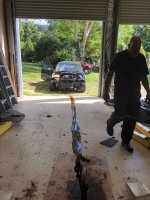
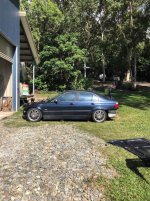
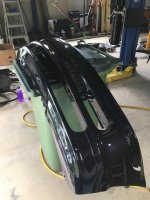
School holidays, and working on Alex's car. Clear lacquer peeling off the bonnet, and tops of both bumpers.
Photo 1. Backing out of garage, and Vanos oil line ruptured. New parts ordered.
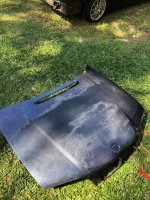
Photo 2. Bonnet and bumpers off for sanding and re-painting.
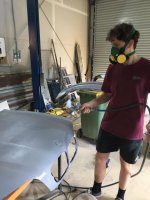
Photo 3. Sanding commences.
Photo 4. Bonnet off before sanding.
Photo 5. Sanding the bonnet.
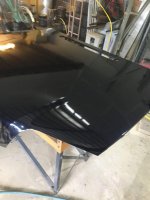
Photo 6. Beginning spraying primer.
More to follow.
Photo 1. Backing out of garage, and Vanos oil line ruptured. New parts ordered.
Photo 2. Bonnet and bumpers off for sanding and re-painting.
Photo 3. Sanding commences.
Photo 4. Bonnet off before sanding.
Photo 5. Sanding the bonnet.
Photo 6. Beginning spraying primer.
More to follow.
Attachments


Primer on bonnet, and both bumpers. Realised I didn't put enough thinners in the paint, and came out a bit dry, and rough. Took a bit of sanding to get it smooth again, but accomplished it in the end. Three coats of base coat, and 4 coats of top coat completed today. Tomorrow plan on fine sanding, and polishing it to a fine shine.
Will post more when done.
Cheers,
Ken
Will post more when done.
Cheers,
Ken
Attachments


HOTFR8
Banned
Great to see some progress.