67carl
Well-known member
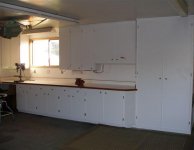
Really nice, I did almost the same but used melamine for the face frames and doors.
Love that Kramer painting! Nice cabinets too!


Really nice, I did almost the same but used melamine for the face frames and doors.

Really nice, I did almost the same but used melamine for the face frames and doors.
quantumhardwareofconcord on eBay.Aussie Dan. Just wondering if you could give your source for the full overlay hinges for $1 ?
Thanks
Really nice, I did almost the same but used melamine for the face frames and doors.
Yup, it definitely makes things easier, you do need to finesse the doors a little to make sure you have even gaps but other than that you're also able to save time because you're making 3 identical units.Thanks for the feedback. I'd forgotten about the overlapping doors and I was already wondering how I would lift an 8'x8' set of cabinets onto the wall. I figure I'll just eat another sheet of plywood and make 3 individual cabinets and bolt them together like you did.
Lots of cabinets have been built out of it, for doors it will probably stay more flat than plywood which can warp a little. Don't get it wet! You'll also want to pick up a roll of edge banding to finish the cut edges.Any opinions on using melamine instead of plywood for the outside and doors? I'd still stick with plywood for the shelves but around here melamine is half the cost of plywood and a white finish would reflect light well.
I was skeptical at first but I'm definitely a Kreg convert now, it does make it very easy.Very cool! I need to get one of those jigs.
Yeah, I use a track saw to cut all the parts which makes it easier (though not exactly easy!) to get them all the same size. It's definitely much more accurate than just running a circular saw along a straightedge. Also don't assume that the sheets of plywood are cut square. Make sure you have a good blade too, I've been using a Diablo 7 1/4" 40 tooth finish blade and have been very happy with it, but I'd like to try their 60 tooth ultra finish blade.Maybe I missed it, but how do you ensure all the shelves are the same exactly width when cutting? I've done shelves before and this is my hardest part. No matter how many times I measure and double check, it seems one or two are always a hair off.
Yup, you could definitely do that, just have to hold the front of the shelves back 3/4" to make room for the strapping. If I were building a closet or something I'd definitely want to stiffen the doors up, but in that case I'd most likely build paneled doors. For the garage the plywood doors are fine (mine are flat to within 1/8" or so), I did put 4 hinges on each door which seems to help keep them flat.For slab doors I usually see some 1x on the back side to strengthen it up and help prevent warping. I suppose if you have access to some steel you could some strips of that as well.
Good idea, I might have to give that a shot since I still haven't gotten around to putting poly on mine, seems like there are always more interesting jobs to do! I know I'm going to need to poly the cnc cabinet so I'll probably hit the storage cabinet doors at the same time. Unloading the cabinets to hit the interior is definitely more effort than I'm willing to go to right now.For poly, I got a cheap spray gun from harbor freight. You can thin it a bit with some thinner or naptha and sand between coats to remove imperfections. This method reduces the runs you sometimes get with a brush, along with no brush strokes. Plus, who doesn't like using air tools.
Yeah, I use a track saw to cut all the parts which makes it easier (though not exactly easy!) to get them all the same size. It's definitely much more accurate than just running a circular saw along a straightedge. Also don't assume that the sheets of plywood are cut square. Make sure you have a good blade too, I've been using a Diablo 7 1/4" 40 tooth finish blade and have been very happy with it, but I'd like to try their 60 tooth ultra finish blade.
Yeah, the 40t will cut faster but the finish blade will give a much nicer cut with no chipping or tear-out in the plywood. The system I use isn't as fancy as the festool track saw etc, but does a pretty good job as long as you make sure you're holding the saw level and not letting it sag. EZ-smart looks like the prices have gone up since I bought mine.I just looked up a track saw. Didn't even know those existed. I usually just clamp a 2x4 or a piece or base and run my circular saw along that. I run the same blade with good results. I have a 60-70 tooth I used when building my bar, but haven't used it since. The 40 tooth has done well for what I have needed.
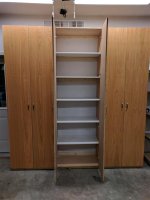
Nope. They're screwed to the wall so the drywall forms the back of the cabinet. You could easily stick a thin sheet on the back if you were going to build a freestanding version.I am digging these cabinets. Do you ever wish that they had a backboard in them?

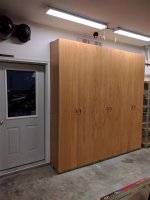
Your cabinets appear to be a bit different in design from Aussie Dans.
It looks like instead of building 3 separate cabinets and then joining them that you made one big cabinet. The tell is in the single plywood separating the spaces vs. the double that Aussie Dan did.
I was thinking about trying to save a sheet by doing the same but I wondered how, or if, you bolted the shelves to the uprights? Did you use a biscuit or other fastener?
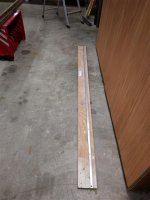
") - wish I would have done that a long time ago. It worked great except that I decided to rip the other side of the fence for the short side of my saw - big mistake. This resulted in me having issues with clamps getting in the way and cause a few miss-cuts.
- wish I would have done that a long time ago. It worked great except that I decided to rip the other side of the fence for the short side of my saw - big mistake. This resulted in me having issues with clamps getting in the way and cause a few miss-cuts.Rookie mistakes
- I mentioned clamps getting in the way. Rookie move 101, always be sure that your work area is free of obstructions (DOH!)
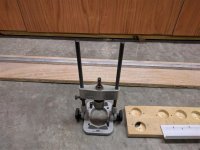
- Check your tools before each cut. My drill alignment tool has a stop on it that came loose and I ended up drilling through one of the doors
- My hinge pattern marked the door with 3 dots; one for the cup and 2 for the screws. Old eyes, poor light, and repetition got to me and I ended up drilling a cup using the wrong dot. From then on I circled the cup dot.
- Measure once for a pattern and then use it. When lining up the uprights I started by measuring and that was a big mistake. Once I cut a 2x4 to the correct size I was able to easily line everything up in exactly the correct spot. I wish I would have figured that out earlier in the cutting process.
- When putting your hinges on, be sure they don't lie exactly where you just put the shelf - DOH!
- Finish before assembly, well, at least for the doors. With everything assembled it is really hard to finish the lap sided door surfaces.