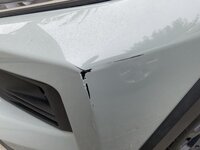
My wife’s ‘20 Rav 4 has a bit of paint rub, ala, yours truly on the front L fender. It is a color called Lunar Rock. Don’t think that matters, but I have picked up a small bit of the paint and was getting ready to hit when I thought I’d ask. What is the best way to apply this for best results? Much obliged for any suggestion.


You are using an out of date browser. It may not display this or other websites correctly.
You should upgrade or use an alternative browser.
You should upgrade or use an alternative browser.
Automotive touch-up paint
- Thread starter Jackfre
- Start date
BillK
Well-known member
Picture of the damage would make it easier to give suggestions.
Walkers
Well-known member
I agree, need pics
Bill Bowman
Well-known member
Also, the type of touch up paint that you have.
rktinc
Well-known member
I have had the best luck with Dr Color product. It applied correctly with great care. It works wonderfully.
Dr.Color .com
Dr.Color .com
frankd
Well-known member
I'm curious as to the best way to correct this also. I've tried touching up many scratches/scuff and they always come out awful.
captain14
Well-known member
Is there a dent in there or just the light reflection?
nadogail
Well-known member
I follow the directions on the container.
Touch up paint could make that look better OR worse, it depends on how it's applied, how rough that bare plastic is etc. Are you talking about spray can touch up or something along the "Dr Colorchip" (or whatever it's called)?
The spray stuff like Duplicolor is almost never actual auto base coat...
Honestly your best bet is to find someone locally who does something along the lines of "mobile" paint repair.
If it were me, I'd remove the bumper, sand the damaged spots. Use some quality flexible filler if needed on the damaged spots, apply adhesion promoter to any spot that was down to bare plastic, prime those spots, scuff the entire thing with a 3m pad, tack, then get some matching auto base coat in an aerosol can (any good auto / body paint supply can provide it - it's ACTUAL auto base coat, matched to your paint code, put into a spray can) and a can of the 2K aerosol urethane clear coat.
But I don't know how comfortable you are with paint / body work. I'm no pro by any stretch, but I've done the process I described above on four or five plastic bumper covers and you can't tell, to this day, whether they were ever damaged / repainted.
The spray stuff like Duplicolor is almost never actual auto base coat...
Honestly your best bet is to find someone locally who does something along the lines of "mobile" paint repair.
If it were me, I'd remove the bumper, sand the damaged spots. Use some quality flexible filler if needed on the damaged spots, apply adhesion promoter to any spot that was down to bare plastic, prime those spots, scuff the entire thing with a 3m pad, tack, then get some matching auto base coat in an aerosol can (any good auto / body paint supply can provide it - it's ACTUAL auto base coat, matched to your paint code, put into a spray can) and a can of the 2K aerosol urethane clear coat.
But I don't know how comfortable you are with paint / body work. I'm no pro by any stretch, but I've done the process I described above on four or five plastic bumper covers and you can't tell, to this day, whether they were ever damaged / repainted.
firebirdparts
Well-known member
The best way, by far is to spray it. For something that size, an air brush would do it. Spray a spot about the size of a dime.
4xdog
Well-known member
I have had the best luck with Dr Color product. It applied correctly with great care. It works wonderfully.
Dr.Color .com
A buddy of mine -- a seriously detailed, very competent guy around material science and cars, spoke highly about Dr. ColorChip. He said the results he got on his wife's Audi were excellent. And that's not idle praise from him.
So I got some Super White (040) and Millenium Silver (9C0) for my Tacoma and Lexus RX respectively for some tiny (1-2mm) rock chips on the front of both vehicles.
Miserable results. Thin coverage. Difficult to wipe as directed to leave paint in the chip and remove the thin film of excess paint around the chip from squeegeeing. I'd never encourage anyone to spend the money (not exactly cheap) to get the results I did. I've gone back to the dealer brush-on.
(And I've spent 40+ years doing R&D and technical service in paints and coatings -- this isn't my first rodeo with these kinds of materials.)
Last edited:
Metal-Marc
Well-known member
That's a big area for a touch up. What's you goal? A twenty footer job?
shoot summ
Well-known member
- Joined
- Jun 8, 2010
- Messages
- 2,960
Mirrors my experience as well.A buddy of mine -- a seriously detailed, very competent guy around material science and cars, spoke highly about Dr. ColorChip. He said the results he got on his wife's Audi were superb. And that's not idle praise from him.
So I got some Super White (040) and Millenium Silver (9C0) for my Tacoma and Lexus RX respectively for some tiny (1-2mm) rock chips on the front of both vehicles.
Miserable results. Thin coverage. Difficult to wipe as directed to leave paint in the chip and remove the thin film of excess paint around the chip from squeegeeing. I'd never encourage anyone to spend the money (not exactly cheap) to get the results I did. I've gone back to the dealer brush-on.
(And I've spent 40+ years doing R&D and technical service in paints and coatings -- this isn't my first rodeo with these kinds of materials.)
mrbill55
Well-known member
So here is the initial problem at first blush, the color itself has 8 "alternate mixes" to the paint product, meaning their are 8 variations of the same color code, sprayed at different times on the assembly line. Second, you are down to the raw base material of the bumper material, you now need to add a primer, then sealer, before you use the touch up paint. So, what you need to do now is as follows:Sorry for the delayed response. Here it is.
1: You need a micro sanding wand, the head, about the size of a "Q" tip, carefully sand down the bare area, and the very edges of the area where paint is still attached.
2: Wipe down with an automotive grade de-waxer/degreaser
3: Once dry, I suggest you use a foam "Q" tip (buy a small box) to apply a primer, or primer/seal combination, light, even strokes, and several layers until you do not see the black bumper material.
4: Next is the application of your color, again, light, even strokes, and very light coverage layers until the primer is completely covered.
5: Once accomplished, you can then do the same with a clear/top coat. Again, clean, even, light strokes and coverage.
Allow each layer to properly dry/out gas before adding another on top.
6: Walk away for an evening, come back the next day and see if it needs a light hand buffing
What I recommend, go to your local autobody shop and let them prep and blend the paint within the bumper itself. Do it once, do ir right, and forget about worrying about it or getting yourself wound up about it every time you see the homemade repair job.
Bill S.

