

Hello,
Several months ago I started looking at floor coverings here at Garage Journal. I was lucky to come across Justin Krauss from Garageflooringllc.com
I must commend his effort and assistance through the purchasing and install. The shipping of the products were prompt and his responses to questions were quick and knowledgeable.
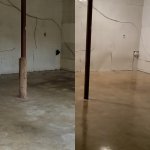
I went with All Weather Flooring's Water Based Epoxy in clear for my garage. The house was built in 1980, and the 525 sq ft floor had quite a bit of stains and wear on it. My primary goal was to get a protective coating on the floor to make cleanup easy and to lock out any smells from the previous owners animals, plus now I can walk in my garage with socks on and not drag dust back in the house!
Oil stains, pet stains, paint, rust, you name it this floor had it on there, but I tested a few spots with the water test (1/2 cup of water on the floor, make sure it soaks up and doesnt bead up) and it worked, except where the oil stains were obviously.
I have a lot of photos, so I just put them in a publicly viewable album here:
https://photos.app.goo.gl/KKJKi2qTj49CHfM59
Normally this stuff requires minimal prep, just a de-greasing of the floor and some acid etch. However, with the condition of my garage floor I needed to go a step further. I bought some TSP, DAWN dish detergent, stiff bristled deck brush and a 5 gallon bucket, then rented a floor buffing/polisher from Home Depot with the Diamabrush Coating Removal tool (Big disc with diamond covered flaps).
Read below to follow along with how I finished my floor:
1. Remove all loose articles and items from the garage.
2. Sweep floor to remove debris.
3. Mix 3 Cups of TSP, 1 cup DAWN (Powdered Tide will also work) and mix in a 5 gallon bucket of hot water.
4. Dip stiff bristled deck brush into cleaning solution and scrub floor, vigorously and liberally.
5. Let cleaning agent sit for 15 minutes.
6. Powerwash floor.
7. Squeegee floor and let dry.
8. When the floor is dry, test stained areas again to see if oil makes water bead up. If there were spots that still beaded up I went over it again with a thick paste of TSP/Dawn/Water, scrub and let sit then clean up. I also used CLR on some major rust spots
9. After the floor was clean, I rented the buffer/diamabrush. Grind the garage floor, using water. You will see the difference after grinding the floor, remember to not let it sit in one spot too long or it will show the larger aggregate in the concrete. Also, this thing loves to bite into the floor, it will take some muscle to manipulate it and keep it moving.
10. Spray the floor as you grind, don't let the sludge build up or dry.
11. When done grinding, spray the floor off and squeegee it. Make sure to get it as clean as possible. Once the sludge dries it will be more difficult to remove. You can use a Wet Vac to clean it up as you go if you have a helper, but I did this whole install on my own and would grind in 5x5 sq ft areas, spray, moved to the next square, spray, rinse wash repeat, then sprayed and squeegeed the floor again when I was done grinding. I never let the floor get dry until I was finished squeegeeing that area.
12. Once the floor was dried, I used a leaf blower and blew off any dust and cleared out any holes/cracks.
13. I had a decent crack from the house settling in the floor, so I used a Crack Chaser wheel and cleaned it out.
14. Fill in cracks / holes with 100% solids epoxy crack filler.
15. Using a 4" Angle Grinder and 4" Diamabrush I ground the filler down and went over any spots that looked like they were still dark from oil stains. I also went around the perimeter of the room and wherever the floor polisher wouldnt reach. Be careful as this thing will eat your concrete, use a good respirator and vacuum shield.
16. Vacuum the dust (make sure to use a fine particle seperator for the vacuum).
17. Sweep and vacuum again. Clean the floor until you run your hand across the concrete and don't have any dust on your fingers.
18. With a clean floor, prepare your tools and materials.
19. Mix the primer up (Same epoxy as what the rest of the floor is, but mixed with water to thin it out). I used 1 gallon of Epoxy for primer, and mixed it with water per the directions. I used a paint mixing bit for my handheld drill and mixed it up in a 5 gallon bucket.
20. Pour primer into your 18" paint roller pan.
21. Use a small 4" roller and prime the perimeter and any small areas that the larger roller can't get to.
22. Using the 18" roller roll out a thin coat of primer on the floor, don't let it pool up.
23. Let the prime coat dry to the touch, you should be able to put your hand on it without it being tacky. (For me I primed around 6pm, and by 10pm I was able to put the epoxy coat down)
24. Once floor has dried to the touch, prepare your epoxy (I used two gallons for this part, Mix part A with Part B for each gallon, then mix the two catalyzed gallons together) I also added two packets of antiskid additive. (Could have gone with three, but 2 two packets work well enough)
25. Attach your spiked shoes onto your feet and use the small roller to go over the perimeter again with a thick coat.
26. Once the perimeter is complete, put down your epoxy coat. Thick but do not allow it to pool.
I let the epoxy dry for 3 days before I went in and did anything else. I completed the rolling before midnight, so from the time I primed to finish it was under 6 hours. I was able to walk on it the next night, but I didn't want to move anything on it until I was confident it was cured enough.
I had one spot which I had let the epoxy pool up and it left a puddle. I could have ground it down and re-epoxied it, but after long enough it cured and isn't noticeable unless you drag something over it.
This is definitely a 2 day project at least, depending on your floor condition. The prep is what takes the longest part, but as they say, prep work is what makes the difference.
I didn't want to write this review until I had time with it, I had installed this in September and have since moved appliances, safes, jacks, cabinets, dropped tools and wood on the floor. I park my Side by Side on it, and I occasionally have pulled my truck in after a long drive to unload materials. The floor can scuff but it cleans up easily, it has not chipped from dropping tools on it, and it has not been gouged. I have spilled antifreeze, dripped spray paint and latex paint onto it. It has all cleaned up without damage to the floor.
I had my doubts about the durability as I wanted to originally go with a Polycuramine, but am very happy with this.
Products List:
AWF WB Epoxy - Clear (3 Gallons)
Seal Crete Anti Skid (2 packets)
Dawn Dish detergent
TSP
CLR
Tools:
Diamabrush 4" concrete coating removal disc
4" Angle Grinder with vacuum shroud attachment
Diamabrush Concrete coating removal disc for floor polisher
Floor Polisher
Crack Chaser wheel (amazon.com)
5 Gallon buckets
18" Roller pan
18" 3/8" roller cover
18" roller with broom handle
4" roller
4" roller handle
Spiked shoes (I used 1x6's with screws in them because I had forgot to buy them, just buy a cheap set instead of building your own)
Respirator
Wet/Dry Shopvac
Floor Squeegee
Leaf Blower / Compressed air with blow nozzle (optional)
Cordless Drill
Paint Mixer
Deck brush
Shop Broom
Several months ago I started looking at floor coverings here at Garage Journal. I was lucky to come across Justin Krauss from Garageflooringllc.com
I must commend his effort and assistance through the purchasing and install. The shipping of the products were prompt and his responses to questions were quick and knowledgeable.
I went with All Weather Flooring's Water Based Epoxy in clear for my garage. The house was built in 1980, and the 525 sq ft floor had quite a bit of stains and wear on it. My primary goal was to get a protective coating on the floor to make cleanup easy and to lock out any smells from the previous owners animals, plus now I can walk in my garage with socks on and not drag dust back in the house!
Oil stains, pet stains, paint, rust, you name it this floor had it on there, but I tested a few spots with the water test (1/2 cup of water on the floor, make sure it soaks up and doesnt bead up) and it worked, except where the oil stains were obviously.
I have a lot of photos, so I just put them in a publicly viewable album here:
https://photos.app.goo.gl/KKJKi2qTj49CHfM59
Normally this stuff requires minimal prep, just a de-greasing of the floor and some acid etch. However, with the condition of my garage floor I needed to go a step further. I bought some TSP, DAWN dish detergent, stiff bristled deck brush and a 5 gallon bucket, then rented a floor buffing/polisher from Home Depot with the Diamabrush Coating Removal tool (Big disc with diamond covered flaps).
Read below to follow along with how I finished my floor:
1. Remove all loose articles and items from the garage.
2. Sweep floor to remove debris.
3. Mix 3 Cups of TSP, 1 cup DAWN (Powdered Tide will also work) and mix in a 5 gallon bucket of hot water.
4. Dip stiff bristled deck brush into cleaning solution and scrub floor, vigorously and liberally.
5. Let cleaning agent sit for 15 minutes.
6. Powerwash floor.
7. Squeegee floor and let dry.
8. When the floor is dry, test stained areas again to see if oil makes water bead up. If there were spots that still beaded up I went over it again with a thick paste of TSP/Dawn/Water, scrub and let sit then clean up. I also used CLR on some major rust spots
9. After the floor was clean, I rented the buffer/diamabrush. Grind the garage floor, using water. You will see the difference after grinding the floor, remember to not let it sit in one spot too long or it will show the larger aggregate in the concrete. Also, this thing loves to bite into the floor, it will take some muscle to manipulate it and keep it moving.
10. Spray the floor as you grind, don't let the sludge build up or dry.
11. When done grinding, spray the floor off and squeegee it. Make sure to get it as clean as possible. Once the sludge dries it will be more difficult to remove. You can use a Wet Vac to clean it up as you go if you have a helper, but I did this whole install on my own and would grind in 5x5 sq ft areas, spray, moved to the next square, spray, rinse wash repeat, then sprayed and squeegeed the floor again when I was done grinding. I never let the floor get dry until I was finished squeegeeing that area.
12. Once the floor was dried, I used a leaf blower and blew off any dust and cleared out any holes/cracks.
13. I had a decent crack from the house settling in the floor, so I used a Crack Chaser wheel and cleaned it out.
14. Fill in cracks / holes with 100% solids epoxy crack filler.
15. Using a 4" Angle Grinder and 4" Diamabrush I ground the filler down and went over any spots that looked like they were still dark from oil stains. I also went around the perimeter of the room and wherever the floor polisher wouldnt reach. Be careful as this thing will eat your concrete, use a good respirator and vacuum shield.
16. Vacuum the dust (make sure to use a fine particle seperator for the vacuum).
17. Sweep and vacuum again. Clean the floor until you run your hand across the concrete and don't have any dust on your fingers.
18. With a clean floor, prepare your tools and materials.
19. Mix the primer up (Same epoxy as what the rest of the floor is, but mixed with water to thin it out). I used 1 gallon of Epoxy for primer, and mixed it with water per the directions. I used a paint mixing bit for my handheld drill and mixed it up in a 5 gallon bucket.
20. Pour primer into your 18" paint roller pan.
21. Use a small 4" roller and prime the perimeter and any small areas that the larger roller can't get to.
22. Using the 18" roller roll out a thin coat of primer on the floor, don't let it pool up.
23. Let the prime coat dry to the touch, you should be able to put your hand on it without it being tacky. (For me I primed around 6pm, and by 10pm I was able to put the epoxy coat down)
24. Once floor has dried to the touch, prepare your epoxy (I used two gallons for this part, Mix part A with Part B for each gallon, then mix the two catalyzed gallons together) I also added two packets of antiskid additive. (Could have gone with three, but 2 two packets work well enough)
25. Attach your spiked shoes onto your feet and use the small roller to go over the perimeter again with a thick coat.
26. Once the perimeter is complete, put down your epoxy coat. Thick but do not allow it to pool.
I let the epoxy dry for 3 days before I went in and did anything else. I completed the rolling before midnight, so from the time I primed to finish it was under 6 hours. I was able to walk on it the next night, but I didn't want to move anything on it until I was confident it was cured enough.
I had one spot which I had let the epoxy pool up and it left a puddle. I could have ground it down and re-epoxied it, but after long enough it cured and isn't noticeable unless you drag something over it.
This is definitely a 2 day project at least, depending on your floor condition. The prep is what takes the longest part, but as they say, prep work is what makes the difference.
I didn't want to write this review until I had time with it, I had installed this in September and have since moved appliances, safes, jacks, cabinets, dropped tools and wood on the floor. I park my Side by Side on it, and I occasionally have pulled my truck in after a long drive to unload materials. The floor can scuff but it cleans up easily, it has not chipped from dropping tools on it, and it has not been gouged. I have spilled antifreeze, dripped spray paint and latex paint onto it. It has all cleaned up without damage to the floor.
I had my doubts about the durability as I wanted to originally go with a Polycuramine, but am very happy with this.
Products List:
AWF WB Epoxy - Clear (3 Gallons)
Seal Crete Anti Skid (2 packets)
Dawn Dish detergent
TSP
CLR
Tools:
Diamabrush 4" concrete coating removal disc
4" Angle Grinder with vacuum shroud attachment
Diamabrush Concrete coating removal disc for floor polisher
Floor Polisher
Crack Chaser wheel (amazon.com)
5 Gallon buckets
18" Roller pan
18" 3/8" roller cover
18" roller with broom handle
4" roller
4" roller handle
Spiked shoes (I used 1x6's with screws in them because I had forgot to buy them, just buy a cheap set instead of building your own)
Respirator
Wet/Dry Shopvac
Floor Squeegee
Leaf Blower / Compressed air with blow nozzle (optional)
Cordless Drill
Paint Mixer
Deck brush
Shop Broom
Attachments
Last edited: