To avoid these ads, REGISTER NOW!

Baada's Basement Overhaul and Epoxy Floor

Baada

Well-known member
Joined
Sep 28, 2010
Messages
258
Location
Eastern Missouri
Approximately 8 months ago I finished a complete overhaul on my basement. This involved some new plumbing and electrical work, new paint and most importantly an epoxy floor. I waited for several months before posting so that I could get a feel for how well it would hold up and how bad the mistakes I made would really affect the project. This thread will mostly be about the floor.

The whole goal of the project was to make the basement habitable and functional without spending a ton of cash. It was an extensive project and I learned a ton. I would mostly do everything the same way but with some minor tweaks here and there that would probably make a huge difference in the finished product, which I will share as this thread progresses. The first tip is to not do this when your wife is pregnant and you live in a 900sqft house where the laundry, and most everything is stored in the basement.:argue:


So, to start with this is what things looked like before I began. The view from the top of the stairs looking down. YIKES!
DSC03860-L.jpg

And some shots of the floor, which was some type of floor paint/epoxy that was wearing off badly.
DSC03868-L.jpg
DSC03863-L.jpg

The floor drain where the A/C and humidifier drained. NASTY!:puke:
DSC03910-L.jpg

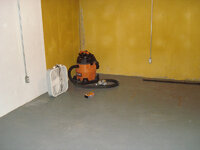
Some awesome color choices on the wall by the previous owner. I guess they couldn't decide if the mustard yellow was nice enough to paint all the way around or perhaps the yellow was to expensive so they only put it in the important spot? You can also see the electrical boxes I added. When I started there was one outlet in the whole basement.
DSC03865-L.jpg

This was what the ceiling looked like before painting. Due its low height we couldn't do a drop ceiling. Plus, paint is much cheaper. Note the outlet and surround speaker wire hanging from the support column.
DSC03881-L.jpg

And finally everything moved to one side to start on half the floor. Because we used the basement so frequently we couldn't do it all at once. Plus, we had nowhere to store the stuff while it was being done except to shove it all on one side.
DSC03872-L.jpg
 
To avoid these ads, REGISTER NOW!
OP
B

Baada

Well-known member
Joined
Sep 28, 2010
Messages
258
Location
Eastern Missouri
I started a thread back when I did the concrete prep (located here Concrete Prep Options) but I copied my description of the work I did if you don't want to navigate to another thread. Additionally, I taped off all the air ducts, hung plastic to protect the other half.

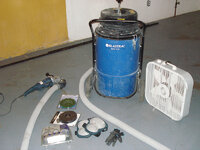
I rented a 7' angle grinder with shroud and bought a three pack of grinding discs and a diamond cup. I also rented a twin turbo shop vac; it literally had two motors that had to be switched on indepenandtly or it would trip the breaker. It was designed specifically for this type of work because it had a knob on top that about every hour I would turn the vacuum off and push the knob down several times and it would knock most of the dust off the filter to increase suction. That being said, I really wasn't all that impressed with the amount of suction even when "clean."
DSC03884-L.jpg

I set up a fan blowing out one of the basement windows and opened a few windows on the other side to get as much dust out of the air as possible. Between the vacuum and the fan it wasn't bad at all. I was glad to be wearing my P100 respirator though. There was still a small layer of dust on the tops of the outlets and such but it vacuumed up easily.
DSC03885-M.jpg

I started with the grinding discs and it took about 5 minutes before I realized it would work but take about 10 straight days of grinding to get anywhere. I then tried the diamond cup and it was much much better. The vacuum pressure created by the dust shroud made it very easy to stay level and helped pull the cup towards the concrete which was nice. After about 2 hours I realized it was going to take too long with that route and went back to HD and also rented the floor standing model. Plus, my knees and back were already hurting.
DSC03886-L.jpg


The floor standing model used a 9' cup diamond and worked pretty well. The dust collection wasn't as good but it was still effective. I tried to see if I could increase production rate with a little water but it really didn't seem to help much and made a mess. I got more milleage out of some weight (25lbs) hung on the motor housing. This machine required next to no effort to operate.
DSC03900-L.jpg

The best way I found to do it was to use the floor standing grinder to knock off as much as I could. Because the floor was pretty wavy I would then switch to the angle grinder/diamond cup and worke on the low spots. When I had gotten as far as I could with that I switched to the grinding disc and because it was flexible I could angle it a bit and get into the low spots. All in all I got about 95% of the existing epoxy off and the floor is much smoother than it was before. I wish I could have gotten it all but it that would have required some serious concrete removal to get down to the low spots. Plus, what is there is very well attached so it shouldn't cause any issues.

So, the good news is I got about 500 sqft done in about 8 hours time. The bad news is that I have to move all the stuff from one side of the basement to the other and rent everything again and grind the remaining 500 sqft. Gonna get some more Advil in anticipation.
 
OP
B

Baada

Well-known member
Joined
Sep 28, 2010
Messages
258
Location
Eastern Missouri
Here is a shot of the Foreman (Forewoman techinically) checking on my work. You can also see more fine paintwork on the wall. It must be an artistic thing that's over my head. Less is more kind of deal.
DSC03915-L.jpg


Now the stairs she is standing on were pretty horrible. I think the stringers were hand sawn after a 12 pack. :drink: There isn't a straight line or 90 degree angle to be found. The step heights varied from 6 1/2" to 8" but not one was the same. Not to mention the fine finish they put on the treads.
DSC03927-L.jpg


Plus you can see that there were no risers so anything stored under the stairs would get covered in dust and dirt. No good. Additionally, the storage shelf left a little to be desired.
DSC03919-L.jpg


The solution? Tear them out and start from scratch. Plus, then I could grind the floor underneath for epoxy. In order to make this work however I had to make the new stringers, store them in the basment, take the grinding equipment down, tear out the old stairs, grind, install the new stingers and temporarely reinstall the old treads to get the grinding equipment out. It really sucked. You can also see in this picture the light switch for the stair and basement lights...major upgrade from the individual pull strings. Plus if you look really close you can see the new drain line for the AC/humidifier running along the wall around to the sink drain. No more stepping on the line at the bottom of the stair in the dark and rolling an ankle.
DSC03947-L.jpg
 
OP
B

Baada

Well-known member
Joined
Sep 28, 2010
Messages
258
Location
Eastern Missouri
Once all the concrete grinding was done I set about repairing the cracks, chips and holes left behind from 55 years of wear and tear.

For the larger holes I used bondo, which worked very well. For the smaller holes and the cracks I used acrylic crack filler, which also worked very well. In both cases I applied the product so when dry it would be a little bit higher than the floor. After it cured I simply used the grinding discs to smooth it out. This worked perfectly. One thing I learned though is that for the cracks to smooth it so there is a little more material left behind than you think. On one half of the basement I ground it down so that the filler material was only in the crack. After epoxy I could still see the crack a little. On the second half I left it so that there was little material coming out of the crack and over the edges of the crack...just a little. This totally hid the crack under the epoxy.

Here is a shot of a crack coming out from the drain line in the floor on the first half that I sanded so all the filler material was in the crack void itself. Unfortunately I didn't take one of a crack on the second half with the material also covering the edges of the crack.
DSC03977-L.jpg


Additionally, on the first half of the basement I didn't spend enough time seeking out the imperfections as I mistakenly assumed that the epoxy would fill and hide them. For the second half I really paid attention to all the little gouges and little holes that I could find and filled them all in and sanded smooth. I got significantly better results after epoxying.
 
OP
B

Baada

Well-known member
Joined
Sep 28, 2010
Messages
258
Location
Eastern Missouri
Next was the base color and chip color and size selection. Another tip, this is also not the type of decision to try to make with a pregnant wife.:lol_hitti

After we had several samples made up and sent to us from Epoxy Coat we decided on a tan base color with a 3 chip color code consisting of tan chips, one color darker than tan chips and one color lighter than tap chips. Additionally, we decided on the small chip size. Basically my wife didn't want the contrast of chips and wanted a more single color look.

After ordering and receiving everything from Epoxy Coat I noticed that the chips we received were significanly larger than what was on the "wife approved" sample. I called and Christine sent me a whole new set of cihps immediately, which was awesome. Unfortunately they were the same size as the first set I received.

Here are a few shots of the chips received vs. the samples we received.
DSC04003-L.jpg

DSC03997-L.jpg


Not to worry, Christine advised that I could grind them up in a blender. Well, I'm pretty sure I already mentioned the pregnant wife right? I determined that I valued my life enough not to use her blender on epoxy chips. I dumped all the chips into a bucket, attached the included mixing bit into my drill and went to town on high speed. This did a pretty good job of breaking them up to the right size and I could sleep at night with both eyes closed.
 
OP
B

Baada

Well-known member
Joined
Sep 28, 2010
Messages
258
Location
Eastern Missouri
So now I was off the races. All the prep was done, I had the materials in hand and the floor was ready to be put down. Wait wait wait. Moisture test? Oh ****, better do one considering it'a basement built in the 50's. Fortunately I was lucky and I had very low moisture so I was good to go.

Here is everything set up and ready to go. Some points to consider:
-You can see the duck tape I used to separate the first half from the second. This worked great, just remove about an hour after applying the epoxy, or when it's tacky and won't flow anymore.
-I also highly recommend the disposable paint tray for laying the roller and brushes in. It won't soak through and when it drys the epoxy flakes right out and you can reuse the tray.
-I taped my floor squeegee to an old broom handle to make life easier.
-I seperated my chips into four equal parts for the four sections to be done. I also premarked dots on the floor with permanent pen so I had basic guidelines when applying where the sections where.
DSC04006-L.jpg
 
OP
B

Baada

Well-known member
Joined
Sep 28, 2010
Messages
258
Location
Eastern Missouri
Each half of the basement was approximately 425 sqft. I used one kit per half.

Here are a few shots of the completed first floor.
DSC04016-L.jpg


Here is a hint, remove any masking tape before it cures...what a pain.
DSC04015-L.jpg


There is a lot more contrast between the walls and the floor than this picture shows.
DSC04013-L.jpg


And finally a close up showing a little more of the flakes and the line resulting from doing it in two sections. The line is pretty faint and I had a hard time getting it to show in the photos.
DSC00165-L.jpg

DSC00164-L.jpg
 
Last edited:
OP
B

Baada

Well-known member
Joined
Sep 28, 2010
Messages
258
Location
Eastern Missouri
And finally, some shots of the completed basement with a new stair case, shelving, laundry sink and other small touches to make it more comfortable.

DSC00144-L.jpg


Unfortunately this is my tool storage area because I only have a garden shed and no garage.
DSC00153-L.jpg


Laundry area.
DSC00162-L.jpg


A shot of the painted ceiling....and you can barely see my outdated bigscreen/mancave area.
DSC00159-L.jpg


And finally what it looks like from upstairs. I think it's a tad more inviting and a little less "Silence of the Lambs."
DSC00142-L.jpg
 
OP
B

Baada

Well-known member
Joined
Sep 28, 2010
Messages
258
Location
Eastern Missouri
Lessons learned!

- Do not use the bucket and measuring stick method. I did this twice and both times I ended up with not enough part B. The first time it was just a little shy but the second time it was a fair bit. And I was absolutely meticulous about measuring as best as I possibly could. The worst part is that the second time the section that didn't have enough part B was right at the bottom of the stairs which gets the most traffic. The finish has dulled significantly in this area and I'm not sure if it's normal for a high traffic area or due to the improper ratio. The epoxy did cure hard and doesn't appear to be softer but I have a feeling it is.

-Concrete preparation. Depending on the size of your floor and the condition it may be worth hiring someone to grind the floor. I spent a lot of time and about $400 on rental equipment to get my floor. It probably would have been a little less if I could have done it all at once instead of two separate times but I'm not sure I could have done it all in one 24 hour rental period. I later learned that there are folks who will do it for about $500ish in my location. I think the larger the area you have the more feasable and cost effecting it is to have someone do that part for you.

-Smell. They say it doesn't smell and I would have agreed with them. That is until my pregnant wife informed me that it smelled very strong. I had tons of ventilation but it took 4-6 days before the smell was reduced enough for her to go into the basement. Eventually it completely went away and I don't think it was dangerous chemicals or anything, it just had a smell to it that my wife didn't like. Probably not as big of a deal for a garage but for a basement it was an issue. Just plan accordingly.

-Latex gloves. Buy a box because you will go through them quicker than you think. You really don't want epoxy on your skin because it takes forever to wear off. Additionally, I changed gloves frequently because they got covered in epoxy and they tore when pushing and pulling the roller.

- Do everything possible to fix every floor defect before putting down the epoxy. The epoxy does not fill in and level out like I thought it would. I had some pretty minor chips that I expected to the epoxy to fill in and it did not.

- Primer, or at least some kind of pre-coat to fill in pin holes and other defects that lead to fisheyes or bubbles or just little holes. On the second half I really really spent time filling in every hole I could possible find, even the very very small ones and my results were waaaay better, but still not perfect. I feel like a primer coat would have made the resulting epoxy coat much smoother. I even considered rolling on a primer and then using a squeegee push it into the small holes and to scrape most of it off. Whatever you can do to make the floor perfect before the epoxy is probably worth it. Plus it seems like it prevents the random outgassing or moisture problems that some people seem to get so it's just good insurance.

- Flake application. I did not have spike shoes and thought I was doing a god job of throwing the flakes...until the floor cured and I got a better look. In part because of the low contrast of the flakes I chose and in part due to the distance I had to throw, sometimes (8-10ft), I had some areas that were really heavy and some that were super lite. Get the spike shoes....it's worth the $35 ten times over.

- Personnel. I did everything myself and it worked out ok. However, I could really see the benefit of someone helping out. Even if it's just minor things. I was moving fast the whole time and it was a bit stressfull.

- Grit/Flakes/Sharkbite. Initially I was going to coat the steps in epoxy. Naturally I was concerned about traction on the stairs so I planned on using grit. I got the normal grit and the fine grit from Epoxy Coat in addition to Sharkbite I got at a local retailer. In the end I went a different route with the steps so I didn't get a chance to try the Epoxy Coat on a wood surface but they told me it would work well. Because I was planning to build a storage area under the stairs I used this as a test location for the various traction aides. Here are my conclusions:

> Normal grit is very rough and should only be used for really slippery work conditions like hydraulic or motor oil. I actually cut my finger when I reached down to feel it and I was being careful because I read another thread where someone else had cut their finger before when they touched it. Because this was going to be inside the house the normal grit was a definite no go for me.

> Fine grit was better but it was still much to rough for bare feet. I would consider this for floors that are prone to being wet all the time but I think it's overkill for normal use.

>Sharkbite. I could barely tell that I had applied it. I actually thought I hadn't put enough down so I did a second test spot in a corner when I laid the second half of the floor and it wasn't any different. I don't think it's practical for thick coating of epoxy. Maybe for a thin coat and then I would wait for it to tack up pretty good before sprinkling on a liberal coating of Sharkbite. I'm sure it has it's applications but for me it didn't seem like it would help much.

>Flakes. In my opinion this is by far the most practical and useful method of getting some traction. If you are concerned about a slippery floor, order more flakes. Even if they are the same color as your base coat, they are the way to go. In the areas where I had poor flake coverage the floor is a little slick. In the ares where I had heavy flake coverage the floor is very not slick. In the normal flake coverage area the traction is just right, even when wet or wearing socks.

-Flaws after epoxy cures. Don't freak out. It's like any other project where you notice the smallest defects as if they had a neon arrow pointing at them. In a few weeks you will forget all about them. Once the floor get's a little use they are barely noticeable. People laugh at me when I point out the defects on my floor to them and give a look like I'm crazy.

All in all I am extremely happy with the floor. I have some chips from droping sharp objects on the floor but from what I can tell the concrete chipped and not the epoxy separating from the foor. It was huge improvement over the existing floor and I will likely use epoxy again when I have an area that needs a floor coating.
 
Last edited:
OP
B

Baada

Well-known member
Joined
Sep 28, 2010
Messages
258
Location
Eastern Missouri
Let me know what you guys think and if you have any questions.. Any feedback on my process is greatly welcomed in case I do it again down the road.
 

Jim B

Well-known member
Joined
Mar 31, 2012
Messages
196
Location
California, USA
I did epoxy on my garage floor about 2 months ago and I have to say all your recomendations are spot on. Especially repairing defects in the concrete before applying the epoxy. Really great job on your floor and the entire project. I also like the stairs.:thumbup:
 

welder4956

Well-known member
Joined
Apr 8, 2010
Messages
3,084
Location
Birmingham, AL USA

Good job! Looks like you tied the A/C condensate drain into the sewage drain with no trap. If so, you will be getting some bad odors coming up in the A/C coils that will be blown through the house. This will need a trap on it or route it somewhere else to above the sink trap (like a dishwasher drain), floor drain or a sump with a automatic pump.
 
OP
B

Baada

Well-known member
Joined
Sep 28, 2010
Messages
258
Location
Eastern Missouri
Good job! Looks like you tied the A/C condensate drain into the sewage drain with no trap. If so, you will be getting some bad odors coming up in the A/C coils that will be blown through the house. This will need a trap on it or route it somewhere else to above the sink trap (like a dishwasher drain), floor drain or a sump with a automatic pump.

This is a very good point. There are actually two traps. One is on the drain line itself just outside the edge of the picture. It is a small trap though and I was worried about it drying out and the smell coming through like you suggested. Fortunately, there is water draining from the A/C or the humidifier just about every day so it hasn't been an issue. Additionally, the floor drain actually has a trap in it as well and with the laundry and the sink being used nearly every day it's always full of fresh water.
 
To avoid these ads, REGISTER NOW!

Lou E

New member
Joined
Nov 11, 2012
Messages
2
That turned out great, what a transformation, and the step by step really helps with letting someone know what they, and myself, are in for.
 
OP
B

Baada

Well-known member
Joined
Sep 28, 2010
Messages
258
Location
Eastern Missouri
Thanks Lou. Most of what I now know is because I read it first on GJ....I only know a little bit from what I learned on my own.
 

Shea

Well-known member
Joined
Sep 19, 2012
Messages
2,868
Location
California
Great job! :rocker: The first project is always a huge learning process now matter how much you read up on it. The second is much smoother..... What's next? :bounce:
 

JDGolden

Well-known member
Joined
Oct 30, 2012
Messages
1,403
Location
Michigan
That looks really nice! I am strongly considering this for my laundry room (in the basement). This is exactly the look I want. Nice work!
 
OP
B

Baada

Well-known member
Joined
Sep 28, 2010
Messages
258
Location
Eastern Missouri
Thanks lads. We had some family over after Turkey day and we hung out down there so the kids could play. It was really nice to have the area available because we didn't use to and everyone would be crammed into our tiny living room. Well worth the effort.
 

CT2012

Well-known member
Joined
Oct 11, 2012
Messages
354
Location
Northeast
that looks really terrific, you gave me some great ideas/plans for my next project.

how'd you paint the ceiling, and what type of paint/primer?

i have a really low ceiling, and can't afford to lose any height with a dropped panel setup. after a ton of searching and some luck, i found this:

http://www.ceilinglink.com/

it enables a full drop ceiling look but with only 1 inch of lost height.
 

SteveL

Well-known member
Joined
Jan 14, 2005
Messages
760
Location
St. Louis, MO
Would've also like to hear about how you did the ceiling. I'm thinking about spraying mine but not sure how I will like all of the exposed wires being painted. Does that bug you at all?

Nice job on the floor! I'm getting ready to do mine but I have 50 year old tile to deal with and more than likely it contains asbestos.
 
OP
B

Baada

Well-known member
Joined
Sep 28, 2010
Messages
258
Location
Eastern Missouri
I used an airless sprayer for the ceiliengs and the walls. First I used Zinzer primer because it claimed to stick to slick surfaces such as metal heating ducts. Which I think it did pretty well. A little tip I learned though is that when putting the primer on unpainted wood you don't need to spray so much on that it totally hides the wood. Which is to say it shouldn't look like it was painted. All it really needs to do is get a light coat so it when it dries it seals up the wood. I kept recoating and recoating because it kept soaking it up. I think on the first half of my basement if you cut through the floor joists it would be white primer soaked in to the core! Plus, I soaked the wood in primer it actually leached a bunch of color out of the wood and made the primer dark in areas. On the second side I did a quick light coat and it turned out better in the end. I then sprayed it with Valspar Interior Super Flat in Ultra White. It was a bit tricky to get a decent coat on the wood without putting to much on the ducts. I wouldn't say it's perfect but it turned out pretty good. No adhesion problems either.

Another hint. Don't run the AC when painting the ducts on a humid day. It looked good until I came back the next morning and all the paint had dripped off the ducts. Basically the moisture condensed on the cool ducts and washed the paint off. AWESOME!

One more thing. I didn't do this on the first half and knew as soon as I started spraying I was in trouble. While I spent a long time with the shop vac getting everything I could. But as soon as the sprayer was aimed at the ceiling, all the dust that I didn't get with the vacuum went flying from between ducts and crevices. I had to let it dry and recoat a few hours later.

On the second side I ran the hose out of the other side of the shop vac and blew the entire ceiling off first. It was amazing how much dust and debris went flying. Then I vacuumed same as the first time. When I sprayed it this time there was no issues.

All in all a relatively cheap process that made a huge difference.
 

rebelranger

Well-known member
Joined
Sep 18, 2012
Messages
188
Did you rent the airless sprayer? Your basement is almost identical to mine. What is your ceiling height? Mine is about 7'6" and I'm using a drop ceiling but pulled it tight to the joists. Thus it takes only about an inch, the only negative is you have to remove a couple tiles to get to the one you really need moved. I love the floor color. Did you get the floor completely flat with your bondo and filler methods or did you use the epoxy to make flat?
 
OP
B

Baada

Well-known member
Joined
Sep 28, 2010
Messages
258
Location
Eastern Missouri
I actually bought the sprayer on huge sale at Home Depot. I think they were changing to a newer model so I got it brand new for $200ish. It's certainly not a professional grade use it everyday allday sprayer but I have used it a ton and it works great. You can definitely rent them though for a reasonable price.

Ceiling height varies. I'd say most is about 7'6" like yours but there are a few ducts that about 6'3". A little to close for me at 6'1".

We thought about drop tiles but in the end we decided we wanted the look of the exposed floor joists, piping and wiring. I think it looks pretty cool and everybody that see's it seems to love too.

As for the floor leveling definitely don't count on the epoxy to level it out. It will fill in very small defects but any dips/dents needed the bondo or acrylic filler. My epoxy coating is only 12-13 mils thick which is a little less than 1/64". It will hide more than 1/64" defects but I'd really try to get it as close as possible to perfect before coating.
 
OP
B

Baada

Well-known member
Joined
Sep 28, 2010
Messages
258
Location
Eastern Missouri
Now that it has been several years I wanted to give a quick update. Overal the floor had been awesome and held up to my kids abuse better than I would have thought.

Things I'd do differently:

1. I used acrylic crack filler. It works great in most places. However, in one or two places I filled some pretty deep and wide cracks/area with it. It seemed super hard when I sanded it down but I had some bookshelf speakers on stands and one of the rubber feet made an indent in the area that filled in heavily. I'd use something harder for the big areas next time.

2. Grinder type. I used diamond cups to get old paint/epoxy off and smooth out the floor and open the concrete. Because it was in the basement the acid wash phase was a no go for me. The resulting surface was pretty smooth. I have since done another interior floor for my FIL and used the Diama brush system and it left the floor much rougher. On my floor I get chip ups if I drop something sharp and hard, like a can of soup. My FILs floor is bulltet proof. I think there is much better adhesion. That said, the Diama brush will not contour your floor and fix high and low spots. It also doesn't require a vacuum if you keep the floor slightly damp/wet but it makes a bit of a mess if you aren't careful and let it sling slurry everywhere. Diana brush was also cheaper and faster and easier to move into and out of the basement.

3. Touch ups. After I did my floor there were a few areas where bubbles/outgassing occurred. In a few places I tried to knock the high spots off with a chisel and then I mixed up small batch of epoxy, like a quarter cups worth and tried to fill in the holes and cover with a few flakes. The small batch of epoxy didn't set up correctly in a few areas and the flake pattern did not blend well. In the areas where I did nothing to the defect I can't even find them anymore without getting on my hands and knees. The areas I tried to fix look horrible. Unless the defects are horrific and very large just leave them alone.

4. I mentioned it above but use the spike shoes to get even flake distribution. I still notice the heavy flake areas and the less flake/bare areas. I'd also have purchased more flakes as the areas where I went a little heavier have held up a little better and I like the texture look a little more.
 
Last edited:
To avoid these ads, REGISTER NOW!
Top Bottom