karlhungus
Well-known member
After spending the first 30ish years of my life in barracks/apartments, I found myself in a brand new starter home with much to learn about home improvements. Sprinklers, light fixtures, shelving, tile... who knew there was so much to know? After a few small satisfying projects, I started to get into the research, the accumulation of tools and the labor of DIY. It was in that time frame that I stumbled across this website, and I've been poking around off and on ever since. For various reasons, the wife and I knew our housing situation was temporary, so I was reluctant to undertake projects that wouldn't have a good return on investment or would be overly personalized to my tastes. Fast forward a few years, and we bought a home that hopefully we will occupy for a long time.
View media item 52944We have been chipping away at the to-do list as funds and motivation allow. Long term I would like to have all car stuff in the garage, all lawn stuff in the shed, and all shop/woodworking stuff in the basement. The only problem with that plan is there is no shed. I thought the idea of building my own shed sounded fun and possibly cheaper than a Tuff-Shed (I was mistaken). After a little bit of research I found a set of plans I liked; the Family Handyman magazine "Dream Shed". Part of the appeal was at 120 sq ft there is no requirement for a permit. In hindsight I wouldn't have worried about that aspect so much.
![GALLERY]](http://[GALLERY=media, 52951][/GALLERY])
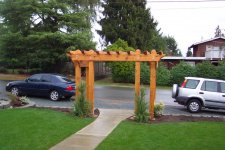
The shed will go on the left side of the picture at the back of the lot. Our property is pie shaped with tight access in the front. Getting vehicles back there wasn't in the cards and getting other toys (motorcycles/snowmobiles) while possible would be a hassle. With that in mind I decided a shed that freed the garage of some clutter would suit my needs.
While discussing my plans with my father (a retired engineer who has built houses and garages) he encouraged me to scrap the 6x6x12s that the shed was supposed to sit atop and build a proper foundation. His thinking, which eventually swayed me, was that he was almost 70 and wanted to pass some of his skills along to me while he was still physically capable. Although overkill and more expensive, I would have acquired some skills and have a nice finished product.
View media item 52876Rented this mini excavator for the job. I had to pay for delivery as they won't let you tow it with anything less than a 3/4 ton. It was a lot of fun to use.
View media item 52880Because of the lousy access, I had to take the mini excavator though the open space. A few hours into the job, headphones in, two park rangers snapped me out of my trance. Traversing the open space wasn't permitted and somebody had turned me in. They determined I had not done any damage and basically told me to carry on. Very cool guys.
View media item 52878View media item 52952Dug a little too deep, had to add and compact the bottom of the trench.
View media item 52941I put batter boards up prior to digging, only to destroy them with the mini-excavator. I redid them and used them and a plumb bob for lay out. When the sun went down I checked my work with a tile laser.
View media item 52883Igor, the Vizsla
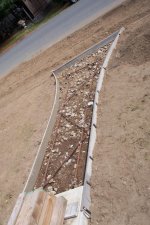
View media item 52936I was concerned that the gap under my forms was too tall and concrete would ****** out the bottom so I stapled 6mil plastic to the forms. I wasn't sure if it would hold the weight but I worked well. (I suspended the rebar later)
View media item 52933Made a chute to get concrete into the hole.
View media item 52929I was pretty worried as this was my first concrete pour so I rented a buggy. Worked well, but the only delivery I could schedule without undue delay was 6AM. The driver showed at 5:50, and I felt bad firing that thing up so early in the suburbs.
View media item 52925Finished product
View media item 52923Took a delivery of block.
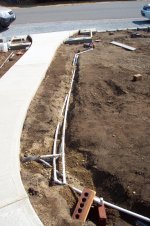
View media item 52928The tight access I mentioned.
View media item 52911My dad showed me how to get started and the turned me free. I tried to do storey poles like I saw in a book, but in practice did not work for me.
View media item 52910Wife has been a huge help.
View media item 52907Finished block.
View media item 52903Base layer of stucco. I think most stucco guys could do a better job blindfolded. Seriously.
View media item 52906Masonry is hard work. Respect to anyone who does it for a living.
View media item 52895Backfilling the trench. That thing got away from me in a turn and smashed the bejesus out of my foot. Somehow all I got was a minor bruise.
View media item 52896Hopefully I'm done renting expensive equipment. Even though it looks like a toy it was very capable.
View media item 52892Screeding pea gravel for the base.
View media item 52885Ready for concrete.
View media item 52955Decided against renting the concrete buggy again. It was a workout, but manageable.
View media item 52956After weeks of clear weather, a Colorado style storm was threatening my flat work. I fashioned a pup tent out of the screen boards and some 6mil plastic.
Thats as far as I've gotten, the goal is to be buttoned up before the snow starts. I'm hopeful that all the muddy, heavy work is behind me and I can move on to learning about framing, roofing and the like.
View media item 52944We have been chipping away at the to-do list as funds and motivation allow. Long term I would like to have all car stuff in the garage, all lawn stuff in the shed, and all shop/woodworking stuff in the basement. The only problem with that plan is there is no shed. I thought the idea of building my own shed sounded fun and possibly cheaper than a Tuff-Shed (I was mistaken). After a little bit of research I found a set of plans I liked; the Family Handyman magazine "Dream Shed". Part of the appeal was at 120 sq ft there is no requirement for a permit. In hindsight I wouldn't have worried about that aspect so much.
The shed will go on the left side of the picture at the back of the lot. Our property is pie shaped with tight access in the front. Getting vehicles back there wasn't in the cards and getting other toys (motorcycles/snowmobiles) while possible would be a hassle. With that in mind I decided a shed that freed the garage of some clutter would suit my needs.
While discussing my plans with my father (a retired engineer who has built houses and garages) he encouraged me to scrap the 6x6x12s that the shed was supposed to sit atop and build a proper foundation. His thinking, which eventually swayed me, was that he was almost 70 and wanted to pass some of his skills along to me while he was still physically capable. Although overkill and more expensive, I would have acquired some skills and have a nice finished product.
View media item 52876Rented this mini excavator for the job. I had to pay for delivery as they won't let you tow it with anything less than a 3/4 ton. It was a lot of fun to use.
View media item 52880Because of the lousy access, I had to take the mini excavator though the open space. A few hours into the job, headphones in, two park rangers snapped me out of my trance. Traversing the open space wasn't permitted and somebody had turned me in. They determined I had not done any damage and basically told me to carry on. Very cool guys.
View media item 52878View media item 52952Dug a little too deep, had to add and compact the bottom of the trench.
View media item 52941I put batter boards up prior to digging, only to destroy them with the mini-excavator. I redid them and used them and a plumb bob for lay out. When the sun went down I checked my work with a tile laser.
View media item 52883Igor, the Vizsla
View media item 52936I was concerned that the gap under my forms was too tall and concrete would ****** out the bottom so I stapled 6mil plastic to the forms. I wasn't sure if it would hold the weight but I worked well. (I suspended the rebar later)
View media item 52933Made a chute to get concrete into the hole.
View media item 52929I was pretty worried as this was my first concrete pour so I rented a buggy. Worked well, but the only delivery I could schedule without undue delay was 6AM. The driver showed at 5:50, and I felt bad firing that thing up so early in the suburbs.
View media item 52925Finished product
View media item 52923Took a delivery of block.
View media item 52928The tight access I mentioned.
View media item 52911My dad showed me how to get started and the turned me free. I tried to do storey poles like I saw in a book, but in practice did not work for me.
View media item 52910Wife has been a huge help.
View media item 52907Finished block.
View media item 52903Base layer of stucco. I think most stucco guys could do a better job blindfolded. Seriously.
View media item 52906Masonry is hard work. Respect to anyone who does it for a living.
View media item 52895Backfilling the trench. That thing got away from me in a turn and smashed the bejesus out of my foot. Somehow all I got was a minor bruise.
View media item 52896Hopefully I'm done renting expensive equipment. Even though it looks like a toy it was very capable.
View media item 52892Screeding pea gravel for the base.
View media item 52885Ready for concrete.
View media item 52955Decided against renting the concrete buggy again. It was a workout, but manageable.
View media item 52956After weeks of clear weather, a Colorado style storm was threatening my flat work. I fashioned a pup tent out of the screen boards and some 6mil plastic.
Thats as far as I've gotten, the goal is to be buttoned up before the snow starts. I'm hopeful that all the muddy, heavy work is behind me and I can move on to learning about framing, roofing and the like.
 engineers tend to go overkill.
 you could have had a storage space under the floor
  can't wait for more.