To avoid these ads, REGISTER NOW!

Above 1200 Sq/FT Bad a$$ barndomium build- in progress

Wokspaces above 1200 squarefeet.
OP
T

Tozlakes

Well-known member
Joined
Oct 17, 2019
Messages
109
Location
Paso Robles, California
Exciting news as I informed my employer, ExxonMobil, of my retirement on November 30th which means one more trip to Alaska after the one I currently am in the middle of.

We put our home of 16 years on the market in July as a for sale by owner only using craiglist to create a frenzy as a ”Coming Soon” Sale. No phone calls from Realtors this way only email inquiries. It worked exactly as planned as we had an open house and people jumped all over it driving the price upward with the home ultimately selling to the first couple that looked at it. This was the final hurdle to decide on retirement timing and get me 100% back to working on the Barndo build.

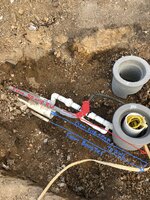
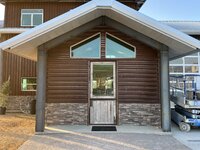
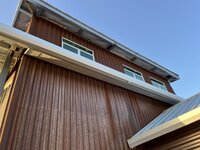
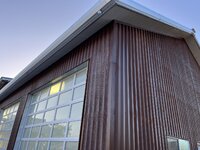
Going to start with underground utilities to and from the well, Electric gate, low voltage lighting etc. as to get a driveway poured by years end I hope. Will then work some other exterior details as to make the home look complete on the exterior prior to jumping on the inside.


In the middle of all of this we, including the Dog and Cat, moved into our 36ft Attitude Toyhauler on the 10 acres where the Barndo is. All set up with full hookups and now have internet and TV so feel like were camping full time. No issue for me, the dog n cat but the wife not so much. We now are trying to make a decision on the purchase of either a Class A Entegra Cornerstone Coach or a Super C Renegade Classic or XL with a Frieghtliner P4 116 Chassis. Lots of feedback to buy used 2020/2021 and let someone else take the financial hit along with working the bugs out but not sure my better half wants to take on a used coach And not be able to pick colors and interior layout. We’ll see what path we go down soon I suppose.

Can’t wait to get back to fulltime on the build and updating the progress on GJ. ———EXCITED to say the least!!!———-
 
To avoid these ads, REGISTER NOW!

SamYoung

Well-known member
Joined
Jun 4, 2020
Messages
104
Location
Massillon, Ohio
Congrats on the retirement and house sale! Looking forward to seeing progress on the barndo again. It's one of my favorite build on GJ
 

Chuck S.

Active member
Joined
Oct 18, 2009
Messages
43
Location
Plano, TX
Just read this all the way through.
Beautiful build!!
Love the list of the features including the garage/kitchen doors. Always wanted to incorporate something like this into our “final home” down the line. Keep the updates/pics coming, great job!!
 
OP
T

Tozlakes

Well-known member
Joined
Oct 17, 2019
Messages
109
Location
Paso Robles, California
Just spoke to my concrete guy who will meet with me once home to get an idea of design and finish for the driveway, front door walkway and possibly the RV spot where as we already have full hookups for when friends arrive with their coaches. He has me on his schedule to pour the first week of December so hoping to be ready for him so we can at least have a driveway for Xmas. Done with dirt!

My concern at this point is the thickness of the driveway as the coach we are purchasing comes in with a GVWR of 54,000 lbs. I poured the shop where the coach will be parked at 4” but may consider 5” in the main driveway areas that the coach will drive across.

Also finally got the quote for the massive windows that will be installed above the living room glass garage door. These windows have to meet all kind of requirements just as all the other have had to meet. Must be Solex green to match other installed windows, dual pain with one pane being tempered, fire rated, efficiencies ratings on U factor and SHGC are crazy numbers, aluminum anodized frames and installation all adding up to a cost you can’t imagine! And the final jab is a 3-4 month delivery time to boot!

AHHHH! The fun of building a new home!
 

Attachments

  • B656386C-130C-41F8-A314-6F8B770717BE.jpeg
    B656386C-130C-41F8-A314-6F8B770717BE.jpeg
    183.1 KB · Views: 490
  • 1A3A9881-CE09-4B8E-B18D-6476050A1192.jpeg
    1A3A9881-CE09-4B8E-B18D-6476050A1192.jpeg
    392.2 KB · Views: 453

Bopbop

Well-known member
Joined
May 25, 2016
Messages
180
Location
Savannah,Ga
That is a really nice setup you have there. The barn/house, the view and the RV.
The 3 to 4 month delivery time on the custom window does not phase me anymore. Being in Design and construction I was just at a job site today and they were quoted 18 weeks on some fire rated doors that usually takes 2 to 3 weeks to get. It has been 22 weeks and they just came in the first of this week.
 
OP
T

Tozlakes

Well-known member
Joined
Oct 17, 2019
Messages
109
Location
Paso Robles, California
Utilities mostly installed over the past month including power to well, booster pump, water lines and gas line. In addition, we installed the underground pipes that will catch roof rain runoff and feed into catch basins at some point.

Been fighting the rain throughout the process and now trying to get the driveway done prior to the next round of rain comes in. Go figure we have around 18” of rain for the season when our average is around 7” once we where ready to work on driveway.

The guys doing the driveway just installed and concreted in the french drain that is tapered in depth and runs about 60’. This was stage one, stage two will be the pour from the garage doors up about half way to the road and the third will complete to the road.

Next steps are the installation of the massive view windows Around the middle of the month. Some 1200 lbs each so a lot of thought going into the install.
 

Attachments

  • 22578BAC-0D23-4AB2-BFF4-40C55A41EB56.jpeg
    22578BAC-0D23-4AB2-BFF4-40C55A41EB56.jpeg
    689.3 KB · Views: 338
  • D5F1BCAE-B83D-4B7A-B9D1-4DFEE1725054.jpeg
    D5F1BCAE-B83D-4B7A-B9D1-4DFEE1725054.jpeg
    802.7 KB · Views: 222
  • 42D42BC9-ADC9-4203-A675-77558F5674B0.jpeg
    42D42BC9-ADC9-4203-A675-77558F5674B0.jpeg
    749.8 KB · Views: 202
  • 9AEDF4C1-F737-4154-8CB7-6EC27D3AA72C.jpeg
    9AEDF4C1-F737-4154-8CB7-6EC27D3AA72C.jpeg
    755.7 KB · Views: 206
  • 7F54C91F-AD24-4183-8B73-48619EDAFDC8.jpeg
    7F54C91F-AD24-4183-8B73-48619EDAFDC8.jpeg
    473.8 KB · Views: 216
OP
T

Tozlakes

Well-known member
Joined
Oct 17, 2019
Messages
109
Location
Paso Robles, California
Concrete driveway, retaining wall and stamped entryway are progressing. Walkway was stamped to match the texture and color close to the stacked stone siding. Being told that the final pressure washing will reduce the coloring a bit more prior to sealing. Sitting at 70 yards so far with some 80 more to go. Trying to get complete before the next round of storms come through. The final pic shows where the9534ADA2-FCA6-44BF-A509-BFB23BE7AE82.jpeg30D5B70C-60F2-4546-871F-484C717960A0.jpegFEA140F2-BC66-47A9-9172-0DB514A43E89.jpegF1555CBE-61C4-444A-A85A-F0422849ED54.jpeg74134647-7388-4F3D-BA42-F8B8ED966839.jpeg6B01C7A7-81AB-4EBD-B7D3-F939DC4FAFDF.jpeg Dog decided that he needed to be in the middle of the fresh poured driveway.
 
OP
T

Tozlakes

Well-known member
Joined
Oct 17, 2019
Messages
109
Location
Paso Robles, California
Homebody, exactly what others have said but a bit too much and not in our preferred area. Instead it gave us the idea to put some footprints at the entry where the walkthrough entry gate will be to welcome all his K9 friends! Likely evolve into cat prints also I’m sure!
 

Attachments

  • 24C97529-BA47-437B-BA8D-79C6E7ED802C.jpeg
    24C97529-BA47-437B-BA8D-79C6E7ED802C.jpeg
    310.7 KB · Views: 248
OP
T

Tozlakes

Well-known member
Joined
Oct 17, 2019
Messages
109
Location
Paso Robles, California
In the end we got the dogs footprints where we wanted them leading into the front entry. Poured the last of the concrete with some minor finish work they will do like sealing the walkway and fine tuning the transition from the concrete to the asphalt road.
Making progress once again on the stacked stone siding with the intention of finishing up the porch area this upcoming week. We went with grey colors originally but then decided to add some browns into it as to not worry about any rust dripping from the siding and staining the stone. All adds to the look we are going for either way so let the rust drip!AAA491E4-FD81-4D46-9D8C-E96266D03170.jpeg345F19CB-B311-43EB-B791-A71175383B51.jpegB89DD9CD-BBCF-440A-BEAF-C7797CE2D8B4.jpegCE37854B-E245-4823-B3C0-0416C7DC5D6C.jpeg
 

Jayman17

Well-known member
Joined
Feb 6, 2017
Messages
3,795
Location
Seattle, Wa
Wow, that’s a nice looking place. It looks like it will take zero maintenance on the outside of your home! I can live with that! 👍

Jay
 

SamYoung

Well-known member
Joined
Jun 4, 2020
Messages
104
Location
Massillon, Ohio
Glad the build is moving again! One of my favorite builds on GJ.

I love how the bare metal siding is aging. Compared to your 2020 pictures, it gives a completely different look to the building. The bright roof and windows/garage doors next to that full surface rust is a beautiful contrast. I'm assuming the main roofline will eventually be getting edged in the same manor as the little main entry bump out roof.

One question, is the plain white man door just for construction? It seems particularly out of place when you see it between the aged handmade Dutch door (matches the aged siding theme) and the aluminum and glass overhead doors (match the rest of the windows/roof/porch door theme). I somewhat understand the Dutch door being a statement piece which matches the siding theme, even though it doesn't match the window and door theme, but what with the white door?
 
OP
T

Tozlakes

Well-known member
Joined
Oct 17, 2019
Messages
109
Location
Paso Robles, California
Sam, thanks for your input on our build.

The main roof will be finished off as soon as I get the eave material installed. Just trying to decide on a color at this point so it has kind of been on the backburner as a wrong color can ruin the look of the home. Need to spend some time on my iPad drawing in some different colors prior I think as to ensure a good blend.

Yes the white door is a fire rated door that was installed to pass inspection and will either be replaced or I will be faced in a metal/wood of sorts so it will match the rest of the home. The Dutch entry door already passes fire code as it meets the minimum 2-3/4” thickness For a wood door.

In addition, I have a ton of big beams that came out of a burnt down mill in Oregon that will in someway be incorporated into the home adding another material to the look were going after. (Rusted metal, stained concrete, massive wooden beams and a ton of glass) This along with a lot of interior pieces that will be finished using old barn wood I have collected over the years will add another dimension to the build.
Glad the build is moving again! One of my favorite builds on GJ.

I love how the bare metal siding is aging. Compared to your 2020 pictures, it gives a completely different look to the building. The bright roof and windows/garage doors next to that full surface rust is a beautiful contrast. I'm assuming the main roofline will eventually be getting edged in the same manor as the little main entry bump out roof.

One question, is the plain white man door just for construction? It seems particularly out of place when you see it between the aged handmade Dutch door (matches the aged siding theme) and the aluminum and glass overhead doors (match the rest of the windows/roof/porch door theme). I somewhat understand the Dutch door being a statement piece which matches the siding theme, even though it doesn't match the window and door theme, but what with the white door?
 
OP
T

Tozlakes

Well-known member
Joined
Oct 17, 2019
Messages
109
Location
Paso Robles, California
Guys came out the last two days and installed all the glass that will provide the killer views from the second story. Incredible crew that did an awesome install! Tempered, double pane Green Solex glass to match the rest of the build.

As to be able to lift the huge pieces of glass safely they had to first go out and purchase the glass lift suction tool that is pretty impressive. Has its own vacuum pump onboard that is driven by a 20v battery. If for any reason one of the four cups lose pressure it automatically starts to retain the vacuum.

Finally seems like we are making progress with a new driveway, underground utilities completed, the final pieces of glass installed and installation of the stacked stone exterior Will finish off all of the metal details above these windows over the next few days before moving onto the eave and gutter work.5CB6C8A5-84A0-4A77-BBF5-DD8A3604B05A.jpegAA668472-DD7C-448E-BE74-7B89FB9A5CDE.jpegA6414E54-A0DE-479E-95C2-0EB9087EBF23.jpeg6812A813-9D6F-40E9-BA28-4FC6DAD3AA89.jpeg090634B8-0FD3-4147-BBE2-6C9393EE31FE.jpegs
 
OP
T

Tozlakes

Well-known member
Joined
Oct 17, 2019
Messages
109
Location
Paso Robles, California
About 2/3rds done with the soffits and rain gutters. This is a much bigger job than I ever expected. The original quote for metal soffit material from Western was over $25k and led me down the road of using Hardie plank boards instead at a cost of $2k. A lot more work using this method but am liking the results so well worth it I suppose. Still needing to do some paint touch up as the sun at certain times of the day show up any faults in the installation.
 

Attachments

  • 506D9423-33CD-4BA5-9310-786F62C1C144.jpeg
    506D9423-33CD-4BA5-9310-786F62C1C144.jpeg
    411.7 KB · Views: 159
  • 2687A1DF-6317-462C-B191-17623014947B.jpeg
    2687A1DF-6317-462C-B191-17623014947B.jpeg
    279.1 KB · Views: 161
  • 13404FC1-2B83-465D-BABE-AD2E4945DFC4.jpeg
    13404FC1-2B83-465D-BABE-AD2E4945DFC4.jpeg
    377.3 KB · Views: 160
  • 7719A48E-70B3-490B-9065-87E723905CD6.jpeg
    7719A48E-70B3-490B-9065-87E723905CD6.jpeg
    366.2 KB · Views: 158
To avoid these ads, REGISTER NOW!
OP
T

Tozlakes

Well-known member
Joined
Oct 17, 2019
Messages
109
Location
Paso Robles, California
Cor
That’s thinking outside the box. Is the Hardy board just butted together? I assume being in CA, the soffit doesn’t need venting?
Correct Shorty, there is no attic space in the build So no venting needed. Roof panels, house wrap, insulation and ceiling panels all sandwiched together. No open area for condensation to accumulate so no venting needed. At least here in Cali. As for the Hardy plank, they are 24” long butted together with a brace at 12” between them as to align panels as close a possible. Crazy as I still am a perfectionist and can see any and all faults in MY install yet when I point them out to others they continue to tell me I am overthinking it.
Que serra serra!
 
OP
T

Tozlakes

Well-known member
Joined
Oct 17, 2019
Messages
109
Location
Paso Robles, California
Finally moved to the inside of the build where we installed the required 30+ sheets of 5/8” firewall between the house and the garage area. Now installing a ton of interior hat resilient channel followed by the electrical and plumbing, closed cell spray foam then drywall.
Temps are getting up into the high 90’s so I moved forward on installing a new 12’ fan along with ordering the 5 ton split HVAC unit as to ensure cool working condition going forward throughout the summer months.

Been fighting the birds that think this house is being built for them. Pulling nest left and right but also had a couple get by me and have babies that I had to leave alone until this week when they finally left. Pain in the A$$.
Already thinking of getting a projector for the massive wall to have a Super Bowl party in the shop area. :beer:
FA52B852-7BC9-44FB-908C-09D1D64491AC.jpeg87C63FC2-F838-4BD7-A57C-9A48ABF20F09.jpeg8BBD665C-B840-4EDE-BEA0-B60117769E40.jpeg4065BAF0-3C08-488B-BB07-03E01E899D36.jpeg
 
OP
T

Tozlakes

Well-known member
Joined
Oct 17, 2019
Messages
109
Location
Paso Robles, California
Spent the last two days building this set of custom entry lights. Made from 1/4’ thick 4”X4”X24” steel tubing. The end weight is around 50lbs each and came out as planned with the heavy duty look I was going for. Clear coated them as to keep the gun metal grey look as to match the beams and have a bit of a contrast with the rusted Corten steel siding.
If you look closely at the tops and bottoms of the fixtures, I cut end caps that create a lighting effect on the siding that looks pretty cool.
I will try and get some night shots of them and upload in the next day or two.
962E5C74-52B2-4AF4-84BD-C0CC320C2323.jpeg
105DA9F4-9DED-47B8-803C-2107F7D22367.jpeg
76B840E8-4E20-4387-B0E0-472C971988E2.jpeg
 
OP
T

Tozlakes

Well-known member
Joined
Oct 17, 2019
Messages
109
Location
Paso Robles, California
Lots of compliments on the lights from anyone who stops by and sees the lights. VERY happy with how they turned out.
Typical CA. BS with the required fire sprinklers going in now but in a way that hides them the best we can. Hugging the beams with nozzles that spray outward. Should be getting the closed cell spray foam put in place in the next week or two.
 

shortykorte

Well-known member
Joined
Sep 1, 2014
Messages
8,034
Location
Tallahassee, Fl
On the birds, I’ll call Gavin and have the barndo registered as a bird sanctuary. 🤣

Inside looks a lot taller and bigger than from the outside. The fans and AC will make for a nice work environment.
 
OP
T

Tozlakes

Well-known member
Joined
Oct 17, 2019
Messages
109
Location
Paso Robles, California
Shorty, the requirement is R25 in the walls and R35 in the ceiling for Cali. Closed cell is around 3” thick And the county inspector will have to sign off before they leave site. My walls in the home are 8” thick so I have a ton of fiberglass insulation that I originally bought to use and will use my laborors to install it in the other 5” of void. This will give me somewhere around R45 For the home.

As for the shop, I am doing an R19 for all walls and ceiling that is around 2” I believe.

In the middle of all of this we picked up a new Fox Red Lab pup (“Newell” as in the name of motorhome we are purchasing) that is involved in every portion of the build. 🤪788FA120-D568-4A29-A80F-C22597CC6F9D.jpeg434D1885-7695-46BD-898F-F045F98975A6.jpeg
 
OP
T

Tozlakes

Well-known member
Joined
Oct 17, 2019
Messages
109
Location
Paso Robles, California
Had to make the “CAUTION PUPPY” sign as I have 2-3 UPS, Fed Ex and USPS drivers dropping off build supplies everyday. They all seem to think they need to back into my driveway instead of walking 50’ from the road and scares the hell out of me with the pup wandering around.

They finished up the closed cell insulation on Monday and what a difference already in temps in both the shop and home. Getting back up into 100+ degrees this weekend in Paso Robles so will open everything up for the cool nights (60 degrees) and close it up in the morning and see how well it holds the cool temps. Expecting the world for the cost of this stuff!

In the process of getting quotes to drywall the home and walls of the shop and leaving the ceiling as is for now until I decide what to do to make a clean look. Options are drywall or panels after a ton of hat channel installation or white fabric as seen in a lot of metal buildings for about 25% of the cost. (See pic below)

If you look real close at the shop and home ceiling beams in the pics you can see the required fire sprinkler system that was installed. Challenged the guy who installed them to conceal them the best he could and he did an awesome job in doing so. Used side spraying nozzles and ran the pipe as close to the trusses as possible. Actually adds to the industrial look of the home so kinda don’t mind the look in the end!

270760DC-FBAF-4A58-B074-AF9478DAC80B.jpeg7CA44B22-29CC-44DE-9051-A32C29FC43F0.jpegFA09B0BE-D122-4B5A-9434-280ADB202657.jpeg33111796-827A-43FB-8428-2DA37B55294F.jpeg
 

shortykorte

Well-known member
Joined
Sep 1, 2014
Messages
8,034
Location
Tallahassee, Fl
Your design is right up my alley just don’t have the same budget. On residential sprinklers, do all of the heads go off at once or just the one that is tripped by heat?
 
OP
T

Tozlakes

Well-known member
Joined
Oct 17, 2019
Messages
109
Location
Paso Robles, California
Shorty, luckily only one sprinkler head at a time releases when the doodad inside melts at some 200ish degrees. The alarm bell then detects flow setting off a bell alarm In the shop.

The system will have to be tested by the fire marshal prior to receiving the final on the build along with his confirmation on anything fire related to the home including clearance of brush and burnables, fire monitor location and marking so firetruck can locate quickly and connect in the case of a fire image.jpgimage.jpgalong with verifying 20 minute fire resistant doors and windows are installed throughout. IT”S A METAL BUILDING DIP$HITS!

Talking with a fire Captain buddy of mine he said all of the insurance companies were the one’s who pushed this code through requiring fire sprinklers thinking they would save money being paid out for house fires. They now realize the cost for water damage from sprinkler releases are costing them more than fires would have but is too late to reverse their stupidity!
 

shortykorte

Well-known member
Joined
Sep 1, 2014
Messages
8,034
Location
Tallahassee, Fl
Ah, I was thinking the same thing about the water damage. Are these fire requirements required for all new houses? Or just certain environments?
 
OP
T

Tozlakes

Well-known member
Joined
Oct 17, 2019
Messages
109
Location
Paso Robles, California
I believe the fire sprinkler requirement is Cali wide but maybe just certain county’s including San Luis Obispo? For sure in high fire rated areas.
Between this requirement, water run off to a tank with pump, solar, drought resistant plant plan and many others it will likely add $100k+ to the project!🤮
 
OP
T

Tozlakes

Well-known member
Joined
Oct 17, 2019
Messages
109
Location
Paso Robles, California
Currently installing the second floor trusses and welding them to the top of the beams.

Was going back and forth on what to use on the underside of the floor up and between the trusses. When looking at tons of restraunts and breweries that are using the same type of trusses that are uncovered for viewing they typically paint as to blend everything together whereas it is not the focal point and noticed by anyone. Was standing in Lowe’s yesterday discussing colors with the Paint mixing employee and pointed upward as to make my point. She laughed and said she had been working there for years and never looked at the details of the ceiling before.

We decided we wanted the trusses, fire sprinklers and HVAC ducting to part of the focal point adding to the industrial look we are going for. We ended up painting the bottom side of the plywood flooring in a gray then blotched it lightly with a black and finally blotched over with a rusted brown to get the look. Because of the 1-1/8” (actually 1.060”) tongue and groove being $117 a sheet I decided to go with 3/4” (actually thicker at 23/32”) T&G for $29 a sheet and double sheeting with glue and screw between layers. A little more work but saves about $1000+ and will be thicker (1-1/2”) and stronger in the end. We’ll lay out each row in a stagger on the first layer then the second layer will be laid out 90 degrees across it and staggered adding even more strength to the floor.

Kind of in a catch 22 as I have to have access with my lift as to first install my HVAC ducting (pain to get at this point) on the upper ceiling prior to installing the rest of the trusses but need the trusses and floor installed as to fab the walls for the bathroom and walk in closet prior to drywaller’s arriving next week. Will likely have to complete the floor on the already installed trusses as to fab walls, drywall, install ducting then complete the rest of the floor.

C84E5327-D49A-4649-BE68-070B7E95783F.jpeg1FAD0E35-62CF-4935-85CD-8CD5AD52363D.jpeg10D9B117-C7BF-4972-9FD4-4A41DBD0F810.jpeg
 

shortykorte

Well-known member
Joined
Sep 1, 2014
Messages
8,034
Location
Tallahassee, Fl
Looking really nice. I like the idea of painting the plywood. The loft residence that was in my shop used same T&G ply glued down. One layer and it was solid. Pain in the *** to demo.
I like your idea to make some contrast with the ceiling. Here’s a place I visited in June and liked.
A02739ED-230E-480F-B0C0-C40A945C13FD.jpeg
Can we get info on the metal studs. Are they the same on side wall as the ones on back wall?
 
To avoid these ads, REGISTER NOW!
Top Bottom