To avoid these ads, REGISTER NOW!

Baldor bench grinder, back from the dead

Cahark

Well-known member
Joined
Sep 28, 2016
Messages
340
Location
Dayton,Oh
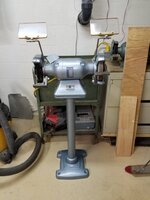
Earlier this week I found a Baldor bench grinder on craigslist. The seller was asking $50 for the grinder. It looked like it was missing some parts, but that didn't bother me because I was looking to turn this grinder into a buffer anyways. The wheel housings and the tool rests mean nothing to me in the situation.

I asked all the right questions, and the seller told me that the grinder worked. During our phone conversation he also told me that there is a small crack on the front of the grinder that you couldn't see in the posting. He assured me that this is a minor crack and did not harm the function of the grinder. At this point I proceeded to drive 45 minutes to go check it out and pick it up.

Upon arriving, I found that the grinder must have been dropped at some point during its life. The base was cracked into six pieces and was flopping around loosely from the motor itself. To top it all off the shaft was bent .110" or nearly an 1/8th inch. I explained to the seller who obviously didn't know anything about the machine and that this was unacceptable. In fact the grinder danced across the floor as he demoed that it functioned to me.

After the seller realized how much of a major problem this was, he asked me to make him an offer. I probably offered too much at $20, but he accepted it.

c1ded6ee74518defa7bf1deb0f5d3206.jpg

This brings us to where I am today. I decided to first take the grinder apart and see if the shaft was fixable. I decided to give it a try straightening it. I got my indicators all set up and used my Bridgeport as a makeshift press. I was a little concerned that I would be creating too much pressure on the quill, but I made sure to not use any more pressure than what I would normally use drilling a hole to straighten the shaft. I also used a brass block between the quill and the shaft to make sure I didn't damage anything. In about 30 minutes I was able to get the shaft straightened to about .0018 TIR checking runout.
e79e53af58eb317475538a10134008ce.jpg
After I straightened the shaft I also realized that the shoulder that the bearing set up against was marred out. Apparently someone had tried this repair unsuccessfully before. At that point I decided to set the shaft up in the lathe and true up the shoulder. It only took a few thousandths to clean it up.
f7240bcc8b5e3afcfb10e62de0324067.jpg
a5e1ed3b06b0ddd34b6fd00638c5d887.jpg
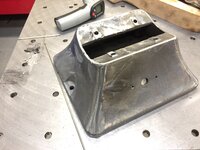
That brings me to where I am at the moment. The base is practically a puzzle. Luckily all of the pieces are here. Unfortunately I'm going to have to sort it out with the TIG welder and see how lucky I get.

04029ce0315ac8c0b8b262abbb81b902.jpg
9c1ff02a8687d7181d79581e3bcbbbdb.jpg
Hopefully this goes better than I expect it to. I will be very happy if I can get this grinder going for the price of a set of bearings, twenty dollars, and a couple hours of my time.More updates to come.


Sent from my iPhone using Tapatalk
 

Attachments

  • c1ded6ee74518defa7bf1deb0f5d3206.jpg
    c1ded6ee74518defa7bf1deb0f5d3206.jpg
    502 KB · Views: 0
  • e79e53af58eb317475538a10134008ce.jpg
    e79e53af58eb317475538a10134008ce.jpg
    546.6 KB · Views: 1
  • f7240bcc8b5e3afcfb10e62de0324067.jpg
    f7240bcc8b5e3afcfb10e62de0324067.jpg
    363.8 KB · Views: 0
  • a5e1ed3b06b0ddd34b6fd00638c5d887.jpg
    a5e1ed3b06b0ddd34b6fd00638c5d887.jpg
    477.1 KB · Views: 1
  • 04029ce0315ac8c0b8b262abbb81b902.jpg
    04029ce0315ac8c0b8b262abbb81b902.jpg
    555.3 KB · Views: 1
  • 9c1ff02a8687d7181d79581e3bcbbbdb.jpg
    9c1ff02a8687d7181d79581e3bcbbbdb.jpg
    505.4 KB · Views: 1
To avoid these ads, REGISTER NOW!

royesses

Well-known member
Joined
Mar 28, 2009
Messages
789
Don't ya just love the description by sellers-a small crack. Tig with silicon bronze rod should take care of the broken base cracks. Great job saving an old but high quality grinder. I'm envious of that Clausing lathe and Bridgeport mill. Very nice.

Roy
 
OP
C

Cahark

Well-known member
Joined
Sep 28, 2016
Messages
340
Location
Dayton,Oh
Don't ya just love the description by sellers-a small crack. Tig with silicon bronze rod should take care of the broken base cracks. Great job saving an old but high quality grinder. I'm envious of that Clausing lathe and Bridgeport mill. Very nice.

Roy


I have some nickel rod that I've been having good luck with lately. I have some silicon bronze laying around, but I've never used it.

Thanks for the compliments on the machines. They were a lot of work getting them back up to par, but it has been rewarding.


Sent from my iPhone using Tapatalk
 
OP
C

Cahark

Well-known member
Joined
Sep 28, 2016
Messages
340
Location
Dayton,Oh
What size grinder is that? I may have a base from a parts Baldor.


It is a 1/2 horse. Model number is 7300. I may be interested in buying it if welding doesn't go well. I'm a machinist by trade, but only a hack and whack cheesy welder by necessity


Sent from my iPhone using Tapatalk
 
Last edited:
OP
C

Cahark

Well-known member
Joined
Sep 28, 2016
Messages
340
Location
Dayton,Oh
Made a decent amount of progress last night. I started by drilling a hole at the end of the crack that was not broken completely off. I did this so the crack wouldn't spread.
851ceb19b00c6dd56e082f7af4b94865.jpg
After that, I gathered all the pices and started to groove them out for weld
52e92c4d746dd9bbd88c551d03bda685.jpg
After that, I slathered some weld into the joints. I chose to use nickel rod for the repair. I'm not much of a welder, so the repair only turned out OK.
85601a876c83920e8d4fa5780e88c5bd.jpg
Afterwards I ground down the welds so they looked presentable.
aefafd9b0dbe2234630d9e01033abe2d.jpg
Once everything was completed, I laid in a bit of JB weld for filler to smooth out any low spots.
Next up is paint. So far it's turning out pretty well. Not my best work, but I'm satisfied.
17255f1e358d0242d7983e572c985010.jpg
17c62c4665793896badd87ba2021faba.jpg
Bearings will be in Monday. Hopefully it will turn out pretty well.


Sent from my iPhone using Tapatalk
 

Attachments

  • 52e92c4d746dd9bbd88c551d03bda685.jpg
    52e92c4d746dd9bbd88c551d03bda685.jpg
    485 KB · Views: 0
  • 85601a876c83920e8d4fa5780e88c5bd.jpg
    85601a876c83920e8d4fa5780e88c5bd.jpg
    457.8 KB · Views: 0
  • aefafd9b0dbe2234630d9e01033abe2d.jpg
    aefafd9b0dbe2234630d9e01033abe2d.jpg
    468.6 KB · Views: 0
  • 17255f1e358d0242d7983e572c985010.jpg
    17255f1e358d0242d7983e572c985010.jpg
    466.5 KB · Views: 1
  • 17c62c4665793896badd87ba2021faba.jpg
    17c62c4665793896badd87ba2021faba.jpg
    416 KB · Views: 1
  • 851ceb19b00c6dd56e082f7af4b94865.jpg
    851ceb19b00c6dd56e082f7af4b94865.jpg
    601.6 KB · Views: 0

royesses

Well-known member
Joined
Mar 28, 2009
Messages
789
The weld looks great. That will last a lifetime. Some new bearings and you've got a pure winner!

Roy
 

larryq

Well-known member
Joined
Jul 12, 2011
Messages
2,421
I wouldn't have gone near a grinder in that condition; big props to you for bringing 'er back from the lip of the grave.
 
OP
C

Cahark

Well-known member
Joined
Sep 28, 2016
Messages
340
Location
Dayton,Oh
I wouldn't have gone near a grinder in that condition; big props to you for bringing 'er back from the lip of the grave.


I tend to ask myself what im getting into often. I'm thinking about getting a sign for my garage.
"Chris's home for abused and neglected machine tools"


Sent from my iPhone using Tapatalk
 
OP
C

Cahark

Well-known member
Joined
Sep 28, 2016
Messages
340
Location
Dayton,Oh
+1

I could handle a cracked base, but would have passed on a bent shaft


I totally agree, but I straighten parts at work on a regular basis. Luckily this was easier than others. It usually doesn't go so well.


Sent from my iPhone using Tapatalk
 
To avoid these ads, REGISTER NOW!
OP
C

Cahark

Well-known member
Joined
Sep 28, 2016
Messages
340
Location
Dayton,Oh
nice repair
even if it's effectively not worth the time you invested , be proud that you accomplished something that many folks would not be able to


I will have about 5 hours total in this job as long as everything goes well from here on out. After all, I would just be drinking beer if I wasn't working on this. Haha!


Sent from my iPhone using Tapatalk
 

larryq

Well-known member
Joined
Jul 12, 2011
Messages
2,421
I'd love to know more about how you straightened the shaft, as unfortunately I don't have a milling machine, nor do I know much about checking runout with indicators.

To start, it looks like you put the shaft in that 'V' shaped piece of brass and pressed down on it with the milling machine? Is that basically correct? And how did you check that it was straight after, did you have to remove it, do your check, then put it back in position for another session of pressing?

Regarding your lathe work (another tool I have never used), you weren't concerned that you might take off too much material so the bearing wouldn't fit properly in the bellhousing afterward?
 
OP
C

Cahark

Well-known member
Joined
Sep 28, 2016
Messages
340
Location
Dayton,Oh
I wouldn't have done that to a milling machine. Time to get an arbor press.


I do own an arbor press. Unfortunately, there is not enough room of the table to fixture the shaft.

As far as using the mill, I first checked how much pressure it took on the quill to bend the shaft. It took less pressure than drilling a 5/8 hole in steel to get the shaft to move. That being said, I moved the quill to its top position, locked it down securely, and used the knee to precisely position the mill to the point needed to bend the shaft back in position. This allowed me to not put pressure on the rack gear of the quill. I also placed a chunk of brass between the quill and the shaft. This absolutely did not harm the mill in any way. I've done this off and on for SMALL bending jobs over the last 10 years in machine shops always making sure to never put any more pressure on the machine than drilling a hole. After doing this job I checked the mill for tram. .0003" TIR at a 8" diameter swing of an indicol.

Was it the best option in the whole world?absolutely not, but I felt comfortable in my scenario.

Thanks for checking out my post!


Sent from my iPhone using Tapatalk
 
OP
C

Cahark

Well-known member
Joined
Sep 28, 2016
Messages
340
Location
Dayton,Oh
I'd love to know more about how you straightened the shaft, as unfortunately I don't have a milling machine, nor do I know much about checking runout with indicators.

To start, it looks like you put the shaft in that 'V' shaped piece of brass and pressed down on it with the milling machine? Is that basically correct? And how did you check that it was straight after, did you have to remove it, do your check, then put it back in position for another session of pressing?

Regarding your lathe work (another tool I have never used), you weren't concerned that you might take off too much material so the bearing wouldn't fit properly in the bellhousing afterward?


Let me get back to you on this when I have a bit of time to write this evening


Sent from my iPhone using Tapatalk
 
OP
C

Cahark

Well-known member
Joined
Sep 28, 2016
Messages
340
Location
Dayton,Oh
I'd love to know more about how you straightened the shaft, as unfortunately I don't have a milling machine, nor do I know much about checking runout with indicators.

To start, it looks like you put the shaft in that 'V' shaped piece of brass and pressed down on it with the milling machine? Is that basically correct? And how did you check that it was straight after, did you have to remove it, do your check, then put it back in position for another session of pressing?

Regarding your lathe work (another tool I have never used), you weren't concerned that you might take off too much material so the bearing wouldn't fit properly in the bellhousing afterward?


First things first. This is my method with the tools that I have. There are much more accurate ways of straitening and measuring how far out the shaft is, but usually they require better equipment that is more costly and takes up more space than what I have available. That being said....

The first thing I do is try to determine where and how bad the bend is. In my scenario this was fairly simple. Based on context clues I determined that the grinder was dropped and probably fell on the shaft. This meant that the bend was most likely where the bearing rides due to that being the pivot. I will then remove the shaft from whatever type of equipment I am using. At that point I will try to find some concentric surfaces that I can set on the blocks to get a rough measurement. The blocks need to be narrow enough that they ride on surfaces that you know are relatively close and it is very helpful that those surfaces run concentric with the bent portion of the shaft. Set up an indicator at a few points along the shaft. This will help you get an idea as you're rotating the shaft where the bend starts and ends. It will also let you know what portion of the shaft is still straight if any. Knowing where the straight portion of the shaft is will give you something to work to.

Once I have determined how bad the bend is i usually set up in an arbor press, or the milling machine if the bend is not too bad. Please see my other post about verifying that you're not putting to much stress on the milling machine if you are going to use this method. I really like to have the shaft placed in the V-block during the bend. Make sure not to use your high precision prized V-block that you use for finish grinding. I place the V-block around the area where I want the shaft to pivot. It's helpful to place an indicator directly under the area where you are putting pressure on the shaft. This will be an indicator on how far you need to push to get the shaft to start to bend in the right direction. For example. I may be able to push the shaft down words about .050" and have it spring right back into position. The next time I push down on the shaft I may push it to .070" and the shaft may spring back a few thousandths away from the original reading. So if the shaft is out of whack 1/8 of an inch total indicator reading, that means you need to push the shaft and have it stay put after spring back at 1/16th of an inch reading on the indicator. There are a lot of variables in this And it doesn't always go easily. Sometimes you have to push a little, then check your readings multiple times. I try to set up so I can check it in position while I'm doing bending, but this doesn't always work out.

There is a bit of a science to it, but for me it's usually combined with a little bit of trial and error.

Now to touch on the Lathe. In this particular set up, the Armature has a take up spring on one side of the housing pressing against the bearing. This provides preload for the bearing and also allows for a little bit of error in manufacturing. My scenario I only had to take off about .002" on the face to true it up. Based on experience I know that this is not going to cause any adverse results. Now if this was a solid mounted bearing with a solid retainer I would not have this luxury.

I hope I was able to answer most of your questions. feel free to ask more if you see fit. This was a relatively simple bend, but situations get much more complex with compound Bends involved. Your tactics can greatly change when you have three or four bends in the same shaft


Sent from my iPhone using Tapatalk
 
OP
C

Cahark

Well-known member
Joined
Sep 28, 2016
Messages
340
Location
Dayton,Oh
Cahark, really nice grinder resurrection. I would have gave up the grinder for dead, thanks for sharing how you straightened the shaft.


Thanks for the compliments. I will be posting the final assembly soon. I'm a sucker for abused equipment.


Sent from my iPhone using Tapatalk
 
OP
C

Cahark

Well-known member
Joined
Sep 28, 2016
Messages
340
Location
Dayton,Oh
Finished up the "buffer" tonight. Everything went great.

I started off by installing the newly acquired bearings. This grinder takes a 6203 Bearing. I've had pretty good luck with Nachi bearings in the past and decided to keep up with what's working for me. They are seven dollars or so each.

94c4fdec1b5354991db884fa87484e62.jpg
8e25bcad106a43d4c137820176a0c8cd.jpg
After installing the bearings I cleaned up the last few screws and install all the badges. I referenced old pictures to make sure that the wiring was good on the new cable also.

The capacitor probably could have been replaced. I noticed when I started up the buffer it seemed to start a little harder then what I'm used to. Unfortunately there are no numbers on the capacitor. This hurts my chances of finding a replacement. If anyone knows what size capacitor this grinder takes, the information would be much appreciated. If all else fails I will take it to an electric motor shop here in town that should be able to hook me up with what I need.

The grinder fired right up and ran with zero vibration. I am absolutely stoked with the result.
25b9e1d2dd31635f35451a86e7200ae8.jpg
542d885a5e471ad4de8517b1dddc55cc.jpg
12ea8ddc74553eade6aa6b2f227da7c0.jpg
cf2c77fd9061d4c78b07a7198fb077df.jpg
Don't ever hesitate to take on a project that scares you a little bit. I truly didn't know if I would have good results fixing this buffer or not, but I felt it was worth the gamble for $20. In total I have $14 and bearings, and about $10 in paint. I can't wait to chuck my old junky buffer and move onto this machine.


Sent from my iPhone using Tapatalk
 

Attachments

  • cf2c77fd9061d4c78b07a7198fb077df.jpg
    cf2c77fd9061d4c78b07a7198fb077df.jpg
    446.5 KB · Views: 0
  • 12ea8ddc74553eade6aa6b2f227da7c0.jpg
    12ea8ddc74553eade6aa6b2f227da7c0.jpg
    433.3 KB · Views: 0
  • 542d885a5e471ad4de8517b1dddc55cc.jpg
    542d885a5e471ad4de8517b1dddc55cc.jpg
    443.4 KB · Views: 0
  • 94c4fdec1b5354991db884fa87484e62.jpg
    94c4fdec1b5354991db884fa87484e62.jpg
    378.6 KB · Views: 0
  • 8e25bcad106a43d4c137820176a0c8cd.jpg
    8e25bcad106a43d4c137820176a0c8cd.jpg
    380.3 KB · Views: 0
  • 25b9e1d2dd31635f35451a86e7200ae8.jpg
    25b9e1d2dd31635f35451a86e7200ae8.jpg
    443 KB · Views: 0

sld961

Well-known member
Joined
Oct 28, 2015
Messages
395
I have a 7307D, a 1/2hp, 7", very similar to yours. This is the capacitor that I replaced. 6 uf 330v. And this is my grinder, very similar.

Dunno if your capacitor is the same, but it may be a starting point. If you call Baldor, they may be able to tell you. eaa14b44fc1b351650f05f99e2c05b51.jpg352b10e51be0429565850aa2232ec65a.jpg

Sent from my SM-G930V using Tapatalk
 

Attachments

  • eaa14b44fc1b351650f05f99e2c05b51.jpg
    eaa14b44fc1b351650f05f99e2c05b51.jpg
    66.4 KB · Views: 1
  • 352b10e51be0429565850aa2232ec65a.jpg
    352b10e51be0429565850aa2232ec65a.jpg
    75.1 KB · Views: 2
OP
C

Cahark

Well-known member
Joined
Sep 28, 2016
Messages
340
Location
Dayton,Oh
That looks exactly like what I need. I'll pick one up this week.


Sent from my iPhone using Tapatalk
 

oldtools

Well-known member
Joined
Sep 15, 2008
Messages
2,706
Awesome job. It look great fully restored. I wish I have your skills. I love Baldor grinder/buffer. I have 6 of them. Some of them shake like crazy. I assume they must be out of balance. I don't even know how to balance them. I will watch some Youtube video.
 
To avoid these ads, REGISTER NOW!
Top Bottom