To avoid these ads, REGISTER NOW!

baldor motor

edl

Well-known member
Joined
Jan 29, 2006
Messages
809
Location
Southeast, US
anybody familiar with rebuilding one?

i have a 1977, 3/4h, 1ph motor

have the front cover off and the bearing off - it looks like the fan is welded onto the shaft - so how do you disattach the rear cover from the assembly to pull the assembly out the front?

thanks!
 
To avoid these ads, REGISTER NOW!
OP
E

edl

Well-known member
Joined
Jan 29, 2006
Messages
809
Location
Southeast, US
it is hard to see the back, b.c. there is about a half inch gap......
 

Attachments

  • 01a28fb28a6ad5369ace1bfebc4b18119ffba4f2e3.jpg
    01a28fb28a6ad5369ace1bfebc4b18119ffba4f2e3.jpg
    143 KB · Views: 87
  • 01565874b4ec8c47b6bf509cc1d36344b078d586f5_00001.jpg
    01565874b4ec8c47b6bf509cc1d36344b078d586f5_00001.jpg
    117.9 KB · Views: 84
  • 01e79941cdd468542e1f78a2a04c75f8e28719119a.jpg
    01e79941cdd468542e1f78a2a04c75f8e28719119a.jpg
    133.3 KB · Views: 83
OP
E

edl

Well-known member
Joined
Jan 29, 2006
Messages
809
Location
Southeast, US
nameplate on the motor (it is on a 15" drill press)
 

Attachments

  • IMG_0354.jpg
    IMG_0354.jpg
    135.1 KB · Views: 46
  • IMG_0358.jpg
    IMG_0358.jpg
    136.6 KB · Views: 31
OP
E

edl

Well-known member
Joined
Jan 29, 2006
Messages
809
Location
Southeast, US
this one looks similar

the way the fan is welded on the shaft is the same

at 2:35 when he is about to put the back bell on, there are 2 empty screw holes...from what i can see through the crack on the back of my motor there is some kind of starter switch screwed in there...he doesn't show that

 
OP
E

edl

Well-known member
Joined
Jan 29, 2006
Messages
809
Location
Southeast, US
ok - here is what i have found out today:

++ called Baldor ... they say the spec # crosses to a "proprietary" motor - i.e., it was private labeled to clausing and so they can share nothing with me

++ but the guy says from the specs it crosses generally to their current el3507 - problem is, baldor's manuals and product information guides give no blown out diagrams that help w assembly / dissassembly

++ called a service center, and i think (and the youtube video shows this) that the back end cap has a bearing recessed into it and the whole end cap is pressed onto the shaft via this bearing - and it is 40 years old and stuck

i can't figure out how to pull it apart - the only thing i can think of is to pull on the fan - but that (a) could bust the fan blades and (b) once the bearing is free, it smacks into the centrifugal switch just in front of it - guess the way it is supposed to go is the shaft just pulls free of that back bearing and then you can unscrew the switch from the back cap and free it and then take the bearing out of the back cap and replace it

any thoughts?

thx
 

Daveo

Well-known member
Joined
Nov 24, 2012
Messages
146
If its a drill press motor buy a new one.... Im not so sure why you feel the need to save it...You an adapt a bunch of new or used motors to a drill press.

I bought a 3 phase motor (new) and a VFD for my my drill press for less that 225.00. A vfd opens up a whole new level of possibilities on a drill press too...

In my limited experience of electric motors, the bearings (or caps) are the culprit of a bad motor, why just not replace them and call it done?

You can weld brackets on electric motors too, just dont put the ground on the shaft....
 
Last edited:

catalytic

Well-known member
Joined
Jul 16, 2011
Messages
636
Location
Boston, Los Angeles, Cleveland
I've rebuilt and worked on a lot of motors. Yours is weird. On TEFC motors, fans are usually outside the bearings, whereas yours is inside the bearings.

If it's welded on I wouldn't pull on it. You can buy replacement fans, but could get messy. Can you get the shaft/armature out without messing with the fan? Seems like you could. Or could you get the opposite side endbell off to get access to the other bearing? (I assume that's why you posted -- to get access to the second bearing to change it). Seems unlikely that they would have put a bearing on and then welded something on to prevent it from being changed on an industrial machine.

If there's no way to get to it and it doesn't make noise when run, then I vote for leaving it alone and just changing the front bearing shown in the picture.

By the way, I saw your post on another forum. I have the same exact Clausing 16" step pulley drill press (different motor, though). It is a fantastic machine -- leagues above comparably sized drills. The people who were telling you that $250 wasn't a good price over there were nuts if yours in in nice shape... I paid $230 for mine and think it's one of the best deals I've ever found on a machine (and I check local auctions in LA, bu a lot of machines, & see everything...).
 
Last edited:
OP
E

edl

Well-known member
Joined
Jan 29, 2006
Messages
809
Location
Southeast, US
Catalytic - thanks - and I appreciate the vote of confidence - i was shocked that someone would say you could have done "A LOT" better (all caps was in the original) for 250 ... what 240? 220? - the thing was in solid working conditions - that i wanted to restore it is on me not the machine - what can i say, i restore old cars, why should old quality US iron machines be any different? - after a fresh coat of paint, some bearings and and all of the crud cleaned out, this machine will be cherry - the replacement model is the 20" and is made to this day and sells new today for 4,700 ... i am pretty happy

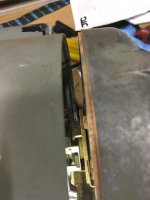
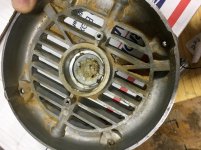
as for the motor, that is exactly the issue...i can't get the back cover off because the shaft is stuck in the back bearing, which is behind the centrifugal switch and embedded in the rear end cap

the problem is the bearing is designed for the bearing to be taken out when the end cap is completely off and the actuator is unscrewed and off the end cap

and the shaft has to be removed first - if i could get the fan off, i could pull the whole thing out the back and then work on getting the shaft out and bearing out

but i can't get the fan off...it is welded to the shaft

and i am reluctant to pull on the fan b/c the blades will likely bend

and so, as you point out, i posted.........

if i can't figure it out...i'll just replace the front as you say

but it surprises me that these motors have been made for 40 years with little change and no one has a tip or trick here or over there.............:dunno:
 

catalytic

Well-known member
Joined
Jul 16, 2011
Messages
636
Location
Boston, Los Angeles, Cleveland
i can't get the back cover off because the shaft is stuck in the back bearing, which is behind the centrifugal switch and embedded in the rear end cap


I'm not sure I understand, but if you mean that the back cover is stuck onto the outer race of the back bearing, then that should be solveable -- most motor end bells have notches around the perimeter where you can fit a screwdriver blade. One twist of a screwdriver blade is usually enough to pull the endbell off and separate if from the bearing.
 
OP
E

edl

Well-known member
Joined
Jan 29, 2006
Messages
809
Location
Southeast, US
that is what i mean

i'll check for that...didn't notice them when i was last working on it

thanks
 

sanddan

Well-known member
Joined
Jul 7, 2005
Messages
708
Location
Oregon
I recently worked on my 5hp compressor motor. Disassembly wasn't too bad but while I was moving the armature on the bench I broke part of the centrifugal switch. I found a local electric motor rebuild shop and took the pieces there. The guy found a replacement part, in a box of used ones, replaced the 2 bearings and reassembled it while I waited. He also bench tested it to ensure proper function and then only charged $40 total!

Maybe you can find someone local that can help you out.
 
To avoid these ads, REGISTER NOW!
OP
E

edl

Well-known member
Joined
Jan 29, 2006
Messages
809
Location
Southeast, US
Success!! :rocker:


Heat was the answer!

as discussed, the back cap had the bearing stuck into it - and the shaft into that

1. heated the back center of the cap
2. that allowed me to pull the the shaft hard forward, banging the rear cap on the barrell and the thing popped free ... that is the bearing popped off the rear cap...it remained on the shaft
3. used some pullers and it is off
4. can you guess what the last guy used the drill press for?

hope this might help someone down the road

thanks again
 

Attachments

  • IMG_1094.jpg
    IMG_1094.jpg
    143.1 KB · Views: 55
  • IMG_1059.jpg
    IMG_1059.jpg
    143.4 KB · Views: 59
  • IMG_1067.jpg
    IMG_1067.jpg
    145.1 KB · Views: 53
  • IMG_1060.jpg
    IMG_1060.jpg
    139.9 KB · Views: 61
  • IMG_1062.jpg
    IMG_1062.jpg
    136.2 KB · Views: 58
  • IMG_1054.jpg
    IMG_1054.jpg
    138.7 KB · Views: 62
OP
E

edl

Well-known member
Joined
Jan 29, 2006
Messages
809
Location
Southeast, US
not broke...but alot of noise from the bearings and some runout

and literally packed with sawdust even after using compressed air and blowing the heck out of it

but it ran

i imagine after i "fix" it...it won't any more

biggest goal was to replace the bearings
 
OP
E

edl

Well-known member
Joined
Jan 29, 2006
Messages
809
Location
Southeast, US
Hi Guys - on the bearing like the image attached, how much grease goes in there? - i assume i want to squish it down beneath the cage as much as possible?

thanks

PS: the image is of the old bearing being thrown away...the new one is identical (but clean!)
 

Attachments

  • IMG_1092.jpg
    IMG_1092.jpg
    134.8 KB · Views: 39
OP
E

edl

Well-known member
Joined
Jan 29, 2006
Messages
809
Location
Southeast, US
yes ... too late

the design is kind of sealed on both sides as follows:

1 side is factory sealed (metal)

the other side pushes down against a spring type washer that covers the opening and that both of those push into a blind hole so the open side is against the wall of the end cap

any thoughts on how much grease?

thanks
 

pancho400cid

Well-known member
Joined
Sep 26, 2014
Messages
4,515
Location
Austin, TX
One rule of thumb is to fully pack the bearing and fill the "void" around the bearing to about 30%, but in your case the void around the bearing looks very small.

Too much grease makes bearings run hot and it usually just ends up inside the motor.

If it was me I'd pack the bearing to about 60% and any void to 30%. No guarantees though.
 
OP
E

edl

Well-known member
Joined
Jan 29, 2006
Messages
809
Location
Southeast, US
thanks Pancho400cid -

just to be clear: the space below the cage 60% and the void above the cage 30% - correct?

thanks again
 

pancho400cid

Well-known member
Joined
Sep 26, 2014
Messages
4,515
Location
Austin, TX
I can't really see how much volume is around your bearing. It looks like the bearing almost "fills" the pocket in the bracket (aka endbell, aka end cap) - if you packed your bearing 100% in that case, then there is no room for the grease to circulate.

The SKF link by edl above is very good - I have an older version of that info in catalog form. Look at page 78 of the link. That pic is a similar bearing packed to basically 100%. If it was me, I would pack it like that then run my finger around and remove grease in a smooth groove sorta hourglass shaped in cross section then partially fill the channels in the bracket and retainers or whatever.

In the link, pg 75, Fig 1, if you carefully look at the white (ungreased) parts and the tan (greased parts) it more-or-less jibes with what I'm saying.
 
To avoid these ads, REGISTER NOW!
Top Bottom