To avoid these ads, REGISTER NOW!

Bathroom vanity installed in non-square corner

branimal

Well-known member
Joined
May 31, 2016
Messages
1,943
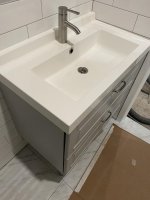
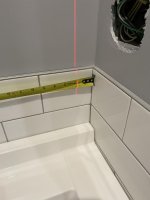
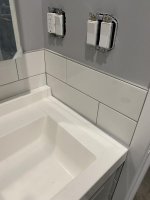
I went to install my wall hung vanity and sink yesterday and sure enough the corner where I'm installing it is non-square. I take responsibility for that screw up b/c I framed the wall. Most of the corners I installed are pretty close to square but where it counted it was off square. Just my luck.

I was a little frustrated and decided to forge ahead. I figured I'd cover the 7/16" gap with clear silicone and a back rod. I drilled the holes and installed the vanity.

Now I'm looking at it and having second thoughts on such a huge silicone line..

I have a couple of options:

1. Silicone the gap and probably never notice it again.
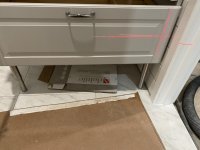
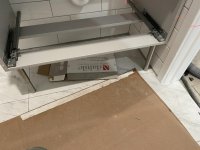
2. Slide the cabinet off the right wall by 1 3/4". That's where the screw holes are, so the vanity box will cover the screw holes. B/c the vanity is wall hung, I'm not worried about dropping stuff down the gap. And I can rig up something to clean that area.


What would you guys do here?
 

Attachments

  • IMG_9091.jpg
    IMG_9091.jpg
    57.8 KB · Views: 299
  • IMG_9092.jpg
    IMG_9092.jpg
    34 KB · Views: 293
  • IMG_9095.jpg
    IMG_9095.jpg
    44.1 KB · Views: 271
  • IMG_9096.jpg
    IMG_9096.jpg
    136.1 KB · Views: 265
To avoid these ads, REGISTER NOW!

Notgrownup

Well-known member
Joined
May 5, 2014
Messages
5,925
Location
Snow Hill NC
What mike said, a scribed piece of porcelain or granite. You should be able to get your local countertop or cultured marble place. It would look like it belongs there and not draw the eye to it.
 

TommyK

Well-known member
Joined
Mar 29, 2011
Messages
546
Location
CT
It looks like you have some overhang on the left side. Scribe the right side to the wall. If you don't have enough overhang on the left side to take the whole 7/16" out, take half of it. That will get you in the "caulk zone".
 

Andamo

Well-known member
Joined
Mar 23, 2005
Messages
154
Location
Trinity, Florida
It looks like you may have dodged a bullet anyways. It looks like the drawer in the vanity might have hit the door molding if it was against the right wall.
 

Jinks

Well-known member
Joined
Aug 28, 2012
Messages
2,885
Location
Daytona Beach
Either the back/side splash, or move the sink 2 to 4 inches left & fit a spacer between it & the wall. Never **** a sink/vanity to an end wall with a door casing near. As the drawer hardware wears clearing the casing will become more & more of an issue.
 

yeldogt

Well-known member
Joined
Jan 2, 2012
Messages
18,184
Well -- you bought a top that was designed to have open areas on both sides. That's not a top for a corner.

Also -- that's an uncomfortable space with the door there. You should have used a proper wall sink with small floating cabinet. No legs ... proper sink size with offset faucet. Used in city properties with great results
 
Last edited:

tboy

Well-known member
Joined
May 23, 2013
Messages
149
Location
Central Ohio
Looks like IKEA, I love their vanities and plumbing solution, a great way to get space under the sink, and I usually am astonished I can complete a plumbing job with only the stuff they include in the bag (as opposed to several trips to the depot).

I would move it the few inches to the left, and NOT try and create some sort of filler. Never mention again that YOU made that mistake! I owned a 1928 house that was supposedly built by craftsmen (everyone told me they don't make houses like that these days, and the builders were true craftsmen). That was not true, mine must have been built on a Friday I guess, there was all sorts of non-square walls etc...
 

JRC3

Well-known member
Joined
Jun 30, 2014
Messages
12,481
Location
Southwestern OH
I would remove enough tile on that side and notch the drywall to make room for the top, then fit the tile to it. It's way cleaner that way.

Most corners are out of square and many modern vanity tops are made in ways that can't really be easily scribed and fit properly to the wall. Also setting the vanity away from the wall to compensate looks like **** and just creates a void to lose items. I can't stand to see it.

I hate little bathrooms and entry level (Lowes) cabinets but here's one I did a year or so ago. That corner was way more than 7/16" out. In fact, I cut the drywall to make room for the top and the front of the top still stuck out in front of the tile a tad, that corner was out by at least 3/4" The house was a slamb-up post-war 1954 so every inside wall corner is typically out.

Another thing about wall tile. When laying it out you need to include the vanity and where joints will land on the finished top so you don't have a sliver to deal with. A bath with wall tile that continues into the shower just adds to the layout complications.
 

Attachments

  • 20190310_164013.jpg
    20190310_164013.jpg
    56.2 KB · Views: 125

Innovate1

Well-known member
Joined
Jul 28, 2014
Messages
4,289
Location
Illinois near St. Louis, Missouri
I have a corner that will get a sink soon and think the corner is very close to square. But some of the issues are similar. Was planning to put the sink tight against the side wall but it will likely be a top that is meant to be open on both sides. I had allowed for a light centered above it and had figured for a 30" cabinet. Now am looking at doing a 24" wide cabinet. It's a 5' x 5' half bath and don't really need a large sink (there will be a large shop sink in the open area). I was planning to move the light box over so it is centered over the sink. Now I am thinking perhaps I should just space the sink from the wall about 3" and call it done. But the floor isn't open below so it will be hard to clean the narrow slot. Planning to put FRP behind and beside the sink and toilet if it makes any difference.
 
OP
B

branimal

Well-known member
Joined
May 31, 2016
Messages
1,943
Ikea makes the sink. I checked their website and they don't sell a matching ceramic sidesplash. I think getting a color match in white will be difficult.

I can slide the vanity about 3" to the left. This is an ideal solution. The only problem is the two holes I already drilled on the right side of the vanity will be exposed.

Is filling those holes with some type of epoxy and trying to get a color match possible? Will it look like cr*p? My tile manufacturer doesn't paint touch up paint.

The other solution is to slide it over 1 3/4" and have the vanity's box cover the holes.

The vanity is a free floating vanity. The legs are just there for show. So nothing is going to fall down that 1 3/4" and go missing forever.
 

Attachments

  • IMG_9109.jpg
    IMG_9109.jpg
    140.3 KB · Views: 76
Last edited:
To avoid these ads, REGISTER NOW!
OP
B

branimal

Well-known member
Joined
May 31, 2016
Messages
1,943
JRC3; said:
The tile is new, right? Just replace the damaged tiles. You hack old existing tile, not brand new. :thumbup:

Genius! Is it that easy to pull out the damaged tile without disturbing the other tiles? I've got a grout cutting bit for my dremel that could score those 1/16" grout lines. After that, do I just gently hammer out the damaged tile?

I also have an attachment for my Fein multitool. It's a carbide grout removal tool. Might be a hair too big for my grout lines though.

Thanks!!!
 

ddurrett896

Well-known member
Joined
Mar 29, 2015
Messages
995
Location
VA
I'd caulk it and move on. If you have a spouse, that crack will be hidden 99% of the time by a hair straighter, curler or combination or perfume, dry shampoo and hair accessories.
 

dunnhead

New member
Joined
Feb 4, 2013
Messages
4
One other thought....
How would it look if you pulled the back-left corner away from the wall some to shrink the gap on the right side? Instead of having a 7/16 gap on the side, split the difference and have a small gap on the back and small gap on the side. It might be less noticeable once caulked.
 

Ries

Well-known member
Joined
Jul 22, 2016
Messages
93
Location
North metro in MN
One other thought....
How would it look if you pulled the back-left corner away from the wall some to shrink the gap on the right side? Instead of having a 7/16 gap on the side, split the difference and have a small gap on the back and small gap on the side. It might be less noticeable once caulked.

I was thinking the same thing...
 

tcianci

Well-known member
Joined
Feb 7, 2009
Messages
4,242
Location
Walpole, Ma
What's the top made of? A lot of them aren't porcelain and can be "adjusted" with a belt sander. Anything like Corian or other solid surface material or what they call cultured marble can be shaped with a belt sander.

I you do decide to move it left and change the tiles, tap the tiles in the middle of their face and break them, stay away from the edges and resist the urge to try to pry them out. Work from the center of the tile towards the edges.
 

The Cobbler

Super Moderator
Staff member
Joined
Oct 24, 2013
Messages
25,920
Location
Niagara Region, Ontario, Canada
I would remove enough tile on that side and notch the drywall to make room for the top, then fit the tile to it. It's way cleaner that way.

....

X2
looks like you just need to scribe 1 tile to match the backsplash, remove the other 2 tiles beside the top, slide the top over , shim it up to snug up against the bottom row of the tiles .
you could do that all without removing any tile if you were patient
 
OP
B

branimal

Well-known member
Joined
May 31, 2016
Messages
1,943
Some great ideas here.

1. I experimented with sliding the vanity over 3" and it still looked odd. My mistake here was getting a 32" vanity for such a small space. A 24" vanity would give me ample room on both sides.

2. I played around with white caulk to disguise the gap. As soon as I laid it down it made the gap even more obvious. The color mismatch was atrocious. I cleaned it out right away.

3. JRC3's idea to notch the tile is the perfect solution. But I already brought my Horrible freight monster brick/tile saw to the basement. Not really excited about bringing that back up and setting it up.

I know I'm going to get cr*p for this but I ended up caulking the gap with clear silicone. I used backer rod, masking tape, isopropyl alcohol and an old credit card and got a pretty decent caulk line (IMO). I left it to dry for 36 hours and its fairly firm.

In a few months if the caulk starts falling apart or gets nasty from moisture I can pull it out and remove the tile as per JRC3's method. At that point I'll be cutting tile for another bathroom here. Will keep extra tile on hand.

Thanks guys.
 

Attachments

  • IMG_9159.jpg
    IMG_9159.jpg
    80.9 KB · Views: 53
  • IMG_9162.jpg
    IMG_9162.jpg
    46.1 KB · Views: 57

yeldogt

Well-known member
Joined
Jan 2, 2012
Messages
18,184
I would remove enough tile on that side and notch the drywall to make room for the top, then fit the tile to it. It's way cleaner that way.

Most corners are out of square and many modern vanity tops are made in ways that can't really be easily scribed and fit properly to the wall. Also setting the vanity away from the wall to compensate looks like **** and just creates a void to lose items. I can't stand to see it.

I hate little bathrooms and entry level (Lowes) cabinets but here's one I did a year or so ago. That corner was way more than 7/16" out. In fact, I cut the drywall to make room for the top and the front of the top still stuck out in front of the tile a tad, that corner was out by at least 3/4" The house was a slamb-up post-war 1954 so every inside wall corner is typically out.

Another thing about wall tile. When laying it out you need to include the vanity and where joints will land on the finished top so you don't have a sliver to deal with. A bath with wall tile that continues into the shower just adds to the layout complications.

if you do that -- how will it match up to the other tiles ?
 

yeldogt

Well-known member
Joined
Jan 2, 2012
Messages
18,184
Again -- you bought a stand alone vanity and top. Two problems

The top is not flush to the cabinet side. You have a top that extended past the cabinet -- this creates the gap at the cabinet side to the wall as well as no back splash on the side.

Next time get a smaller wall hung w/ attached cabinet -- they function well in small bathrooms and present no install problems
 

Innovate1

Well-known member
Joined
Jul 28, 2014
Messages
4,289
Location
Illinois near St. Louis, Missouri
Again -- you bought a stand alone vanity and top. Two problems

The top is not flush to the cabinet side. You have a top that extended past the cabinet -- this creates the gap at the cabinet side to the wall as well as no back splash on the side.

Next time get a smaller wall hung w/ attached cabinet -- they function well in small bathrooms and present no install problems

I like the idea of a wall hung and am in a similar situation. My corner is square (I think...) but I need to put the top against the side wall and the overhang of the top is an issue. Can I find that type of cabinet at the big box stores? Where do I get one? Have any examples? Looking at 24" width.
 

JRC3

Well-known member
Joined
Jun 30, 2014
Messages
12,481
Location
Southwestern OH
Set the saw up in the basement. I set my monster tile saw up in bathrooms and other inside places all the time. Just lay down some plastic and blue tape some to the wall for overspray. In unfinished basement I've done the same but hung the plastic in a u shape from the joists around the saw. A piece of cardboard does the same. Keep a few rags to wipe off you cut tiles.

Another tip, don't fill the saw's tray up with water. I use a bucket to feed the pump clean water and drain the tray as needed. Recircing that nasty water is counterproductive. But moreso, my bucket method is great for little jobs when filling a tray full enough, and then having to empty it is a pain. A tray with a quart of dirty water is easy to clean or whatever. I also have a small saw for small work, but that's not an option here.

Now for a run-on paragraph...

Removing existing field tiles is nothing. Just crack it in the middle with a hammer and an all or small chisel. Do it i in a couple places so you can dig in the middle and pry the pieces out from the middle. Be careful not to let the edges of the old tile grind against the existing tile too much. Once one tile is out the others are a piece of cake. Then scrape the old grout off the good tile edges with a utility knife, a sharp blade works best and wasting a few blades is worth it. If you chip a good tile on any step, just remove it too. I've done this hundreds of times with tile 50 years old to one day old. The fact that your tile is fairly new probably means that the mastic is still a little soft. Afterwards just scrape the old mastic or thinset off the drywall, odds are most of it will come off with the tile pieces. Try not to beat the drywall up too much, more than likely it will just pull some of the paper off, vacuum it clean. Usually I don't even have to do anything to the surface as there's still a split layer of paper left on the drywall. If there are a few dig marks you could just add a tad more mastic, but not so much the tile sticks out. Remember these wall tiles are mostly decorative, a few little voids won't affect anything.

HTH :thumbup:
 

FANTM58

Well-known member
Joined
Feb 21, 2015
Messages
575
Location
Brighton, Co
I had the same issue with a clients project, not my fault,,,i ended up using 1/4" cement
backer board on the side with the gap and above the existing backsplash. then installed 1/2" Schluter trim around these areas, and layed some glass accent backsplash on the
cement board, the finished product cam out pretty flush with the existing backslpash.
the client picked out some whit glass mosaic, it worked out great, sorry i do not have any images to share,,
 
To avoid these ads, REGISTER NOW!
Top Bottom