To avoid these ads, REGISTER NOW!

Beacon Morris 45k Garage Heater Install

xjfish

Well-known member
Joined
Feb 22, 2014
Messages
1,292
I'm trying to make some headway on this project as time allows in my cold 24'x30'x8' central MN garage. The plan is to install a BM 45k btu heater directly to 2x4s strung across the ceiling joists at a 45* angle. I'll be using a concentric/sealed combustion kit going horizontal. I am going with natural gas and recently had a .5" gas line installed from the house meter to garage with risers, nothing hooked up yet. Garage insulation is about 75% done, leaving corner for heater open studs until mostly installed.

Anyways, I will have some questions...

I'm a little confused about exactly how to go about figuring where to hang and vent the unit at 45*. It is possible that I may be overthinking this, but I was hoping to mount the concentric box/cut vent hole roughly centered in a stud as cleanly as possible. (See red "X" in pic for what I think may be ideal) I realize the unit needs to be 18" minimum away from walls and the vent pipe has a minimum run length.
HOrSGZs.jpg

Just try to mock it up on the floor? Any tips for finding hanging/vent location appreciated.

I will try to keep this post somewhat updated with some pics for anyone who cares. :)
 
To avoid these ads, REGISTER NOW!

CKS1955

Well-known member
Joined
Oct 12, 2014
Messages
489
Location
Michigan
This doesn’t exactly answer your question, but I installed mine so the heat blows down the longest wall creating a circular pattern for the air flow. I also have ceiling fan in the middle to help further mix the air.

I believe the minimum for length for exhaust is 5’. You’ll have to calculate what an elbow length is (it adds resistance, so it’s not as simple as measuring the length).

I don’t believe the clearance for all sides of the unit is 18”, that only applies to the rear. The top and vertical sides of the unit is 1”.

Jay
 

Attachments

  • 7ED74DDF-35A5-423F-9E5B-DAF13F2509CC.jpg
    7ED74DDF-35A5-423F-9E5B-DAF13F2509CC.jpg
    167.4 KB · Views: 98
Last edited:
OP
X

xjfish

Well-known member
Joined
Feb 22, 2014
Messages
1,292
Thanks for the reply Jay, you are correct on clearances. I decided the best way to go about figuring where to mount the heater was to mock it up on a shelving unit with an old floor transmission jack underneath. :lol_hitti 
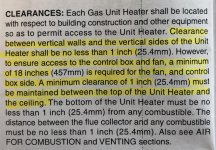
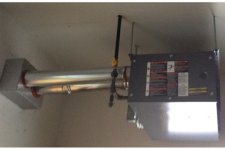
I can not vent the heater where I originally hoped to due to exterior overhang clearances. If venting horizontal at 45* I will need to mount the heater near the location shown. I will probably need to hang the heater a few inches down from the ceiling on threaded rod to achieve that 3' minimum clearance for the exterior sloped overhang.

What do you think of this for a rough location? 1st pic view from the center of overhead garage doors.

HOGIfEn.jpg

HOGIDwj.jpg


Should I possibly scrap the 45* all together and just aim it straight towards the doors?
 

Pruittx2

Well-known member
Joined
Oct 30, 2018
Messages
98
Location
Points to middle of right palm, Michigan
Sure you could do that,, then maybe just mount a wall fan blowing back towards the work bench from opposite side of shop. The 45* will also have you having to hit 3 studs in the ceiling. instead of 2 going straight. Here's how I hung my Big Maxx, on an angle using 3/8's rod's.
119.jpg
026.jpg
 

CKS1955

Well-known member
Joined
Oct 12, 2014
Messages
489
Location
Michigan
I used threaded rod as well to hang the heater. Location looks good, like your solution for staging the heater.

Jay
 
OP
X

xjfish

Well-known member
Joined
Feb 22, 2014
Messages
1,292
Thanks gentlemen. That's the route I'm going. With a low ceiling a wall fan should work well. I just cut the hole in exterior wall for the concentric vent. I'm going to mount the vent box directly to osb wall first, move heater into position, install overkill Superstrut, and level it out. I'll try to take pics later but venting should just barely make 3' clearances.

Instructions say min 1' vent pipe clearance from ext. wall. It should stick out roughly 2', about the same length as overhang 3' above. Sound ok?
 
OP
X

xjfish

Well-known member
Joined
Feb 22, 2014
Messages
1,292
HOKcOFT.jpg

HOKdaKY.jpg

Couple of rough in pics. If you guys see anything stupid looking at all in this process, let me know!
 
OP
X

xjfish

Well-known member
Joined
Feb 22, 2014
Messages
1,292
Question: I DO use the orange o-ring gaskets with this install correct? (Exhaust is cat III)
Three were included. This is directly from concentric vent instructions:

"NOTICE: When using double wall vent pipe, O-ring gaskets are not required and should be discarded. When using single wall vent pipe, one O-ring should be inserted in each of the flue pipe openings in the Air Inlet Screen, Deflector Disk and the top of the Combustion Air Inlet Box Assembly."

How does the mfg. expect one to seal the obvious gap between the "Box" and the 4" exhaust pipe?
 

CKS1955

Well-known member
Joined
Oct 12, 2014
Messages
489
Location
Michigan
Question: I DO use the orange o-ring gaskets with this install correct? (Exhaust is cat III)
Three were included. This is directly from concentric vent instructions:

"NOTICE: When using double wall vent pipe, O-ring gaskets are not required and should be discarded. When using single wall vent pipe, one O-ring should be inserted in each of the flue pipe openings in the Air Inlet Screen, Deflector Disk and the top of the Combustion Air Inlet Box Assembly."

How does the mfg. expect one to seal the obvious gap between the "Box" and the 4" exhaust pipe?

Yes use all three o-ring gaskets and use the red silicone to seal the gap between the o-ring and the 4” pipe. Even with using the o-ring there will still be a slight space to fill with the red silicone. See attached pictures (these pictures are from a previous post I did). If you need additional pictures let me know.

Jay
 

Attachments

  • 2B3899D3-C490-42A2-97AD-8FFEC5C6B148.jpeg
    2B3899D3-C490-42A2-97AD-8FFEC5C6B148.jpeg
    50.9 KB · Views: 153
  • 76D3E339-6D09-47C5-9A50-C0B1760A9CB4.jpeg
    76D3E339-6D09-47C5-9A50-C0B1760A9CB4.jpeg
    19.2 KB · Views: 148
Last edited:
OP
X

xjfish

Well-known member
Joined
Feb 22, 2014
Messages
1,292
Little after work progress...

Wired in a 15A dedicated heater circuit (left lowest breaker). Used 12ga. wire because I had it on hand. Running wire to a "handy box" with a switch. Plan it to run an 8' 12-2 shielded/armored whip directly to heater from said handy box.
HPvsTjY.jpg

I mounted simple cheap "L" brackets to the concentric vent box. Marked the 7" intake pipe on the exterior with the box tight to the wall. Everything is getting removed for wall insulation, and pipe cutting before buttoning things up.
HPvvASZ.jpg

Heater location roughed in with Superstrut ready to go.
HPvxrPk.jpg
 

jmarkwolf

Well-known member
Joined
Jan 15, 2013
Messages
1,812
Location
Southeast Michigan
I installed my 45K BTU Beacon Morris heater in the back corner of my 28ft x 30ft x 10ft detached garage shop, generally diagonally facing the insulated garage door. It's snugged up against the ceiling and suspended from Unistrut across the rafters above. It's worked well for several years now.

Until I added a ceiling fan, however, there was a distinct stratification layer about belt level during winter, below which cold air radiated from the slab, and warm air above. The ceiling fan fixed that. I leave the fan on pretty much 24/7, and thermostat set to 55 deg F until I go out there to work. Takes only about 10 mins to get to 65 deg F.

Used a drywall hoist to lift it into place.
 
Last edited:
To avoid these ads, REGISTER NOW!

CKS1955

Well-known member
Joined
Oct 12, 2014
Messages
489
Location
Michigan
...Until I added a ceiling fan, however, there was a distinct stratification layer about belt level during winter, below which cold air radiated from the slab, and warm air above. The ceiling fan fixed that...

Ditto, the ceiling fan made big difference for my shop as well.

Jay
 
OP
X

xjfish

Well-known member
Joined
Feb 22, 2014
Messages
1,292
I am leaning towards setting up a wall fan blowing back towards the wall facing away from the heater to mix things up in this 8' space. If I could find a very low profile ceiling fan, I guess I would consider that for the winter months.

I obviously need to seal and finish the venting. With highs in the 20s this week, not great for curing sealants. Anyone have a pic of what the installed horizontal storm collar should look like? My mostly ran 25' thermostat wire is too short, I'm going to yank the whole thing or possibly splice. Plan is to have it wired and ready to go for my basic wifi thermostat but run heater on a switch for testing purposes AND finishing insulation first purposes.
A couple progress pics for giggles... Any input is great. :beer:

HQgwYEX.jpg

HQgxkAT.jpg

HQgxztB.jpg
 
OP
X

xjfish

Well-known member
Joined
Feb 22, 2014
Messages
1,292
Just about ready for gas hookup I think. Waiting to hear back from a contractor... Please let me know if you see any issues.
HT0RAMk.jpg

HT0Tqd9.jpg

HT0TXCJ.jpg

HT0Upcp.jpg

I quickly made up a support bracket for the exhaust pipe to kind of secure it better. It is screwed into the concentric vent box and pipe. Seem o.k?
HT0VHfo.jpg
 
OP
X

xjfish

Well-known member
Joined
Feb 22, 2014
Messages
1,292
HVKo1iw.jpg

HVKoKZz.jpg


Gas hooked up today. Local company did a nice clean job. No outside pics. Heater seems to be working great. :) Now to finish insulating and install wi-fi stat. Also think I will add a wall fan.
 

toyotadriver

Well-known member
Joined
Dec 30, 2010
Messages
1,586
Yes. I don't know? :headscrat Working nice...

That is interesting. Never seen that before on natural gas (or propane either). Normally with propane, if there is a two stage gas system in place, the first regulator is at the tank and the second stage is at the entrance.

Also thought there was supposed to be a gas shut off near the appliance.

Still, looks like a nice install. Your work appears to be excellent.
 

pbon

Well-known member
Joined
May 14, 2017
Messages
3,498
There is an in-line ball valve after the copper pipe.

Some issues I noticed- I read no foil tape on combustible exhaust. Must be screws or locking clamps. Also looks like the elbow slopes down when the entire line should slope up. And can’t tell on my phone screen whether that is cat3 SS or not.
 

D45

Well-known member
Joined
Mar 21, 2014
Messages
4,834
Location
NW INDIANA
I just did an install with a horizontal run

Manual said downward slop is fine, as long as the terminating end cap isn't over a walkway, where the condensation can freeze and cause a walking hazard........or, if the pitch is upward there should be a T with a condensation drain/trap

I don't think the foil tape will hurt anything
 

pbon

Well-known member
Joined
May 14, 2017
Messages
3,498
Ok. I think the instructions for my Mr. Heater Big Max 50k for horizontal required upward slope. On double wall, foil tape should be ok. There is even 3M 600 degree rated flue tape. But I don’t think code allows tape for combustion exhaust.
 

toyotadriver

Well-known member
Joined
Dec 30, 2010
Messages
1,586
There is an in-line ball valve after the copper pipe.

Some issues I noticed- I read no foil tape on combustible exhaust. Must be screws or locking clamps. Also looks like the elbow slopes down when the entire line should slope up. And can’t tell on my phone screen whether that is cat3 SS or not.


I missed the valve the first time I looked at the picture but see it now.

I don't see foil tape on the exhaust. Just the outside air intake.
 
Last edited:

Showkey

"MEMBER EMERITUS"
Joined
Aug 9, 2014
Messages
8,638
Location
Wausau WI
Single wall CAT III is oring sealed at each joint so there would be no need to tape.
That oring seal and locking tab joint is part of the reason on the change to CAT III.
Tape on Double walled would B vent and ( should) not used on horizontal venting.

Some say up some say down........on CAT III I would say down is good choice.........get any water down and out away from the unit. If you have a water trap....then you have deal with the water.
 
Last edited:
OP
X

xjfish

Well-known member
Joined
Feb 22, 2014
Messages
1,292
Your replies are appreciated. To clear things up:

- Exhaust is double wall CAT III.
- Both intake and exhaust pipe slope downwards, per mfg instructions.
- There is no foil tape on the exhaust at all. Exhaust joints are sealed with included hi-temp RTV silicone along with factory clamps and orings.
- The intake (B-Vent) joints are wrapped with high temp insulated tape. Not 3M branded but equivalent.
- There is a ball valve near the meter feeding garage and at heater.

The hanging NG Reznor unit heater installed where I work has the same looking regulator setup before the heater. When I get a chance I will try to post the exterior gas work pics. Gas hookup/parts cost was $660. Dirt-work and gas line w risers was around $250 (deal). Total cost for the job guesstimate was around $1800-1900. Horizontal vent definitely added to cost. More than I really wanted to spend initially but happy with end result so far.
 
To avoid these ads, REGISTER NOW!
Top Bottom