To avoid these ads, REGISTER NOW!

Beacon Morris BRT045 Installation Finished

byalegend

Active member
Joined
Oct 16, 2011
Messages
36
Beacon Morris BRT045 Installation Finished (Video Included)

I've been a lurker here for a few years, and I thought I'd post video of my installation of a Beacon Morris BRT045 heater. This forum was very helpful in compiling information to complete the installation.

Video 1 of 3:

Video 2 of 3:

Video 3 of 3:

Playlist - Beacon Morris Garage Heater Installation: https://www.youtube.com/playlist?list=PLPMuWagkDfQj7xzuN0-lTGzKhnJoFQXf2

Thanks.

Edit: I'm updating this post with pricing info for major expenses:

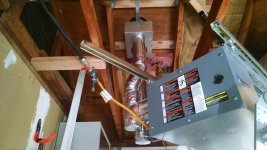
- Beacon Morris BRT045 heater: $499 + about $50 shipping @ Menard's
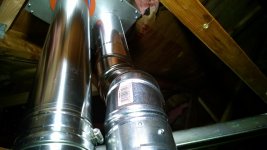
- Concentric vent kit (AS-X7-4): $217 @ littlegreenhouse.com (free shipping and orange gaskets included)
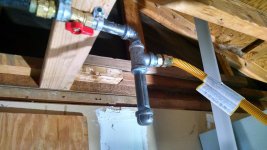
- 4" special gas pipe kit incl. UL 1738: $165 @ littlegreenhouse.com <-- bought additional pieces - see video 2 for further explanation
- Malco C5R crimpers: $35 @ Home Depot
- Single-wall vent roof flashing and storm collar (Flashing - GV1386): $30 on eBay - ended up using a storm collar I found at a local hardware store
- Gas line installation: $20/linear foot x 30 ft = $600 (after watching the plumber, would probably do myself if I had to do it again and if DIY is allowed in my area)
- Electrical wiring and conduit: Approx $125 for tools and materials ($40 for conduit bender)
- Thermostat (Lux TX9600TS - touch screen and programmable): $30 used on Amazon
- Mechanical and electrical permits: Approx $125
==============
Approx. total incl. misc: $2000
 
Last edited:
To avoid these ads, REGISTER NOW!
OP
B

byalegend

Active member
Joined
Oct 16, 2011
Messages
36
Some pics
 

Attachments

  • IMG_20151127_230742306_HDR.jpg
    IMG_20151127_230742306_HDR.jpg
    150.5 KB · Views: 308
  • IMG_20151202_213706778_HDR.jpg
    IMG_20151202_213706778_HDR.jpg
    154.9 KB · Views: 234
  • thermostat-1.jpg
    thermostat-1.jpg
    12.3 KB · Views: 213
  • IMG_20151122_084945429.jpg
    IMG_20151122_084945429.jpg
    146.8 KB · Views: 245
  • IMG_20151125_171252982.jpg
    IMG_20151125_171252982.jpg
    141.1 KB · Views: 256
  • IMG_20151123_101856.jpg
    IMG_20151123_101856.jpg
    143.5 KB · Views: 290
  • IMG_20151127_122352056.jpg
    IMG_20151127_122352056.jpg
    148.4 KB · Views: 312

ForceFed70

Well-known member
Joined
Apr 27, 2010
Messages
3,441
Location
BC, Canada
Sealed combustion - cool!

Looks like a great install. Only thing I can pick at is that I don't think your drip leg is to code. The gas is supposed to change direction at the leg - not just flow past if that makes sense.

Should be an easy fix for you as you are using flex pipe to make the heater connection. Just need to add a 90* fitting pointing down before the T.
 

ForceFed70

Well-known member
Joined
Apr 27, 2010
Messages
3,441
Location
BC, Canada
Wait a moment - what's that gas tubing leading up to the shutoff valve? I had thought it was black iron, but upon closer inspection it appears to be some sort of a flexible tubing. It almost looks like hydraulic hose?

Are you sure that's an appropriate and approved material? I've never seen anything like it that would make it past an inspector.
 
OP
B

byalegend

Active member
Joined
Oct 16, 2011
Messages
36
Wait a moment - what's that gas tubing leading up to the shutoff valve? I had thought it was black iron, but upon closer inspection it appears to be some sort of a flexible tubing. It almost looks like hydraulic hose?

Are you sure that's an appropriate and approved material? I've never seen anything like it that would make it past an inspector.
The local inspector signed off on the gas piping. A professional plumber performed the gas installation (I don't mess with gas [emoji2]). The black gas line is flexible, and it's apparently an approved alternative.


Sent from my XT1080 using Tapatalk
 
Last edited:

ForceFed70

Well-known member
Joined
Apr 27, 2010
Messages
3,441
Location
BC, Canada
The local inspector signed off on the gas piping. A professional plumber performed the gas installation (I don't mess with gas [emoji2]). The black gas line is flexible, and it's apparently an approved alternative.


Sent from my XT1080 using Tapatalk

Interesting. Learn something new every day. Would love to know more about the product as it would certainly be a lot easier to use.

Do you know the product - or would you be able to read the info printed on the hose?
 

ForceFed70

Well-known member
Joined
Apr 27, 2010
Messages
3,441
Location
BC, Canada
I didn't look that closely. There's a crapload of different products similar to that, there.

Yes. If you get the time, let us know what labeling is on the hose itself. We should be able to find a spec sheet online with that information.
 

Yourfired

Well-known member
Joined
Aug 24, 2015
Messages
121
Awesome product, very nice installation! I actually purchased a smaller one online from Canarsee supply last year and have been using it to keep the tiles in my kitchen warm.
 
OP
B

byalegend

Active member
Joined
Oct 16, 2011
Messages
36
Awesome product, very nice installation! I actually purchased a smaller one online from Canarsee supply last year and have been using it to keep the tiles in my kitchen warm.
Thanks. It's been nice to have a heater in the garage so I can work comfortably. The funny thing is that the temps in my area have been near 60 degrees the last few days.

Sent from my XT1080 using Tapatalk
 

bobmulry

Well-known member
Joined
Nov 21, 2012
Messages
144
Location
Coarsegold, CA
Hi,

Nice install.......

I do have one suggestion...........

It appears that the unistrut is attached to the overhead with some type of lag screw putting the screw threads in tension all of the time......

Unistrut makes some neat 90 degree brackets that bolt to the unistut on one end and allow you to drill through holes in the overhead beam using bolts, nuts and flat washers to carry the load in shear........

Or you could make your own............

If some is good, more is better and too much is just right........

Bob
 
OP
B

byalegend

Active member
Joined
Oct 16, 2011
Messages
36
Hi,

Nice install.......

I do have one suggestion...........

It appears that the unistrut is attached to the overhead with some type of lag screw putting the screw threads in tension all of the time......

Unistrut makes some neat 90 degree brackets that bolt to the unistut on one end and allow you to drill through holes in the overhead beam using bolts, nuts and flat washers to carry the load in shear........

Or you could make your own............

If some is good, more is better and too much is just right........

Bob
Hmm, OK. I might check into those brackets. I'd thought about using Unistrut U-bolts, but the lag screws seemed to hold extremely well.

Sent from my XT1080 using Tapatalk
 

rferoni

Member
Joined
Oct 21, 2007
Messages
6
byalegend,

Great job! I just bought this same heater and am getting ready to install it. If you don't mind, how much did the concentric venting cost including all piping? Did you purchase online? I had planned on doing concentric venting thru the sidewall but mis-researched the cost! I thought it was going to cost around $230 but it looks like its going to cost around $400. I may just run two pipes thru the sidewall. Apparently there was a recent change in the code so now the pipe needs to be stainless.

Thank you for any information.
Ron
 
OP
B

byalegend

Active member
Joined
Oct 16, 2011
Messages
36
byalegend,

Great job! I just bought this same heater and am getting ready to install it. If you don't mind, how much did the concentric venting cost including all piping? Did you purchase online? I had planned on doing concentric venting thru the sidewall but mis-researched the cost! I thought it was going to cost around $230 but it looks like its going to cost around $400. I may just run two pipes thru the sidewall. Apparently there was a recent change in the code so now the pipe needs to be stainless.

Thank you for any information.
Ron
Thanks. I bought the kit from littlegreenhouse.com for $217, since their kits include the orange gaskets and they offer free shipping (the kit is for the Sterling GG heater, but the Beacon Morris is identical). Like I mentioned in video 2, the pipe kit is sold separately at littlegreenhouse.com and includes UL 1738 special gas pipe. The pipe kit was $165. There are a couple other mentions in that video you might find helpful. Two pipes through the sidewall won't meet code if you plan on having it inspected.

Sent from my XT1080 using Tapatalk
 
Last edited:
To avoid these ads, REGISTER NOW!

CNGsaves

Well-known member
Joined
Sep 26, 2012
Messages
13,233
Location
KS and OK
That's nice heater and separated combustion is even better.

2 problems:
. . . . a) Improper flexible black gas line (presume that is rubber) ??
(replace with black pipe steel to within 3 ft from heater, then flex pipe)
. . . . b) Drip leg done incorrectly as gas flow should have a 90 degree turn

What is plan for garage overall ?? Install ceiling ?? Insulation ??

Does the roof have vents like gable vents, ridge vents, etc ?? If so you'll just be trying to heat the environment as well !! ;)
 
OP
B

byalegend

Active member
Joined
Oct 16, 2011
Messages
36
That's nice heater and separated combustion is even better.

2 problems:
. . . . a) Improper flexible black gas line (presume that is rubber) ??
(replace with black pipe steel to within 3 ft from heater, then flex pipe)
. . . . b) Drip leg done incorrectly as gas flow should have a 90 degree turn

What is plan for garage overall ?? Install ceiling ?? Insulation ??

Does the roof have vents like gable vents, ridge vents, etc ?? If so you'll just be trying to heat the environment as well !! ;)
I'm starting to wonder about my professional gas installation and why the inspector found no issues. The company I chose was highly recommended on Angie's List. The roof will be replaced in a couple years, so I planned on having ridge vents added at that point then I'll also install foam baffles and new insulation; the ceiling will remain open.

I've attached a pic of the black flexible gas pipe. The part number appears to be PMG-1066: http://www.gastite.com/us/technical-resources/code-approvals.html. The pipe seems to be CSST, which I thought was allowed for substantial lengths in residences. Dunno. I'm going to add a 90 and flip the tee this weekend to have a proper drip leg.

uploadfromtaptalk1449709151983.jpg
Sent from my XT1080 using Tapatalk
 
Last edited:

CKS1955

Well-known member
Joined
Oct 12, 2014
Messages
489
Location
Michigan
Great video of the process. Just a couple corrections to the gas line as mentioned above.

Of note when installing insulation, the Kraft face should be covered, I believe it is highly flammable.

Jay
 

rohartman

Well-known member
Joined
Dec 28, 2012
Messages
968
Location
Ohio
Great videos, I'm in the process of installing my Beacon Morris heater. What is the advantage of the external intake?

Thanks O
 
OP
B

byalegend

Active member
Joined
Oct 16, 2011
Messages
36
Great videos, I'm in the process of installing my Beacon Morris heater. What is the advantage of the external intake?

Thanks O
It helps to lengthen the heater's life by drawing in fresh air instead of contaminated air from the garage (e.g. saw dust, chemicals, etc). Also, the air that gets sucked into the heater is warmed slightly by the heat from the flue before reaching the heater. That's about the extent of my knowledge. There are probably other benefits of which I'm unaware.

Sent from my XT1080 using Tapatalk
 

manwithtools

ALLIANCE MEMBER
Joined
Aug 24, 2015
Messages
13,730
Location
Lebanon, TN
I'm starting to wonder about my professional gas installation and why the inspector found no issues. The company I chose was highly recommended on Angie's List. The roof will be replaced in a couple years, so I planned on having ridge vents added at that point then I'll also install foam baffles and new insulation; the ceiling will remain open.

I've attached a pic of the black flexible gas pipe. The part number appears to be PMG-1066: http://www.gastite.com/us/technical-resources/code-approvals.html. The pipe seems to be CSST, which I thought was allowed for substantial lengths in residences. Dunno. I'm going to add a 90 and flip the tee this weekend to have a proper drip leg.

uploadfromtaptalk1449709151983.jpg
Sent from my XT1080 using Tapatalk

Yep, that is FlashShield CSST, my research indicates that should be fine for use indoors and when it's properly bonded (for lightning strikes) it should be good for outside use too. The outer black covering is apparently conductive which adds to the stability of the product. Do some research and see what it turns up for you.

Many schools of thought regarding it's overall suitability. I'm on the fence at this point. I talked to my local LP vendor yesterday and they indicated that copper outside (1/2") and iron (1/2") inside would be fine by them.

My installation is simple enough that I think I'll use the copper / iron combo.
 

CKS1955

Well-known member
Joined
Oct 12, 2014
Messages
489
Location
Michigan
It helps to lengthen the heater's life by drawing in fresh air instead of contaminated air from the garage (e.g. saw dust, chemicals, etc). Also, the air that gets sucked into the heater is warmed slightly by the heat from the flue before reaching the heater. That's about the extent of my knowledge. There are probably other benefits of which I'm unaware.

Sent from my XT1080 using Tapatalk

Plus the air used by combustion has already been conditioned but gets dumped outside. The air used by combustion has to be replaced by unconditioned air that finds its way into the building envelope via gaps, etc. So theoretical by using air from outside the building improves the efficiency.

Jay
 
OP
B

byalegend

Active member
Joined
Oct 16, 2011
Messages
36
Yep, that is FlashShield CSST, my research indicates that should be fine for use indoors and when it's properly bonded (for lightning strikes) it should be good for outside use too. The outer black covering is apparently conductive which adds to the stability of the product. Do some research and see what it turns up for you.

Many schools of thought regarding it's overall suitability. I'm on the fence at this point. I talked to my local LP vendor yesterday and they indicated that copper outside (1/2") and iron (1/2") inside would be fine by them.

My installation is simple enough that I think I'll use the copper / iron combo.

Yes, it is Gastite FlashShield CSST, not rubber tubing. The plumber mentioned that it's suitable for indoor and outdoor use. It's good to know that only the drip leg needs to be corrected.
 
Last edited:

vicegripbloodblister

Well-known member
Joined
Nov 15, 2014
Messages
56
Location
Midwest
Same heater just put in my garage and it works good. I went horizontal with concentric vent and believe the separated combustion is money well spent. It's quiet and warms the garage quickly. Very nice install and and enjoy your new heater !!!
 
OP
B

byalegend

Active member
Joined
Oct 16, 2011
Messages
36
Same heater just put in my garage and it works good. I went horizontal with concentric vent and believe the separated combustion is money well spent. It's quiet and warms the garage quickly. Very nice install and and enjoy your new heater !!!

Thanks. Yes, the garage warms up very quickly. I just read through your installation thread - nice. I was a little nervous about venting vertically, but I didn't have much choice. It seems to have turned out fine.
 

CNGsaves

Well-known member
Joined
Sep 26, 2012
Messages
13,233
Location
KS and OK
Good to hear that you've determined gas line is CSST that will serve it's purpose IF properly bonded and kept from getting wet/rusty or damaged. Since you already had black pipe steel in the garage for hot water tank, I would have just extended with black pipe steel. BPS would flow better since it has larger inside diameter than csst as csst has corrugations that slow down flow. Also BPS is obviously stronger, thus safer.

Sorry I hadn't watched all videos when I posted so now I see that you've got insulation on all the upper rafter spaces of the ceiling.

Really do LIKE those Sterling Garage Guy/Menards Beacon Morris heaters with the separated combustion with that concentric vent kit. :thumbup: Buying it through the LittleGreenHouse website is great idea to get great price and all the components.

Looks like you had watched this YouTube which also shows all the benefits of separated combustion and concentric vent kit:

Great job of talking through all the details/part numbers/etc in your videos. These are some of BEST videos I've seen so kudo's on a great job !! :thumbup:

Enjoy the heater. :beer:
 
OP
B

byalegend

Active member
Joined
Oct 16, 2011
Messages
36
Good to hear that you've determined gas line is CSST that will serve it's purpose IF properly bonded and kept from getting wet/rusty or damaged. Since you already had black pipe steel in the garage for hot water tank, I would have just extended with black pipe steel. BPS would flow better since it has larger inside diameter than csst as csst has corrugations that slow down flow. Also BPS is obviously stronger, thus safer.


Sorry I hadn't watched all videos when I posted so now I see that you've got insulation on all the upper rafter spaces of the ceiling.


Really do LIKE those Sterling Garage Guy/Menards Beacon Morris heaters with the separated combustion with that concentric vent kit. [emoji106] Buying it through the LittleGreenHouse website is great idea to get great price and all the components.


Looks like you had watched this YouTube which also shows all the benefits of separated combustion and concentric vent kit:


Great job of talking through all the details/part numbers/etc in your videos. These are some of BEST videos I've seen so kudo's on a great job !! [emoji106]


Enjoy the heater. [emoji481]


Thanks for the compliments. I did a ton of research (Beacon Morris tech support probably got tired of my calls :)), and I know it can be frustrating for novices like myself when seemingly minor details are left out of project videos. So, I tried to do the videos from a novice's perspective without making them lengthy.

Yeah, if I were doing the gas installation myself knowing what I know now, I probably would use black steel. I relied on the plumber's expertise for this one, but I probably should have asked more questions. It still works great as-is.
 
Last edited:
OP
B

byalegend

Active member
Joined
Oct 16, 2011
Messages
36
I fixed the drip leg today. I even got up the courage to replace a couple 40-year-old valves, where the plumber discovered a leak in one of them during his testing - checked for leaks and all is good. Thanks, everyone.


Sent from my XT1080 using Tapatalk
 

Attachments

  • IMG_20151212_124236820_HDR.jpg
    IMG_20151212_124236820_HDR.jpg
    147.4 KB · Views: 113
  • IMG_20151212_154220672.jpg
    IMG_20151212_154220672.jpg
    139.8 KB · Views: 107
Last edited:

phos

New member
Joined
Mar 2, 2015
Messages
3
Great video. I recently referenced it several times while installing my sterling gg 75btu heater with concentric vent kit. I put it on my building which is a 36x48. The ceiling height from concrete is 11 feet 7 inches. The concrete is insulated underneath with foam and on the sides. All walls are R19 and R40 in the ceiling. I have 4 windows in there, 3 overhead doors of which two of them are 12x10's and the third is 8x8. The overhead doors are R16.5 and all have windows in them. It's currently well below zero and the heater runs for about 8 or 9 minutes and then will turn off for 20 minutes before running again. I keep it at 60 degrees.. So here's my question...

On the back of the sterling heater where the thermostat wires connect there is a W1, W2, G, and R terminal. If I connect a cheap thermostat and use the R, G, and W1 to the thermostat it works as expected. However, I want a wireless "smart" thermostat that I can control remotely but there is no "C" terminal. Does this heater not support one of these fancy wifi thermostats?

Thanks!
 

dfiler2

Well-known member
Joined
Dec 15, 2014
Messages
2,858
Location
NW Minnesota
On the back of the sterling heater where the thermostat wires connect there is a W1, W2, G, and R terminal. If I connect a cheap thermostat and use the R, G, and W1 to the thermostat it works as expected. However, I want a wireless "smart" thermostat that I can control remotely but there is no "C" terminal. Does this heater not support one of these fancy wifi thermostats?

Thanks!

I just did this with a 75,000 BTU unit, if you look at the top of the control board you'll see a "c" terminal with nothing connected, I ran a wire from there to "W2" which was not connected on mine. I have a Honeywell WIFI thermostat and it works fine. The "C" terminal is just a return path for the current, a little like having a neutral with 120v.
 
OP
B

byalegend

Active member
Joined
Oct 16, 2011
Messages
36
I just did this with a 75,000 BTU unit, if you look at the top of the control board you'll see a "c" terminal with nothing connected, I ran a wire from there to "W2" which was not connected on mine. I have a Honeywell WIFI thermostat and it works fine. The "C" terminal is just a return path for the current, a little like having a neutral with 120v.
Good to know. I thought about installing a WiFi thermostat, but I thought it was overkill in my situation.

Sent from my XT1080 using Tapatalk
 
To avoid these ads, REGISTER NOW!
Top Bottom