
Howdy yall! Been a looker on here for a while... but haven't posted much. This forum has been a major help leading me up this this fun project - thanks to all that have contributed before me 
When the wife and I were shopping around for a house my only stipulations were concerning the garage ~ the rest, whatever made her happy. While I didn't get the 'ideal' garage (most things in life are a compromise); I was still left with a usable space. Currently it's the last room of the house that really needs work and my wife has given me the green light to finally get on with the renovation
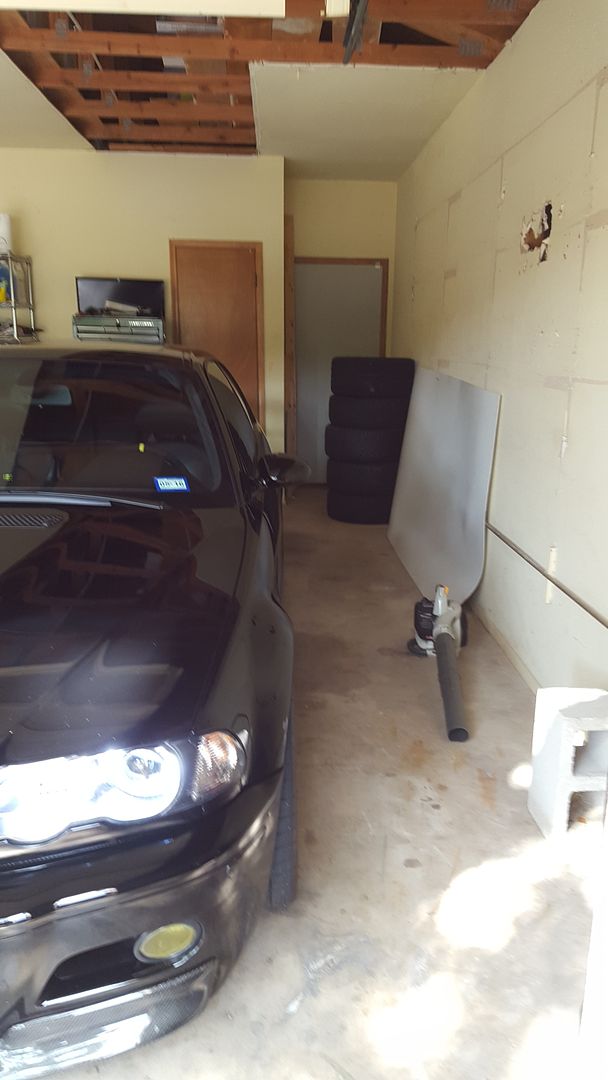
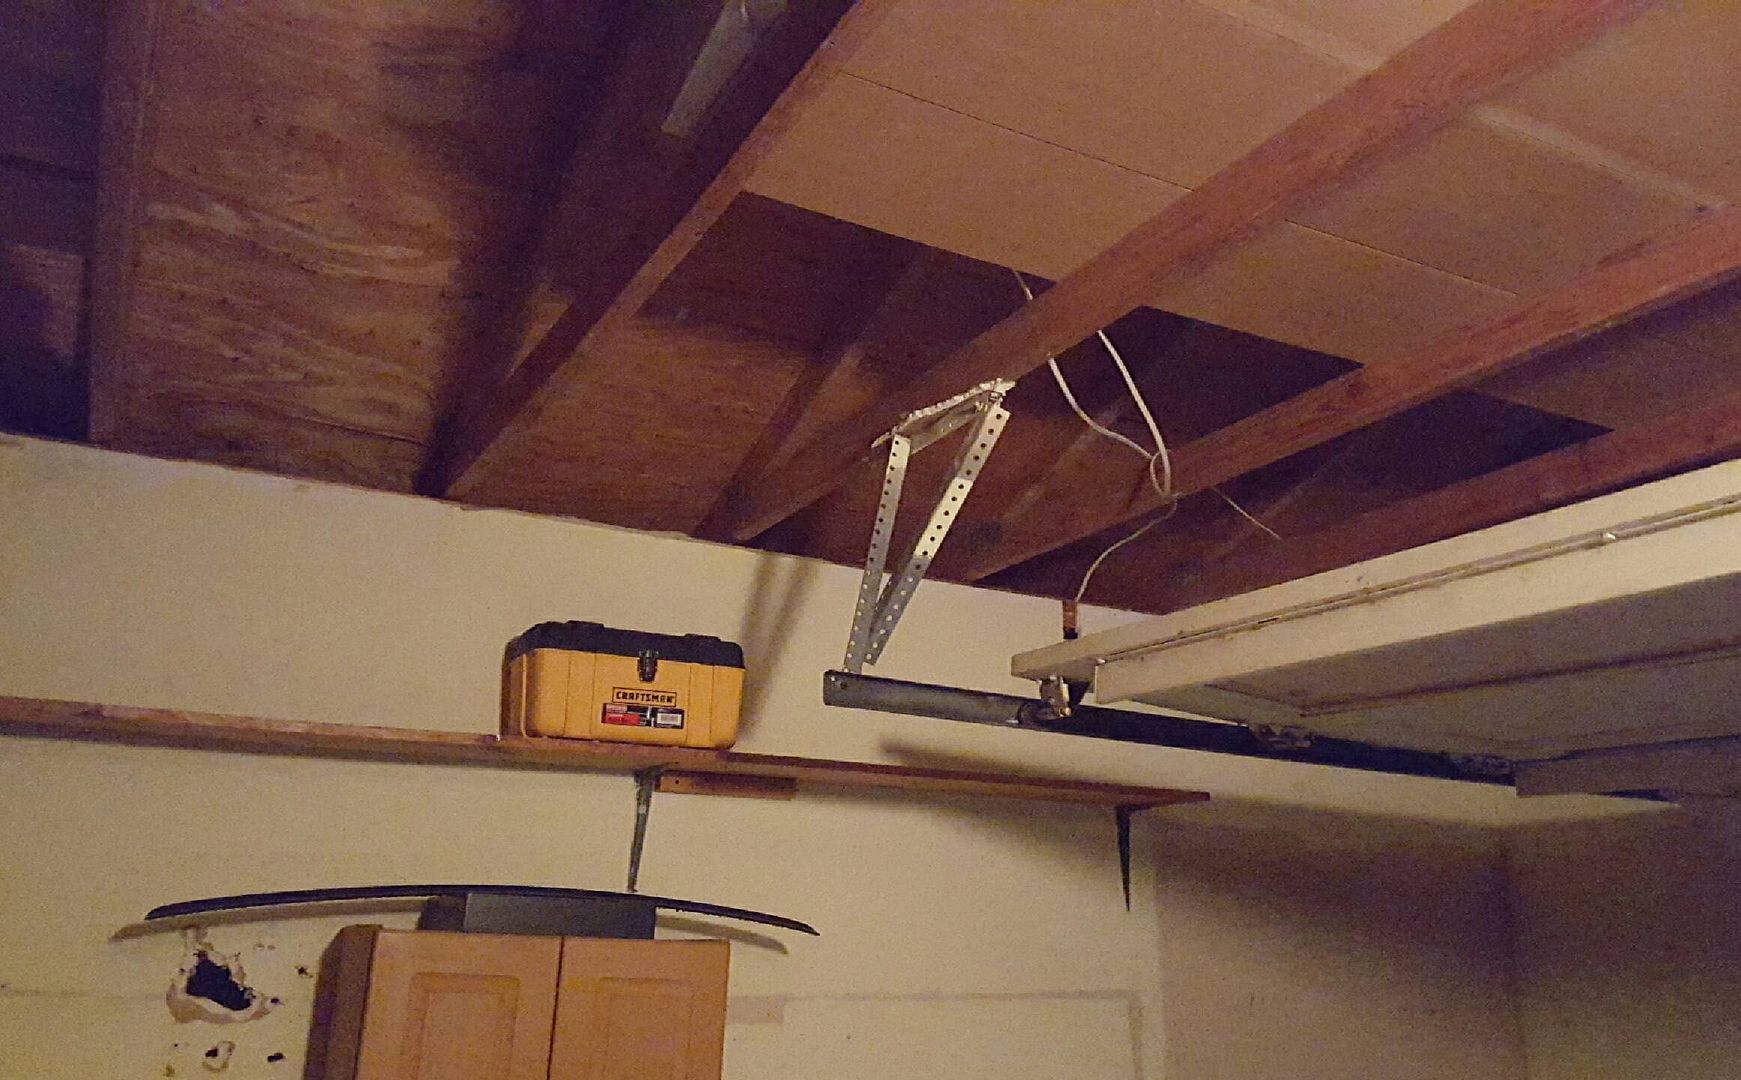
As you can see in these pictures the finish was in pretty rough shape. Tape/Joints cracking, half the drywall ceiling missing, the other half falling down, holes, rotted out old wooden overhead door, kicked-in not to code man door, etc etc


Also the wifey recently ‘accidentally’ ran her Jeep into the door jamb

^^^of course that was my fault for parking her car “kinda funky” in there the night before
So order of business to get this garage tip-top:
- Replace overhead door
- Replace man-door
- Demo drywall - re-drywall, tape, float, texture, paint
- Attic ladder
- Electrical - add outlets, lighting, switches, etc
- Fluid applied floor
- Purchase furniture – cabinets, lockers, storage, work bench, etc
- Purchase accessories - wall fans, high chair, working chair, creeper, folding chair storage rack system, retractable extension cord reel, etc
Below are some renderings I've come up with to get dimensionally stable:


The location of the workbench has been my main headache... with the location of the 3ea mandoors along the back wall there's no 'perfect' location. This corner looks a bit cramped in the rendering but the car can slide a good 2' towards the front of the garage allowing the left side of the workbench more easily usable space. My wives Jeep will almost always be parked in the left bay and with her recent history of running into things I'd like to give her the least amount of object to come in-contact with :thumbsup:
I’m trying to keep the least amount of objects on the left and right side of the bays – I want to be able to easily open doors, not hit my head on anything… and still allow myself space to get a jack at all four corners.
^^^ANY INPUT TO THE LAYOUT IS APPRECIATED!
Some discussion points regarding the upcoming scope:
FINISH-OUT
- Obvi going to remove all the damaged/non-existent drywall and replace with new. Scrap most of the texture, tape, float, sand, re-texture, and paint. I'm thinking for paint going with a flat finish light grey on both the walls and ceiling.
- adding a floor to ceiling peg board at the front of the garage for yard work essentials (edger, blower, broom, trimmer, etc)
- adding FRP panel in the other front corner at the water softner
OVERHEAD GARAGE DOOR
- Clopay, traditional long panels, 2" insulation (R-10), long flush windows
- Liftmaster #8355 1/2hp belt drive (quite!!)
- I've got 10' ceiling in the space and the door is a std 8'... I requested some vertical track extensions to snug the motor and track up against the ceiling as tight as possible. This should give me another 8"-10" of clearance.
MAN DOOR
- Replacing door, frame, hardware... additional safety features include fire rated, insulated, proper thickness, dead bolt, hinge stiffeners, wide angle view port, etc.
ATTIC LADDER
- The current position of the attic access isn't ideal and pretty dangers and cumbersome to get the old foldable ladder out to lift myself and objects up there for storage... we're installing a proper insulated attic ladder relocated more to the center of the garage in the left bay. This will be a heavy duty unit and support up to 400lbs capacity.
ELECTRICAL
- Relocating water softner outlet (closer to the unit for additional usable wall space), adding additional wall outlets, and adding ceiling outlets at the wall fan locations. This will all be on a dedicated breaker at the elect panel
- Rewire electric panel, add a bus bar, and add a main ground/ground rod
- Adding 4ea 4' Perterson LED ceiling mounted lights (2ea per bay) - 3,750lum. If this isn't enough lighting I've selected fixtures that can easily be added to in series with a simple pigtail.
- Also with the added circuit we’re adding two std bulbs on a switch at the relocated attic ladder to provide lighting in the attic space above the garage.
FLOORING
- Ideally I'd like to have RaceDeck flooring but the extra $1.5k min. just seems un-necessary at this time (that's with the GarageJournel discount).
- I'm likely going to go with the Sherwin-Williams Armorseal fluid applied flooring in a light beige solid color. I'm not a fan of the granular sprinkles; while it looks kinda cool I know from experience that stuff can make finding a dropped bolt or washer an extra choir LOL
- As most people are, I'm a bit worried about the product lifting... it's all in the floor prep. There's a seal currently on the flooring so I'm going to have to chemically etch or mechanically grind the surface. This is a project I'm not looking forward to but really hope this will be the finishing touch for the space!
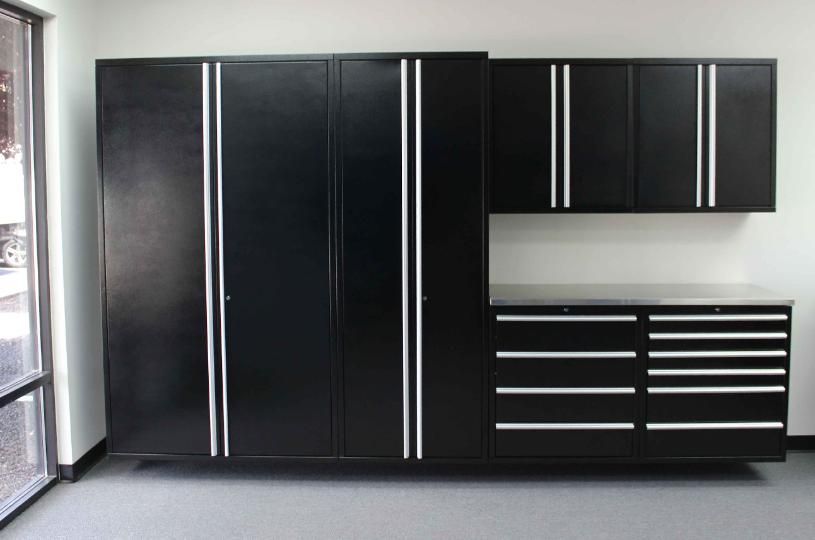
GARAGE CABINETS, STORAGE AND WORKSTATION
- This topic is still up for debate. I'm either going to go with Craftsman Premium Heavy Duty or Saber Magnum series for the cabinets and storage. Saber will cost over $1k premium after s/h. They also don't go on sale while Sears has massive discounts around the holidays. I think Saber (even if they're bolt assembled) will be nicer quality... but the Craftsman Premium Heavy Duty are still way above my current need and use... and they'll still likely last me a 'lifetime' (if I win the lotto I'll buy LISTA's for $30k ).
).
- Side note, I've got a craftsman tool chest (seen in pics above) and funny enough I think the Saber products would match that better then the Craftsman Premium Heavy Duty.
Craftsman Premium Heavy Duty


Saber
- For the workbench I've pretty much decided on the Gladiator 8' adjustable work bench with butchers block top (rated weight capacity of 3,000lbs) with power strip and tool caddy. The finish on the bench legs will match the Craftsman Cabinets pretty well too (I think) and the power strip is a nice convenient bonus that stops things from rolling off the back!


ACCESSORIES
- High Chair
- Rolling Working Chair
- Creeper
- Monkey Bar folding chair rack (along the wall between the workbench and water softener
- Ceiling mounted retractable extension cord reel (installed next to the garage motor)
- LED under-cabinet task light at workbench
- and 2ea 24" Global Industries wall mounted oscillating fans. I'd like to buy the "quite" Air King fans but at over twice(!) the cost of the GL’s – they just don’t pass my “so-what” test.
The Finish-out and MEP work will be completed rather quickly but the furniture and accessories I'm willing to wait for them to go on-sale... the space should be fully sorted by the end of the year - I hope you enjoy going through the process with me :goodluck:
When the wife and I were shopping around for a house my only stipulations were concerning the garage ~ the rest, whatever made her happy. While I didn't get the 'ideal' garage (most things in life are a compromise); I was still left with a usable space. Currently it's the last room of the house that really needs work and my wife has given me the green light to finally get on with the renovation
As you can see in these pictures the finish was in pretty rough shape. Tape/Joints cracking, half the drywall ceiling missing, the other half falling down, holes, rotted out old wooden overhead door, kicked-in not to code man door, etc etc


Also the wifey recently ‘accidentally’ ran her Jeep into the door jamb

^^^of course that was my fault for parking her car “kinda funky” in there the night before
So order of business to get this garage tip-top:
- Replace overhead door
- Replace man-door
- Demo drywall - re-drywall, tape, float, texture, paint
- Attic ladder
- Electrical - add outlets, lighting, switches, etc
- Fluid applied floor
- Purchase furniture – cabinets, lockers, storage, work bench, etc
- Purchase accessories - wall fans, high chair, working chair, creeper, folding chair storage rack system, retractable extension cord reel, etc
Below are some renderings I've come up with to get dimensionally stable:


The location of the workbench has been my main headache... with the location of the 3ea mandoors along the back wall there's no 'perfect' location. This corner looks a bit cramped in the rendering but the car can slide a good 2' towards the front of the garage allowing the left side of the workbench more easily usable space. My wives Jeep will almost always be parked in the left bay and with her recent history of running into things
I'd like to give her the least amount of object to come in-contact with :thumbsup:I’m trying to keep the least amount of objects on the left and right side of the bays – I want to be able to easily open doors, not hit my head on anything… and still allow myself space to get a jack at all four corners.
^^^ANY INPUT TO THE LAYOUT IS APPRECIATED!
Some discussion points regarding the upcoming scope:
FINISH-OUT
- Obvi going to remove all the damaged/non-existent drywall and replace with new. Scrap most of the texture, tape, float, sand, re-texture, and paint. I'm thinking for paint going with a flat finish light grey on both the walls and ceiling.
- adding a floor to ceiling peg board at the front of the garage for yard work essentials (edger, blower, broom, trimmer, etc)
- adding FRP panel in the other front corner at the water softner
OVERHEAD GARAGE DOOR
- Clopay, traditional long panels, 2" insulation (R-10), long flush windows
- Liftmaster #8355 1/2hp belt drive (quite!!)
- I've got 10' ceiling in the space and the door is a std 8'... I requested some vertical track extensions to snug the motor and track up against the ceiling as tight as possible. This should give me another 8"-10" of clearance.
MAN DOOR
- Replacing door, frame, hardware... additional safety features include fire rated, insulated, proper thickness, dead bolt, hinge stiffeners, wide angle view port, etc.
ATTIC LADDER
- The current position of the attic access isn't ideal and pretty dangers and cumbersome to get the old foldable ladder out to lift myself and objects up there for storage... we're installing a proper insulated attic ladder relocated more to the center of the garage in the left bay. This will be a heavy duty unit and support up to 400lbs capacity.
ELECTRICAL
- Relocating water softner outlet (closer to the unit for additional usable wall space), adding additional wall outlets, and adding ceiling outlets at the wall fan locations. This will all be on a dedicated breaker at the elect panel
- Rewire electric panel, add a bus bar, and add a main ground/ground rod
- Adding 4ea 4' Perterson LED ceiling mounted lights (2ea per bay) - 3,750lum. If this isn't enough lighting I've selected fixtures that can easily be added to in series with a simple pigtail.
- Also with the added circuit we’re adding two std bulbs on a switch at the relocated attic ladder to provide lighting in the attic space above the garage.
FLOORING
- Ideally I'd like to have RaceDeck flooring but the extra $1.5k min. just seems un-necessary at this time (that's with the GarageJournel discount).
- I'm likely going to go with the Sherwin-Williams Armorseal fluid applied flooring in a light beige solid color. I'm not a fan of the granular sprinkles; while it looks kinda cool I know from experience that stuff can make finding a dropped bolt or washer an extra choir LOL
- As most people are, I'm a bit worried about the product lifting... it's all in the floor prep. There's a seal currently on the flooring so I'm going to have to chemically etch or mechanically grind the surface. This is a project I'm not looking forward to but really hope this will be the finishing touch for the space!
GARAGE CABINETS, STORAGE AND WORKSTATION
- This topic is still up for debate. I'm either going to go with Craftsman Premium Heavy Duty or Saber Magnum series for the cabinets and storage. Saber will cost over $1k premium after s/h. They also don't go on sale while Sears has massive discounts around the holidays. I think Saber (even if they're bolt assembled) will be nicer quality... but the Craftsman Premium Heavy Duty are still way above my current need and use... and they'll still likely last me a 'lifetime' (if I win the lotto I'll buy LISTA's for $30k
).- Side note, I've got a craftsman tool chest (seen in pics above) and funny enough I think the Saber products would match that better then the Craftsman Premium Heavy Duty.
Craftsman Premium Heavy Duty


Saber

- For the workbench I've pretty much decided on the Gladiator 8' adjustable work bench with butchers block top (rated weight capacity of 3,000lbs) with power strip and tool caddy. The finish on the bench legs will match the Craftsman Cabinets pretty well too (I think) and the power strip is a nice convenient bonus that stops things from rolling off the back!


ACCESSORIES
- High Chair
- Rolling Working Chair
- Creeper
- Monkey Bar folding chair rack (along the wall between the workbench and water softener
- Ceiling mounted retractable extension cord reel (installed next to the garage motor)
- LED under-cabinet task light at workbench
- and 2ea 24" Global Industries wall mounted oscillating fans. I'd like to buy the "quite" Air King fans but at over twice(!) the cost of the GL’s – they just don’t pass my “so-what” test.
The Finish-out and MEP work will be completed rather quickly but the furniture and accessories I'm willing to wait for them to go on-sale... the space should be fully sorted by the end of the year - I hope you enjoy going through the process with me :goodluck:


