To avoid these ads, REGISTER NOW!

BEFORE & AFTER....A Tool Polisher's Haven

harley jim

Well-known member
Joined
Dec 6, 2013
Messages
11,401
Location
Cleveland Tn..........out in the sticks
Re: BEFORE & AFTER....A Tool Polisher's Haven

Old Radar
I wait with bated breath on the completion of the crank shaft. Another epic moment in Garage Journal history. [emoji106][emoji481][emoji481]
And thanks I like the oiler too.

Sent from my SM-A102U using Tapatalk
 
To avoid these ads, REGISTER NOW!

i4ni

Well-known member
Joined
Jan 23, 2010
Messages
1,015
You’ve hit on the salient issue. We all like, and like to see, bright polished things—even more so if they aren’t normally meant to be bright and polished. The danger—especially with this thread—is to see a finished piece and think to yourself: Hey, I bet I could do something like that!

Then it’s a two-pronged equation of being smart enough to pick the right project and recognizing when you’re finished. Harley Jim’s beautiful little oiler that he found in the morning and finished the same day is a perfect project to spend two or three hours on. On the other side of the spectrum, I shudder to think how many times I’ve carried that 100+ pound crankshaft to the end of the driveway and hefted it up on the sawhorses—let alone the hours I’ve spent working on it once I got it there.

Some of us are just smarter than others. Here’s to you, Jim! :beer:
What is in the cranks future?
 

Old Radar

Well-known member
Joined
Apr 17, 2019
Messages
2,754
Location
San Antonio, TX
What is in the cranks future?

It will be the rotating "post" for my dual grinder stand. Here are a couple of previous shots:

attachment.php


attachment.php
 

Attachments

  • DryFit.jpg
    DryFit.jpg
    88.8 KB · Views: 1,254
  • 21 Mar 20a.jpg
    21 Mar 20a.jpg
    115.2 KB · Views: 1,268

Bigblockyeti

Banned
Joined
Feb 1, 2018
Messages
2,550
Location
Upstate, SC
That's way cool, I'd love to build something like that to place my Rockwell belt/wheel grinder and my Milwaukee bench grinder back to back. Having moved less than two years ago, I've learned making things really heavy for the sake of stability can also be a nightmare when paying by the lb. to move all your worldly belongings 600 miles.
 

skorpio

Well-known member
Joined
Aug 22, 2011
Messages
47
Man........you guys do some great work. Does anyone know where to find the old school Naval Jelly at?

I personally have found Naval Jelly to be completely counterproductive to this sort of thing. The dulling that it does to the metal under the rust is often deeper than the rust it removed, so it just seems to give you something that requires more mechanical abrasive effort to get shiny. It all depends on what the goal is I guess. Navel Jelly might be an option if the goal is a surface for paint, but if you are going for that mirror polish, eh, probably not so much.

You know you've really began to master the polishing craft when that day comes where you've polished something brass and suddenly you seem to be removing the "brass" color. At first you think it must have been plated, but soon realize you've made it so reflective it looks silver. Unfortunately it's an achievement you rarely get to share with anyone as virtually anything you do to it at that point will, I guess for lack of a better term, de-silver it, even simply leaving it alone for a pretty short period of time. You just get that fleeting moment of personal glory.
 

Old Radar

Well-known member
Joined
Apr 17, 2019
Messages
2,754
Location
San Antonio, TX
I personally have found Naval Jelly to be completely counterproductive to this sort of thing. The dulling that it does to the metal under the rust is often deeper than the rust it removed, so it just seems to give you something that requires more mechanical abrasive effort to get shiny. It all depends on what the goal is I guess. Navel Jelly might be an option if the goal is a surface for paint, but if you are going for that mirror polish, eh, probably not so much.

I'm completely with you on that! And the **** that passes for Naval Jelly these days is even worse. See my posts #795-#797 for pics of my crank shaft before and after I used Rust-Oleum Rust Dissolver Jelly. :mad:

Nice saw top, though!!
 

Bowtie4life

Well-known member
Joined
Apr 17, 2020
Messages
130
Location
Washington DC
I personally have found Naval Jelly to be completely counterproductive to this sort of thing. The dulling that it does to the metal under the rust is often deeper than the rust it removed, so it just seems to give you something that requires more mechanical abrasive effort to get shiny. It all depends on what the goal is I guess. Navel Jelly might be an option if the goal is a surface for paint, but if you are going for that mirror polish, eh, probably not so much.

You know you've really began to master the polishing craft when that day comes where you've polished something brass and suddenly you seem to be removing the "brass" color. At first you think it must have been plated, but soon realize you've made it so reflective it looks silver. Unfortunately it's an achievement you rarely get to share with anyone as virtually anything you do to it at that point will, I guess for lack of a better term, de-silver it, even simply leaving it alone for a pretty short period of time. You just get that fleeting moment of personal glory.

Thanks for the information about Naval Jelly. I am usually going to bead blast the item or paint it.
 

Old Radar

Well-known member
Joined
Apr 17, 2019
Messages
2,754
Location
San Antonio, TX
i like it. Did you take pics of the brake drum fabrication ?

Grinder Stand1.jpg
This is what everything looked like straight from the salvage yard.

Base.jpg
Partially wire-brushed.

base2.jpg
Pre-Clear Coat and Pre-Rust Converter coating on the inner lining.

Base with Clearcoat.jpg
Completed Base with 1/4" steel plate and bolts from first pic.
 

i4ni

Well-known member
Joined
Jan 23, 2010
Messages
1,015
Grinder Stand1.jpg
This is what everything looked like straight from the salvage yard.

Base.jpg
Partially wire-brushed.

base2.jpg
Pre-Clear Coat and Pre-Rust Converter coating on the inner lining.

Base with Clearcoat.jpg
Completed Base with 1/4" steel plate and bolts from first pic.

I like how you did the wheel studs that's a cleaner look I'm guessing you used a plasma cutter rather than drilling all those holes I know I would LoL. The crank rotates in the sprocket which I assume you welded to the plate but my question is what did the sprocket drive? Fuel pump ?oil pump? None of the above?
 
Last edited:

Old Radar

Well-known member
Joined
Apr 17, 2019
Messages
2,754
Location
San Antonio, TX
Drill, baby, drill.

Since my little bench top drill press was no match for the task, I used and old milling machine that my neighbor's buddy has. Even with that, it took almost two hours to drill all those holes.

I got the crank at a salvage yard--the foreman gave me about three minutes to dig through a fresh truckload of engine parts before the big magnet crane moved in, so I have no idea what engine it came from or what that sprocket drove. But, yes, it's welded and gusseted it to the plate.
 

Old Radar

Well-known member
Joined
Apr 17, 2019
Messages
2,754
Location
San Antonio, TX
Well, I finally recognized when I was finished—it was sometime early last month…:lol_hitti

I’ve gone as far as I felt was necessary and much further than was actually necessary.

Tomorrow (hopefully) I’ll start the clear coat. Too bad I have to clear coat it since that will alter the color a little, but it beats the heck out of watching the "patina" re-develop.

attachment.php


attachment.php
 

Attachments

  • Pre-Clearcoat-1.jpg
    Pre-Clearcoat-1.jpg
    146 KB · Views: 1,029
  • Pre-Clearcoat-2.jpg
    Pre-Clearcoat-2.jpg
    147.2 KB · Views: 1,035

skorpio

Well-known member
Joined
Aug 22, 2011
Messages
47
Wow now that's sweet. How`d you do that ? Machine it?

Nope, all by hand, well, palm sander for a lot of it, if that counts, and sanded through 5000 grit with a final polish of SimiChrome and then waxed with Mothers California Gold paste wax. Some of the initial flattening was done by draw filing. There is a seam, which you can barely make out in that photo that runs front to back pretty much through the hologram stripe in the bill. The iron to the left of that seam was pretty beat up and rusted, and the iron to the right is a new Sawstop wing. The table is flat to about 3 thousandths of an inch per foot, flatter by twice than the Sawstop wings were out of the box. It's really kind of a teaser pic as I am going to try and get the rest of the top done over the weekend. Attached is a pic of the whole thing, and I am filling in that gap with more cast iron. So it will basically be a 27"x80" continuous flat slab of polished iron. All the parts finally showed up this week to finish it up, well mostly finished it up I guess, the plan is to put a sliding table on both ends of it.

Both the Unisaw and the Shaper were kinda rough, not terrible but not great either. The saw had been used as a storage bench for 25-30 years in a garage buried under leaky paint cans (came off of Craigslist) and the Shaper top was covered in glue and that came from an industrial equipment Liquidator. The shaper top is gonna take some work, it's got probably close to a hundredth of an inch of crown in it on the left hand side.
 

Attachments

  • 20200406_091020.jpg
    20200406_091020.jpg
    147.7 KB · Views: 235
To avoid these ads, REGISTER NOW!

Old Radar

Well-known member
Joined
Apr 17, 2019
Messages
2,754
Location
San Antonio, TX
Finished the clear coat and put the top plate on. Sprucing up the two grinders and the piston rod next. The piston rod will be the handle to rotate the crank shaft to change which grinder faces front.

attachment.php


attachment.php


attachment.php


attachment.php


attachment.php
 

Attachments

  • TopPlate-2.jpg
    TopPlate-2.jpg
    144.6 KB · Views: 1,349
  • ClearCoated with Top Plate-2.jpg
    ClearCoated with Top Plate-2.jpg
    148.2 KB · Views: 1,333
  • TopPlate-1.jpg
    TopPlate-1.jpg
    122.4 KB · Views: 1,340
  • ClearCoated with Top Plate-1.jpg
    ClearCoated with Top Plate-1.jpg
    149.4 KB · Views: 1,338
  • ClearCoated-1.jpg
    ClearCoated-1.jpg
    150.6 KB · Views: 1,348

skorpio

Well-known member
Joined
Aug 22, 2011
Messages
47
Delta Unisaw/Shaper Combo dealy coming along,
20200428_043538.jpg
I don't have a before on the Unisaw but it was in similar condition to the Shaper when I got it which I am attaching.
20200203073841273_L.JPG
 
Last edited:

bubinga

Well-known member
Joined
Jul 26, 2014
Messages
12,744
Location
Bridgeport Ohio. (Across River From Wheeling WV)
Finished the clear coat and put the top plate on. Sprucing up the two grinders and the piston rod next. The piston rod will be the handle to rotate the crank shaft to change which grinder faces front.

attachment.php


attachment.php


attachment.php


attachment.php


attachment.php

Old Radar
That is looking great[emoji106]

Sent from my SM-A102U using Tapatalk

lt is beautiful!!!:shocking::shocking::shocking::shocking::shocking::beer::beer::beer::beer::beer:
 

Bowtie4life

Well-known member
Joined
Apr 17, 2020
Messages
130
Location
Washington DC
Now that is a work of art............simply beautiful!!!! I can't put mine together the way I was going to do it after looking at yours.
 

drivesitfar

Well-known member
Joined
Oct 23, 2013
Messages
36,004
Location
Pacific Northwest
Old Radar: that stand is ART. WOW.

what are you planning on mounting on it and guessing maybe a grinder on one side and vise on the other or do tell? i'm not sure how you marked and drilled all those holes even if it was on a neighbor or friend's mill, but nice work.

WELL DONE!!!
 

skorpio

Well-known member
Joined
Aug 22, 2011
Messages
47
Mating the Unisaw and the shaper together is a neat idea, I like the nice wide table you're ending up with.

When I got the Unisaw the original MDF extension table was pretty much trashed and I was looking at these cast iron router table extensions. Sawstop sold a cast iron insert to put between their router table extension and the saw wing which I thought was brilliant, but it resulted in a saw/router combo with just a little better than half of the rip capacity of what my saw originally had. So I got it in my head I was going to do such a thing but extend it to what my original rip capacity was, especially since my Unifence rail was already that length. Anyway in the end I just decided a shaper was a way more substantial, and surprisingly cheaper way to accomplish that. The table is actually larger than the original MDF one and not something that'll need to be periodically replaced, and the whole thing is still mobile. It's a beast, whole thing is probably close to 3/4 of a ton and the whole table is about the size of a twin size mattress.
 

Old Radar

Well-known member
Joined
Apr 17, 2019
Messages
2,754
Location
San Antonio, TX
Old Radar: that stand is ART. WOW.

what are you planning on mounting on it and guessing maybe a grinder on one side and vise on the other or do tell? I'm not sure how you marked and drilled all those holes even if it was on a neighbor or friend's mill, but nice work.

WELL DONE!!!

Thanks Drives and all the others who have commented.

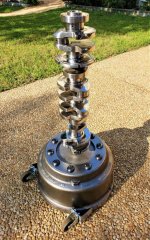
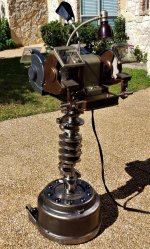
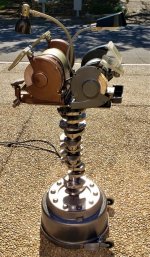
Well, I think I'm finished with my dual grinder stand. Except, of course, for fitting it into the spot in my garage that I planned for its home--could be tight...

I'm pleased with the overall result, but there are some issues.

1. This bad boy weighs in at just a touch over 300 pounds. Without the grinders installed, I was able to maneuver it over bumps and gaps with reasonable ease. Fully assembled, I have to lean it over to about 45 degrees to keep the base from scraping--and therefore I'm hefting a lot of the weight. You geometry types can figure the percentage. Needless to say, wheels or no, I won't be trotting it around the garage too often.

2. I thought the piston rod attached near the top of the crank would serve nicely as a handle to maneuver the stand around the garage. Fail! The stand with the grinders is too heavy and the rod is too short to be effective. It's easier to just grab the Pre-Block and force it around. The piston rod has been relegated to a towel rack and tool holder.

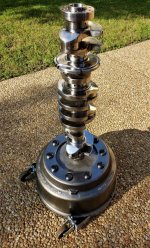
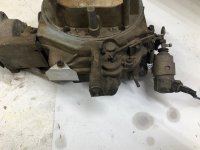
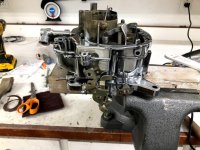
3. It's difficult to see, but in the second and third pics, there is a T-handle hex wrench drilled through the bottom two counter weights into the bottom plate. This was meant to lock the crank shaft in place with one of the grinders facing the user. Lift it out a couple of inches, spin the shaft 180 degrees and slide it into the hole on the other side of the bottom plate and the second grinder would be ready for use. The design flaw is that the T-handle I found is too slender and is susceptible to bending. I'll need to find one more stout and re-drill the holes.

I haven't settled on the final configuration of wheels yet. I'm leaning toward 60 & 100 grit stones on one and then a wire wheel and buffing wheel on the other, but may go with a twisted wire wheel instead of the 60 grit stone. I'm also anxiously awaiting Mattblast's Initial Operational Capability on printing labels on metal so my Pre-Block will be presentable again.

Edit: I've also got to fabricate a combo deflector chute for the exhaust ports so they're not throwing **** on each other. I guess I'm not quite finished yet...

attachment.php


attachment.php


attachment.php


attachment.php
 

Attachments

  • Finished-4.jpg
    Finished-4.jpg
    148.9 KB · Views: 2,395
  • Finished-3.jpg
    Finished-3.jpg
    148 KB · Views: 3,530
  • Finished-2.jpg
    Finished-2.jpg
    149.5 KB · Views: 2,404
  • Finished-1.jpg
    Finished-1.jpg
    149 KB · Views: 2,411
Last edited:

Shelbylex

Well-known member
Joined
Jan 20, 2018
Messages
3,109
Location
MA
Old Radar, this is absolutely amazing! Words are not enough to express how cool is your design and setup!
 

CrocBox

Member
Joined
Nov 10, 2019
Messages
11
Location
FL
That grinder stand is a work of industrial art!

Sent from my XT1650 using Tapatalk
 

Bob Heine

ALLIANCE MEMBER
Joined
Oct 24, 2009
Messages
10,703
Location
Boca Raton, Florida
I haven't settled on the final configuration of wheels yet. I'm leaning toward 60 & 100 grit stones on one and then a wire wheel and buffing wheel on the other, but may go with a twisted wire wheel instead of the 60 grit stone.
Old Radar, based on the amount of effort you put into that amazing stand, one of your wheels should be a deburring wheel. They are stupid expensive but really hold up and polish things I didn't expect could be polished.
attachment.php


Not sure who has the lowest price for the 3M wheels but there are a lot of places that are higher than this one: https://www.applied.com/c-brands/c-3m/00048011051321/Scotch-Brite-EXL-Deburring-Wheel/p/102177257
 

Attachments

  • EXL Wheel.jpg
    EXL Wheel.jpg
    74.5 KB · Views: 959

Slednut

Well-known member
Joined
Dec 20, 2012
Messages
2,550
Location
Washington state
Lots of really nice stuff here. I'm having a problem finding tools that will polish the nooks and crannies of some of the things I've done. I have a dremel tool with the little buffing pads but I'm not having much luck with it. It's not variable speed so it may be spinning too fast. Here's a carb I'm working on.
 

Attachments

  • Carb 1.jpg
    Carb 1.jpg
    126.3 KB · Views: 151
  • Carb 3.jpg
    Carb 3.jpg
    154 KB · Views: 174

Graham08

Well-known member
Joined
Dec 10, 2007
Messages
713
Location
Iron Station, NC
Here's my Johnson Model B band saw. Before ($20 Craigslist find):

49845472876_c49819a1fa_c.jpg

And after:

49845471126_36c3e760db_c.jpg

After replacing all the bearings and getting a decent blade on it, it cuts straight! I ended up making new sheet metal parts since the stuff that was on it was in really rough shape. My only regret is doing Rustoleum paint from a rattle can instead of something a bit nicer.
 

Old Radar

Well-known member
Joined
Apr 17, 2019
Messages
2,754
Location
San Antonio, TX
Thanks everyone for your comments, encouragement and suggestions! I enjoyed the project--some aspects more than others--and the benefits are already apparent by way of consolidating the tools and opening up space on my workbenches.
 
To avoid these ads, REGISTER NOW!
Top Bottom