To avoid these ads, REGISTER NOW!

beginner welding projects

markvfr

Well-known member
Joined
Jun 1, 2010
Messages
79
I got a MIG welder this year as I always wanted to learn and after running some beads on coupons I thought I can still practice my technique while doing some small simple projects. Main purpose of this thread is to share some newbie projects.

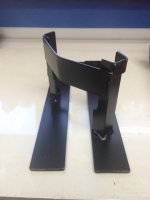
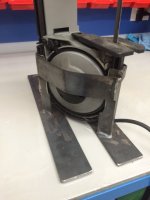
First thing I wanted to make were some hangers on the wall for steel stock. Got some square tubing and 1/4" flat bar, settled on 30deg angle. Welded it up, drilled holes for mounting and tremclad rattle canned it. Welds were not pretty but strong. I cut some practice beads and etched them and the nugget had good penetration.
 

Attachments

  • IMG_4846.JPG
    IMG_4846.JPG
    109.1 KB · Views: 359
  • IMG_4849.JPG
    IMG_4849.JPG
    109.1 KB · Views: 446
  • IMG_4866.JPG
    IMG_4866.JPG
    113.9 KB · Views: 400
  • IMG_4871.JPG
    IMG_4871.JPG
    63.6 KB · Views: 408
Last edited:
To avoid these ads, REGISTER NOW!
OP
M

markvfr

Well-known member
Joined
Jun 1, 2010
Messages
79
After I graciously got some scrap metal from another member on this forum, I used some of it to make a small stand for my shock vacuum setup. It took me about 20 mins to make this. Some square tubing scrap and 5x5" square plate. My welds looked better on this piece, but I don't have any pre-paint pics.
 

Attachments

  • IMG_6367.JPG
    IMG_6367.JPG
    84.7 KB · Views: 334
  • IMG_6366.JPG
    IMG_6366.JPG
    89.6 KB · Views: 389
Last edited:
OP
M

markvfr

Well-known member
Joined
Jun 1, 2010
Messages
79
I got some reclaimed oak coffee tables for free so decided to re-purpose the tops and make steel frames for them. Got some angle iron, 1" and 2" tubing. Since I had an abrasive chop saw, cutting those 45deg angles was a bit of a pain, so next time, I'll notch the angle for the mitred corners.

During welding I had some issues with running too hot and burned some holes in the square tubing, so learned how to fill it and grind, grind, grind. Now have motivation to make nice welds as grinding *****.

Once the frames were welded up and painted, it was time to refinish the oak tops. After sanding 25 years of **** off of them, filled the cracks with wood filler, stained with a light walnut stain and finished it with Waterlox tung oil.
 

Attachments

  • IMG_6066.jpg
    IMG_6066.jpg
    80.1 KB · Views: 280
  • IMG_4900.JPG
    IMG_4900.JPG
    112.9 KB · Views: 252
  • IMG_4892.JPG
    IMG_4892.JPG
    79.3 KB · Views: 272
  • IMG_4896.JPG
    IMG_4896.JPG
    98.5 KB · Views: 272
  • IMG_6283.jpg
    IMG_6283.jpg
    102.2 KB · Views: 222
  • IMG_6214.jpg
    IMG_6214.jpg
    62.2 KB · Views: 213
  • IMG_6215.JPG
    IMG_6215.JPG
    133.2 KB · Views: 217
Last edited:
OP
M

markvfr

Well-known member
Joined
Jun 1, 2010
Messages
79
I was getting fed up with only having the chop saw and not being able cut small intricate pieces and also being able to use it in my garage and not outside with all the cutting dust that the chop saw produces. I settled on a Milwaukee portable band saw. I got it this past weekend and decided to build a vertical stand for it. I got the design from "The Fab Forums" on youtube as it appeared to be the easiest design. Thanks dude.

Still had some 1/4" flat bar left over, some angle iron and cut some small tabs from smaller stock for the retaining tabs. I welded the base first, then fitted the angle iron to the saw. Then used some heat on the small pieces and the cross brace to bend it into shape and welded it last. My MIG technique is getting better and I'm happy with the results overall. The stand is perfectly stable, simple and portable.
 

Attachments

  • IMG_6365.JPG
    IMG_6365.JPG
    72.9 KB · Views: 224
  • IMG_6364.JPG
    IMG_6364.JPG
    98.6 KB · Views: 265
  • IMG_6363.JPG
    IMG_6363.JPG
    76 KB · Views: 216
  • IMG_6362.JPG
    IMG_6362.JPG
    74.7 KB · Views: 209
  • IMG_6338.JPG
    IMG_6338.JPG
    91 KB · Views: 246
  • IMG_6334.JPG
    IMG_6334.JPG
    58.5 KB · Views: 238
  • IMG_6331.JPG
    IMG_6331.JPG
    106.5 KB · Views: 276
Last edited:
OP
M

markvfr

Well-known member
Joined
Jun 1, 2010
Messages
79
I hope a few of my projects I've shown can kickstart this thread to share some ideas.

On another note, I have also been practicing TIG, and man thats a whole different kettle of fish. MIG is a joke compared to TIG for me. :eyecrazy:
 

buildyourown

Well-known member
Joined
Jan 8, 2010
Messages
185
Those actually look pretty good. I'm a huge fan of making stuff as practice. I've got a few things in my shop that I gas welded 20yrs ago and are so ugly it is literally embarrassing. My day job is about 20% tig so needless to say, I've improved.
But you know, all those old ugly things are still working great and remind you were you started.
 
OP
M

markvfr

Well-known member
Joined
Jun 1, 2010
Messages
79
Those actually look pretty good. I'm a huge fan of making stuff as practice. I've got a few things in my shop that I gas welded 20yrs ago and are so ugly it is literally embarrassing. My day job is about 20% tig so needless to say, I've improved.
But you know, all those old ugly things are still working great and remind you were you started.

I dunno, they all look like **** to me except for some of the beads on the saw stand. :) Thats how you learn though right?

Yup, I still have woodworking projects I made in grade 8 almost 30 years ago, man they are ugly. :wtf:
 
Last edited:
OP
M

markvfr

Well-known member
Joined
Jun 1, 2010
Messages
79
I would post up some of mine, but my welds look like boogers and chicken poop.

Please do. That's why I started this thread, to share ideas, not be crucified by welding pros on our less than perfect welds. Unless you ask for it of course. ;) Everyone started somewhere and no one was putting down perfect beads the first time they picked up a torch.
 

2oolhound

Well-known member
Joined
Dec 18, 2010
Messages
5,918
Location
BC Canada
My feelings on it is you need to burn rods or wire. No amount of reading, advice or youtube videos will make you a welder. You need to do it. Pour your time into it. It also helps if you're driven.
 

sberry

Banned
Joined
Jun 18, 2005
Messages
35,747
Location
Brethren, Michigan
Those do look decent. No one wonders wtf. I really sand that kind of thing more than grind and do it so slightly you usually don't notice its been done but to clean the splatter. I usually use a 1/4 wheel and bump the trigger a little and can really not leave grind marks.
I havnt really used flaps, I have sander with 36 grit on it too.
 

Crusarius

Well-known member
Joined
Aug 22, 2013
Messages
383
Location
Upstate NY
I love flap disks but they just don't last and are pricey. I usually just use a soft pad. Can get them in 36, 80, and 120 grit. Cheaper and lost a lot longer. Also being flexible makes them more versatile.

The best thing about flapdisks is once they wear out they make great buffing pads. Will leave a mirror finish on some materials.
 
OP
M

markvfr

Well-known member
Joined
Jun 1, 2010
Messages
79
I love flap disks but they just don't last and are pricey. I usually just use a soft pad. Can get them in 36, 80, and 120 grit. Cheaper and lost a lot longer. Also being flexible makes them more versatile.

The best thing about flapdisks is once they wear out they make great buffing pads. Will leave a mirror finish on some materials.

I was hoping there was an alternative to flap discs as they are expensive. Can you guide me to some good softpads? Thanks.
 

Crusarius

Well-known member
Joined
Aug 22, 2013
Messages
383
Location
Upstate NY
This is the best I can do right now since everything is blocked at work. I guess it is called a sanding disk backer.

m7fuaWc-UfbXKykpIT990Gg.jpg


http://thumbs2.ebaystatic.com/d/l225/m/m7fuaWc-UfbXKykpIT990Gg.jpg

https://goo.gl/images/WwAFAE
 

Crusarius

Well-known member
Joined
Aug 22, 2013
Messages
383
Location
Upstate NY
I have accidentally ended up hooking the edge of the plastic back on sharp corners of sheet metal. It does make is smaller :) But the good thing about that is if you want to grind a tight radius you can shape the plastic to what you need.
 

TauntDevil

Well-known member
Joined
Mar 19, 2014
Messages
194
Location
Mesa, AZ
These look great. My first projects with my mig was stitch welding cars haha. They came out horrible but the people letting me didnt care, as long as it held xD
 
To avoid these ads, REGISTER NOW!

sberry

Banned
Joined
Jun 18, 2005
Messages
35,747
Location
Brethren, Michigan
I am careful with the grinder to start with and try to cover my tracks. Where it gets a nice finish sand out grinding marks prior to blast or further sanding. I hate the splatter and the little places it lands and it takes just a whiz with a heavy sander to clean it off smooth. Yes, above, the backing plates and the disks. I have a 7 inch which is my fave and a 5 so a guy can gut the old disks down with old snips and use on it occasionally.
 

Attachments

  • air grinders 3.JPG
    air grinders 3.JPG
    37 KB · Views: 148
Last edited:

gayler

Well-known member
Joined
Sep 22, 2011
Messages
3,272
Location
Lakin Kansas
Please do. That's why I started this thread, to share ideas, not be crucified by welding pros on our less than perfect welds. Unless you ask for it of course. ;) Everyone started somewhere and no one was putting down perfect beads the first time they picked up a torch.

How's this look? Using a harbor freight 170 welder with .030 flux core wire.
 

Attachments

  • IMG_20161020_140219.jpg
    IMG_20161020_140219.jpg
    148.7 KB · Views: 327

moodubs

Well-known member
Joined
Jan 10, 2015
Messages
82
Location
Wrexham North Wales
hey fella keep up the good work, I have been welding professionally since 1983, we are all born learning everything we do, every day we learn more, no one knows everything (although there are some who seem to know more than google) keep at it
 
OP
M

markvfr

Well-known member
Joined
Jun 1, 2010
Messages
79
Well, been running some coupon Tig beads on steel and aluminum. Good and tricky but slowly making progress. Now to build something with these beginner tig skills. :)

a5aae06d07b2b8e6dcf604e1fb5c1b08.jpg


a0c50b0a9f1b8cf2e363d10e524eb97d.jpg
 

sanddan

Well-known member
Joined
Jul 7, 2005
Messages
708
Location
Oregon
I have projects in my shop that I welded over 20 years ago. Most of the early welds were too cold but still keep it "stuck together" even today.

I agree that doing projects is the best way to learn, keep it up.

Good projects to do...

shelf brackets, can make them out of 1" sq tubing or angle iron.

benches and/or tables, I have 3 or 4 made out of 1", 1.5" and 2" square tubing. all are .120" wall thickness which is easy to weld. You can get 24"x48"x3/4" melamine pre cut at Home Depot for tops and shelves.

Stands for tools such as grinders and belt sanders. 3" or even better 4" square tubing and a truck wheel for a base. Most of mine have a base made out of 2" thick rounds that are drops from cutting larger sheets of steel. 14" to 18" diameter work good.
 
OP
M

markvfr

Well-known member
Joined
Jun 1, 2010
Messages
79
Sanddan, great, thanks for those ideas. My progression is exactly like you said, brackets, tables and stands.

I'm now working on aluminum fishing rod rack which will be my first aluminum project.

I'm thinking of anodizing the final rack but can't find any rough cost estimates without calling a shop. Any ideas? The rack will be 24" wide and 6" tall.
 

2oolhound

Well-known member
Joined
Dec 18, 2010
Messages
5,918
Location
BC Canada
My small shop is very crowded. I have about a ton of steel piled on my mezzanine floor so I beefed up the supports with two - 2" schedule 40 pipes that run floor to ceiling. I figured I could keep my mig up near ceiling height by building an arm off one of these vertical pipes.

I ended up making this articulating arm. There are no bearings, just 2" OD pipe inside 2 1/6th ID pipe. Each arm extends about 8" and there are 3 swivels, one at the vertical support pipe, then where the 2 arms join and the third is on the table the mig sits on. I wrapped a sheet of .oio" brass shim around each pivot to act as a babbitt bearing. There is very little free play.


It will extend to 6' long so it covers an area of 12' although it mostly will be used right where it is. I sat on it at full extension (240 lbs.) to test my welds


beakie

Well-known member
Joined
Feb 21, 2014
Messages
492
Location
Ontario, Canada
My small shop is very crowded. I have about a ton of steel piled on my mezzanine floor so I beefed up the supports with two - 2" schedule 40 pipes that run floor to ceiling. I figured I could keep my mig up near ceiling height by building an arm off one of these vertical pipes.

I ended up making this articulating arm. There are no bearings, just 2" OD pipe inside 2 1/6th ID pipe. Each arm extends about 8" and there are 3 swivels, one at the vertical support pipe, then where the 2 arms join and the third is on the table the mig sits on. I wrapped a sheet of .oio" brass shim around each pivot to act as a babbitt bearing. There is very little free play.


It will extend to 6' long so it covers an area of 12' although it mostly will be used right where it is. I sat on it at full extension (240 lbs.) to test my welds


that's a pretty neat idea, one I may borrow down the road.
I would maybe go 12-18" per arm.

only addition I would make is it riding on a vertical tube with through holes every 1'.
so I can use it low, or raise up high if working on otherside of a vehicle/trailer/etc.


good job
 
Last edited:

littleviking

Well-known member
Joined
Sep 22, 2009
Messages
81
I cleaned it before welding. It is flux core welded and I just lightly wire brushed after welding. It still has some tanish **** on it from the flux.


I know people say Flux Core is farm welding and usually doesnt need to be cleaned and de greased before welding. Mostly they are saying that because it WILL weld through rust and dirt and grime.

However, If you take a few minutes to grind down to bare shiney metal and then brush that off and keep the weld area clean your weld will improve drasticly not only in apperance but in strength.

That weld looks to be fully engaged and I don't see anything that makes me think its a bad weld.

next time just hit it with a flap disc till its shiney and give it a good bead.

Otherwise looks good to me.

Then again Im a fluxcore farm welder. :-D
 

gayler

Well-known member
Joined
Sep 22, 2011
Messages
3,272
Location
Lakin Kansas
I know people say Flux Core is farm welding and usually doesnt need to be cleaned and de greased before welding. Mostly they are saying that because it WILL weld through rust and dirt and grime.

However, If you take a few minutes to grind down to bare shiney metal and then brush that off and keep the weld area clean your weld will improve drasticly not only in apperance but in strength.

That weld looks to be fully engaged and I don't see anything that makes me think its a bad weld.

next time just hit it with a flap disc till its shiney and give it a good bead.

Otherwise looks good to me.

Then again Im a fluxcore farm welder. :-D

Thanks!
 

2oolhound

Well-known member
Joined
Dec 18, 2010
Messages
5,918
Location
BC Canada
Thanks for the compliment beakie.

I got the idea from this drill rotisserie arm I got with my drill press when I bought it. It works so well I figured I should copy the concept.

 
To avoid these ads, REGISTER NOW!
Top Bottom