To avoid these ads, REGISTER NOW!

Beginner's Garage - Finishing Previous Owner's Work

jpedi001

Member
Joined
Jan 7, 2016
Messages
12
Location
Virginia Beach, VA
Hello Everyone,

My wife and I moved into our first home about a year ago. Ever since we bought the house I've been enjoying the hard work, craftsmanship and excellent written and pictorial documentation skills :bowdown: of fellow members on the site.

Our house is a 2 story single family home that has gone through a number of renovations. One of those renovations (not sure which owner before us) turned the car port into an enclosed single car garage.

I'd like to use this thread to document what I've done so far, my plans in the future and get all the input I can.

As I said we moved in about a year ago. Yes, it's taken me this long to start this thread but the house has given me some veteran problems to deal with in my first year. Six months in, my second floor shower pan decided to spring a leak and one month after that a water pipe busted underneath my slab. $7000 and one year later here I am; finally able to get back to the fun stuff of enhancing my garage space.

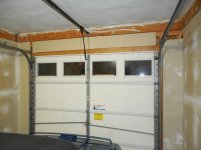
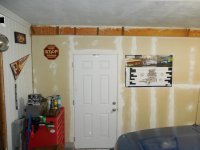
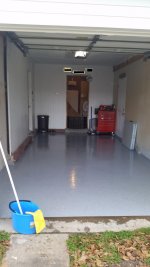
The first 5 photos are of the garage as it is now. The only improvements I've made are take down a terrible excuse of a bench, put down an epoxy coating over the concrete and add a garage door opener. So far I was able to complete all the work by myself or with the help of my father. Of course I've added some of my own little touches as well. (criticism welcome for my selections.:beer:)

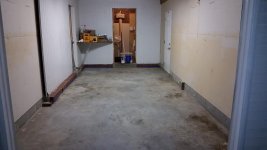
The next two photos are of the garage before the epoxy floor and garage door opener. I've also started prepping to paint the walls with drywall tape and mud.

Here's my first question. On a number of the photos there is an exposed wood "header?". This header sticks out about 3/4" from the surface of the drywall. I want to paint the drywall and have everything look uniform. Do I need to drywall over this header as well? Does anyone know why it is like this?

If you have gotten this far thanks for reading. I appreciate it and taking the time to offer any suggestions, feedback or answers to my questions.

Thanks,
Jeremy
 

Attachments

  • DSCN0003.jpg
    DSCN0003.jpg
    128.9 KB · Views: 92
  • DSCN0004.jpg
    DSCN0004.jpg
    128.9 KB · Views: 78
  • DSCN0005.jpg
    DSCN0005.jpg
    131.1 KB · Views: 81
  • DSCN0013.jpg
    DSCN0013.jpg
    130.1 KB · Views: 79
  • DSCN0001.jpg
    DSCN0001.jpg
    131 KB · Views: 75
  • 20151226_092218.jpg
    20151226_092218.jpg
    125.5 KB · Views: 67
  • 20151023_184541.jpg
    20151023_184541.jpg
    130.3 KB · Views: 78
To avoid these ads, REGISTER NOW!
OP
J

jpedi001

Member
Joined
Jan 7, 2016
Messages
12
Location
Virginia Beach, VA
One more photo of just after the epoxy went down. I'm really pleased with the rustoleum product that I neglected to mention.

Time for question number 2.

How do I get my photos to appear in line with text as I see on so many other posts.
(I'm a newbie)
 

Attachments

  • 20160116_154402.jpg
    20160116_154402.jpg
    135.3 KB · Views: 69

Bib Overalls

Well-known member
Joined
Dec 4, 2006
Messages
3,318
Location
Jonesboro, Arkansas
Some of the best threads here are about overcoming the challenges of limited space. Always surprised at how effective small, owner executed enhancements can be. One thing I will say is that self discipline is the key to maximizing a small space. You can push a mess around in a big space but a mess in a small space is always in the way. Looking forward to seeing how you make this space work for you.
 
OP
J

jpedi001

Member
Joined
Jan 7, 2016
Messages
12
Location
Virginia Beach, VA
Some of the best threads here are about overcoming the challenges of limited space. Always surprised at how effective small, owner executed enhancements can be. One thing I will say is that self discipline is the key to maximizing a small space. You can push a mess around in a big space but a mess in a small space is always in the way. Looking forward to seeing how you make this space work for you.

One of my visions to combat this is to finish off the utility room in the background with some well thought out storage and work bench. The other idea I have is to tear down the wall behind the tool box. We shall see. Thanks for looking!
 
To avoid these ads, REGISTER NOW!

sublime68charger

Well-known member
Joined
Sep 9, 2014
Messages
5,415
Location
SW Wisconsin
If it was me I'd just paint the header the same color as your putting on the dry wall.

Wait if it was me I'd leave the header in natural tone and just paint the dry wall.

But for you paint the header the same as what you paint the dry wall.

Though maybe give the header a good base coat of white primer to get it closer to the color your gonna paint the dry wall?
Just my off the hip ideas?

Also put your location in your profile will help if you have questions with what area the country you are in!

Guessin Washington DC? Saw a redskins banner?

Welcome and nice pics to get you started!
 

Dave_Car_Guy

Well-known member
Joined
Dec 2, 2016
Messages
53
Location
Danville, CA
Nice start to it, the floor looks great!

Like Sublime, I would be tempted to leave the wood header exposed. Maybe sand and stain it even, depending on the paint color you are using elsewhere. You could also paint it a matching color as the drywall, but make it gloss, or paint it as if it were a crown moulding with a nice contract light color. Or even add a 3-4 inch moulding on it to make it seem like the moulding and header were one piece, then paint it a gloss crown moulding color. See...Aren't you sorry you asked??

I'm not sure what teh wall at the end is used for "hiding" back there (water heater or anything?), but I think you are right, that you could knock it down and then build in your bench and cabinetry back there.

Thanks for sharing your plans, we're with you all the way!
 
OP
J

jpedi001

Member
Joined
Jan 7, 2016
Messages
12
Location
Virginia Beach, VA
If it was me I'd just paint the header the same color as your putting on the dry wall.

Wait if it was me I'd leave the header in natural tone and just paint the dry wall.

But for you paint the header the same as what you paint the dry wall.

Though maybe give the header a good base coat of white primer to get it closer to the color your gonna paint the dry wall?
Just my off the hip ideas?

Also put your location in your profile will help if you have questions with what area the country you are in!

Guessin Washington DC? Saw a redskins banner?

Welcome and nice pics to get you started!

Thanks sublime, paint is definitely the most straight forward uniform route.
Location added. I'm in southeast VA. Virginia Beach to be exact.

Nice start to it, the floor looks great!

Like Sublime, I would be tempted to leave the wood header exposed. Maybe sand and stain it even, depending on the paint color you are using elsewhere. You could also paint it a matching color as the drywall, but make it gloss, or paint it as if it were a crown moulding with a nice contract light color. Or even add a 3-4 inch moulding on it to make it seem like the moulding and header were one piece, then paint it a gloss crown moulding color. See...Aren't you sorry you asked??

I'm not sure what teh wall at the end is used for "hiding" back there (water heater or anything?), but I think you are right, that you could knock it down and then build in your bench and cabinetry back there.

Thanks for sharing your plans, we're with you all the way!

Dave, I like your idea on the moulding. Outside the box. I think I have some lying around. Could have a quick look on that one.

J01, everyone has to start somewhere. Your off to a good start with what you already have done.

Terrick, thanks for looking!
 
OP
J

jpedi001

Member
Joined
Jan 7, 2016
Messages
12
Location
Virginia Beach, VA
It's not a modification to my garage but it is some work I did in the garage on a furniture piece for the house.

Early 1900's American Seating Company school desk restoration.
 

Attachments

  • 20161002_094933.jpg
    20161002_094933.jpg
    149.3 KB · Views: 11
  • 20161002_094954.jpg
    20161002_094954.jpg
    137.9 KB · Views: 9
  • DSCN0019.jpg
    DSCN0019.jpg
    147 KB · Views: 12
  • DSCN0021.jpg
    DSCN0021.jpg
    140.6 KB · Views: 12
  • DSCN0028.jpg
    DSCN0028.jpg
    142.3 KB · Views: 11
To avoid these ads, REGISTER NOW!
Top Bottom