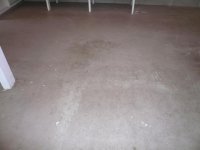
This week I decided to resurface my 3 car garage floor with epoxy. After reading many reviews and speaking with local painters I decided on Corotech. Several threads here and elsewhere discuss the benefits and results of a properly prepped floor.... so I rented a floor grinder with diamabrush attachment and wet grinded the floor. Another thread mentioned 6 hours... I said no way I can do it faster... Well 6+ hours later the floor was ground.
With step 1 completed I let the floor dry for 2 days. First day was beautiful, 75 degrees and low humidity around 45%... next day I left a dehumidifier running full steam to get the floor bone dry...
Step 2 was to apply Corotech V-155 primer. A two part mixture 3/4 to 1/4 mix ratio and comes as a kit. Mixed for 5 minutes and let stand for another 30. This produce sucked into the floor pretty well and it took 2 gallons to cover my 3 car garage, approximately 750 square feet.
(NOTE: THE PRIMER DRYS PATCHY) - Some spots look as if nothing was put on and others like too much... but it was applied evenly, or as evenly as a 9 inch roller can put it on.
(WARNING: Even thought the floor was ground down... there still existed little fish eye patches where paint was below the surface of the grinder (see pics). The chemical primer made these little chips soft and they bubbled so I said "Hello" to another two hours on my knees scrapping these little suckers down with a paint scraper..)
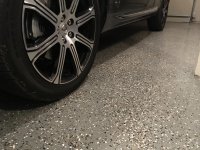
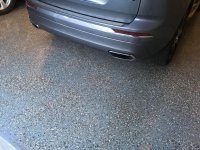
Step 3 was to apply Corotech V-400 epoxy (Battleship Grey). A two part mixture 1 to 1 ratio. This comes in gallons only so a 5 gallon bucket for mixture was helpful. Same mixing and 30 minute wait. Rolled on smooth although spreading flakes was a challenge as I never did it before. My advice is to fling those flakes with determination into the air for even distribution. I used 12 (12 oz) cans of flakes and two gallons of epoxy (1 epoxy and 1 catalyst) covered the entire floor well.
Step 4 was to apply Corotech V-400 epoxy (clear coat). Same drill as Step 3 however I warn you. It was early impossible to see the wet and dry areas. I did not use spiked shoes and it was a challenge covering the entire floor.
In closing I hope the effort was worth it and the floor wears well and no "hot tire" occurs... My first post .. hope it was helpful... Pics below..
With step 1 completed I let the floor dry for 2 days. First day was beautiful, 75 degrees and low humidity around 45%... next day I left a dehumidifier running full steam to get the floor bone dry...
Step 2 was to apply Corotech V-155 primer. A two part mixture 3/4 to 1/4 mix ratio and comes as a kit. Mixed for 5 minutes and let stand for another 30. This produce sucked into the floor pretty well and it took 2 gallons to cover my 3 car garage, approximately 750 square feet.
(NOTE: THE PRIMER DRYS PATCHY) - Some spots look as if nothing was put on and others like too much... but it was applied evenly, or as evenly as a 9 inch roller can put it on.
(WARNING: Even thought the floor was ground down... there still existed little fish eye patches where paint was below the surface of the grinder (see pics). The chemical primer made these little chips soft and they bubbled so I said "Hello" to another two hours on my knees scrapping these little suckers down with a paint scraper..)
Step 3 was to apply Corotech V-400 epoxy (Battleship Grey). A two part mixture 1 to 1 ratio. This comes in gallons only so a 5 gallon bucket for mixture was helpful. Same mixing and 30 minute wait. Rolled on smooth although spreading flakes was a challenge as I never did it before. My advice is to fling those flakes with determination into the air for even distribution. I used 12 (12 oz) cans of flakes and two gallons of epoxy (1 epoxy and 1 catalyst) covered the entire floor well.
Step 4 was to apply Corotech V-400 epoxy (clear coat). Same drill as Step 3 however I warn you. It was early impossible to see the wet and dry areas. I did not use spiked shoes and it was a challenge covering the entire floor.
In closing I hope the effort was worth it and the floor wears well and no "hot tire" occurs... My first post .. hope it was helpful... Pics below..