To avoid these ads, REGISTER NOW!

Best Way to Frame Interior Pole Barn Walls?

Stryfe

Active member
Joined
Oct 28, 2023
Messages
33
Hey everyone. I've done research into the various methods used for framing the interior of a pole barn and determined there are 4 normal ways to do this:
  • Girts ran across the face of the posts, same way as the outside girts, then mount sheathing
  • Bookshelf girts, then mount sheathing
  • Frame traditional walls, then mount sheating
  • Mount sheathing directly to existing girts, leaving posts exposed
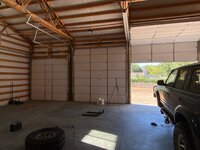
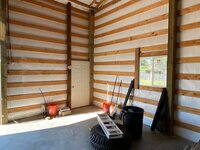
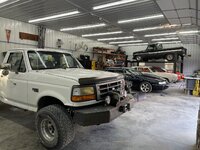
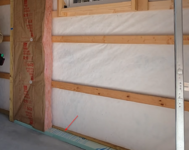
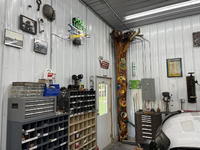
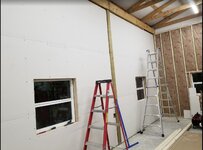
I should also state that my posts are 12' OC and I want to run my electrical on the face of the interior walls so that changes or modifications to my wiring can easily be done. I'm leaning towards bookshelf girts mainly because the area behind my man door won't allow for the man door to open anymore if I were to frame it with the girts on the face of the posts, unless I do that one section differently. You can see that in the pictures.

Thoughts?
 

Attachments

  • image3.jpeg
    image3.jpeg
    894.8 KB · Views: 109
  • image1.jpeg
    image1.jpeg
    928.4 KB · Views: 103
  • image2.jpeg
    image2.jpeg
    895.8 KB · Views: 97
  • image0 (1).jpeg
    image0 (1).jpeg
    1,000.3 KB · Views: 97
To avoid these ads, REGISTER NOW!

Natty Bumppo

Well-known member
Joined
Dec 8, 2019
Messages
370
Location
Savoy, MA
I went with traditional vertical framing because I was adding 2" polyiso and I wanted load bearing studs for cabinets, heavy duty hangers and hooks, shelving, etc.

Looking at your barn, if you don't need load bearing studs, an if you're not going to add any more insulation, I think I'd just add my wall sheathing to those girts and leave the posts exposed.
 

racecougar

Well-known member
Joined
Jan 26, 2021
Messages
5,190
Location
Missouri
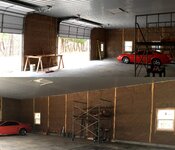
I went with bookshelf girts for the actual construction of my building, as it reduced lumber/labor while still creating a nice strong package. The cavities created fit off-the-shelf R-19 batts perfectly, making insulation of the walls a snap (it only took me a couple hours to insulate 2340 sq ft of walls).

I did all of my wiring in surface-mounted EMT, too. That has paid dividends, as I've made a number of changes over the years.

49753674_10100369123232093_2504584503347904512_o.jpg


49815633_10100370519124713_7847168617186590720_o.jpg

IMG_2510 (Large).JPG
 

Fav Onefour

Well-known member
Joined
Jul 14, 2022
Messages
725
Location
MN cold and hot
Does that insulation go below the slab?
It's hard to see for sure how the walls - floor intersect. That may be a factor with interior finishing options. I'd want to isolate and seal the bottom insulation/slab intersection before burying it behind interior finish.

The man door and overhead are right into the corners. Stick with options that do not have face framing beyond posts.
Stick walls between posts might be an easy upgrade. I'd want to address the insulation issue if going that route.

I get the idea of running wiring outside the walls. That's your choice. I'm a big planner and I still find wiring options that I hadn't considered. You also have a couple options if you want to get away from exposed wiring.
Stick walls with removable panels would allow upgrades even with buried wiring.
You did not mention adding insulation with the interior upgrade. Another option is to build your interior walls to a traditional height and leave the top unfinished. Wire runs could be done above the stick wall with drops inside.
 
OP
S

Stryfe

Active member
Joined
Oct 28, 2023
Messages
33
I went with bookshelf girts for the actual construction of my building, as it reduced lumber/labor while still creating a nice strong package. The cavities created fit off-the-shelf R-19 batts perfectly, making insulation of the walls a snap (it only took me a couple hours to insulate 2340 sq ft of walls).

I did all of my wiring in surface-mounted EMT, too. That has paid dividends, as I've made a number of changes over the years.
Looks awesome! Do you have pictures of your sub panel? Is it also surface mounted?

Does that insulation go below the slab?
It's hard to see for sure how the walls - floor intersect. That may be a factor with interior finishing options. I'd want to isolate and seal the bottom insulation/slab intersection before burying it behind interior finish.

The man door and overhead are right into the corners. Stick with options that do not have face framing beyond posts.
Stick walls between posts might be an easy upgrade. I'd want to address the insulation issue if going that route.

I get the idea of running wiring outside the walls. That's your choice. I'm a big planner and I still find wiring options that I hadn't considered. You also have a couple options if you want to get away from exposed wiring.
Stick walls with removable panels would allow upgrades even with buried wiring.
You did not mention adding insulation with the interior upgrade. Another option is to build your interior walls to a traditional height and leave the top unfinished. Wire runs could be done above the stick wall with drops inside.
Leaving the top unfinished was an idea I've had because I don't need to finish them all the way up. Was thinking the first 8'. I've considered adding additional insulation but not sure I need it.. seems fine to me in Idaho summers and winters, it's just your standard fiberglass blanket. Not opposed to adding more though.

My insulation does not go below the slab. The skirt board is right up against the slab, with a gap between the slab and board that bugs love to crawl up through. Very traditional pole barn building. I've been adding backer rod and sikaflex to the joint to seal it. I then plan to do something like this to finish it off before putting walls up:

1724862590050.png
 
To avoid these ads, REGISTER NOW!
OP
S

Stryfe

Active member
Joined
Oct 28, 2023
Messages
33
@Hubmonkey Thanks for sharing. Quick question, above your sheathing and on the ceiling I see some existing vinyl faced fiberglass insulation, or is that just a vapor barrier? If you did add insulation to existing insulation, did you puncture it before installing that new R13?
 

strength_and_power

Well-known member
Joined
Apr 26, 2015
Messages
1,426
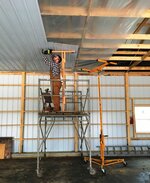
I used 8’ sections of U panel with J trim at the top. Super clean look and the Galvalume finish should brighten it up.
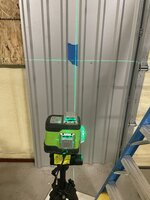
I did OSB from 4’-8’ so I have a good mounting surface pretty much anywhere. My electric is in the walls, I debated surface mounting but liked the cleaner look of hiding the mc cable. On panels where I do have electric, I mounted that panel on top of the adjacent panels so I I need access, it’s a quick process. Using a laser made transfering the outlet location to the Galvalume a breeze.
 

Attachments

  • IMG_5592.jpeg
    IMG_5592.jpeg
    1,003.3 KB · Views: 50
  • IMG_5627.jpeg
    IMG_5627.jpeg
    698 KB · Views: 46
  • IMG_5629.jpeg
    IMG_5629.jpeg
    931.1 KB · Views: 45
  • IMG_5639.jpeg
    IMG_5639.jpeg
    901.2 KB · Views: 46
  • IMG_5824.jpeg
    IMG_5824.jpeg
    833.5 KB · Views: 47
  • IMG_5834.jpeg
    IMG_5834.jpeg
    793.2 KB · Views: 45
  • IMG_5835.jpeg
    IMG_5835.jpeg
    792.7 KB · Views: 53
To avoid these ads, REGISTER NOW!
Top Bottom