To avoid these ads, REGISTER NOW!

Best way to make this thin plinth?

Viper98912

Well-known member
Joined
Oct 20, 2012
Messages
1,139
Location
GA
Hello GJ!

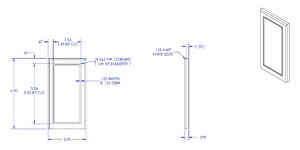
I've been adding some trim pieces around the house to the existing window and door trim to dress up the flat-wood "cheap craftsman" stock trim. Cutting out the old trim and starting completely over was definitely not an option. Anyway I've got some good things going on but would like to add on some thin plinths to the bottom of the door frames. I don't want to cut out all of the existing door frame bottoms to install a stock plinth, so I've designed a custom one to add onto the existing bar (that's 3.5" wide). Only problem is that this design is only 3/8" thick and I'd like to add a chamfer to 3 sides, along with a center "square" cutout just for looks.

I'm not sure exactly how to make this, since I need to make about 100 of them (it's crazy to think how many doors you can have in a house, and every door takes 4...). I figured buying some hobby poplar 3.5" wide and cutting it to length (6.5") and routering the edge and square cutout. I don't want to hand-table router these, due to it being such a small piece of wood and I don't want to lose any fingers working this close. Perhaps someone who has a CNC router?

Any other thoughts on how to make?

Plinth.jpg
 
To avoid these ads, REGISTER NOW!

The Cobbler

Super Moderator
Staff member
Joined
Oct 24, 2013
Messages
26,165
Location
Niagara Region, Ontario, Canada
If you can't find a reasonable place to CNC them, I would make them double sided and then cut ( resaw) them in half .
I would use a small trim router , make a jig to router the center portion. bevel the 3 sides and then cut them in half .
 

MushCreek

Well-known member
Joined
Jan 14, 2015
Messages
9,973
Location
Upstate South Carolina
You could leave the piece longer, do your routing, then cut it off. That way you'd have more to hold on to. I've also attached a smaller piece to a bigger one with double-sided tape to give me more to hold on to.
 

PCustoms

Well-known member
Joined
Jul 23, 2011
Messages
23,684
Location
VT
Tape them to a larger piece of material/backer.

I'd run these on a router table all day. Batch each operation, i.e. cut to length, route all grooves in face, chamfer. At each step you run all 100pcs.
 
Last edited:

bwringer

Well-known member
Joined
Jan 1, 2013
Messages
10,381
Location
Indianapolis
Yup, attach with double-sided tape on a scrap or MDF backer and make jigs or fences, etc. for the router tasks.

I think you could do the routing for six or ten or 12 or whatever fits all at once on one long board, THEN cut them apart. That would simplify the workholding quite a bit too. Depending on the materials, maybe you could run them two or four wide if you can get 7" wide stock? That might increase cost.

And using two routers would be very worthwhile so you don't have to reset anything between batches.
 

CraigStu

Well-known member
Joined
May 22, 2014
Messages
4,085
Location
Blacksburg, Va
I have no idea on material cost but a plastic 3D printer maybe? Back to woodworking. How about 1/4" for the whole piece and a bunch of 1/8 to make the center rectangle and strips to form the outer 'picture frame' and glue them together. No routing needed. The strips you cut full width and then chamfer the one edge or possibly cut one side at 90 deg. and the other side at a 45 deg. BTW Hobby Lobby has a ton of small really nicely finished pieces of wood.
 
OP
V

Viper98912

Well-known member
Joined
Oct 20, 2012
Messages
1,139
Location
GA
Hello everyone,

Sorry for the delayed reply as life got in the way with a newborn :eyecrazy:

I took a screenshot of the drawing I previously made; I'm still thinking of possibly trying to find someone with a CNC router and pay to have the 100 pieces made, since time is a little tight at the moment...

Plinth Dims.jpg
 
To avoid these ads, REGISTER NOW!
OP
V

Viper98912

Well-known member
Joined
Oct 20, 2012
Messages
1,139
Location
GA
If you can't find a reasonable place to CNC them, I would make them double sided and then cut ( resaw) them in half .
I would use a small trim router , make a jig to router the center portion. bevel the 3 sides and then cut them in half .

Sawing ~3/4" thick (and slightly larger) material that's 3.5" tall would be a difficult task (and slightly dangerous) without real machinery.

You could leave the piece longer, do your routing, then cut it off. That way you'd have more to hold on to. I've also attached a smaller piece to a bigger one with double-sided tape to give me more to hold on to.

If I do this by hand, yes I like the idea of doing a long pieces and then cutting to length on a miter saw.

Tape them to a larger piece of material/backer.

I'd run these on a router table all day. Batch each operation, i.e. cut to length, route all grooves in face, chamfer. At each step you run all 100pcs.

👍

Yup, attach with double-sided tape on a scrap or MDF backer and make jigs or fences, etc. for the router tasks.

I think you could do the routing for six or ten or 12 or whatever fits all at once on one long board, THEN cut them apart. That would simplify the workholding quite a bit too. Depending on the materials, maybe you could run them two or four wide if you can get 7" wide stock? That might increase cost.

And using two routers would be very worthwhile so you don't have to reset anything between batches.

👍

I have no idea on material cost but a plastic 3D printer maybe? Back to woodworking. How about 1/4" for the whole piece and a bunch of 1/8 to make the center rectangle and strips to form the outer 'picture frame' and glue them together. No routing needed. The strips you cut full width and then chamfer the one edge or possibly cut one side at 90 deg. and the other side at a 45 deg. BTW Hobby Lobby has a ton of small really nicely finished pieces of wood.

While I have a 3D printer capable of making this, I do want to make this out of wood so I can prime it and paint it like normal, as well as brad nail it into the existing door trim.


Thanks for the ideas and tips everyone!
 

MoonRise

Well-known member
Joined
Nov 5, 2010
Messages
4,045
Location
NJ
Cedar is a soft wood (physically), but the grain can splinter when cut or routed. Use good sharp bits and don't hog out to much material in one cut.

Doable.

Thinking some more, take a piece of stock that is 2x the final part length (plus a little bit for the cross cut kerf loss), route the end grain on the two short ends and then route the edge grain on the two long sides. Cross cut to desired finish length and your outer edges are all done and you now have two plinth blocks sized and shaped.

Only thing left is the face routing. Make a jig/template, line up jig/template with the workpiece and use the trim router to cut the surface grooving. Done.

A router table can certainly help, but is not necessarily essential to do this task.

btw, if you are planning on painting the cedar be aware that the oils in cedar can bleed through many/most paints and primers. So you have to do extra priming with a 'stain blocker' type primer first and then do your top coat paint.

Only 3/8" thick for your add-on plinths though? Is that enough of a shadow/visual line? Stock that thin can tend to warp and is a bit more delicate than thicker stock during handling and machining and installation.
 

Zeke

Well-known member
Joined
Aug 13, 2009
Messages
17,176
Location
Long Beach CA, the sewer by the sea.
You should be able to find someone online that will make and send these to you. A run or 100 is worth someone's time. Get a few extras.

Actually I just saw that SendCutSend does Baltic birch plywood.
 

rayra

Well-known member
Joined
Dec 1, 2014
Messages
4,724
Location
Escaped from Los Angeles
If you are painting them, use MDF, they'll mill just fine. And under paint no one will know the difference.

And not to just be negative, but IMAO you inner racetrack with the rounded corners will just look like a different form of cheap.
 
OP
V

Viper98912

Well-known member
Joined
Oct 20, 2012
Messages
1,139
Location
GA
Cedar is a soft wood (physically), but the grain can splinter when cut or routed. Use good sharp bits and don't hog out to much material in one cut.

Doable.

Thinking some more, take a piece of stock that is 2x the final part length (plus a little bit for the cross cut kerf loss), route the end grain on the two short ends and then route the edge grain on the two long sides. Cross cut to desired finish length and your outer edges are all done and you now have two plinth blocks sized and shaped.

Only thing left is the face routing. Make a jig/template, line up jig/template with the workpiece and use the trim router to cut the surface grooving. Done.

A router table can certainly help, but is not necessarily essential to do this task.

btw, if you are planning on painting the cedar be aware that the oils in cedar can bleed through many/most paints and primers. So you have to do extra priming with a 'stain blocker' type primer first and then do your top coat paint.

Only 3/8" thick for your add-on plinths though? Is that enough of a shadow/visual line? Stock that thin can tend to warp and is a bit more delicate than thicker stock during handling and machining and installation.

Agree on the double-cut setup. And thanks for the tip on the cedar oils, did not know that.

In regards to the 3/8" thickness, it's being mated to a 1/4" lip, so it was just to create a very slight visual line at the bottom of the door frame. But now you've got me thinking of increasing it just slightly. I might need to make a mockup...

You should be able to find someone online that will make and send these to you. A run or 100 is worth someone's time. Get a few extras.

Actually I just saw that SendCutSend does Baltic birch plywood.

👍

If you are painting them, use MDF, they'll mill just fine. And under paint no one will know the difference.

And not to just be negative, but IMAO you inner racetrack with the rounded corners will just look like a different form of cheap.

Interesting observation/opinion on the inner racetrack. The only reason for it was because I felt like a plain block of wood was just too plain looking. But now this has got me thinking, especially because the racetrack is really the only thing holding me up (chamfering the edges would be the easy part). Maybe I do go back to just a flat block...
 

CraigStu

Well-known member
Joined
May 22, 2014
Messages
4,085
Location
Blacksburg, Va
To dress up a flat block a little look at the wood section of hobby lobby, michaels etc. They may have something 1/8in thick that could be glued on. Only thing that pops immediately to mind is a star. Also look at HD and L. Somewhere in the wood trim? section I bought some 1/8in thick bald eagles years ago. These were maybe 8 inches wide so not for you but they also have decorative things. Heck they have squares that might do your whole thing. Their search doesn't work real well and I don't know the proper term for these either. But see the square piece in this kit? I think you may be able to find something that will work for you already made and for sale.
 

Innovate1

Well-known member
Joined
Jul 28, 2014
Messages
4,324
Location
Illinois near St. Louis, Missouri
If you are going to CNC them you might as well do something a bit more complex for the inner pattern. I recently made some blocks to match some existing Anderson blocks that turned out nice. I ended up making them in maple because the cheaper, softer wood tore out and didn't hold the small features well. If they have a really high speed spindle you might have better luck - mine was about 15k. I ended up running the pattern twice because the first pass left some fuzz. The second pass cleaned that up. Yours are just a little over the size of my machine I think - it's a desktop mill. The picture is a stock photo but mine looked the same.
1680726257052.png
 
To avoid these ads, REGISTER NOW!
Top Bottom