To avoid these ads, REGISTER NOW!

Bigger, Taller, Better.

cavalry

Well-known member
Joined
Sep 5, 2006
Messages
168
Location
Upstate NY
We first have to play a little catch-up as this has been an ongoing project. Lets rewind to last fall...
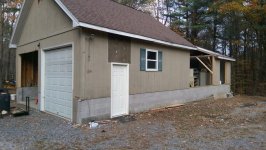
My "shop" was little more than a everyday residential parking garage. It was completely inadequate for my needs and I never wanted to really make improvements because it seemed easier to just put up a 40x60 steel building and have a more appropriate space to work with from the get go. I didn't want to put a barn on the same property as my house for fear of unreasonable reassessment so I was negotiating on a neighboring property. That fell though so I was forced to work with what I have.
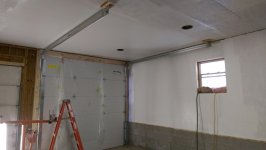
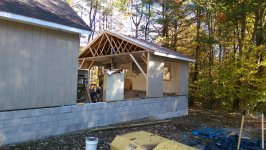
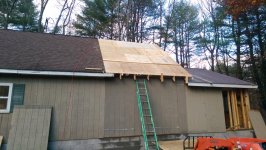
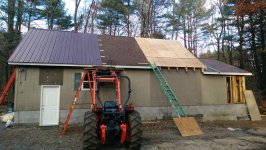
It was compromised of the main section 24x24, 8' walls sitting on one row 8" block, but with a full upstairs via attic trusses. At some point the previous home owner put on an abortion of a 12x24 addition on the backside, but with a lower pitched truss roof. To say the shop was basic is an understatement. It had a 16 space 100A panel, no insulation or finished walls, some lighting, and was heated with a small woodstove. The overhead doors were too small for most of my vehicles and equipment which kind of defeats the purpose of having a shop when you are outside.
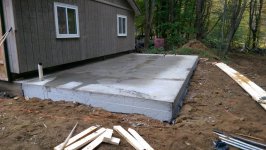
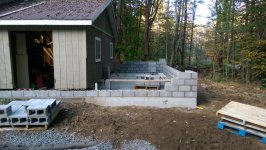
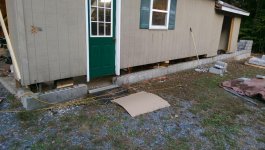
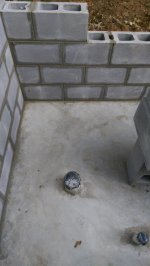
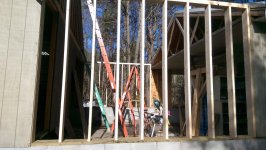
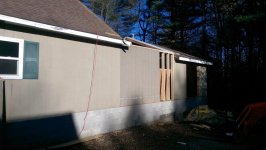
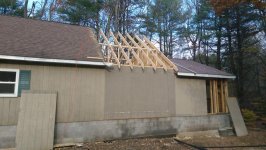
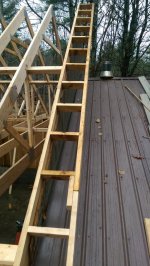
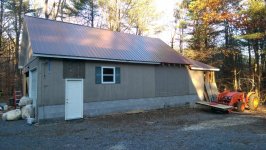
I needed bigger and taller to start with. I did some models and although its lower than I wanted I settled on 10'8" ceilings so it wouldn't look too "weird". My plan was to pour a 12x24 slab to the rear of the abortion addition, detach and slide back that addition, then raise the existing structure up 24" infill with block, then build to match the front section.
I might mention at this point that that this for the most part was a one man operation because I am a cheap ******* and don't like paying anyone for work I can do and most likely do better. Being this is a rural location and not really liking to deal with local goverment bureaucracy, I decided to take my chances and not procure a building permit.
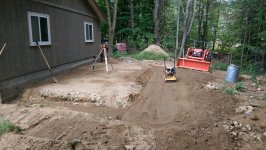
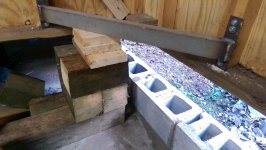
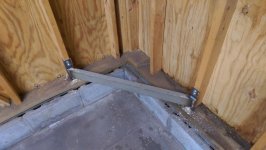
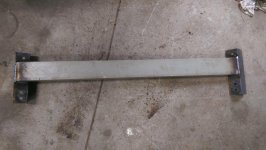
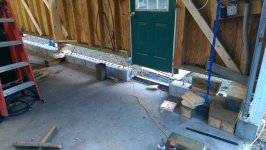
First step was some sitework. I dug out the wash sand that was there and brought in about 30 yards of gravel, compacted, leveled and ready for forms.
 

Attachments

  • shop sitework.jpg
    shop sitework.jpg
    100.7 KB · Views: 81
Last edited:
To avoid these ads, REGISTER NOW!
OP
C

cavalry

Well-known member
Joined
Sep 5, 2006
Messages
168
Location
Upstate NY
Slab formed up, waiting on the truck to show up. I hired a mason I know well to help me pour and then take over and finish. For what I paid him to finish it I was barely more than the cost of renting a power trowel. I have finished before but I would hope with 40 years on the job he should be able to get a better final surface than I would be able to.
I had decided that I wanted to sacrifice some space and put in a small restroom and a floor drain. Piping was stubbed up for this. The 3" PVC in the foreground will be for the umbilical to the house
 

Attachments

  • shop formed.jpg
    shop formed.jpg
    103.2 KB · Views: 64
OP
C

cavalry

Well-known member
Joined
Sep 5, 2006
Messages
168
Location
Upstate NY
Slab after peeling off the forms. It was raining that next day and I was pretty happy to verify the pitch to the floor drain was correct and it was shedding water well.
I was also able to put a apron on my shed with the overage on the concrete.
 

Attachments

  • shop slab.jpg
    shop slab.jpg
    153.7 KB · Views: 75
  • shed apron.jpg
    shed apron.jpg
    153.4 KB · Views: 73
OP
C

cavalry

Well-known member
Joined
Sep 5, 2006
Messages
168
Location
Upstate NY
I needed to come up with a way to jack this pig up. I started off by diagonal bracing the entire structure by nailing 2x4x10's to the studs on the inside. I rooted though the scrap bin and made 4 of these. They got lagged to the studs in the corners for jacking and cribbing. I also jacked under the center of the drip edge wall with some pretty scary looking carpentry, 6 jacks and up she goes! I did some rough math with some WAG added in for all the **** in the attic I didnt want to remove. I came up with 6000lbs a jack. I started off with 3 ton jacks with the 10's and 20's on reserve. They were just about perfect, one hand jacking that I could feel the resistance when I took too much weight. Its was difficult doing the one man band on 6 jacks and not having everything come crashing down on top of me.
 

Attachments

  • IMAG2336.jpg
    IMAG2336.jpg
    149.6 KB · Views: 94
  • IMAG2307.jpg
    IMAG2307.jpg
    142 KB · Views: 87
  • IMAG2306.jpg
    IMAG2306.jpg
    146.7 KB · Views: 84
OP
C

cavalry

Well-known member
Joined
Sep 5, 2006
Messages
168
Location
Upstate NY
I had my mason come back and lay block. It worked out pretty well, I jacked it up and made space, he and a helper laid block.
Real estate is precious in a small shop. Its going not going to be a spacious restroom by any means.
 

Attachments

  • IMAG2338.jpg
    IMAG2338.jpg
    157.3 KB · Views: 95
  • IMAG2340.jpg
    IMAG2340.jpg
    149 KB · Views: 89
  • IMAG2341.jpg
    IMAG2341.jpg
    152.7 KB · Views: 83
  • IMAG2342.jpg
    IMAG2342.jpg
    143.7 KB · Views: 81
OP
C

cavalry

Well-known member
Joined
Sep 5, 2006
Messages
168
Location
Upstate NY
The last course completed but still sitting on blocks. The back section was then rolled back to its final location and everything anchored.
In an effort to start closing up the giant holes, I used sections of the old doors to make one temporary one closing off the hole. A new man door was installed and the header lowered.
 

Attachments

  • shop doors and anchor.jpg
    shop doors and anchor.jpg
    100.6 KB · Views: 93
  • shop 5.jpg
    shop 5.jpg
    158.1 KB · Views: 104
  • shop last course.jpg
    shop last course.jpg
    104.6 KB · Views: 103
OP
C

cavalry

Well-known member
Joined
Sep 5, 2006
Messages
168
Location
Upstate NY
Framed in the wall and sheathed. There are dozens of variations for T111. I decided to limit how many different ones I had on the most visible side by reusing some from the original structures now removed gable wall.
 

Attachments

  • shop6.jpg
    shop6.jpg
    153.1 KB · Views: 59
  • shop7.jpg
    shop7.jpg
    146.8 KB · Views: 63
OP
C

cavalry

Well-known member
Joined
Sep 5, 2006
Messages
168
Location
Upstate NY
My tractor was just big enough to set the trusses. I set the first one myself, but decided to have a buddy come over and help me with the rest.
I really dislike trusses because they are such ****. These did not disappoint. I was a bit concerned that one had "NFG" written all over it, but could not find anything wrong with it.
 

Attachments

  • shop8.jpg
    shop8.jpg
    155.4 KB · Views: 83
  • shop9.jpg
    shop9.jpg
    154.2 KB · Views: 76
OP
C

cavalry

Well-known member
Joined
Sep 5, 2006
Messages
168
Location
Upstate NY
I broke out the OSHA approved scaffolding. Its alot easier to lift up the full sheets, have something to stage from and in the event of a slip, only fall a foot.
Rafter extensions were finished up, and sheathing completed.
 

Attachments

  • shop12.jpg
    shop12.jpg
    155.1 KB · Views: 84
  • shop11.jpg
    shop11.jpg
    156.5 KB · Views: 85
  • shop10.jpg
    shop10.jpg
    156.4 KB · Views: 81
OP
C

cavalry

Well-known member
Joined
Sep 5, 2006
Messages
168
Location
Upstate NY
Started putting up tin as foul weather was predicted. Underlayment was installed, and the roof finished up.
 

Attachments

  • shop13.jpg
    shop13.jpg
    157.1 KB · Views: 86
  • shop14.jpg
    shop14.jpg
    156.5 KB · Views: 86

theoldwizard1

Well-known member
Joined
Feb 22, 2011
Messages
43,147
Location
SE MI
The back section was then rolled back to its final location and everything anchored.

Why ? How ?

I really dislike trusses because they are such ****.
WOW ! That is a pretty broad brush statement. What don't you like about them ?

Yes, they are hard to set, single handed, and inserting them in between 2 finished roof section is even more difficult.
 
Last edited:
To avoid these ads, REGISTER NOW!
OP
C

cavalry

Well-known member
Joined
Sep 5, 2006
Messages
168
Location
Upstate NY
Why ? How ?


WOW ! That is a pretty broad brush statement. What don't you like about them ?

I really didn't like the original addition because it was poorly planned and even more poorly constructed, but I already owned it and it seemed a shame to demo. The sills on the addition were built with KD which obviously was a poor choice but were not yet rotten. I put a treated sill down on the blocks and rolled it back on pipes, then nailed the sills together.
Maybe I have just always ended up with trusses from low quality builders? I do not find they are dimensionally accurate or teaming with quality. These had about 1/2" variation between trusses both in the top and bottom chords, The attic ceiling was not even close to consistent. I was able to hide the variation but its there. Two of the mending plates were not sunk properly, in more than a few spots they relied on the mending plates solely for strength, some joints were very open with 1/4"+ gaps. It was 3+ weeks to receive these and winter was coming so I dealt with it rather than have them try again.
My personal opinion is I think a proficient carpenter can stick build a much better roof system but of course spans become an issue and trusses are fast and easy to put up.
 
Last edited:

theoldwizard1

Well-known member
Joined
Feb 22, 2011
Messages
43,147
Location
SE MI
Maybe I have just always ended up with trusses from low quality builders? I do not find they are dimensionally accurate or teaming with quality. These had about 1/2" variation between trusses both in the top and bottom chords, The attic ceiling was not even close to consistent. I was able to hide the variation but its there. Two of the mending plates were not sunk properly, in more than a few spots they relied on the mending plates solely for strength, some joints were very open with 1/4"+ gaps.

Not seated plates, opens of 1/4". Must be minimum wage labor or paid by the piece !
 

Ajustable

Well-known member
Joined
Feb 20, 2014
Messages
153
Location
Niagara
Great work on the raise. ill follow along, i find this type of reno rewarding in that it generally improves the original. thumbs up
 

Toothaker

Well-known member
Joined
Nov 25, 2016
Messages
1,367
Location
Wichita, Kansas
I like it - very impressive.:rocker: I especially like how you didn't tell anyone here before you did all this. That's not sarcasm. If you had outlined your plans beforehand there would be 7 pages of debates about things - permits, saving the addition, raising the structure, etc.:lol:
 
OP
C

cavalry

Well-known member
Joined
Sep 5, 2006
Messages
168
Location
Upstate NY
I like it - very impressive.:rocker: I especially like how you didn't tell anyone here before you did all this. That's not sarcasm. If you had outlined your plans beforehand there would be 7 pages of debates about things - permits, saving the addition, raising the structure, etc.:lol:

Very true. I knew how I wanted to do it and how to implement it. If you noticed I have been a forum member for a long time but am a very infrequent poster. There is a lot of good information here but sometimes it gets buried along the way.
 
OP
C

cavalry

Well-known member
Joined
Sep 5, 2006
Messages
168
Location
Upstate NY
Toothaker bringing up permits leads us to an interesting story. I declined to get one as I live in a podunk town and I would rather ask for forgiveness than permission.

It was about at this point in construction that I came home to a giant yellow cease and desist notice stapled to the shop. I chuckled because the exterior work was pretty much complete and there was nothing really to cease.
I called our part time code enforcer, who only works 3 hours 2 days a week. He was surprisingly not a ****, and said after he got back from his 2 week vacation I needed to get a permit for my "re-roof", but he understood winter was coming so I could continue in the meantime. I don't know if he was incompetent or just giving me a break. I paid for my overly expensive permit for my "new roof" when he got back and closed it out at the same time, no followup inspection needed. Crappy CE office hours, exorbitant fees and people poking around....exactly why I decided to build without a permit in the first place.
 
OP
C

cavalry

Well-known member
Joined
Sep 5, 2006
Messages
168
Location
Upstate NY
The stairwell was framed in and the attic floor laid. The original plan was for the furnace to go downstairs but it ended up going in the attic.
 

Attachments

  • shop attic.jpg
    shop attic.jpg
    145 KB · Views: 41
OP
C

cavalry

Well-known member
Joined
Sep 5, 2006
Messages
168
Location
Upstate NY
I was waiting on my propane tank to be delivered for heating which turned out to be an adventure in itself so I started insulating the downstairs. The 2x8 truss cords did not lead themselves to a high R value unless I went spray foam, so the ceiling and roof were each insulated with R19 fiber. The shop will be a conditioned space and the attic heated only from lost heat from downstairs. I would have liked to go with more insulation but could not afford to loose ceiling height from rigid foam and spray was out of my budget.
The walls on the original shop were 2x4, and the addition 2x6. I furred out the 2x4's to 6", insulated R19 fiber. The south side really gets pounded with sunlight so I added 1" of poly-iso to bump up the insulation and to cut down thermal bridging.
The interior was sheathed in OSB. I had no place to put the contents of the shop while working so it was all jammed in one side, and moved far too many times to work.
 

Attachments

  • shop insulation.jpg
    shop insulation.jpg
    137.1 KB · Views: 35
  • shop osb palace.jpg
    shop osb palace.jpg
    143.9 KB · Views: 45
OP
C

cavalry

Well-known member
Joined
Sep 5, 2006
Messages
168
Location
Upstate NY
The interior sheathing continued. My 10x10 door finally showed up, which is quite an upgrade from the 9x 6'8" that it replaced. Realistically, its probably too big for the structure, and I had to go with a low headroom back mount. The other door will be matching and installed when heating season is over.

My other shop is OSB and while cheap and clean to start, the texture collects dust that just cannot be cleaned off. I know there has been quite the debate on smoothing OSB here, but I absolutely did not want drywall on the walls. I did the test section shown here before putting up my door tracks. Labor wise its not that bad at all. I primed with oil base, caulked the seams, rolled on two coats of thinned mud and plowed through it with a drywall sander, primed and painted gloss white. I didn't care about hiding the seams, just making it smooth, and it worked out very well. I would say it looks comparable to a typical "garage grade" drywall job.
 

Attachments

  • shop door.jpg
    shop door.jpg
    136.2 KB · Views: 45
OP
C

cavalry

Well-known member
Joined
Sep 5, 2006
Messages
168
Location
Upstate NY
How will you (did you) insulate the CMU? They have an R value of about .0001.

If I had built new it would have been much different but being a remodel I was limited on how to insulate. I didn't want foam on the inside for durability and space issues and couldn't do it outside without major changes. Its hit or miss with who you believe on the effectiveness of pour in and I can see their point with thermal bridging, but I did peralite as it was not a large expense. I know its a loss area but will have to be ok with it. I wasted a lot of propane this winter doing my part to contribute to global warming and still only spent about $5-600 to keep it at 60*. I still have a lot of spots to tighten up and would assume next year when its completed I will consume less.
When its all done I will do some thermal imagery to see how bad the CMU loss really is.
 

Riley

Well-known member
Joined
Feb 18, 2007
Messages
398
Great project! Congrats on successfully dealing with the "locals".
 
To avoid these ads, REGISTER NOW!
Top Bottom