To avoid these ads, REGISTER NOW!

Binks Quincy 310 air compressor HELP!

TeenagerThatLikesFloorjac

Well-known member
Joined
Dec 30, 2020
Messages
82
Location
QC
Hi everyone,

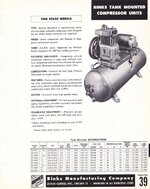
I recently pick up a Binks 33-1026 air compressor. After hours of research before getting it i was able to find out It has a Quincy 310 pump. Once i found that out i knew i had to get it, it also has a 2hp GE electric motor.

Pump and motor are in great shape. When i went to pick it up i saw that the tank has multiple welds on the bottom, so that's a write off. Regardless, $150 for a Quincy 310 is a steal. The motor and pump are massive, i knew they would be big, bit was surprised.

I've got a few question for the gurus;

Everything is in working order, should i leave everything alone or is there any preventative maintenance i should do. Such as removing, inspecting and cleaning/lapping the valves? Oil looks new but i'm going to change it out for some real Quincy oil. I've already adjusted the oil pressure so its within limit, it was slightly high when i got it.

The electric motor is massive and works great. Previous owner kept it greased, no play in the bearings and no weird noises when spinning. Anything i should do here? The inside seems very dusty, as would any 60 year old ish motor would be.

There is definitely some blow by, when i remove the dip stick while running there is air that comes out in pulses but I am not sure if its excessive. Previous owner said the pump wasn't used much and it definitely seems that way.

I'm looking for some advice to make this setup last another 60 years, I'm in the process of finding a new tank for it. I'll attach some pictures and a video of it running. I'll also get a new air filter, the current one doesn't have any filter element, its a large mesh with a metal maze.

I'll also mess with the belt tension, seems a tad bit loose.


EDIT: Only one picture will load. Heres a link to a few others.
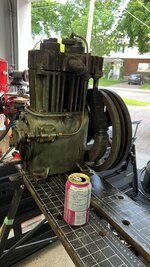
 

Attachments

  • IMG_8836.jpg
    IMG_8836.jpg
    746.8 KB · Views: 43
To avoid these ads, REGISTER NOW!

The Cobbler

Super Moderator
Staff member
Joined
Oct 24, 2013
Messages
25,999
Location
Niagara Region, Ontario, Canada
nice find. that deserves a "YOU ****"
great call on the tank. hack it up so no one else can use it .
I am in the camp if it aint broke, don't fix it. general maintenance aside of course, and you're addressing that . .
I would run it for a while , see how it performs and decide from there.
 
OP
T

TeenagerThatLikesFloorjac

Well-known member
Joined
Dec 30, 2020
Messages
82
Location
QC
nice find. that deserves a "YOU ****"
great call on the tank. hack it up so no one else can use it .
I am in the camp if it aint broke, don't fix it. general maintenance aside of course, and you're addressing that . .
I would run it for a while , see how it performs and decide from there.
My exact thought, I am going to cut open a hole, im curious how bad it is in there, at that point it'll be useless then I will try and find a place that weights scrap and gives you cash. It should pay for the gas...
the crankase naturally has pulses as the pistons move up & down .
That is true, I didn't think of that. I used a timer and timed how long it fills to 40 psi. (I don't dare to go higher with the comprised tank, when i got there it was filled to 120 psi) and it seems to be putting out ~8.7 CFM which seems healthy. According to a catalog I found, its supposed to put out 7 CFM with a displacement of 9.5 CFM. I'm sure the 7 CFM rating is for a higher pressure but seems good.
 
OP
T

TeenagerThatLikesFloorjac

Well-known member
Joined
Dec 30, 2020
Messages
82
Location
QC
Update:

Took apart some of the valves to inspect. It came apart easily and i didn't have to make a special socket to remove the retainers.

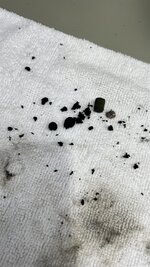
I was primarily looking for rust which there was none off. Lots of gooey carbon deposits but it all washed up nicely. The round metal valve has an indentation from the valve seat. I am not quite sure if it's supposed to be flat or be like that.

Also, does anyone know how hot the head should get, it gets pretty warm to the point where you can't hold your finger for more than a few seconds. I think i'm going to order a head/valve rebuild kit and get everything nice and clean including the intercooler.

Took a peak at the cylinder walls and it looked like there was some dirt. Turns out the walls are like a mirror, i was just reflecting the top of the piston. No scorring of any sorts and the tops of the pistons are relatively clean, no hard carbon deposits, just some soft stuff that look like little spots that wipes easily.

Finally, a Solberg silencer/filter is on it's way so it has some actual filtration and perhaps lower the intake noise.

So far i'm really impressed with this old beast. I still have to get a safe tank and tackle some wiring but i'm looking forward to it.


walta

Well-known member
Joined
Jan 13, 2017
Messages
2,313
Location
Dutzow Missouri
I got my 210 under similar circumstances.

I changed the oil several times but darkened up quickly each time. After round 4 I gave up and cracked open the crack case (DIP stick panel) found a half inch layer of muck on the bottom. The oil has been clear ever since. It must have been it first oil change.

The pump has been great to me.

Walta
 
OP
T

TeenagerThatLikesFloorjac

Well-known member
Joined
Dec 30, 2020
Messages
82
Location
QC
I got my 210 under similar circumstances.

I changed the oil several times but darkened up quickly each time. After round 4 I gave up and cracked open the crack case (DIP stick panel) found a half inch layer of muck on the bottom. The oil has been clear ever since. It must have been it first oil change.

The pump has been great to me.

Walta
Good to know, I’ll check that out, while changing the oil. Shouldn’t take long to clean out the bottom of the crank case and make a new gasket. Thanks.

Oil as of now seems very clean, I plan on changing it to 30W non detergent. Not sure what in it now.
 

MacMcMacmac

Well-known member
Joined
Oct 21, 2014
Messages
1,593
Location
canada
Those valve discs are hooped. Get yourself a head overhaul kit at the very least. This may include the valve bodies, but if not, put a disc into the ones you have and see how much side to side movement they have. If you can move them to any side far enough to let a sliver of the valve port remain exposed, get new valve bodies. For the amount of running it took to make those valve discs look like that, I would expect a lot more carbon build up. It was probably run on the right kind of oil to just have a thin dusty carbon build up like that.
 
OP
T

TeenagerThatLikesFloorjac

Well-known member
Joined
Dec 30, 2020
Messages
82
Location
QC
Too bad i only saw that post ^ after re assembling everything. I found a new tank and got everything swapped over.

I took the time to lap all the valves to a flat mirror finish. For one valve i had to remove a lot of material for the sealing surface to be flat. I believe it all worked out though, here is a video of it in action with a pressure gauge on the interstage port. Tank pressure was at 100 psi in this video. Does it check out?

I found an old post you made a while back describing the procedure but it doesn't mention at what tank pressure to do it at. When theres 0 psi in the tank its in the low 20s. I hooked a gauge up because i thought the compressor head and oulet temps were way too high but now i think its normal. The outlet flange can reach 250-270F when pumping for a while at high pressures.


I'm encountering a new issue, the unloader valve is no longer making that crisp "pssst" sound when the compressor cuts off. It does it sometimes at lower pressures but even that i can't be certain of, i've heard it a few times while messing around though. Here is a video of what i'm talking about.


I've taken apart the unloader assembly tower on the head, everything moves freely there. If I remove the line leading to the unloader valve it will still pump air. Is this how it is supposed to be? I'm trying to diagnose what is causing the issue but I don't fully understand how the mechanism works from the pilot valve to unloader valve. I was expecting it not to pump air when i removed the line but that wasn't the case.

The pressures seems to bleed off but it doesn't make that "pssst" sound. Perhaps it's meant to be like that at higher pressures? Any ideas on what it could be?

@MacMcMacmac

Edit: Theres a brand new diaphragm in the unloader. I tried using the old one but to troubleshoot but it did the same thing. Everything worked fine before i changed tanks, but i was running a max on 80 psi. I think something must be slightly sticking in the pilot valve. I'll wait for your input before doing anything.
 
Last edited:

MacMcMacmac

Well-known member
Joined
Oct 21, 2014
Messages
1,593
Location
canada
Pressures look good. Just remember that until the tank pressure reaches interstage pressure at least, there isn't any appreciable back pressure in the HP cylinder.

I would swap out the rubber x-ring seal and cup seal in the hydraulic unloader valve on the side of the crankcase. They might be on the ragged edge of being worn out, allowing the valve to cycle sometimes, and not at other times.

If you remove the line to the unloader tower it will always pump, since it's the pressure in that line that cycles the unloader piston.
 
OP
T

TeenagerThatLikesFloorjac

Well-known member
Joined
Dec 30, 2020
Messages
82
Location
QC
Pressures look good. Just remember that until the tank pressure reaches interstage pressure at least, there isn't any appreciable back pressure in the HP cylinder.

I would swap out the rubber x-ring seal and cup seal in the hydraulic unloader valve on the side of the crankcase. They might be on the ragged edge of being worn out, allowing the valve to cycle sometimes, and not at other times.

If you remove the line to the unloader tower it will always pump, since it's the pressure in that line that cycles the unloader piston.
The pressure is being bleed off, just slowly instead of a satisfying "psst"

I think i get how it works, tank pressure is fed to the pilot valve, which is then fed to the unloader tower. if there is oil pressure, that line will be cut off at the pilot valve, so that no tank pressure will make is way to the unloader tower. This makes the valve operate normally.

Now, if there is no oil pressure but pressure in the tank, the pilot valve allows that pressure to make its way to the diaphragm in the unloader tower. This will press on the brass piston, overpowering the spring pressure, holding the valve open so that no more pumping is possible.

Does this sound about right?


I pulled apart the pilot valve. The parts that sits in the crankcase seems to operating smoothly with no binding. I see the port where the oil pressure would enter and push the plates apart. It seems like there is just 2 o-rings in there, no square x-ring. They seemed in fair condition bit I had an o-ring kit and changed them out regardless, no difference.

I then pulled the fitting of the entry/exit. The entry port was practically blocked, at one point there was a filter media but it was so dense and clogged not much air was getting through. I cleaned it out and left the mesh before the port. I would like to add new material to act like a filter but im not sure what to use exactly.

Anyways i thought for sure this was the issue. I hooked it all back up and it worked! I heard the "psst"... only once... and then it went back to the slower release, although it releases quicker now. I'm on the right track, the system works but something is weak/old.


IMG_9241.jpg


I have a new theory, on the face of the pilot valve there is a bolt, behind there is a spring and ball bearing and another small piece. The spring seems stretched and weak, i'm thinking a stronger spring might make the release of the air more immediate and at once versus the slower release im experiencing. Now it is just finding a spring around the garage that will work...

All this for that "psst" sound haha. Works fine as is.
 
OP
T

TeenagerThatLikesFloorjac

Well-known member
Joined
Dec 30, 2020
Messages
82
Location
QC
I'm at a loss... I've checked everything i could think of and it still won't unload "psst" consistently. In the past few days i've

-completely disassembled the hydraulic unloader, measured and bought new quad ring seals.

I've done lots of testing and this works as intended, but leaks a bit of air into the crankcase but this isn't the main concern


-Dissasembled the unloader tower and bench tested it with compressed air. Seems like it takes 15-25 psi to overcome to spring. No issues here.

A few of the caps that cover the valves were leaking around the seal. Sanded the surfaces smooth and it fixed it.


-Re lapped all the valves and made a tool so that i could properly torque the retaining nut.

I am confident that all the valves are sealing and there aren't any leaks but the issue still remains. The remaining pressure in the cylinders and intercooler is being vented off somewhere. I am certain my HP discharge valve is sealing but im hearing air escaping in the crankcase? This is with the hydraulic unloader disconnected so that no air is leaking from there.

At this point i'm thinking my cylinder head might be cracked. If my HP discharge is sealing (which im confident it is) air wouldn't be allowed back into the HP cylinder and leak down the piston rings into the crankcase. So then how is air making into way into the crankcase???


In this video you can hear nothing making its way out the intake, the air is coming from the crankcase vent. Honestly, i'm not even sure this is related to the issue im chasing... I'm all around confused at this point, seem like i have two issues to sort out.
 
OP
T

TeenagerThatLikesFloorjac

Well-known member
Joined
Dec 30, 2020
Messages
82
Location
QC
I should add, compressor has no issues pumping up to 175 psi, sounds healthy, pumps around the correct calculated CFM, unloads the air from the cylinders but just not with that crisp "psst" sound it used to do. Any ideas or theories for me to explore would be greatly appreciated, thanks.


Edit: After further reflection, the only path from the head to crank case are the pistons. My HP discharge valve must not be sealing 100% while the LP is. causing the pressure to leak through the rings.
 
Last edited:

MacMcMacmac

Well-known member
Joined
Oct 21, 2014
Messages
1,593
Location
canada
Check your valves to see if the discs can move side to side enough t leave a sliver of uncovered valve seat which will let air leak back into the cylinder. I chased that for a couple of hours one day. If the discs have visible grooves in them, replace them.

If oil pressure is not bleeding off quickly after shut down, it may be making the unloader react slowly. There is a centrifugal shuttle valve built into some Quincy cranks that perform this function. Other cranks have a bleed orifice drilled into the front setscrew that seals up the oil passage at the end of the crankshaft.

You can run the compressor up and manually supply air to the tower via the copper tube and a blow gun to see if that part is working properly and work back from there.
 

walta

Well-known member
Joined
Jan 13, 2017
Messages
2,313
Location
Dutzow Missouri
The item in this photo with the red arrow should be a check valve that prevents air from returning from the tank back to the compressor.

A leaky check valve symptom would be continuous hissing from the unloader until the tank is empty or the motor restarts.


Walta
 

Attachments

  • 2023-09-02_22-47-241.gif
    2023-09-02_22-47-241.gif
    198 KB · Views: 48
OP
T

TeenagerThatLikesFloorjac

Well-known member
Joined
Dec 30, 2020
Messages
82
Location
QC
After many hours of trying to get my HP discharge valve to be leak free i finally found an method that works. @MacMcMacmac is correct, if the bumper is worn the valve could have excessive play causing it to leak.

Even with a brand new bumper, seat and valve it still wouldn't seal 100%. Here is what worked for me; (I have no idea how people get away with sanding it with 320 grit and have no issues...)

The secret is to use WD-40 as a lubricant while using wet/dry sand paper. My seats were pretty good since i've sanded them like 5 times now... They would hold a fluid like gasoline without issues but would leak air. In my case, I started with 600 grit. Figure 8 motions work best, work on something flat, like a piece of glass. Once the seat is fully levelled and uniform, move up to 1000 grit repeat, then 2000 and 4000 if available. At this point the valve will be 100% leak free. I hope I can spare someone the head ache... I did this to the valve seat and the disc.

I've tried almost every combination, dry, wet, even polishing to a mirror finish, lapping it like an automotive valve by spinning and it still wouldn't seal properly. The secret ingredient is WD-40.

Moving forward, the unloader still doesn't make that "psst" noise but it unloads all the pressure so that restart is not an issue. One thing i'm trying to figure out is if i use compressed air to actuate the unloader tower, it still pumps air. I removed the diaphragm and pressed it with my hand and the same thing. I can feel that i'm pressing the valve open but it doesn't seem to care, maybe 5% of the air is being unloaded. I made sure all the ports are clean, air has a clear path but it somehow still pumps. It is puzzling, I heard it once on startup unload for a few seconds before it built oil pressure but it doesn't do that all the time.

I've checked many times and the hydraulic unloader works as intended, i even removed it as a variable and used compressed air. I'm starting to think the HP piston may have a cracked piston ring or something. The reason i'm thinking rings because it all happened after the first time I raised the pressure of the tank to 175 psi, it stopped making the "psst" noise. But then again, today with a 2hp motor it made

0-75 psi 8.2 CFM
0-150 psi 8.1 CFM

Those numbers seem quite healthy to me, not quite sure what to think. The bores are in decent shape, they are somewhat glazed and the HP bore has 1 or 2 minor vertical scores that my finger nail can catch and is in overall poorer condition than the LP.


Here is the style of unloader tower i have, I'm not able to find a diagram for it but i'm pretty sure i have it pieced together properly.


I'm not giving up until this Quincy works better than the day it was built over 60 years ago...
 
OP
T

TeenagerThatLikesFloorjac

Well-known member
Joined
Dec 30, 2020
Messages
82
Location
QC
The item in this photo with the red arrow should be a check valve that prevents air from returning from the tank back to the compressor.

A leaky check valve symptom would be continuous hissing from the unloader until the tank is empty or the motor restarts.


Walta
I believe all Quincy QR series pumps don't use check valves. They rely on the HP discharge valve to seal. I finally got it to seal properly. It was super finicky for me. Others seems to have no problems... Thanks for the suggestion though, that arrow is pointing to the 3/4" compression nut.
 
OP
T

TeenagerThatLikesFloorjac

Well-known member
Joined
Dec 30, 2020
Messages
82
Location
QC
Not sure how i stumbled upon this... I don't know how to proceed...


Unloader tower will only unload air if i cover the intake and then press it down... At this point i'm not too sure what it means...
 
To avoid these ads, REGISTER NOW!
OP
T

TeenagerThatLikesFloorjac

Well-known member
Joined
Dec 30, 2020
Messages
82
Location
QC
The mystery is solved! I would first like to thank everyone who gave suggestions, you guys know what you are talking about. It helped me immensely. I've learnt alot about my Quincy compressor while trying to troubleshoot.

It turns out it was the unloader piston seal. It is a thin plastic sheet that seals against the unloader tower body. While the compressor would unload, the air rushing upwards would push the plastic upwards, causing it to seal (against the unloader body) when it is not supposed too. I've never seen this style of unloader piston seal online but i could see why they changed designs. I haven't seen this issue documented anywhere on the internet.


The reason why it would unload when the intake was covered is because the partial vacuum in the cylinder would **** the "seal" down. For the time being i cut a circular piece of gasket board to replace it. This temporary solution makes the pump work exactly how it was intended.

Here is the a video when it shuts off. Very nice crisp "psst" sound. It also more importantly unloads perfectly on startup when there's no oil pressure. I am relieved that it all works as intended now. I've learnt a ton about Quincy's during this process. This project was my first introductions into compressors. I hope the information in this thread helps others. For the time being I am just going to use it. In the future it will get a rebuild and i will definitely document that. There is less information and pictures out there on the 310s versus 325s.


(Don't worry that out of place bright green base plate and pressure switch will be painted)

Even if you think something is working right, that may not be case. I thought for sure my HP discharge was sealing... it was leaking even though i thought it was lapped well (the head wasn't cracked or something lol). Even with a brand new valve disc, bumper and guide it still wouldn't seal. I guess i am just unlucky (method on how i got it to seal is a few posts above). The unloader tower was actuating freely and didn't seem like there was any issues. It was the culprit all along. My theories were basically all wrong but it made me fix other issues during the journey. After countless hours and weeks of getting nowhere it was the hope and theories that kept me motivated. Thanks again.
 
OP
T

TeenagerThatLikesFloorjac

Well-known member
Joined
Dec 30, 2020
Messages
82
Location
QC


Changed the oil today and removed the inspection cover to clean out the bottom of the crank case. Pretty clean internals, non detergent oil was definitely doing its job keeping the sediment at the bottom. 1 quart of oil came out, about the halfway mark on the dipstick. it took 1.5 quarts to get it to the full line. I used Valvoline SAE 30 non detergent oil.

The compressor just about keeps up with my sandblaster. That 100% duty cycle sure is nice, especially since i've heard they love to run for long periods of time. As of now i don't have the need for dual controls but in the future I might look into to it for a fun project. Perhaps a 3hp motor in the future too if the ol' GE motor ever gives up. I'm more than happy with how this compressor performs, nice and quiet too. Massive improvement over a 33 gallon oiless craftsman.
 

The Tool Tyrant

ALLIANCE MEMBER
Joined
Dec 19, 2011
Messages
2,182
Location
Bonita, Ca. (San Diego)
Those internals look really clean, especially being as it didn't have a air filter element. I'm guessing that it was only run for a very short period without the element.

The dual control on pilot valve mode will save your motor when sandblasting. It also allows the pump to cool as it's in 'freewheel' mode.
 
OP
T

TeenagerThatLikesFloorjac

Well-known member
Joined
Dec 30, 2020
Messages
82
Location
QC
Hello everyone,

I am looking for some advice,

My hydraulic unloader assembly is leaking a large amount of air into the crankcase.

I have two concerns with this, compressor running more frequently but more importantly all of that humid air making its way into the crankcase, then through the breather up into the head.

I haven't timed it or anything but it seems like it takes 1-2 hours to go from 170 psi to 120.

I have a old style unloader that uses balls bearings and no rubber components. Screen Shot 2023-10-08 at 5.23.16 PM.png

The ball bearing on the right is responsible for cutting off the pressure to the unloader tower.

The one on the left is when there is no oil pressure and is sending pressure to the unloader tower.

The housing itself seems to made out of brass, I've have tried hitting the ball bearing with a punch to get a create a better seat. It seems to reduce the leakage considerably for awhile until it leaks again.

I've tried doing research but i am not too sure what this process is called. I remember when i was rebuilding a floor jack this process was highly frowned upon to do at home on safety valves, but this is different.

Does anyone have a method to create a leak free seal? I know there is good contact on the back of part #3, i thought perhaps something was worn and there wasn't enough travel but i've confirmed all is good.

All i could find when researching was this diamond ball lap tool.

https://baltecballs.com/ball_valve.php

Any advice would be greatly appreciated. Thanks.
 

American Locomotive

Well-known member
Joined
Jan 8, 2017
Messages
11,016
Location
Rhode Island
Try replacing the ball bearings, and then lap the seats in. The ball laps seem pretty cheap.

If that doesn't work, I would probably just abandon the hydraulic unloader and get a pressure switch with an integrated unloader and hook the line up to the interstage port.
 

DandyDon

Member
Joined
Jan 15, 2024
Messages
12
Location
Huntsville AL
Hello Joel, enjoyed your post and all of the suggestions and advice given from everyone. I am new to the Quincy compressors or any other compressor for that matter. I am going to look at and probably purchase a Quincy 310 ROC 22 this coming weekend. I know I will be visiting this post again after my purchase.
 
OP
T

TeenagerThatLikesFloorjac

Well-known member
Joined
Dec 30, 2020
Messages
82
Location
QC
Hello Joel, enjoyed your post and all of the suggestions and advice given from everyone. I am new to the Quincy compressors or any other compressor for that matter. I am going to look at and probably purchase a Quincy 310 ROC 22 this coming weekend. I know I will be visiting this post again after my purchase.
Glad my documentation could help you! I'm glad I came across this unit, I was originally looking at Devilbiss units but the replacement parts depending on the model was hit and miss. It took me awhile to backtrack which pump it was from the images on the ad, but once i figured out it was a Quincy and did some research i was sold!

Did you end up picking up that compressor?
 
OP
T

TeenagerThatLikesFloorjac

Well-known member
Joined
Dec 30, 2020
Messages
82
Location
QC
Joel, you can either spend your time trying to get a good seal or just replace the unit... https://www.eindustrialsolutions.com/aftermarket-quincy-6278x-hydraulic-unloader-assembly

I have come to realize that you're very tenacious regarding 'fixing' things, but time is money so you need to choose.
If you look up in the thread you can see there was a bunch of stuff blocking the air passage on to the hydraulic unloader. I have since recreated that with aluminum foil, the volume of air that can pass through is reduced significantly but the pressure (i think) is the same. Thus, the unloader tower operates as it should and the amount of lost air while the compressor is off is within acceptable tolerances now.

I'll probably revisit this in the future but for now i'm happy!
 
OP
T

TeenagerThatLikesFloorjac

Well-known member
Joined
Dec 30, 2020
Messages
82
Location
QC
Did the tank get scrapped or become the foundation of a smoker project?
It's sitting in my backyard for the moment. One day i'll cut the top off and use as an outdoor fire place. Not looking forward to cutting 0.1420" steel with cut off blades... Pretty impressive how thick and heavy it is in comparison to the new "Husky" branded one i got to replace it. I paid $50 and it has a build date of 2022 and the insides looked like it was never used... I can't complain.

I did hydro static pressure test it to be safe, it doesn't seem like i ever posted pics in this thread.
 

DandyDon

Member
Joined
Jan 15, 2024
Messages
12
Location
Huntsville AL
Glad my documentation could help you! I'm glad I came across this unit, I was originally looking at Devilbiss units but the replacement parts depending on the model was hit and miss. It took me awhile to backtrack which pump it was from the images on the ad, but once i figured out it was a Quincy and did some research i was sold!

Did you end up picking up that compressor?
Yes, pulled trigger and brought it home. Been running electrical wire, installed electrical disconnect box and a magnetic motor starter (has a 230v single phase 5 hp motor). Flipped the switch and it came alive for the first time last weekend. Everything seemed to be operating as it should. Oil pressure at 20 psi with no strange noise and built 135 psi tank pressure. After running it a few times noticed the oil pressure is now very low. Oil level on the dip stick is In the full range. Now starting to do my research to find the cause and a fix.
 
OP
T

TeenagerThatLikesFloorjac

Well-known member
Joined
Dec 30, 2020
Messages
82
Location
QC
Yes, pulled trigger and brought it home. Been running electrical wire, installed electrical disconnect box and a magnetic motor starter (has a 230v single phase 5 hp motor). Flipped the switch and it came alive for the first time last weekend. Everything seemed to be operating as it should. Oil pressure at 20 psi with no strange noise and built 135 psi tank pressure. After running it a few times noticed the oil pressure is now very low. Oil level on the dip stick is In the full range. Now starting to do my research to find the cause and a fix.
Glad to hear she still pumps air, since the oil level looks good, the next place to look would be the oil pressure adjustment screw.


In this vid you can see where its located, if the jam nut is missing it could've loosened up causing low oil pressure. Don't quote me on this but i believe threading it in = higher oil pressure and out = lower. I could be wrong, it could be the opposite. Play around with it and see if you can get your oil pressure back to spec.

If that doesn't do anything i would pull the inspection cover plate where the dipstick lives and check for any build up of gunk. Oil pump strainer may be plugged...
 

DandyDon

Member
Joined
Jan 15, 2024
Messages
12
Location
Huntsville AL
Glad to hear she still pumps air, since the oil level looks good, the next place to look would be the oil pressure adjustment screw.


In this vid you can see where its located, if the jam nut is missing it could've loosened up causing low oil pressure. Don't quote me on this but i believe threading it in = higher oil pressure and out = lower. I could be wrong, it could be the opposite. Play around with it and see if you can get your oil pressure back to spec.

If that doesn't do anything i would pull the inspection cover plate where the dipstick lives and check for any build up of gunk. Oil pump strainer may be plugged...
Thanks for the video & advice, that will be the path I will start with and see what happens. By the way, where did you get your air inlet air filter from and do you have a part number for it?
Thanks for the help!
 
OP
T

TeenagerThatLikesFloorjac

Well-known member
Joined
Dec 30, 2020
Messages
82
Location
QC
Thanks for the video & advice, that will be the path I will start with and see what happens. By the way, where did you get your air inlet air filter from and do you have a part number for it?
Thanks for the help!
It's a Solberg! I've seen plenty of people recommend them, so i got one myself... I would definitely recommend one too. it does a great job silencing the intake noise.

Anything with a 3/4 NPT male fitting will work. Mine is a Solberg FS-15-075B / 4Z679
 

DandyDon

Member
Joined
Jan 15, 2024
Messages
12
Location
Huntsville AL
Thank you, will be getting that same air filter. Also, I will be working on my low oil pressure issue next week and post my results.
Appreciate all help given!
 

DandyDon

Member
Joined
Jan 15, 2024
Messages
12
Location
Huntsville AL
Joel, got to work on my air compressor this weekend and did as you suggested. Drained the oil which was pretty black. Opened the side cover and cleaned out all the sludge that was in the bottom (found quite a bit in there) removed and cleaned the oil screen. Was also able to get to the brass crank shaft plug and remove it and the oil spill valve and clean it as well. Reassemble everything, refilled the compressor with 30W Non-Detergent oil, started it up and “WOW” oil pressure back up to 18-20 psi. Happy, Happy, Happy!!!

Oh yea almost forgot, I add the Solberg air filter you recommended and it made a world of difference to the noise of the intake as you said it would.

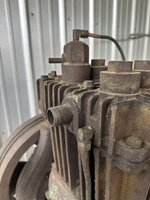
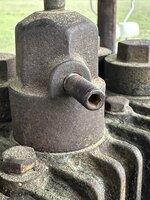
Have another question, on my cylinder unloader valve there is a 1/8” NPT socket head pipe plug what is this plug for? How tight should it be? Mine was only finger tight which allowed it to leak air. See pics below.

Thanks and Happy Saint Patrick Day everyone!

DandyDon

IMG_0399.jpeg


IMG_0395.jpeg
 

Attachments

  • IMG_0398.jpeg
    IMG_0398.jpeg
    738 KB · Views: 14
Last edited:
OP
T

TeenagerThatLikesFloorjac

Well-known member
Joined
Dec 30, 2020
Messages
82
Location
QC
Joel, got to work on my air compressor this weekend and did as you suggested. Drained the oil which was pretty black. Opened the side cover and cleaned out all the sludge that was in the bottom (found quite a bit in there) removed and cleaned the oil screen. Was also able to get to the brass crank shaft plug and remove it and the oil spill valve and clean it as well. Reassemble everything, refilled the compressor with 30W Non-Detergent oil, started it up and “WOW” oil pressure back up to 18-20 psi. Happy, Happy, Happy!!!

Oh yea almost forgot, I add the Solberg air filter you recommended and it made a world of difference to the noise of the intake as you said it would.

Have another question, on my cylinder unloader valve there is a 1/8” NPT socket head pipe plug what is this plug for? How tight should it be? Mine was only finger tight which allowed it to leak air. See pics below.

Thanks and Happy Saint Patrick Day everyone!

DandyDon

IMG_0399.jpeg


IMG_0395.jpeg
Hi,
i'm glad it all worked out. That extra port in the unloader tower is likely for a dual unloader setup for continuous run. Since you don't have 2 unloader towers your compressor probably wasn't specd for it. You can just plug it and make sure it doesn't leak and work it's way loose. Loctite would seal the threads and make sure it doesn't loosen up over time if you have a bottle around...
 
To avoid these ads, REGISTER NOW!
Top Bottom