So I did it today. Ordered the bendpak xpr-10acx. Has anyone installed it themselves? Any tips or tricks to make this go smoothly... I am so excited to finally have a lift on its way. Now I just have to get a real compressor and my garage will be awesome.


You are using an out of date browser. It may not display this or other websites correctly.
You should upgrade or use an alternative browser.
You should upgrade or use an alternative browser.
Bit the bullet. Ordered a Bendpak XPR-10ACX
- Thread starter bondsman
- Start date
Juday
Active member
Nice! Where did you get it from, and what was the price....(if you don't mind me asking).
I went through metro-lifts. Only because the customer service is great. I talked to Wes and he said that since I am installing it myself, I could call him anytime should I run into a snag. They have installed thousands of lifts and can walk me through any problems.
Bendpak sets the prices and should any of the vendors deviate, they could lose their product line. So I paid the normal retail price plus the $40 to have it delivered to my house.
I did learn alot about Bendpak and Dannmar. I chose the Bendpak for the triple telescoping arms and the fact that it can be used symmetrically as well as asymmetrically.
Dannmar is not Bendpak and is not affiliated other than Dannmar is Bendpak's son (and they don't get along). Dannmar went as far as copying the advertising of bendpak (just changing the color of the cars on the lifts) to make them appear to be affiliated. I am sure Dannmar is a quality lift, but I just chose Bendpak for their certification and the above mentioned attributes.
All in all, I don't care if they are affiliated or not, it could be a salesman blowing smoke. But I chose Bendpak for their quality, Metro-lift's customer service, and the price was not really a factor in my decision.
Now should the lift arrive and I have alot of problems with it, I will surely let ya'll know.
jackmcpilot
New member
- Joined
- Aug 6, 2010
- Messages
- 4
Hi,
I just installed an XPR-10AC.
I have not wired it yet or put Hydraulic fluid in so I still have to look forward to using it.
I just built a new shop at my house and since I was pouring the floor I decided to use 2 and one half foot allthread into concrete and then poured the floor.
I built a jig and stood the posts up on it and bolted the allthread to it and used that to level and pour the base concrete and rebar.
I was really worried that everything would not line up but it worked out great and should be super strong.
The jig is now the top of a 12' X 2.5 ' workbench.
I am going to have an electrician wire it in because the instructions are not that easy for a non electrician.
I did wire in a 220 recepticle overhead so it should be a simple matter for a pro.
I rented a forklift to stand the posts up since I had to lift them up over the bolts that protuded from the floor 2.5 inches.
I rented on a Fri and had the use of the forklift until Monday for the one day price of $240 which included delivery and pickup.
I'm eagerly looking forward to completing this project.
There is a great thread about loading an asymentrical lift on this forum.
So you took the measurements of your lift and transferred it to a piece of steel, traced the bottom plate on the steel, then drilled the holes where it would mount, then placed it where you wanted it, drove the allthread in, removed your jig, poured the concrete, cut the excess allthread when the concrete cured, then placed your posts directly on the protruding bolts which lined up perfectly?
That is awesome. Wish I would have thought about that.... I planned my pad to include thicker concrete where the lift is going, but you did it right. I commend you on that one. Never have to worry about it pulling out of the concrete. You did put a nut/washer on there that was embedded in the concrete to keep it from pulling out didn't you?
That is awesome. Wish I would have thought about that.... I planned my pad to include thicker concrete where the lift is going, but you did it right. I commend you on that one. Never have to worry about it pulling out of the concrete. You did put a nut/washer on there that was embedded in the concrete to keep it from pulling out didn't you?
jackmcpilot
New member
- Joined
- Aug 6, 2010
- Messages
- 4
I built the jig out of 2x4s with 1/2 inch plywood top,
I lifted the posts on the jig with the end measurements and a chalk line and drilled the holes through the plywood.
I then bolted the allthread to the plywood with nuts and washers top and bottom with 2.5 feet of allthread protruding below the jig.
We dug a three foot hole under each post position and tied the rebar to the allthread.
We then poured concrete in the hole with the top of the plywood at floor level.
After that set up for a couple of weeks we removed the wooden jig and poured the floor with 2 and 1/2 inches of bolts sticking out.
The floor over the post positions is also over 6 inches thick.
If they pull out I will be amazed.
It did make a great workbench too.
Well, that was pretty smart. Wish I would have thought of that. But then again, I didn't really know which lift I was going to get. You pretty much had your garage completely planned out before you built it. You have any pics? What size is it?
jackmcpilot
New member
- Joined
- Aug 6, 2010
- Messages
- 4
I built a 40X60 pole barn with steel sides and roof. It is insulated except for skylights along the top of the walls.
I wanted it large enough to keep a 27' sailboat in for the winter and also for resale if someone wants to store a large motorhome.
It has two 14'high overhead doors in the front and a 14' slider in the rear.
The lift is in the middle of the shop.
I'll try to load pix in the next post.
I was really holding my breath when we put the top piece on. If it didn't line up Plan B was to move over two feet and bolt it in with the expansion bolts and cut off the other bolts at floor level. I am very happy Plan A worked.
jackmcpilot
New member
- Joined
- Aug 6, 2010
- Messages
- 4
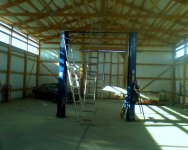
Here is a pcture of the shop with the new lift being rigged.
I have a lot of framing for storage and a bathroom to do this winter.
The next step before winter is to install a heater.
I'm thinking of the infared tubes (Solaron)
View attachment 72897
I have a lot of framing for storage and a bathroom to do this winter.
The next step before winter is to install a heater.
I'm thinking of the infared tubes (Solaron)
View attachment 72897
Attachments
zeebad1
Well-known member
We are very happy with ours. Haven't used the floor jack since we put it up. (I was looking at the jack yesterday, and the handle is all rusty!!)

My wife & I put ours together in one evening. I borrowed the neighbors boom truck to set the posts, rented a hammer drill for the anchors, and worked off of the scissorlift to install the top components.
The instructions left a little bit to be desired wen it came to the hose routing, but after I figured out what they wanted, everything fit together OK.
I did have an electrician wire it. That's one thing I don't mess with.
zeebad1
Well-known member
Thanks for the compliment. I think that I can actually say that it's finished.
The lift is close, but right where I wanted it.....

It's 9 1/2' from the wall. I'd have to look back at the instructions, but that is close to the recommended minimum.
The one thing that I've learned is that I don't have to pull through so far. If I utilize the asymmetrical configuration, that leaves me with more than enough room in front of the vehicle, and I can open the door without hitting the post.
The lift is close, but right where I wanted it.....
It's 9 1/2' from the wall. I'd have to look back at the instructions, but that is close to the recommended minimum.
The one thing that I've learned is that I don't have to pull through so far. If I utilize the asymmetrical configuration, that leaves me with more than enough room in front of the vehicle, and I can open the door without hitting the post.
I have installed several above ground lifts including my bendpak 10k. It's really not a big deal. Hardest part is lifting the crossbar up. Just follow the directions for laying out the lines and so forth, figure out where you want it insofar as the longest vehicle you intended to work on so you will be able to close your garage door with the car on the lift. I always get the whole thing assembled, with the crossbar left a little loose so you can wiggle the whole lift around and get it settled, then just drill the holes with the lift in place. Hammer the bolts in with enough threads for leveling. Then extend and swing the arms inward and level them up by shimming the posts on either side. Tighten everything up and wire it, done.
e-tek
Well-known member
Nice!!!!!!!!!!!!!Both space and lift!! May you enjoy many happy hours together!!!