To avoid these ads, REGISTER NOW!

Between 485 & 705 SQ/FT BJ383SS's Woodshop/Garage

Workspaces between 485 and 705 squarefeet.

Denwood

Well-known member
Joined
Sep 22, 2014
Messages
4,353
Location
Thunder Bay, Ontario, Canada
Great use and organization of the space Bret. Affer spending the morning helping my sister-in-law transition over to winter tires in my tiny 16x24, the space in your shop looks downright luxurious:)
 
To avoid these ads, REGISTER NOW!
OP
B

bj383ss

Well-known member
Joined
Sep 29, 2011
Messages
3,166
Location
TX
Great use and organization of the space Bret. Affer spending the morning helping my sister-in-law transition over to winter tires in my tiny 16x24, the space in your shop looks downright luxurious:)
Thank you Dennis. I do enjoy my space but it is only a 3rd of big garage I had grown use to. But I make it work. I have too much stuff.

Great job Bret.

That is all.

Thank you Rian


Let the fun begin...

2016-11-24_06-43-46 by bjohnson388, on Flickr
 

dlcwent

Member Emeritus
Joined
Feb 24, 2014
Messages
8,427
Location
coastal maine
Hey Bret, It looks like some Christmas decorations are in your near future. Don't let them stress you out. ( They always stress me out)

As I said before, you have an awesome shop. Curious what your rule of thumb is on saving wood? Any piece? One foot or more? I always have trouble deciding when I should throw out a piece, so I only keep 2' and up.
 

Bob Heine

ALLIANCE MEMBER
Joined
Oct 24, 2009
Messages
10,722
Location
Boca Raton, Florida
Curious what your rule of thumb is on saving wood? Any piece? One foot or more? I always have trouble deciding when I should throw out a piece, so I only keep 2' and up.
Bret and Dan, I too am curious about saving small pieces of wood. I save the 4x4 fence posts from our 6-foot high fences when the bottom rots off, use those leftover posts to replace the rotted posts on the 4-foot high fences and then cut those leftover short posts into cribbing (I have lots of cribbing).

I'm guessing that my 1- and 2-inch long pieces of 1x2, 2x2 and assorted hardwood sanding/shimming/leveling blocks should be thrown out....
Blocks%20of%20Wood_zpsbnp7mnkf.jpg


And Bret, the truck and the garage are looking great. The Christmas lights are my kryptonite -- I buy the cheapest lights I can find after the holidays and use them the next year. The first time they blink off they go in the trash. Our children do the entertaining so our home gets just enough holiday decor to indicate what time of year it is. This year the outside is going to be one big lighted wreath above the garage. Ho Ho Ho...
 

-Brent-

Well-known member
Joined
Dec 23, 2009
Messages
4,709
Location
Utah
Just finished reading the thread. Holy hell, you're a true craftsman. I really liked those atomic-age looking rockets.

So, what happens with the other vehicles now that there's no big garage anymore?
 
OP
B

bj383ss

Well-known member
Joined
Sep 29, 2011
Messages
3,166
Location
TX
Hey Bret, It looks like some Christmas decorations are in your near future. Don't let them stress you out. ( They always stress me out)

As I said before, you have an awesome shop. Curious what your rule of thumb is on saving wood? Any piece? One foot or more? I always have trouble deciding when I should throw out a piece, so I only keep 2' and up.

Thanks for stopping in Dan. Xmas decorations don't really stress me out. I have a map and everything is labeled. What I don't like is getting on the roof. Especially the new house. Although it is single story the roof peaks are much taller than my old house. I got some new light clips that work very well.


Bret and Dan, I too am curious about saving small pieces of wood. I save the 4x4 fence posts from our 6-foot high fences when the bottom rots off, use those leftover posts to replace the rotted posts on the 4-foot high fences and then cut those leftover short posts into cribbing (I have lots of cribbing).

I'm guessing that my 1- and 2-inch long pieces of 1x2, 2x2 and assorted hardwood sanding/shimming/leveling blocks should be thrown out....
Blocks%20of%20Wood_zpsbnp7mnkf.jpg


And Bret, the truck and the garage are looking great. The Christmas lights are my kryptonite -- I buy the cheapest lights I can find after the holidays and use them the next year. The first time they blink off they go in the trash. Our children do the entertaining so our home gets just enough holiday decor to indicate what time of year it is. This year the outside is going to be one big lighted wreath above the garage. Ho Ho Ho...

Bob maybe someday I can dial back the decorations but at this point in my life, we have become the host for all family gatherings. Besides the fact my wife would leave me if I didn't hang them. She is very passionate about Xmas. Working in retail for 21 years I am less passionate but the 2 boys help make Xmas fun and exciting.

To answer your question about scraps. I do tend to keep a lot on hand but for the most part I only save pieces that I know I can use for a future project. That can be a slippery slope. When I first started woodworking I kept every cutoff. Not so much anymore. I do keep all hardwoods unless its unuseable as they come at a premium price. I do like to save all the cabinet grade plywood cutoffs as well. But anything pine I tend to toss it unless it is a long piece or I have something in the near future. I also toss anything that is warped or crooked especially 2x4's as its too much trouble to get them straight.


Just finished reading the thread. Holy hell, you're a true craftsman. I really liked those atomic-age looking rockets.

So, what happens with the other vehicles now that there's no big garage anymore?

Thank you Brent for the comments. I commend you for reading all the way through. My thread is a mess with things starting out in the big 6 car and my old house garage.

To answer your question. The 95' Chevy truck and 72 Olds' belong to my Mother in law. Though I will inherit both of them at some point. The Caprice is still sitting in there. I need to get rid of it. It's just hard to let go because I have owned since 1995. I have thought about bringing it home as well but it would just be an eyesore in my driveway. It needs too much money to get it running again. I plan to buy an old Chevy pickup for Home Depot runs here in the next year so it will be taking up a parking spot as well.

Bret
 
OP
B

bj383ss

Well-known member
Joined
Sep 29, 2011
Messages
3,166
Location
TX
Hey Bret, how are you liking your homemade air filtration unit? What did you use for the blower/fan?

It works great. Makes a big difference in settled fin dust. I used an old HVAC squirrel cage motor a guy gave me for free. I bought the pocket filter for it from Filters-now.com.

Only downside is it is a little loud. Have to turn the music up a little bit when it is on. I also need to wire me in a timer for when I leave the shop. Right now I just leave it on and set a timer on my phone to remind to go back out there and turn it off.

Bret
 

don long

Well-known member
Joined
Mar 31, 2012
Messages
8,922
Location
southern california
Hi Brett
Finished reading through this entire thread last night.
Very impressed with your set up your many talents and your willingness to share. So much so that I went out to my wood shop that I haven't worked in since last year and rearranged the place today and now have the motivation to get it running
Many thanks to you for the help

Don
 
OP
B

bj383ss

Well-known member
Joined
Sep 29, 2011
Messages
3,166
Location
TX
Hi Don thanks for stopping by. Kudos to you for reading through my disorganized thread. If you were able to keep track of everything that is great.

Glad I could give some motivation. Many threads and members on GJ help keep me on the right track and glad to hear there might be some sawdust floating around in your shop soon.

I have followed along on your threads and love everything you are doing. I have always been a Corvette man even though I have never owned one yet it is on my bucket list. I either want a 70' with a 454 4 speed or a 2004 ZO6. Either one I would be happy. Of course the ultimate for me would be a 65' with a fuel injected 327 but those are way out of my price range.

Bret
 
OP
B

bj383ss

Well-known member
Joined
Sep 29, 2011
Messages
3,166
Location
TX
Last couple of evenings I got the 2 cabinets cleaned out that I want to move. I found a place for them in the shed but it is going to require cutting them up and resizing them into 4 cabinets. The two tops will be hung on the wall. One of them I have to also cut the width down by 6". The two bottom ones have to be cut down to 42" high so they will fit under another cabinet I have on the wall in the shed.

Here they are emptied out. The best part is everything that was in them has been relocated so once they are installed in the shed, this is all empty storage to fill up.

20161128_203746 by bjohnson388, on Flickr
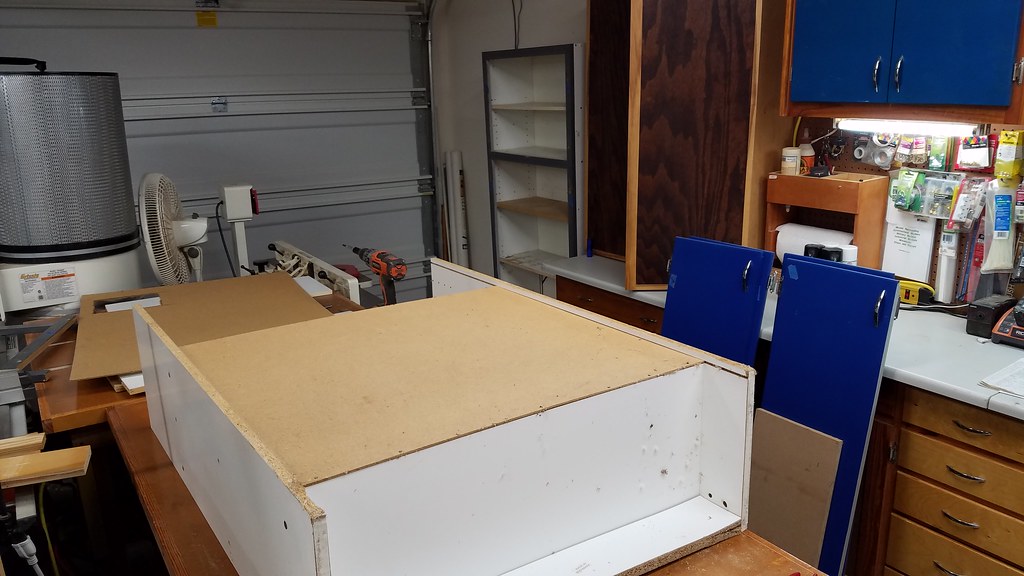
These are 2 cheap melamine bookcases I found in the dumpster when my wife and I rented our first apartment together. When we moved into our first house I made face frames for them and installed the doors.

Surgery has started This will be quick in dirty don't want to spend too much time on them.

20161130_194511 by bjohnson388, on Flickr

20161130_194505 by bjohnson388, on Flickr

Can't wait to start rearranging the tools and get the room and flow back. The way I setup the tablesaw just isn't working. When I originally did it the truck was not home and I placed the DC too close to the saw and it is limiting how much crosscut I can do on large panels which is driving me crazy. The only down side to where I put the DC is I will have a pipe running across the floor but I plan to build ramps around it with a bridge so it will just be a small step. If I don't like it I might run the piping up across the ceiling and down.

Bret
 
OP
B

bj383ss

Well-known member
Joined
Sep 29, 2011
Messages
3,166
Location
TX
Got a few hours last night and this morning working on the cabinets.

I started by marking all the doors and then taking them off. Next I took off the face frames and cut them to the right length. Then I took each side off one at a time and cut them to length and them put them back on so everything would stay where it was


Here you can see how much I had to cutoff of the bottom doors.

20161201_102008 by bjohnson388, on Flickr

First bottome cabinet done. I had to add a rail to the top of the face frame and a top. I also replaced the kick board at the bottom as it was rotted. These are cheap particle board bookshelves. I found them in the dumpster when we first moved into our old house, and I made some face frames and made the doors from MDF. Amazing what paint can hide. They are ok cabinets so just spending as little time on them as possible.

20161201_174051 by bjohnson388, on Flickr

20161201_174102 by bjohnson388, on Flickr


Here is the first upper cabinet done. I was going to cutoff the part below the doors but then I thought why not just add a shelf. Then I just had to add a rail to face frame and done. I will go back and paint and finish these at a later date.

20161201_190129 by bjohnson388, on Flickr

20161201_190137 by bjohnson388, on Flickr


Started work on the 2nd lower cabinet before I quit. I should be able to finish these up tomorrow morning and get them installed in the shed. The best part is since I emptied them out and relocated everything that was in these cabinets this is all extra storage space.

20161201_202944 by bjohnson388, on Flickr

20161201_202950 by bjohnson388, on Flickr


Thanks for reading,

Bret
 

Denwood

Well-known member
Joined
Sep 22, 2014
Messages
4,353
Location
Thunder Bay, Ontario, Canada
Most would toss the old cabinets. I am really liking your re-purpose mentality :)

You mentioned light clips. I'm in need. Curious to see what you have, and why you like them?
 

drivesitfar

Well-known member
Joined
Oct 23, 2013
Messages
36,259
Location
Pacific Northwest
BJ: is this your house all ready for Christmas? or was that just a picture you grabbed off the internet to show Woody the clips?

i agree with Woody that most would have tossed those old cabinets and looks like you not only saved them, but made them better and re sized them to work in another spot. WELL DONE!!
 
OP
B

bj383ss

Well-known member
Joined
Sep 29, 2011
Messages
3,166
Location
TX
BJ: is this your house all ready for Christmas? or was that just a picture you grabbed off the internet to show Woody the clips?

i agree with Woody that most would have tossed those old cabinets and looks like you not only saved them, but made them better and re sized them to work in another spot. WELL DONE!!

Drive - this is my new house.

Thank you for the comments. I will post it over in the woodworking thread.

Bret
 
OP
B

bj383ss

Well-known member
Joined
Sep 29, 2011
Messages
3,166
Location
TX
I finished the cabinets and got them in their new home. Just in time before the rain started pouring.

New top and face frame rail on the 2nd base cabinet.

20161202_093109 by bjohnson388, on Flickr

Drilling some pocket holes for the rail.

20161202_093415 by bjohnson388, on Flickr

20161202_093433 by bjohnson388, on Flickr

Putting the frame together. I really enjoy using pocket screws they are easy to do, fast, and strong.

20161202_093654 by bjohnson388, on Flickr

After mounting the face frame back to the cabinet next thing was to cut the doors down.

20161202_094511 by bjohnson388, on Flickr

On the tablesaw sled. You can see how my left side of the saw is limited in width due the DC. I had a brain fart when I did that. The main reason I am relocating all this.

20161202_094710 by bjohnson388, on Flickr

20161202_094718 by bjohnson388, on Flickr

Cut to length.

20161202_094912 by bjohnson388, on Flickr

Cut the rabbet on the back side of the door as the hinges on it are 3/8" inset.

20161202_095305 by bjohnson388, on Flickr

20161202_095002 by bjohnson388, on Flickr

Door fits good. Time to reinstall the bottom hinge.

20161202_095342 by bjohnson388, on Flickr

20161202_095546 by bjohnson388, on Flickr

Hammered it flat and then repeated all the above for the other door. Both doors installed.

20161202_101140 by bjohnson388, on Flickr

Moving it out to the shed.

20161202_101347 by bjohnson388, on Flickr

Installed in their new home.

20161202_101756 by bjohnson388, on Flickr

And the last cabinet. The 2nd upper. I had to cut the width on this one by 6" so it would fit in the place I had planned for it.

20161202_111403 by bjohnson388, on Flickr

2 new bottom shelves added. I figured I could put all my sandpaper on these 2 shelves.

20161202_112353 by bjohnson388, on Flickr

Putting the face frame back on. I don't normally put these together like this. My normal is building the face frame flat on the workbench and then installing it on the cabinet. But sense these have already been attached I figured I could put the 2 stiles on and the cut the rails to fit.

20161202_113601 by bjohnson388, on Flickr

Cut all the rails and setup a stop block so they would all end up the exact same length and a square face frame.

20161202_113858 by bjohnson388, on Flickr

Face frame done.

20161202_114731 by bjohnson388, on Flickr

Next up was ripping the width of the doors down. I forgot to take pictures of this. And sense I cut the inside part of the doors so I wouldn't have to redo the rabbeted edges I had to redrill the holes for the handles.

20161202_142716 by bjohnson388, on Flickr

20161202_142848 by bjohnson388, on Flickr

And here it is finished. You may notice (maybe) the bottom rail is different than the picture before. I forgot I installed the other cabinet a little bit different so I had to make this one so they would match. You will see what I mean in the last photo.

20161202_143658 by bjohnson388, on Flickr

This cabinet did not have a back so I found some leftover I had and it fit the grooves perfect so I just had to cut it size.

20161202_135833 by bjohnson388, on Flickr

Here are both cabinets mounted to the wall. I mounted a ledger underneath them on the wall level first at the height I wanted to mount them. This makes it easy to mount them by your self. I set them up on the ledger and screw them into the wall. Done.

20161202_150119 by bjohnson388, on Flickr

More storage space in the shed now.

20161202_150124 by bjohnson388, on Flickr

I still need to paint repaint them at some point. I just noticed in this picture the doors on each cabinet are not even with each other. I will have to fix that. You can also see how much skinnier the 2nd cabinet is.

20161202_150129 by bjohnson388, on Flickr

That was long winded. I have had several people ask me to include more pictures and steps so I tried to take more pictures as I worked today.

Thanks for looking,
Bret
 
Last edited:

shortykorte

Well-known member
Joined
Sep 1, 2014
Messages
8,039
Location
Tallahassee, Fl
Great post and not long winded for me. Also it generated several questions which is the great thing about how-to post.

The sled. Most of the projects I've seen lately use a sled and I've never had one. Any tips on size and how much left and right surface area?

Kreg-I made a door frame for a large piece of glass. The joint with glue is surprisingly strong. I'll probably use it today.

Multi-layer pegboard tool holder. What happened to it? The cabinet I mentioned about cutting down was to make one of these. Do you like it? Any tips?

Thanks again for sharing your knowledge and experience.

p.s. 350, 400, 455. Heck I don't care. I'd even like a red one. :bounce:
 

Attachments

  • image.jpg
    image.jpg
    71.8 KB · Views: 30
To avoid these ads, REGISTER NOW!

Denwood

Well-known member
Joined
Sep 22, 2014
Messages
4,353
Location
Thunder Bay, Ontario, Canada
Wow...that looks awesome. Thanks for the clip link..will definitely look them over.

Here is a link Dennis. https://www.amazon.com/dp/B00AXO5T6S/?tag=atomicindus08-20 Although I bought mine at the local Lowe's and paid half this much. Not sure why Amazon has them for double. The reason I like them is because the absolutely line all the lights up perfectly. Great for us OCD guys. The only downside is you have to remove the bulbs to put them on but that was no big deal. Here is a pic of mine installed.

20161126_175836 by bjohnson388, on Flickr

https://www.amazon.com/dp/B00AXO5T6S/?tag=atomicindus08-20


Absolutely I will. I should have them in place today.

Bret
 

drivesitfar

Well-known member
Joined
Oct 23, 2013
Messages
36,259
Location
Pacific Northwest
BJ: first off very cool looking house and very festive too now. so i love all the pictures and the process and i've got just a couple questions.

how did you make the rabbit cut? several passes on the table saw, plane, dado blade or do tell?

also what is the too called that you can drill holes in the sides of wood at an angle cause i need to get one?

thanks for the effort and looks like you are ORGANIZING your space nicely.
 
OP
B

bj383ss

Well-known member
Joined
Sep 29, 2011
Messages
3,166
Location
TX
Great post and not long winded for me. Also it generated several questions which is the great thing about how-to post.

The sled. Most of the projects I've seen lately use a sled and I've never had one. Any tips on size and how much left and right surface area?

Kreg-I made a door frame for a large piece of glass. The joint with glue is surprisingly strong. I'll probably use it today.

Multi-layer pegboard tool holder. What happened to it? The cabinet I mentioned about cutting down was to make one of these. Do you like it? Any tips?

Thanks again for sharing your knowledge and experience.

p.s. 350, 400, 455. Heck I don't care. I'd even like a red one. :bounce:

Shorty I have two sleds. The one in the picture is for ripping big panels. I have another that is used for smaller stuff and also to make box joints. I like both of them but I really want to build one big one that will do both. I really want one that is about the same size as my tablesaw top. That should do just about anything I could throw at it.

Here are pictures of sleds I have saved in my project folder.

This one is really fancy. It has T-track for stops and bolting accessories to it.

214665702 by bjohnson388, on Flickr

It has T-track in the base for hold downs.

214665726 by bjohnson388, on Flickr

His stop block also has built in measuring.

214665730 by bjohnson388, on Flickr

And he can cut angles with it as well.

214665737 by bjohnson388, on Flickr

Another nice one.

IMG_0381 by bjohnson388, on Flickr

This is another easy one to make.

lw3ucoe by bjohnson388, on Flickr

I really like the size of this one and it has a piece of plexi glass across the kerf.

Sled1 by bjohnson388, on Flickr

Sled4 by bjohnson388, on Flickr

A very simple one you could make in a day.

20080821_resized by bjohnson388, on Flickr

This one is really cool has all kinds of adjustments and you can set up stop blocks. I am not sure what the right side is maybe for a router. I like the way he used Plexiglas to measure out his stop block.

392567 by bjohnson388, on Flickr

A pic of my sled when I made it. Notice it is not near big enough.

Picture 003 by bjohnson388, on Flickr


I do really like the Kreg jig for face frames and also for frameless cabinets. As you said when combined with glue it makes a strong joint.

On the pegboard cabinet I assume you are talking about the Orange and gray one. I like the design. Mine is made with MDF and is very Heavy. I do like the pegboard doors as you can use both sides and also the back of the cabinet as well. I also like sliding pegboard doors. Going to make some of those for the cabinet on the other side of the shed.

Here are some pics of he pegboard cabinet when it was in my old shop.

20150715_203255 by bjohnson388, on Flickr
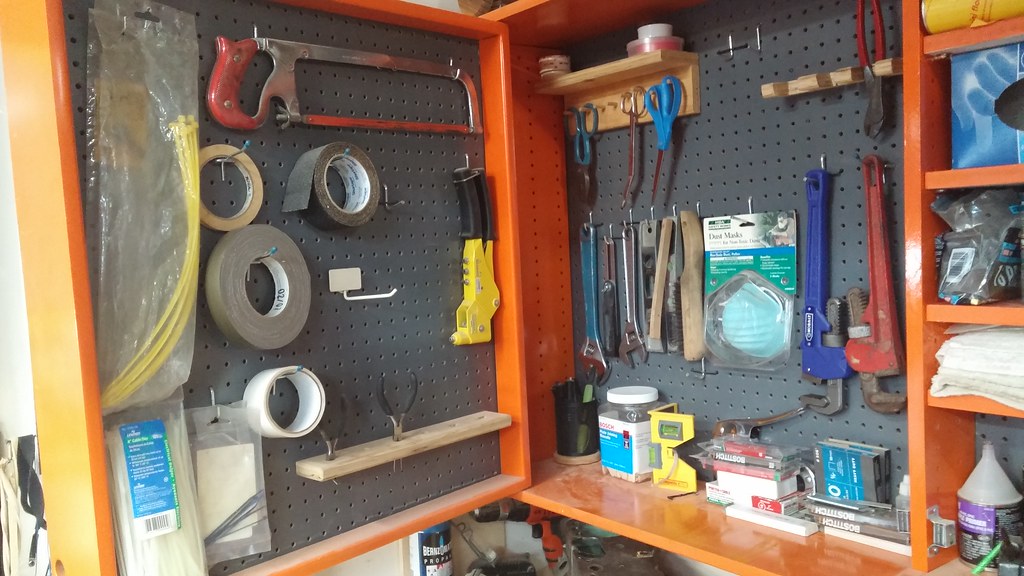
20150715_203317 by bjohnson388, on Flickr

20150715_203301 by bjohnson388, on Flickr

I hope that is what your were asking.

Lastly here is a pic of the sliding pegboard doors I am going to make for my shelf in the shed.

ShopNotes-pegboard-tool-cabinet-inspiration-featured-on-Remodelaholic by bjohnson388, on Flickr


Bret
 
OP
B

bj383ss

Well-known member
Joined
Sep 29, 2011
Messages
3,166
Location
TX
BJ: first off very cool looking house and very festive too now. so i love all the pictures and the process and i've got just a couple questions.

how did you make the rabbit cut? several passes on the table saw, plane, dado blade or do tell?

also what is the too called that you can drill holes in the sides of wood at an angle cause i need to get one?

thanks for the effort and looks like you are ORGANIZING your space nicely.

Drive thanks for stopping in.

I made the rabbit cut with just the single kerf blade but I normally use a dado if I am doing a bunch of cuts its much faster and more accurate.

The pocket holes are made with a kreg jig. I will give you a link but it is a slippery slope. I have the basic kit but I recommend the K4 system. It is so much faster with the built in clamp for drilling. I have the R3 which works but you have to clamp the piece to your bench. Some guys even set a whole table up just for drilling and clamping pocket holes.

The link is Rockler but Lowes carries it as well.

http://www.rockler.com/search/go?w=kreg pocket hole jig

Bret
 

mmavet

Well-known member
Joined
Jan 9, 2016
Messages
130
Location
IOWA USA
I'm not sure how those sleds work...but I'm sure Bob Villa would scratch his head also.
 

shortykorte

Well-known member
Joined
Sep 1, 2014
Messages
8,039
Location
Tallahassee, Fl
Wow, those are some nice sleds. Thank you. I have to agree with mmvet that Bob Villa would be scratching his head. I think I will start off simple. When you say yours is to small, do you mean both the length (parallel to blade) and width (perpendicular to blade)? I could see where you might want up to a 24" length but not sure what would be the correct width either side of the blade. I imagine it depends on the type of projects.

Thank you for the better picture of the orange pegboard storage board. That's what I have in mind. The sliding door one looks great also.
 

shortykorte

Well-known member
Joined
Sep 1, 2014
Messages
8,039
Location
Tallahassee, Fl
OP
B

bj383ss

Well-known member
Joined
Sep 29, 2011
Messages
3,166
Location
TX
Bret, I have the K4 kit. I thought I loaned it out but couldn't remember to whom so I bought the Harbor Freight version for $52 (20% coupon off $65). It works just fine and is metal.

Now I have two pocket screw jigs -- turns out I put the K4 kit away in the 'last place I would think to look'.
http://www.harborfreight.com/portable-pocket-hole-jig-kit-96264.html
HF%20Pocket%20Screw%20Jig_zpsfdl62ovh.jpg

Bob I will definitely have to check that out when I get my next 20% off coupon. I dig metal over plastic as long as it is accurate.


Wow, those are some nice sleds. Thank you. I have to agree with mmvet that Bob Villa would be scratching his head. I think I will start off simple. When you say yours is to small, do you mean both the length (parallel to blade) and width (perpendicular to blade)? I could see where you might want up to a 24" length but not sure what would be the correct width either side of the blade. I imagine it depends on the type of projects.

Thank you for the better picture of the orange pegboard storage board. That's what I have in mind. The sliding door one looks great also.

Your welcome Shorty. As far as the size it is mainly the width of it as I can't crosscut large panels in the small one which is why I made the big one. It works fine for normal stock. But when making cabinets and cutting panels It is only 13" wide to crosscut width. Most cabinet panels are at least 20 -24"

Bret
 

Bob Heine

ALLIANCE MEMBER
Joined
Oct 24, 2009
Messages
10,722
Location
Boca Raton, Florida
Bob, have you used the HF jig? If so, did it work okay?

Bob I will definitely have to check that out when I get my next 20% off coupon. I dig metal over plastic as long as it is accurate.

Bret
Stewart and Bret, I have only used the HF jig once but it worked just fine. It was interesting that the HF jig uses two different angle guides, one for thin stock (1/2" to 1") and the second for thick stock (1-1/4 to 1-1/2"). The Kreg jig uses a single angle guide.
 

NedNorton

Well-known member
Joined
Jul 14, 2012
Messages
608
Location
Colorado, USA
Bret,
Just thought I would add you to the group. Who am I kidding, you helped define the group. Anyway...

I know that I haven't been posting lately but I wanted to let you know that during the time we were in the ICU your thread, among others, help pass the time. Just thought a thank you was in order.

Cheers,
Chris
 
OP
B

bj383ss

Well-known member
Joined
Sep 29, 2011
Messages
3,166
Location
TX
Your wood work skills are amazing
Thank You for stopping in.

Love your place! I'm in the process of making that same sliding pegboard cabinet.

Thank you. Post up a pic of your cabinet when you get done. You will probably finish before me as I haven't even started.

Stewart and Bret, I have only used the HF jig once but it worked just fine. It was interesting that the HF jig uses two different angle guides, one for thin stock (1/2" to 1") and the second for thick stock (1-1/4 to 1-1/2"). The Kreg jig uses a single angle guide.

Thanks for the info Bob. I put it on my Xmas list for the wife.

Bret,
Just thought I would add you to the group. Who am I kidding, you helped define the group. Anyway...

I know that I haven't been posting lately but I wanted to let you know that during the time we were in the ICU your thread, among others, help pass the time. Just thought a thank you was in order.

Cheers,
Chris

Really appreciate that Chris. I know you haven't been posting that much but when you do it is always a worthy post. I love reading about all your ingenuity. I just ordered me some hockey pucks to put under my air compressor. I bought some of those rubber pads at Lowes but they are super thin.

Bret
 

drivesitfar

Well-known member
Joined
Oct 23, 2013
Messages
36,259
Location
Pacific Northwest
BJ: thank you (and BOB) for giving me the name of that tool. it looks like Bob's is going to be on my list of tools to have once i set up my woodshop area. i'm loving the new Woodshop 101 thread and i thank you for posting any and all of your projects and sharing your wisdom too.

cheers
 
OP
B

bj383ss

Well-known member
Joined
Sep 29, 2011
Messages
3,166
Location
TX
BJ: thank you (and BOB) for giving me the name of that tool. it looks like Bob's is going to be on my list of tools to have once i set up my woodshop area. i'm loving the new Woodshop 101 thread and i thank you for posting any and all of your projects and sharing your wisdom too.

cheers

Thank you Drive for the comments.


Couple of projects knocked out today.

Wired up a 220v plug for the new Garage heater I got for Xmas. Last year. While I was in the attic ran a 4 gang plug for the mitersaw bench. Will be running two more 4 gang boxes off it. One for the drill press and the other down at the end near the garage door for whatever.

Dr. Heater. 6000w

20161207_182728 by bjohnson388, on Flickr

It has a healthy plug.

20161207_182736 by bjohnson388, on Flickr
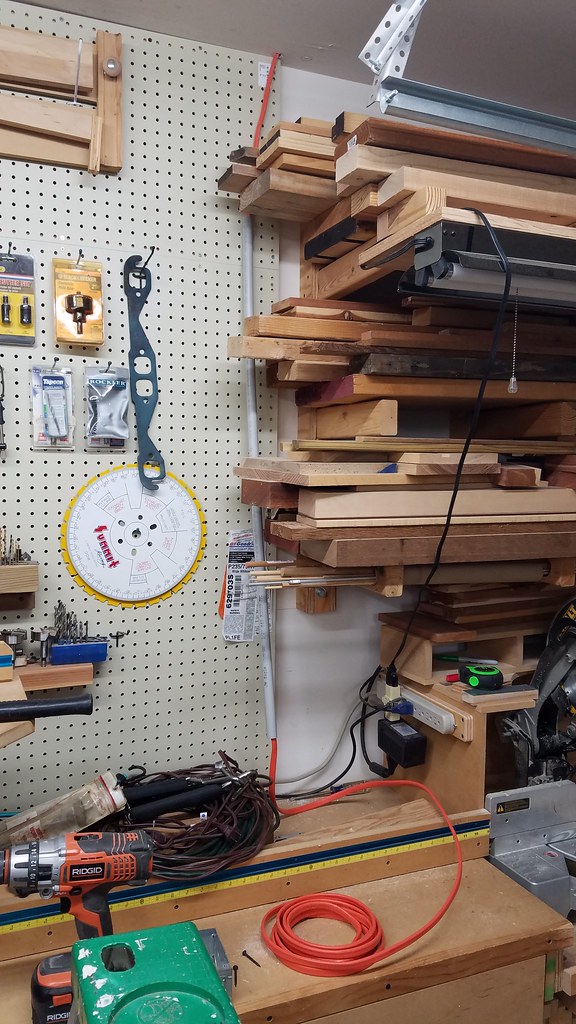
20161207_182742 by bjohnson388, on Flickr

Plugs installed.

20161208_174622 by bjohnson388, on Flickr

Temporary stand for Heater. When I turned it on it was 51* in the shop. After an hour it had brought the shop up to 66* and I had to shut it off. It was 37* outside and temp dropping. I am impressed with it so far.

20161208_174617 by bjohnson388, on Flickr

Finished up some Trees I made for the wife. They go on the porch and replace the pumpkins I made for the fall. Don't know what I am going to make for the spring.

Cut them out on the bandsaw. Sprayed them with spray bomb rustoleum and then sanded them with 80 grit. They are 36", 30" and 24".

20161208_181638 by bjohnson388, on Flickr

20161208_182206 by bjohnson388, on Flickr

20161208_182658 by bjohnson388, on Flickr

I got all my machines moved around where I want them. I need to shrink down my outfeed table. I am going to just rebuild it completely and cut it down 5" on both sides and make the cutout so that the saw can be tilted for a 45* miter cut. I use to have the vacuum underneath but now that I have moved it I need to make better use of the space under there.

After I finish that have to redo all the DC plumbing. Fun.

20161208_194731 by bjohnson388, on Flickr

20161208_194737 by bjohnson388, on Flickr

Will make some cabinets, pegboard, or shelves to go above the Planer to make use of all this open space.
20161208_195643 by bjohnson388, on Flickr


That's it for tonight,
Bret
 

shortykorte

Well-known member
Joined
Sep 1, 2014
Messages
8,039
Location
Tallahassee, Fl
Tight but functional. :thumbup:

What is the distance from the blade line to the right end of the fence rail. Just wondering because mine sticks out quite a bit but I've never had a quality fence before.
 
OP
B

bj383ss

Well-known member
Joined
Sep 29, 2011
Messages
3,166
Location
TX
Tight but functional. :thumbup:

What is the distance from the blade line to the right end of the fence rail. Just wondering because mine sticks out quite a bit but I've never had a quality fence before.

Shorty it looks much tighter in the photos. Truth be told the tightest place around the end of tablesaw rails is 24".

My tablesaw rips 36" to left and I believe 24" to the right. Not the ginormous rip a cabinet saw can do at 50", but to be honest there have been very few times I needed to rip more that 36".

I got a few hours in thanks to my new heater. Turned it on when I got home from work. It was 55* in the shop. Hour later after a shower and some food I come out to the garage and its 67*. It's only 68* in the house. And I don't even have any insulation in the ceiling yet. Love this little heater. It has a thermostat and only comes on when it reaches the selected temp range.

The other cool thing is the thermometer is on my workbench all the way across the shop from the heater.


This is where I have it set for 67*. I had to strip to my short sleeves.

20161209_180256 by bjohnson388, on Flickr

Proof I was in short sleeves.

20161209_191447 by bjohnson388, on Flickr

Started some surgery on my outfeed table. Shortening it by 5" and reconfiguring the bottom so I can add some drawers to it.

Pulled the top off.

20161209_183608 by bjohnson388, on Flickr

Cut all the runners down. Had to redrill the holes on the cut side. I built this table back in 2008 I believe. You can definitely see the difference in the quality of wood that was available at home centers back then. Can't hafdly find anything this solid at Lowe's anymore.

20161209_191512 by bjohnson388, on Flickr
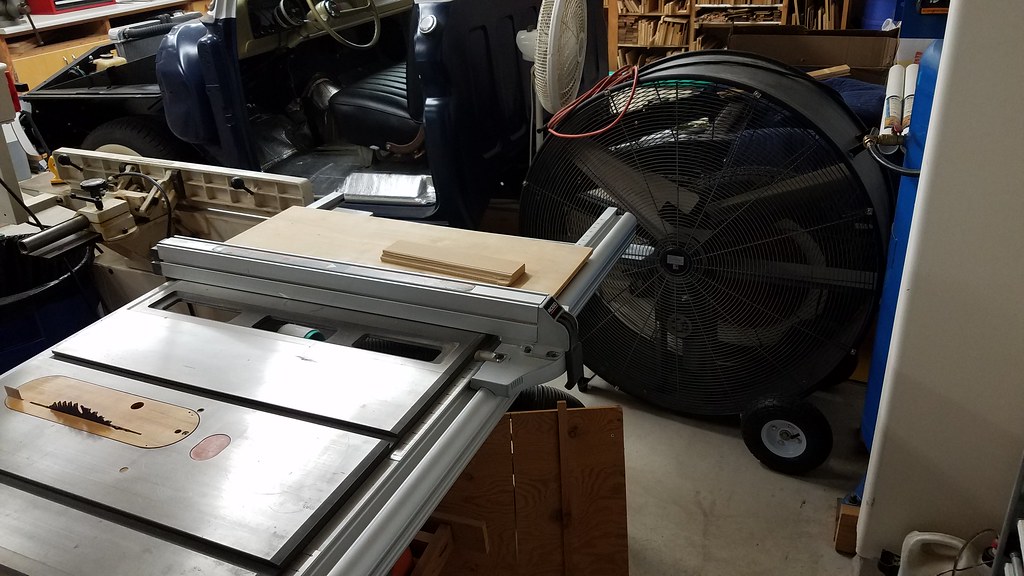
This the extra "hip room" I made. 24" across from the tablesaw rails to the wall here now instead of the 18 it was.

20161209_192014 by bjohnson388, on Flickr


Bret
 

Terranova

Well-known member
Joined
May 12, 2008
Messages
854
Location
Grove City, OH
Bret!
I'm excited! I've started the process of inheiriting / bringing all my dads tools up from their house. My better half has giving me the go ahead to use the third bay similar to your set up as long as we leave room to park her car inside when it gets cold (basically now)
I'm gonna be pouring over this thread for inspiration.
Can you point me toward this air purifier mentioned earlier (post # I guess?)
My nephew has been bitten by the woodwork bug and has been helping me and we just built a purifier/clamp rack using a squirrel cage fan oddly enough, and I'd like to see what you did!
Thanks!!!
T
I'll put a pic of mine up here soon as I can get it loaded
 
To avoid these ads, REGISTER NOW!
Top Bottom