To avoid these ads, REGISTER NOW!

Black & Decker Workmate

wolfcj

Well-known member
Joined
Apr 24, 2017
Messages
599
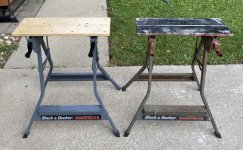
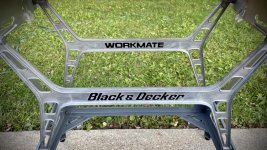
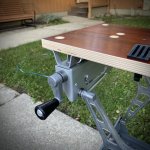
Has anyone ever come across a 79-001 workmate with a black
bottom frame? They show it in the TV ad.

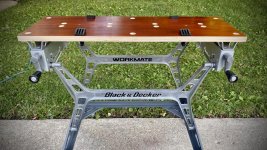
Only on ones that have been repainted. In the video, I think we see an effect of the photography/lighting/post-processing. If you look carefully at other items that they show, I think very few mid-tones (like Workmate gray) show up anywhere. The contrast may have been boosted somewhere along the line, possibly even in the VCR that was used to record this from the broadcast. If we could see the original film of this recording, it might look quite different.

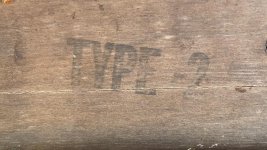
If you look at the four catalog excerpts for the Type 2 on my Documents page, I think you'll see that those photos show a much darker base than you would expect (although not as dark as depicted in the 1976 TV ad). Again, I think it's a photographic/printing artifact, not really a different color paint.

If someone owns a 79-001 with factory-original black paint, it would be among the rarest of rare Workmates, and fascinating to see.
 
Last edited:
To avoid these ads, REGISTER NOW!

Jonathankamm

Well-known member
Joined
Sep 28, 2020
Messages
67
Location
Northern Illinois
I was wondering if anyone would come up with one of those. I've seen that just a very few times, and I don't know what it means.

You sent me a photo of yours a couple of months ago, which I just looked at again. It's from the rear so I can't see some of the characteristics, but I can tell it's a middle-production Type 2, from about spring 1976 to the end of the year. So, the fact that the number stamp is different can't be attributed to it being either an early Type 2 or a late one.

To me, the intriguing possibility for these rare odd numbers is that they were made in a different factory. So far everything we know has indicated that there was one Brockville, Ontario factory and all of the North American 79-001's were made there. However, we also know that demand for the Workmate was through the roof at the time of the Type 2, and that they imported the Irish-made Type 3 to help fill orders. I wonder if they also had some Type 2's made elsewhere, using a different factory coding system.

As an aside, can you tell me whether it has 3 or 4 ribs on the step, and whether the plastic vise-handle knobs have a metal or plastic center core?


4 rib step. Aluminum center on the handles.
 

wolfcj

Well-known member
Joined
Apr 24, 2017
Messages
599
That narrows it down to approximately spring through early summer 1976, right in the middle of the two-year production of the Type 2. Certainly not obvious why it would have a different coding system, but those characteristics match exactly one other Workmate I've seen with the alternate stamp.

You might want to check the center of the handle again; I could be wrong, but I think they're steel, not aluminum. I've cleaned rust off of some of them!
 

Jonathankamm

Well-known member
Joined
Sep 28, 2020
Messages
67
Location
Northern Illinois
That narrows it down to approximately spring through early summer 1976, right in the middle of the two-year production of the Type 2. Certainly not obvious why it would have a different coding system, but those characteristics match exactly one other Workmate I've seen with the alternate stamp.

You might want to check the center of the handle again; I could be wrong, but I think they're steel, not aluminum. I've cleaned rust off of some of them!

Aluminum. Not attracted to magnet.
 

Attachments

  • CB58FD33-1323-459C-ADF0-A435C11F916E.jpg
    CB58FD33-1323-459C-ADF0-A435C11F916E.jpg
    92.6 KB · Views: 57

wolfcj

Well-known member
Joined
Apr 24, 2017
Messages
599
Thanks. I now realize I was thinking about the metal cores on the Type E and Type 3, which are the steel ones that rust!
 

Jonathankamm

Well-known member
Joined
Sep 28, 2020
Messages
67
Location
Northern Illinois
I’m staining tops today. This is the closest I could find to the original color. I made a sample piece.
 

Attachments

  • 4833BFB3-3EF2-4249-95FB-E1E0C5BE0864.jpg
    4833BFB3-3EF2-4249-95FB-E1E0C5BE0864.jpg
    152.1 KB · Views: 82
  • F6C423C8-D17D-4D4F-B8A5-853232AE4789.jpg
    F6C423C8-D17D-4D4F-B8A5-853232AE4789.jpg
    100 KB · Views: 80
  • 90B4BC6D-CC0A-4789-B1B4-9318C84029A2.jpg
    90B4BC6D-CC0A-4789-B1B4-9318C84029A2.jpg
    112.9 KB · Views: 78

Jonathankamm

Well-known member
Joined
Sep 28, 2020
Messages
67
Location
Northern Illinois
I ordered a replacement piece for my B&D workmate 425 because one of the leg clips broke.

The piece that broke on mine must be the piece that breaks on everyone's because it was the first thing to show in Google when I googled "workmate 425 parts".
It's the plastic part that holds the leg extended out and/or folded in.
A good one looks like this.
View media item 68005
Without it, the leg just kinda flops around wounded and makes set up and takedown a general PITA.

Here's a pic of the pieces involved

The new piece, what's left of the old, the leg and axle/pin the leg rotates on.

View media item 68010


Because the amount of damage to the old piece, I was able to disassemble the parts with broken part still pressed on the axle. This led to an error in thinking and I took the new part and pressed it onto the axle thinking I'd be able to get everything put back together with it preassembled like that.

View media item 68008
NOT THE CASE.
About 30 seconds of fumbling around (not pictured here) I got my thinking strait and pulled the piece off the axle.

The piece indexes to the frame with a pin in a hole.

View media item 68009
So I put it in place

View media item 68006

Placed the leg in the correct alighnement so the frame tabs capture the leg tabs.
View media item 68004
And used my hard rubber mallet to drive the axle through everything.
View media item 68007
Since the replacement pieces were so inexpensive ($5 each) I bought four, thinking that I'll probably eventually break the other ones due to use, age and plastic growing old and ridgid. Now I just have to put them away somewhere I'll be able to find them next time!


A cheap way of getting those is simply buy a cheap WM 200 or something. Any workmate that uses those will be the same part. I buy cheap or free workmates all the time just for the parts. 🙂👍🏼
 

Jonathankamm

Well-known member
Joined
Sep 28, 2020
Messages
67
Location
Northern Illinois
I love the 79-001’s but my favorite workmate for usability is the 79-002 Type 1. Same heavy gauge steel and handles as the 001’s but only single height. It makes it easy to just pop open and use. Wide stance. Very sturdy. If you can find one cheap you’ll get a lot of use out of it.
 

Attachments

  • 76A7FCC8-4352-451C-9DC3-7238919DC2D3.jpg
    76A7FCC8-4352-451C-9DC3-7238919DC2D3.jpg
    140.8 KB · Views: 97
  • 151FC9BC-9191-43A4-B458-F2965905C415.jpg
    151FC9BC-9191-43A4-B458-F2965905C415.jpg
    123.8 KB · Views: 75
Last edited:

Jonathankamm

Well-known member
Joined
Sep 28, 2020
Messages
67
Location
Northern Illinois
One issue with restoring is cleaning up the aluminum. I’ve tried wire brushes. Wet/dry sand paper. Painting. But the technique that works the best and is actually the easiest is a powder by Brillo called Cameo. Made specifically for cleaning and polishing aluminum. Sprinkle it on, add a little water and scub with a stiff bristled plastic brush. Does a great job on the oxidation. Makes it look fresh clean and new.
 

Attachments

  • D48CD9FA-84F2-46A6-BF87-39218F1207F6.jpg
    D48CD9FA-84F2-46A6-BF87-39218F1207F6.jpg
    64.8 KB · Views: 93
  • 82FBB225-DD6C-4EBB-A6CD-4B84999987D7.jpg
    82FBB225-DD6C-4EBB-A6CD-4B84999987D7.jpg
    154.9 KB · Views: 108
  • 507B393C-2A8F-4D90-80E1-95CDA571C13E.jpg
    507B393C-2A8F-4D90-80E1-95CDA571C13E.jpg
    159.5 KB · Views: 108

Isaiah6113

Well-known member
Joined
Oct 4, 2013
Messages
158
Location
Oshawa, ON
One issue with restoring is cleaning up the aluminum. I’ve tried wire brushes. Wet/dry sand paper. Painting. But the technique that works the best and is actually the easiest is a powder by Brillo called Cameo. Made specifically for cleaning and polishing aluminum. Sprinkle it on, add a little water and scub with a stiff bristled plastic brush. Does a great job on the oxidation. Makes it look fresh clean and new.


Wow! Great tip! Thanks for that, your clean-up looks fantastic.

Matthew A.


Sent from my iPad using Tapatalk
 

DaveT

Well-known member
Joined
Feb 14, 2019
Messages
238
Location
St. Louis area
One issue with restoring is cleaning up the aluminum. I’ve tried wire brushes. Wet/dry sand paper. Painting. But the technique that works the best and is actually the easiest is a powder by Brillo called Cameo. Made specifically for cleaning and polishing aluminum. Sprinkle it on, add a little water and scub with a stiff bristled plastic brush. Does a great job on the oxidation. Makes it look fresh clean and new.

Jonathankamm: Thanks for sharing this. Looks amazing. Did it strip the black lettering off? What process are you using to paint them black?
 

Jonathankamm

Well-known member
Joined
Sep 28, 2020
Messages
67
Location
Northern Illinois
Jonathankamm: Thanks for sharing this. Looks amazing. Did it strip the black lettering off? What process are you using to paint them black?


Yes. The aluminum cleanser removed the black paint.
I’m searching for the right paint right now. But you can use a foam brush. Wipe off excess paint. Lightly brush across top of letters. Let dry. Do a couple coats til desired finish.
 

wolfcj

Well-known member
Joined
Apr 24, 2017
Messages
599
I now have a full writeup at my web site on the date codes used on the Workmate 79-001. You can read it at:
https://h-frame.weebly.com/blog/a-breakthrough-on-production-dates
It even includes a link to my working list of 79-001's with dates, that you can download and study at your leisure. Among other things, it shows how the components of the 79-001 changed over time.

I have also used the new info to update my Workmate 79-001 History/Timeline page to be much more accurate than was previously possible.

Again, I'll ask for help in my documentation effort -- If you have a 79-001 with the 5-digit code, please don't keep it to yourself. Contribute the info to be added to the list, preferably with a good photo. Thanks!
 

Jonathankamm

Well-known member
Joined
Sep 28, 2020
Messages
67
Location
Northern Illinois
I now have a full writeup at my web site on the date codes used on the Workmate 79-001. You can read it at:
https://h-frame.weebly.com/blog/a-breakthrough-on-production-dates
It even includes a link to my working list of 79-001's with dates, that you can download and study at your leisure. Among other things, it shows how the components of the 79-001 changed over time.

I have also used the new info to update my Workmate 79-001 History/Timeline page to be much more accurate than was previously possible.

Again, I'll ask for help in my documentation effort -- If you have a 79-001 with the 5-digit code, please don't keep it to yourself. Contribute the info to be added to the list, preferably with a good photo. Thanks!

Did I miss what the last 2 numbers are for?
 

Jonathankamm

Well-known member
Joined
Sep 28, 2020
Messages
67
Location
Northern Illinois
I now have a matching pair. Found a mate to my 79-002 (Type 1) today.
I’ll fix it up so they look identical.
 

Attachments

  • 13B44987-D000-42B3-BBA0-5FC346F3A14F.jpg
    13B44987-D000-42B3-BBA0-5FC346F3A14F.jpg
    133.2 KB · Views: 52
  • 91385E78-9B82-4FFE-9142-60681639C46E.jpg
    91385E78-9B82-4FFE-9142-60681639C46E.jpg
    150.9 KB · Views: 51
  • EA5D2499-C754-43EE-95ED-D95668F0F47A.jpg
    EA5D2499-C754-43EE-95ED-D95668F0F47A.jpg
    153.4 KB · Views: 68

Ralf11

Well-known member
Joined
Feb 29, 2016
Messages
2,275
Are the older Workmates better than the 21st century ones?

- I may have missed this in the last 80 pages so please forgive me if I did...
 
To avoid these ads, REGISTER NOW!

Jonathankamm

Well-known member
Joined
Sep 28, 2020
Messages
67
Location
Northern Illinois
Are the older Workmates better than the 21st century ones?

- I may have missed this in the last 80 pages so please forgive me if I did...

By far. The earliest ones were almost all metal. Much heavier gauge metal as well. They started making them lighter. Thinner metals and plastic parts became more common. The earliest ones from the mid seventies are still holding strong today. I love fixin up them into new condition. Haven’t found one yet that was unsavable. The one I’m working on now I got for free. It was going to be thrown out but I’ve got it looking like new. Should be done soon. Here’s some before pics.
 

Attachments

  • 1272B8E0-BC3A-4A4C-B9DB-AC20F727A738.jpg
    1272B8E0-BC3A-4A4C-B9DB-AC20F727A738.jpg
    155.8 KB · Views: 111
  • 181D0420-7BEB-4A7F-ACA9-727DF8E62B8A.jpg
    181D0420-7BEB-4A7F-ACA9-727DF8E62B8A.jpg
    141 KB · Views: 119
  • 846F681F-E3FC-4478-8CA4-FDF427D0E3CF.jpg
    846F681F-E3FC-4478-8CA4-FDF427D0E3CF.jpg
    152.5 KB · Views: 113

Bryan Burns

Well-known member
Joined
Apr 3, 2010
Messages
1,238
Location
Grayslake, Illinois
Looks good. I assume the pieces are loose-fitted. That would make it much easier to remove and then put them back if you want to, compared to a piece of plywood.

Any chance you could tell me the 5-digit number printed under the jaws?

Correct about the loose-fitted "floor boards". It took all of one minute to pop them into place too.

My unit seems to lack a 5-digit code, just has the type stamp.
 

Attachments

  • type 4.jpg
    type 4.jpg
    91.1 KB · Views: 76

Jonathankamm

Well-known member
Joined
Sep 28, 2020
Messages
67
Location
Northern Illinois
Jonathankamm

What method did you use to clean the rust up from the second photo to the third? I have a used WM I bought and the rear cross race is rusted like that.

Thx

For rust removal start with wire brush to remove any big loose pieces. Than I’m a big fan of Krud Kutter products. I use their rust removing gel. Then two coats of etching primer and two coats of dark gray gloss.
 

Attachments

  • 5A804C9C-3792-4284-98CC-615B195D62D0.jpg
    5A804C9C-3792-4284-98CC-615B195D62D0.jpg
    96.3 KB · Views: 56

Jonathankamm

Well-known member
Joined
Sep 28, 2020
Messages
67
Location
Northern Illinois
Painting the lettering on the “H” frame has been a problem. Aluminum is hard to paint. I tried an enamel paint pen and that paint cracked over time. I could sand and prime but that’s way too much work for these letters. Most of the time the simplest solution is the best. What I ended up using is a professional grade sharpie. Covers well. Looks good and will be easy to touch up if needed.
 

Attachments

  • 3FCF8571-3146-4AC2-9F40-668445E2B771.jpg
    3FCF8571-3146-4AC2-9F40-668445E2B771.jpg
    160.2 KB · Views: 67
  • 57F46551-1918-4A38-81D2-7426EA77CF9B.jpg
    57F46551-1918-4A38-81D2-7426EA77CF9B.jpg
    159.6 KB · Views: 57
  • 45775566-633B-4923-AD54-06AEDDE33ECB.jpg
    45775566-633B-4923-AD54-06AEDDE33ECB.jpg
    149.7 KB · Views: 57
  • EC6B4C8A-8C2D-4316-B147-0ABEFD87EC50.jpg
    EC6B4C8A-8C2D-4316-B147-0ABEFD87EC50.jpg
    109.1 KB · Views: 82

Jonathankamm

Well-known member
Joined
Sep 28, 2020
Messages
67
Location
Northern Illinois
Here’s my latest Workmate restore. I got this one for free. It was going to be thrown out. More pics tomorrow in the sun. Late here. Going to bed. 🙂
 

Attachments

  • E3712854-5418-4DD5-8C1E-267268967C05.jpg
    E3712854-5418-4DD5-8C1E-267268967C05.jpg
    155.1 KB · Views: 131

Jeff Ivers

Well-known member
Joined
Apr 9, 2010
Messages
2,550
Location
Oklahoma
Here’s my latest Workmate restore. I got this one for free. It was going to be thrown out. More pics tomorrow in the sun. Late here. Going to bed. 🙂

That looks great! I have only seen (in person) one Workmate with the cast bits in the last 20 years - in use by someone doing some work in an antique store. I am jealous of those who are able to acquire them - particularly for free.
 

Jonathankamm

Well-known member
Joined
Sep 28, 2020
Messages
67
Location
Northern Illinois
That looks great! I have only seen (in person) one Workmate with the cast bits in the last 20 years - in use by someone doing some work in an antique store. I am jealous of those who are able to acquire them - particularly for free.

I get the majority of mine on Facebook Marketplace. Check your area. I’m in Illinois. They seem to be regional. I wish I lived in Michigan. There are probably a dozen right now on the marketplace there. But I also watch eBay, Craigslist, garage and estate sales. I’m picking one up today actually. That will make 6 aluminum models this summer. Plus 6 other more recent ones. But I’m focusing just on the vintage aluminum models now. The hunt is fun. I have yet to find a really good condition one. But they can all be refurbished to new condition. They almost all need new tops. Good luck with your search.
 

wolfcj

Well-known member
Joined
Apr 24, 2017
Messages
599
But they can all be refurbished to new condition.

Not all of them. I have three Type E's right now, two of which have cracked castings. They have been repaired so that they operate, but no one would call them new condition. On one of them the steel screws that go into aluminum components are corroded so badly that I can't even disassemble it to use for parts. Any suggestion for how to non-destructively remove the screws for the H-frames when they won't budge? I've tried many applications of Liquid Wrench and other products to loosen the screws. I even tried an impact wrench, hitting it as hard as I dared. The feet are also totally locked up so I can't unscrew them for re-use. I even submerged the entire end of the leg including the foot in Evaporust for quite a while with no improvement. On that one, the rear leg assembly is broken into two pieces and reconnected with a metal plate held with screws at both ends!

Are you just keeping all of these Workmates, do you sell them after refurbishing, or ...?
 

Jonathankamm

Well-known member
Joined
Sep 28, 2020
Messages
67
Location
Northern Illinois
Not all of them. I have three Type E's right now, two of which have cracked castings. They have been repaired so that they operate, but no one would call them new condition. On one of them the steel screws that go into aluminum components are corroded so badly that I can't even disassemble it to use for parts. Any suggestion for how to non-destructively remove the screws for the H-frames when they won't budge? I've tried many applications of Liquid Wrench and other products to loosen the screws. I even tried an impact wrench, hitting it as hard as I dared. The feet are also totally locked up so I can't unscrew them for re-use. I even submerged the entire end of the leg including the foot in Evaporust for quite a while with no improvement. On that one, the rear leg assembly is broken into two pieces and reconnected with a metal plate held with screws at both ends!

Are you just keeping all of these Workmates, do you sell them after refurbishing, or ...?

I have no experience with the E models. But this current Type 2 I did there was one H frame screw and one foot that were corroded solid. I ended up breaking off the bolt. Drilling and retapping a new hole. I haven’t had any cracked frames yet to deal with. If I couldn’t fix it I’d scrap it for parts.
 

Attachments

  • C29AC444-3A21-4D4A-907E-BC0C991DE3D9.jpg
    C29AC444-3A21-4D4A-907E-BC0C991DE3D9.jpg
    149.1 KB · Views: 62

wolfcj

Well-known member
Joined
Apr 24, 2017
Messages
599
Breaking doesn't work for me for the Type E feet and the H-frames-- They are the original parts I want to save!

So what are you doing with all these after they are refurbished?
 

Jonathankamm

Well-known member
Joined
Sep 28, 2020
Messages
67
Location
Northern Illinois
Breaking doesn't work for me for the Type E feet and the H-frames-- They are the original parts I want to save!

So what are you doing with all these after they are refurbished?

I’ll keep what I want and sell the rest. Here’s the (Type 2) I picked up today. Pics and numbers for your research. Did you get my emails with the others?
 

Attachments

  • 7E5E836E-18E9-4319-ADFA-52C20020C2A2.jpg
    7E5E836E-18E9-4319-ADFA-52C20020C2A2.jpg
    143.8 KB · Views: 69
  • 8D9C7227-AF7B-4AD8-A6A8-46D2797E0ADA.jpg
    8D9C7227-AF7B-4AD8-A6A8-46D2797E0ADA.jpg
    146 KB · Views: 64
  • 1BD7AA4A-3B89-4B47-A49A-80CF18A87F30.jpg
    1BD7AA4A-3B89-4B47-A49A-80CF18A87F30.jpg
    153.4 KB · Views: 60
  • ADD98F2C-E11F-41CA-8A43-3262D22A84D4.jpg
    ADD98F2C-E11F-41CA-8A43-3262D22A84D4.jpg
    155.9 KB · Views: 54
  • 81C50A6A-5737-4F44-B700-D473C3FDBD89.jpg
    81C50A6A-5737-4F44-B700-D473C3FDBD89.jpg
    160.4 KB · Views: 61

Jonathankamm

Well-known member
Joined
Sep 28, 2020
Messages
67
Location
Northern Illinois
My latest restore. This one was destined for the garbage. I got it for free and took my time carefully restoring it to like new condition. Missing and broken parts replaced. New top with traditional cherry stain. Should be good for another 40 years. See above post for before pic.
 

Attachments

  • D318F240-978C-4A6A-B29A-91C8637DABD7.jpg
    D318F240-978C-4A6A-B29A-91C8637DABD7.jpg
    153.7 KB · Views: 73
  • DCFE11EC-B0F6-4097-B8CF-599E1071E316.jpg
    DCFE11EC-B0F6-4097-B8CF-599E1071E316.jpg
    163.2 KB · Views: 72
  • 6382F055-C698-4CA7-8EB9-F3C51FDAD6C9.jpg
    6382F055-C698-4CA7-8EB9-F3C51FDAD6C9.jpg
    101.7 KB · Views: 80
  • AD2F4BFB-3442-4693-9A4C-6244876F50D8.jpg
    AD2F4BFB-3442-4693-9A4C-6244876F50D8.jpg
    124.4 KB · Views: 77
  • B257DC31-DD79-48F9-B669-4E45E0EF4E53.jpg
    B257DC31-DD79-48F9-B669-4E45E0EF4E53.jpg
    159.3 KB · Views: 72
  • 4C7E812E-2D0E-4F71-9DA8-A7A5E48E0904.jpg
    4C7E812E-2D0E-4F71-9DA8-A7A5E48E0904.jpg
    149.6 KB · Views: 75
  • 282AAE03-4D78-432B-86B9-FD5947175961.jpg
    282AAE03-4D78-432B-86B9-FD5947175961.jpg
    147.1 KB · Views: 81

fartymarty

Well-known member
Joined
Nov 9, 2012
Messages
1,348
Location
Fort Worth
My latest restore. This one was destined for the garbage. I got it for free and took my time carefully restoring it to like new condition. Missing and broken parts replaced. New top with traditional cherry stain. Should be good for another 40 years. See above post for before pic.

Nice work!
It's going to be difficult to use it now that it's so dang purtty.
 

Jonathankamm

Well-known member
Joined
Sep 28, 2020
Messages
67
Location
Northern Illinois
Laquer thinner works well on the early black plastic handles.
 

Attachments

  • 3DF04CEE-54DB-4D29-AF39-E10D315FB7F1.jpg
    3DF04CEE-54DB-4D29-AF39-E10D315FB7F1.jpg
    138.5 KB · Views: 55
  • C24C3D0B-E2EC-4F01-B771-39323497F6D3.jpg
    C24C3D0B-E2EC-4F01-B771-39323497F6D3.jpg
    150.7 KB · Views: 68
  • 694A9DEA-97FD-48DD-A7B2-74BFB927A454.jpg
    694A9DEA-97FD-48DD-A7B2-74BFB927A454.jpg
    101.8 KB · Views: 56
  • 36C2339B-C9D6-4A32-B633-F02B4D993FD9.jpg
    36C2339B-C9D6-4A32-B633-F02B4D993FD9.jpg
    133.2 KB · Views: 61

david3921

Well-known member
Joined
Apr 22, 2014
Messages
427
Location
Wyoming, Michigan
My latest restore. This one was destined for the garbage. I got it for free and took my time carefully restoring it to like new condition. Missing and broken parts replaced. New top with traditional cherry stain. Should be good for another 40 years. See above post for before pic.
Beautiful. Question; do you get the new tops from B&D? If so, do they come stamped with the correct i.d. on the underside?
 

Jonathankamm

Well-known member
Joined
Sep 28, 2020
Messages
67
Location
Northern Illinois
Beautiful. Question; do you get the new tops from B&D? If so, do they come stamped with the correct i.d. on the underside?

I make the tops myself. I’ll continue the tradition of marking TYPE and manufacture date on the under side.
 

Attachments

  • 4001BA07-8CB9-4CE3-B187-3387FF6F153A.jpg
    4001BA07-8CB9-4CE3-B187-3387FF6F153A.jpg
    148 KB · Views: 63
  • 12CF313E-05D8-46C7-8BDF-725FC091C8EF.jpg
    12CF313E-05D8-46C7-8BDF-725FC091C8EF.jpg
    154.7 KB · Views: 62
  • 36C7003F-0E5D-495E-AA16-03631EDFB5E3.jpg
    36C7003F-0E5D-495E-AA16-03631EDFB5E3.jpg
    147 KB · Views: 63

wolfcj

Well-known member
Joined
Apr 24, 2017
Messages
599
I hope with something added to the marking to make it clear that it is not an original top with original factory marking. We don't want to confuse future owners.
 
To avoid these ads, REGISTER NOW!
Top Bottom