To avoid these ads, REGISTER NOW!

Black & Decker Workmate

To avoid these ads, REGISTER NOW!

RTM

Well-known member
Joined
May 13, 2019
Messages
13,061
Location
SF Bay Area
Here's an...unusual...Workmate on craigslist. It's either really cool or an abomination. I haven't decided yet which way I lean.
The one nice thing, you might be able to sit at it to work. With the low crossbar, you can’t do that with a WM. Not sure if the top cross piece they added is too low to interfere.
 

Outlawmws

Well-known member
Joined
Aug 9, 2011
Messages
39,091
Location
The Badlands
The one nice thing, you might be able to sit at it to work. With the low crossbar, you can’t do that with a WM. Not sure if the top cross piece they added is too low to interfere.
I don't think it is but if it is, it's an easy fix. the cabinets usually had a front trim piece or tray about there.

And actually, let's think this through a bit. What if you had more than one tool you wanted to drive with the treadle? I can think of several that were adapted to a treadle:

jigsaw/scroll saw
small lathe - wood or metal
table saw
wet grinder

And, of course, sewing machines.

Maybe we are not seeing the whole picture?
 
Last edited:

Aileron

Well-known member
Joined
Apr 15, 2019
Messages
455
Location
outside
I bought a 425 ( think thats the number)back in 99. Think I used it twice. I set my bench top router table on it but its kinda heavy to haul around. Honestly it didnt work very good for what a wanted it to when i first bought it so maybe that why i just leave it sit.
 

Outlawmws

Well-known member
Joined
Aug 9, 2011
Messages
39,091
Location
The Badlands
The 400's and up are just a bit too heavy for more than occasional use, I used my 200's at least 10X more often. the 400 sat under my old bench DP for several years before being freed up by a floor stand conversion. This is part of why I converted to the early aluminum series
 

wolfcj

Well-known member
Joined
Apr 24, 2017
Messages
599
The one nice thing, you might be able to sit at it to work.
One doesn't sit at a Workmate; one sits on it. At least that was the original plan, as illustrated by this drawing from Hickman's own manual for his original single-height Workmate and this photo from Black & Decker's manual for their original UK model WM325 (North American 79-001 Type E). Needless to say, Black & Decker North America never depicted or endorsed this technique!
Mate Tools Workmate manual excerpt sitting.jpg
wm325 excerpt sitting.jpg
 

RTM

Well-known member
Joined
May 13, 2019
Messages
13,061
Location
SF Bay Area
Ad actually let's think this through a bit. What if to had more than one tool you wanted to drive with the treadle? I can think of several that were adapted to a treadle:

jigsaw/scroll saw
small lathe - wood or metal
table saw
wet grinder

And, of course, sewing machines.

Maybe we are not seeing the whole picture?
Had not thought of that option. Good point.
 

wolfcj

Well-known member
Joined
Apr 24, 2017
Messages
599
I posted the eleventh video on my H-frame channel on YouTube last month, a follow-up to my earlier one about the Workmate 79-001 Type 3 and Type 5. In it you will see what is, to my nerdy tool-collecting mind, a remarkable sight—three ultra-rare 79-001 Type 5's together in one place. I also explain how after five years I finally narrowed down the production dates of the Type 3 and Type 5. There are some scattered problems with the audio, but they were minor enough not to be worth doing it over.


fishwatcher

Well-known member
Joined
Jan 26, 2023
Messages
751
How sturdy is a Workmate 300 series? I believe the spec says it has a 300 lbs capacity.

This is an old picture, but if I were to keep around 100 lbs on it regularly, do you see that weakening the Workmate, destined for failure? I got a 50 lbs Craftsman 506-51840 that needs a spot to sit on.


IMG_8619.jpeg
IMG_3024.jpeg
It’d be that, a Capri 6” and a small Craftsman that might sit on the Workmate top. I’m not exactly going for function.. more display and storage of these vises in a small space.

Thanks!
IMG_8618.jpeg
 

Attachments

  • text.txt
    6 bytes · Views: 2

fishwatcher

Well-known member
Joined
Jan 26, 2023
Messages
751
Agreed - but that's a waste of a Workmate. By the way, how does that Capri stack up?
It is.. but I don’t often need that space to work on.. and it’s easy for me to move the vises off of it when needed.

The Capri is great. I haven’t done anything heavy with it.. but it holds up a 2x4 bottom
of a larger top sometimes and feels like it’s strong enough for whatever I need.

With the new to me Craftsman.. the 6” Capri feels light by comparison. 47 lbs with swivel base vs 50 lbs without a base on the 4.5” Craftsman. The action on the Craftsman is smooth, but stiffer.. so maybe that’s why it feels much heavier to operate.

You can see how much more mass the Craftsman has compared to the larger jawed Capri. IMG_3034.jpegIMG_3035.jpeg
 

RTM

Well-known member
Joined
May 13, 2019
Messages
13,061
Location
SF Bay Area
How sturdy is a Workmate 300 series? I believe the spec says it has a 300 lbs capacity.

This is an old picture, but if I were to keep around 100 lbs on it regularly, do you see that weakening the Workmate, destined for failure?
I would worry about the top, depending on its material. If it’s a plywood top, much less worry. If it’s the composite particle board stuff, I’d worry more. The frame itself, I’d only worry if you drag the vises on and off, vs lifting them on, putting the frame into an attempted rhomboid shape.

Keeping the weight above the mounting points of the boards would reduce the strain on them.
 

wolfcj

Well-known member
Joined
Apr 24, 2017
Messages
599
Do we have any Australians following this thread? I recently completed a new section on my website documenting three Workmates from the 1970's that were unique to the Pacific markets, probably manufactured in Japan. It was pretty difficult tracking down this info, and I must admit it isn't as complete or as authoritative as the rest of my site. If anyone here has more information on the Workmate J6910, J6904, or J6900, I'd love to hear from you.
Black & Decker Workmates for Australia and Japan--J6910, J6904, and J6900
 

mr palomar

New member
Joined
Mar 25, 2025
Messages
1
Hi everyone, I recently purchased a Type-2 Workmate. Unfortunately, one of the alloy crank arms broke during shipping. I was wondering if anyone might have a spare they would be interesting in selling? This Workmate is in mint condition and I would really like to repair it with an original part. Many thanks!
 

Attachments

  • IMG_0648.JPG
    IMG_0648.JPG
    670.8 KB · Views: 76

Jeff Ivers

Well-known member
Joined
Apr 9, 2010
Messages
2,550
Location
Oklahoma
Hi everyone, I recently purchased a Type-2 Workmate. Unfortunately, one of the alloy crank arms broke during shipping. I was wondering if anyone might have a spare they would be interesting in selling? This Workmate is in mint condition and I would really like to repair it with an original part. Many thanks!
In the mean time, I would try JB Weld on that.
 

wolfcj

Well-known member
Joined
Apr 24, 2017
Messages
599
Hi everyone, I recently purchased a Type-2 Workmate. Unfortunately, one of the alloy crank arms broke during shipping. I was wondering if anyone might have a spare they would be interesting in selling? This Workmate is in mint condition and I would really like to repair it with an original part. Many thanks!
I didn't think about reattaching the broken part when you asked me about this in your email, but I think that suggestion might work. How well do the parts fit together?

If I were to try it, I would be extra careful when using that handle later, trying to grip it by the unbroken center as much as possible, with little force out at the extremity. I just tried this technique for opening and closing the jaws and it seems as though it could be done, but it might limit how tightly you could close them.
 

RTM

Well-known member
Joined
May 13, 2019
Messages
13,061
Location
SF Bay Area
In the mean time, I would try JB Weld on that.
If you try this, don't clamp it down to zero, that will squeeze out all the epoxy, and give you a weak joint. Had a failure on a similar effort. Hope an expert will weigh in on best methods for gluing this.
 
To avoid these ads, REGISTER NOW!

Provincial

Well-known member
Joined
Sep 21, 2011
Messages
6,855
Location
Near Salem, OR
If you epoxy it together at the break, wait for that to set, then rough up the outside surface of the arm and hub. Then take a strip (I would use 1/16" aluminum) of sheet metal, rough up one side, and with the rough size next to the arm, epoxy it in place.

This transfers most of the stress into pulling on the strip instead of bending the arm and trying to break it off the hub.
 

captain14

Well-known member
Joined
Dec 19, 2012
Messages
7,013
Location
Near College Park Maryland 20740
If you epoxy it together at the break, wait for that to set, then rough up the outside surface of the arm and hub. Then take a strip (I would use 1/16" aluminum) of sheet metal, rough up one side, and with the rough size next to the arm, epoxy it in place.

This transfers most of the stress into pulling on the strip instead of bending the arm and trying to break it off the hub.
I was going to suggest something similar to support and encircle the broken piece.

Just to give you an idea. Pic 2 maybe 2 of those screwed together. The lugs can give you a makeshift handle to turn?
 

Attachments

  • IMG_2079.png
    IMG_2079.png
    637 KB · Views: 41
  • IMG_2080.png
    IMG_2080.png
    463.5 KB · Views: 22
Last edited:

Outlawmws

Well-known member
Joined
Aug 9, 2011
Messages
39,091
Location
The Badlands
This is a tough one to repair with any strength.

I'd take this in 2 steps:

1: Drill oversize for adding 4 pins - see red X's:
  • the 2 closest to the outside to align with the meat on the handle part -Drill the handl part to roughly align with these holes
  • the other 2 at an angle so the pins crisscross in the cavity
  • add the jB weld to the holes on both pieces and lightly coat the broken faces
  • Add the pins
  • Lightly clamp together and let it sit for a full 24 hours
2: Fill the cavity with JB on day 2 - Allow to dry 48 hours minimum.


The "splints" Prov and Cap14 suggested could be added to this as well.

Depending on the thickness on the cap of the "hub" for proves you might want to pin it 2x in the hub and another 2X into the arm.

But quite honestly I'm not confident of any of these holding up on such a high stressed part


1743032278332.png
1;
 

zanyad

ALLIANCE MEMBER
Joined
Apr 26, 2018
Messages
2,755
Location
NE Ohio
I have several Workmates.

First one, a Workmate 125 with bamboo jaws, received as a gift some years ago:
17439706837396359393567903766738.jpg

Second one, 79-001 Type 6 with laminated (MDF core?) jaws, purchased a year or two ago at an estate sale, for $30 (marked "Type 6", date code 92132):
20250406_154702.jpg
20250406_154903.jpg20250406_154855.jpg20250406_154836.jpg20250406_154718.jpg

Third one, 79-001 Type 8 with single-layer plywood jaws, purchased today at an estate sale, for $17.50 (no visible markings found so far):
20250406_155322.jpg
20250406_155403.jpg
20250406_155407.jpg
 

Attachments

  • 20250406_154735.jpg
    20250406_154735.jpg
    655.4 KB · Views: 60

dante2

Well-known member
Joined
Dec 27, 2011
Messages
478
Location
Central OK
I have a couple of 125's and I broke a handle and stripped one of the pivot nuts. Not a great day. The handle I can fix but the pivot nut is the problem. Is there are mod or upgrade to get around the plastic nut? I pulled parts from one to so I have at least one that is functional. Thank you for your help in advance.
 

wolfcj

Well-known member
Joined
Apr 24, 2017
Messages
599
I have a couple of 125's and I broke a handle and stripped one of the pivot nuts. Not a great day. The handle I can fix but the pivot nut is the problem. Is there are mod or upgrade to get around the plastic nut? I pulled parts from one to so I have at least one that is functional. Thank you for your help in advance.
It looks as though replacement pivot nuts are available for the WM125 Type 1, and it's possible that they stayed the same for all Types in the 20+-year run. Are yours marked with a Type number anywhere?
 

dante2

Well-known member
Joined
Dec 27, 2011
Messages
478
Location
Central OK
Just the wm125. Is the thread pitch 1/2-10? Could you get away with adding a nut behind the pivot nut since the the pivot nut is stripped anyway?
 

wolfcj

Well-known member
Joined
Apr 24, 2017
Messages
599
Just the wm125. Is the thread pitch 1/2-10? Could you get away with adding a nut behind the pivot nut since the the pivot nut is stripped anyway?
I've never owned a WM125, so I can't help with details. It's probably a double-start screw, like the earlier Workmates. How would you secure an added nut—glue it to the end of the pivot nut?
 

dante2

Well-known member
Joined
Dec 27, 2011
Messages
478
Location
Central OK
Pivot nut will run about $12 each. I found a 1/2-10 nut for $2 and 4 shipped is under $20. I will look at it some more today about securing it to the pivot nut or the bottom of the vise jaw.
 

wolfcj

Well-known member
Joined
Apr 24, 2017
Messages
599
What caused the pivot nut to break. if you don't mind the question? It might help other owners to know what to avoid.
 

RTM

Well-known member
Joined
May 13, 2019
Messages
13,061
Location
SF Bay Area
@zanyad Here is what your clamp should look like. A clever person will turn the slider right side up, but it stores clamped in the jaws better upside down.

PXL_20250513_040409278-X2.jpg
 

wolfcj

Well-known member
Joined
Apr 24, 2017
Messages
599
@zanyad What you have is a 79-020 tilt top 16" Workmate. A couple of notes about it:

The label shows that yours is an early version of the Type 1. A little later, Black & Decker introduced the slightly cheaper 79-023, without the tilt top. They called the 79-023 the "Standard" version and changed the name of the 79-020 to "Tilt Top" to differentiate the two, so the label on the later 79-020 Type 1 changed to the new name.

The metal jaw covers were intended to be removed for most use. The manual explained it as: "Included Metal Vise Jaw Covers can be used
to protect the vise jaws when gripping objects with shapes or edges that could damage the jaws."
For the Type 3 version of the 79-020, the plastic jaws and the metal jaw covers were dropped, replaced with a single layer of 15/32" plywood (see photo).

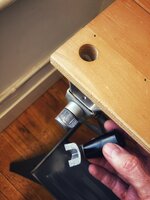
It's common for the bench clamps to be missing, but I don't understand why. Once you install the clamps, there's no reason to ever remove them because they simply retract out of the way into the base (see photo).
 

Attachments

  • DSC03859.JPG
    DSC03859.JPG
    1 MB · Views: 26
  • DSC03860.JPG
    DSC03860.JPG
    395.8 KB · Views: 35

wolfcj

Well-known member
Joined
Apr 24, 2017
Messages
599
Thanks, @RTM and @wolfcj!

I haven't been able to find any replacements for the bench clamps. Has anybody seen them?
I think I saw a used pair on eBay once; that's probably the only hope. Note that the clamps for the Type 1 and Type 3 are different and aren't interchangeable. I'm pretty sure you could find some standard woodworking clamps that would have the right dimensions to do the job.
 

RTM

Well-known member
Joined
May 13, 2019
Messages
13,061
Location
SF Bay Area
I'm pretty sure you could find some standard woodworking clamps that would have the right dimensions to do the job.
Think ping pong table net clamps. They would need to be reversed from what was shown above.

Maybe the Cincinnati Tool Jr clamps would fit.
 

mikegt4

Well-known member
Joined
Sep 12, 2005
Messages
3,262
Location
sw ohio
Thanks, @RTM and @wolfcj!

I haven't been able to find any replacements for the bench clamps. Has anybody seen them?

Last year I picked up a cheap Chinese Workmate knock-off that was sitting at the curb on trash day. There was nothing wrong with it except one of the plastic crank handles was broken off. I ordered a Workmate replacement hardware kit from Buckeye Tool and used a handle to fix the China knock-off (did have to make a bushing so it would fit). All the bench clamps in the kit fit both the knock-off and my Workmate perfectly.

 
To avoid these ads, REGISTER NOW!
Top Bottom