
You are using an out of date browser. It may not display this or other websites correctly.
You should upgrade or use an alternative browser.
You should upgrade or use an alternative browser.
Above 1200 Sq/FT Blackbyrds Basement
- Thread starter Blackbyrd
- Start date
Wokspaces above 1200 squarefeet.
Man the amount of time it takes to clean up novice spot welds hahahhaha. I'm still finding pinholes, plus unfortunately for me I'm also a perfectionist which is terrible if you are doing custom work. I bought my primer and while I planned to get it all ready for this week, thst goal was too lofty for my abilities. I spent way to much time welding and cleaning up said welds that after the second day I just didn't have it in me. Instead I scraped seam sealer out of the floor corners.
Learned a lot about what works for me though, all good practice before I move onto more visable repairs...
Also I got frustrated and clamped my fender skin on the car... it's a better shelf than the body panel rack that I kept having to shuffle to work around.
Plus my son donated a parts bin holder he used for legos. I wanted to do a wall control setup above the back table, but I think this will work out better. Plus I have a plan to build a nice fab table that will incorporate some more storage which was really what I wanted. Ill get some pics of the bin storage. Its not gonna be remotely full, but as I take the Camaro apart it will do me great to catalog the parts and put them in the bins for when its time to go back together! Something I did on a small scale for the firebird during the motor build. I have a decent memory, but putting things together after a few years have past can be challenging for anyone. Help your self with good notes and pictures.
So in short Im miles shy of the goal I set for myself of all the sheet metal work done and the car in primer before the end of the year. I've still got 5 that I know of patches to do, and a 6th im not sure how bad it is yet. Im confident at this point Ill have the floor primed and the quarter skin at least started before years end. Ill get some time over the Christmas holiday to work on it as well. Also I think im about due for more gas for the welder. Tanks at 500psi so by the time I get the floor done it will likely be time to change it out if not before.
Attachments


Last edited:
OutlawDrifter
Well-known member
There's a reason they call it paint and body work jail...always takes longer than you expect!
Keep pushing forward, you'll get it all knocked out")
Keep pushing forward, you'll get it all knocked out
68400BIRD
Well-known member
I also learned the hard way. Grinding makes you a better welder!
I spent 18 months doing all the metal work on the 64'. It seems like it took longer during that period but that was only working on it 2 days a week. I put floors, inner and outer rockers, kick panels, and a patch in the upper roof. And that time was just spent on the frame and the cab. It took another 3 years to get the doors, hood, front fenders, and bed panels done. And I am still not done with the bed. I started in Dec of 2013.Man the amount of time it takes to clean up novice spot welds hahahhaha. I'm still finding pinholes, plus unfortunately for me I'm also a perfectionist which is terrible if you are doing custom work. I bought my primer and while I planned to get it all ready for this week, thst goal was too lofty for my abilities. I spent way to much time welding and cleaning up said welds that after the second day I just didn't have it in me. Instead I scraped seam sealer out of the floor corners.
Learned a lot about what works for me though, all good practice before I move onto more visable repairs...
Also I got frustrated and clamped my fender skin on the car... it's a better shelf than the body panel rack that I kept having to shuffle to work around.
Plus my son donated a parts bin holder he used for legos. I wanted to do a wall control setup above the back table, but I think this will work out better. Plus I have a plan to build a nice fab table that will incorporate some more storage which was really what I wanted. Ill get some pics of the bin storage. Its not gonna be remotely full, but as I take the Camaro apart it will do me great to catalog the parts and put them in the bins for when its time to go back together! Something I did on a small scale for the firebird during the motor build. I have a decent memory, but putting things together after a few years have past can be challenging for anyone. Help your self with good notes and pictures.
So in short Im miles shy of the goal I set for myself of all the sheet metal work done and the car in primer before the end of the year. I've still got 5 that I know of patches to do, and a 6th im not sure how bad it is yet. Im confident at this point Ill have the floor primed and the quarter skin at least started before years end. Ill get some time over the Christmas holiday to work on it as well. Also I think im about due for more gas for the welder. Tanks at 500psi so by the time I get the floor done it will likely be time to change it out if not before.
If you had told me then I would be restoring it 10+ years I would have say what? But life, work, and family come first. Plus doing it in that time period helps soften all the money stuff cost. Especially nowadays. I can't believe how much machine work is going to cost on a 50 yr old SBC.I think I bought this car in 2010?? So I'm not doing much better haha. It's definitely a "LONG TERM" project
Bret
@bj383ss oh man you aint kidding!!!! I had bought a lot of the chassis works stuff prior to 2015. I still have quite a bit to get the front stuff complete like coilovers, swaybars, steering rack, and misc hardware unique to their frame, but prices have gone way up.
Wish I'd been able to put time into it when I bought it, but didn't have the extra funds.... now I have funds to chip away at it just not the free time hahaha. Kids and family change the hobby timenfor sure.
And thanks @xtii know it will come along just not as fast as I'd like it haha. I'm ready for the bolt on phase.
Re organized the back table.... I'm finally happy with this... I think? Plus I put together the brace for my 4 link.... I think after the floor and quarter get started I'm gonna focus on the rear suspension get it done and the 9 inch installed.
Bolt bins are lnt full at the moment, but as i take things apart like fenders and front end I'll bag and tag all the hardware and it will get stored there. I need to do some electrical though. For whatever reason, the builders and previous residents put the conduit and recepticals inbthe cinder block but didn't wire the back half ofnthe garage? In fact the whole back half of the garage only has 3 plugs??
Anyway maybe a winter project... it's not entirely necessary since most of the tools i use are battery, and I have a long drop cord next to the tool box.... but it would be nice for some things.
I need to sell off the window glass from the 71 camaro to free upnsome storage. But it's a nice little work nook behind the camaro for the nastier heavy work that's come along with this restoration.
Attachments


Been cracking away on my time off. I don't go back till the 2nd next year so I'm pushing to get some big things accomplished.
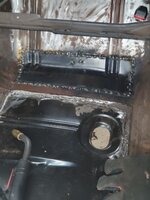
Floor patch has been ground down and the pinholes welded. Needs one more pass and assuming no more pinholes, sanding the rest of the floor and primer!
Stripped the rest of the front end and put up what I'm not using for sale. I'm gonna get the core support powdercoater to match the frame, and all the parts on the table (bumper brackets headlamp brackets) are already dropped off.
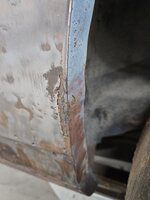
Driver fender had some rust holes at the bottom and I got a patch for it, but now that it's removed there's an inner structure that's rotted away..... can't seem to find one of those. Maybe a lost cause.
Floor patch has been ground down and the pinholes welded. Needs one more pass and assuming no more pinholes, sanding the rest of the floor and primer!
Stripped the rest of the front end and put up what I'm not using for sale. I'm gonna get the core support powdercoater to match the frame, and all the parts on the table (bumper brackets headlamp brackets) are already dropped off.
Driver fender had some rust holes at the bottom and I got a patch for it, but now that it's removed there's an inner structure that's rotted away..... can't seem to find one of those. Maybe a lost cause.
Attachments


Last edited:
Hope everyone had a great Christmas!
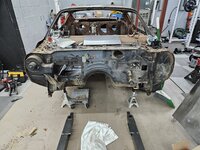
As I wind down getting ready to go back to work after the New Years I've reflected. I over estimated my time commitment for the 2nd gen with trying to get all the sheet metal done and everything primed by years end. It's good to have goals but this one proved a bit lofty. In the end..... I've stripped all the useless items for the project now save a few odds and ends that aren't really a big deal. Floor patches and roof swap are complete which I should be proud of..... though this leaves 6 other areas of patchwork. That said I've really enjoyed the process, there's something quite rewarding about reducing it to bare metal. It's clean, a blank slate!
I plan to prime the floor tomorrow, then I can start to work on the quarter skin.... that's the last big patch, after that it's stuff I can make instead of buy.
I managed to sell the frame and get a commitment to take the rear axle as well so pretty soon i can get the 4 link in, i cut the holes for it in preparation. So I'm eager to strip the under side so I can put my new frame on!
So full floor stripped, and front end completely stripped. Time to clean up and move to the next task!
Attachments


And all that hard work (atleast 12-15hrs) was worth seeing the floor done!
Moved the girls out while I was at it to make sure no overspray landed on them. Had to snap a pic of them lined up.
Didn't get to the quarter like I'd hoped, but progress is progress.
Moved the girls out while I was at it to make sure no overspray landed on them. Had to snap a pic of them lined up.
Didn't get to the quarter like I'd hoped, but progress is progress.
Attachments


jbrentd
Well-known member
Nice job on the floors...I bet you're glad to have that done! I too did not get as much done in the shop as I had hoped during my time off from work.
Beautiful house, too!
Beautiful house, too!
Nothing car related just garage update.
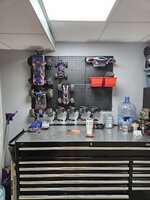
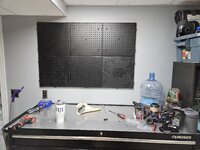
Summer last year, my son got into RC cars and it's created an overflow problem on the wife's side of the garage. They break frequently and I've been using it as a area to work on them. I'm pretty sure this hobby is almost as expensive as building cars....
Anyway 4 cars were eating up surface area onna 66inch work top so I got some pegboard from lowes and cleared some space. Think I'm gonna get 2 more panels to finish it out.
Attachments

So ive been thinking about my open air toilet again.... from time to time i google ideas. And id been thinking about making some cabinets and mire workspace to hide the toilet and give me more storage. This popped up in google search....
Last edited:
OutlawDrifter
Well-known member
"Hideaway *******"
I'd like 10% of the proceeds when you TM your idea!
I'd like 10% of the proceeds when you TM your idea!
gearhead1960
ALLIANCE MEMBER
You mean like this.....I know damn well this is gonna lead to me making one of thise HF toolbox work benches... I'm just gonna have to play with ideas
 @gearhead1960 was already looking at costs and measuring to see what I can fit......
knowing how my stupid brain works Ill have this done before the quarter skin is even cut off....
Would love a 42 inch, but not sure I can make it work. We will see.Now you just gotta wait for that 20% off HF coupon to get started on your workbench build! What kind of ceiling height you got in the basement down there?
About 9 ft to floor joists. Utilities and hvac make it lower in some areas.
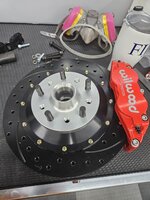
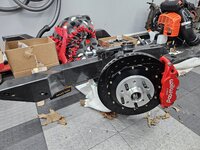
Got these bad boys in....... man I want to put my subframe on!!!
Attachments
So...... I'm a tropical people and this sky dandruff is for the birds!!!! We got 6 inches and counting, these pics were from this morning and it's snowed all day...... and is still snowing. The kid and the dogs (siberian huskies) enjoyed it and I even got on the sled.
After that I decided to spend some time in the shop. Driver quarter and trunk lid stripped. Found a few patches I need to do on the driver side but pretty small. Passenger side started, but ran out of power. I've been using the Bauer 4"drum surface conditioner, I taped my shopvac hose to it, catches like 90% of the debris. Since it's the m18 vac I cycled all my batteries. Regret not splurging for the m18 with the optional 110 plug. Oh well.
Ordered some new door hinges So i can correct the body line before I cut the quarter skin on the passenger side. Previous repair destroyed the body line from door to wheel well and the hinges are so worn the door sags even when closed. So this will correct it, this is why the passenger front fender is still on to help with the line. So soon as I correct the door hinge on that side, Fender will be gone and I can move to the firewall and front half. Feels like i'm moving fast now. I went to assemble my subframe completely and ran into a hickup. The lower joints were fully coated so the layer on the inside interfered with my bushings, they were so tight I couldnt get the pin in place and once I tapped it in a bit it cracked and the outer edge came off. Looks like I will have to remove them and remove the powder coating completely and get another set of bushings.
I'm snowed in the for the majority of the week it seems. Remote work..... may lead to sanding.....
Attachments
-
 20240114_161103.jpg1.2 MB · Views: 44
 -
 20240114_135207.jpg1 MB · Views: 42
 -
 20240115_154153.jpg737.6 KB · Views: 40
 -
 20240115_154127.jpg673.2 KB · Views: 37
 -
 20240115_152408.jpg1.1 MB · Views: 40
 -
 20240115_072132.jpg469.1 KB · Views: 41
 -
 20240115_072118.jpg1.1 MB · Views: 40
 -
 20240115_072222.jpg1.3 MB · Views: 51
Last edited:
I cant believe the amount of snow we got! Over 8 inches at the house and still comin down. Had a hell of a time getting out of the driveway and to the hospital. Sounds like a week of grinding sanding and not working is in your future.
Wait are you serious?!?!?Harbor freight now with door dash! Get the tools you need brought to you!
Swanny1953
ALLIANCE MEMBER
Just found this thread and "wasted" a couple of hours this morning reading it all!! Congrats on the 1LE - they are great cars, I have a buddy who has one. He just barely beat me out in a standing 1/4 mile with my '16 CTS-V.
I'm impressed with your "gumption" to attack the t-top swap! I'm subscribed to follow the progress from here on out.
I'm impressed with your "gumption" to attack the t-top swap! I'm subscribed to follow the progress from here on out.
Just found this thread and "wasted" a couple of hours this morning reading it all!! Congrats on the 1LE - they are great cars, I have a buddy who has one. He just barely beat me out in a standing 1/4 mile with my '16 CTS-V.
I'm impressed with your "gumption" to attack the t-top swap! I'm subscribed to follow the progress from here on out.
Hey! thanks for stopping by, I love the ZL1 its been a fantastic ride so far and I dont see that changing, though at somepoint it may get retired from daily use.
Thanks for following along on the build and my incoherent ramblings.
Finally got my hinges in but have been pretty unmotivated. So I've worked on little things.
Finally bit the bullet and realized I couldn't keep the fender on and play with the hinges so.... the last fender is off. Confirming what I believed that the car was wrecked to some degree and work was done all down the passenger side. Not In a bad way, the passenger fender still had the gm OE part sticker on it. So the repair was done to the best of its time. The other repair is a door skin replacement.
Anywho onto the real story here, trying to man handle a 80lbs door.....
So I took the hinges off 1 at a time and installed the new ones which are place holders for now. This helped keep some of the original alignment but since the bushings were shot anyway it was kind of a wash.
Bought a spring tool, and took out the door spring and began to wrestle what was essentially a steel body pillow. I suffer from I'll brawn things into place syndrome and sometimes I forget that I'm a literal problem solver as my day job. More on that later....
Got into a really good place, but thought I could tweak one more thing....... buggered the whole alignment from there hahaha.
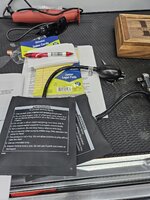
With brawns exhausted I was left with brains..... for reasons I don't understand an event with a locksmith and my wife's car from many years ago popped into my head. AIR WEDGES!!!!! Picked these guys up at harbor freight and put them under the door one at each end. This allowed me some pretty precise control over leveling the door and adjusting gaps. Also allowed the brawns to manipulate the door much easier with it resting on the bags. I could get it into place and it would stay. I know, should have had help with this, but organizing that is rough with my schedule plus this helps me appreciate the project.
Small victories the door opens and closes effortlessly where prior you literally had to lift it off the striker...
Normally I wouldn't have wasted the time on this at this stage cause the door still has to come off again. Reason this was important is the body line on the quarter skin between the door and wheel hoop is non existent due to the previous repair. Door had to be right to line the new skin up. So after I take this in and make sure it's right, onto the quarter skin!
Finally bit the bullet and realized I couldn't keep the fender on and play with the hinges so.... the last fender is off. Confirming what I believed that the car was wrecked to some degree and work was done all down the passenger side. Not In a bad way, the passenger fender still had the gm OE part sticker on it. So the repair was done to the best of its time. The other repair is a door skin replacement.
Anywho onto the real story here, trying to man handle a 80lbs door.....
So I took the hinges off 1 at a time and installed the new ones which are place holders for now. This helped keep some of the original alignment but since the bushings were shot anyway it was kind of a wash.
Bought a spring tool, and took out the door spring and began to wrestle what was essentially a steel body pillow. I suffer from I'll brawn things into place syndrome and sometimes I forget that I'm a literal problem solver as my day job. More on that later....
Got into a really good place, but thought I could tweak one more thing....... buggered the whole alignment from there hahaha.
With brawns exhausted I was left with brains..... for reasons I don't understand an event with a locksmith and my wife's car from many years ago popped into my head. AIR WEDGES!!!!! Picked these guys up at harbor freight and put them under the door one at each end. This allowed me some pretty precise control over leveling the door and adjusting gaps. Also allowed the brawns to manipulate the door much easier with it resting on the bags. I could get it into place and it would stay. I know, should have had help with this, but organizing that is rough with my schedule plus this helps me appreciate the project.
Small victories the door opens and closes effortlessly where prior you literally had to lift it off the striker...
Normally I wouldn't have wasted the time on this at this stage cause the door still has to come off again. Reason this was important is the body line on the quarter skin between the door and wheel hoop is non existent due to the previous repair. Door had to be right to line the new skin up. So after I take this in and make sure it's right, onto the quarter skin!
Attachments


Last edited:
OutlawDrifter
Well-known member
Nice work on the door alignment, sometimes we have to run the wrong way for a bit to catch the turnoff for the "right way"
Yeah there's the hard way than theirs my way...... which is worse. WAY WORSE hahahaNice work on the door alignment, sometimes we have to run the wrong way for a bit to catch the turnoff for the "right way"
jbrentd
Well-known member
Good thing you had those wedges on hand. Nice work...the alignment looks perfect.
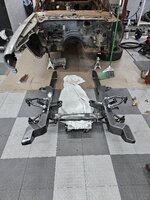
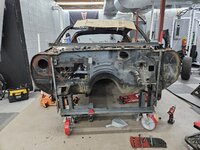
Been plugging along lately, I built a support for front to get it off jackstands. Has some large casters as well so it's mobile.
Also brought my 9" home from storage. More work required than I remember. I didn't think I had the leaf spring mounts. I also thought I had discs.... so I'll have to swap backing plates as well.
Also brought my 9" home from storage. More work required than I remember. I didn't think I had the leaf spring mounts. I also thought I had discs.... so I'll have to swap backing plates as well.
Attachments
Need some help from my fellow gear heads on this one.
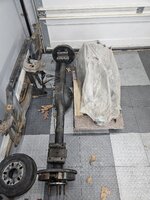
Is this a 9 inch or an 8 inch??
For the record I've had this for well over a decade and it came with the car even though it had its stock rear under it. I have no desire to argue with the guy I bought the car from. He is adamant it's a 9 inch that was pulled from a prostreet car andnthe chunk was swapped to a narrowed housing. It has 35 spline axles installed which lines up with the story, but the axle housing looks like an 8 inch to me.
I (assuming it was a 9 inch) went to mount the jig to hold my 4 link upper arms and realized i couldn't the them spaced an equal distance from the endplates no matter what offset I used on the jig. The instructions say it can be used on a 8 inch by clamping it to the face.
So are the bolt patters for an 8inch center the same as a 9 inch?

