To avoid these ads, REGISTER NOW!

Above 1200 Sq/FT Blackbyrds Basement

Wokspaces above 1200 squarefeet.
OP
B

Blackbyrd

Well-known member
Joined
Nov 28, 2020
Messages
1,147
Location
TN
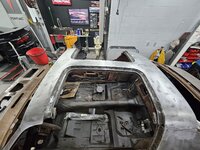
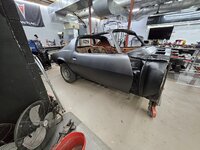
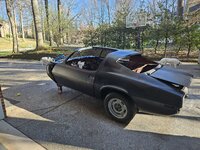
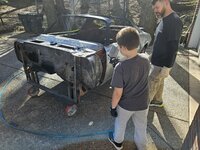
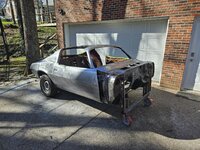
Data dump inbound.... I've been busy just havnt updated in a while. Works been crazy and I got sick for a few days.

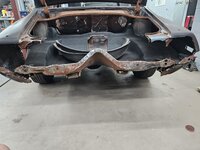
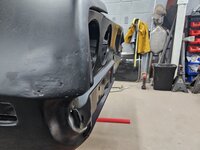
Got a little frustrated with the camaro, just been doing the same thing for a while and needed a creative break. I focused on the byrd and the abs delete.

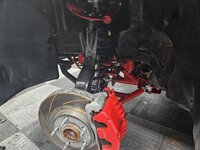
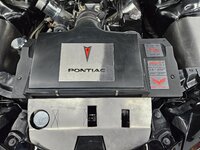
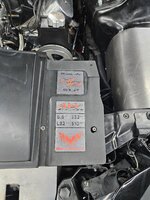
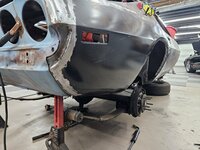
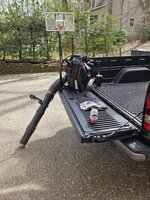
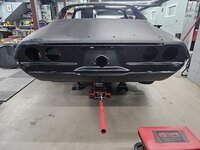
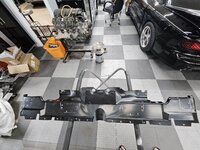
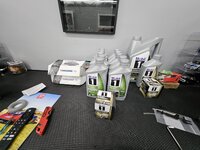
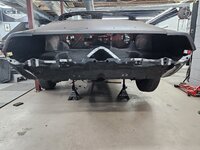
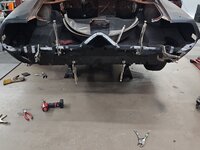
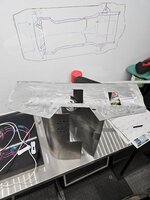
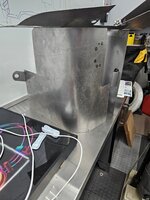
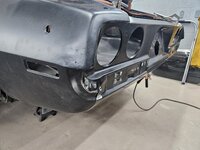
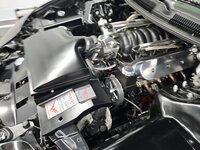
The engine bay portion is done, front calipers were refreshed and lines completed. Rear calipers are refreshed but still need to install the lines. Decided finish up the last closeout panel with the abs module out of the way. Cleaned up some wiring and re routed plug wires (again). I'll straighten the edges figure out the mounting, then get them powdercoated. Had some new engine plaques made to go on the airbox, it needs a refresh as well. Anyone have any recommendations for satin black paint that's good for composites?
 

Attachments

  • 20250129_234359.jpg
    20250129_234359.jpg
    1.2 MB · Views: 186
  • 20250205_214852.jpg
    20250205_214852.jpg
    1.2 MB · Views: 87
  • 20250202_154204.jpg
    20250202_154204.jpg
    869.6 KB · Views: 56
  • 20250206_112925.jpg
    20250206_112925.jpg
    1.1 MB · Views: 50
  • 20250206_112802.jpg
    20250206_112802.jpg
    1.1 MB · Views: 44
  • 20250214_215519.jpg
    20250214_215519.jpg
    874 KB · Views: 43
To avoid these ads, REGISTER NOW!
OP
B

Blackbyrd

Well-known member
Joined
Nov 28, 2020
Messages
1,147
Location
TN
With a clear head i got back into the quarter, finished up all the original stitch welds. All thats left is the wheel well and the little patch i had to restart..... arg!

Still feels good to get this closer to wrapped up.
 

Attachments

  • 20250215_155902.jpg
    20250215_155902.jpg
    844 KB · Views: 33
  • 20250215_155852.jpg
    20250215_155852.jpg
    809.9 KB · Views: 41
OP
B

Blackbyrd

Well-known member
Joined
Nov 28, 2020
Messages
1,147
Location
TN
I've been quiet, but making progress. Didn't seem worth posting a pic cause they looked just like so many other pics in this thread.

I've compiled a list of about 20 things, some I can do some require other steps to be started. But today I knocked 5 things off that list and started a 6th.

I finally committed to zero trim all the tabs were ground off today, all the exterior patches are done save for what I find under the t top trim. That's not the important part....

Whats left is some rust prep for some pitted areas, and stripping the rockers and door jams. Pulling a dent or 2 and a lot of things are gonna be in primer!
 

Attachments

  • 20250308_155506.jpg
    20250308_155506.jpg
    892.4 KB · Views: 33
  • 20250308_155556.jpg
    20250308_155556.jpg
    932.2 KB · Views: 31
  • 20250308_155607.jpg
    20250308_155607.jpg
    936.2 KB · Views: 31
  • 20250302_211713.jpg
    20250302_211713.jpg
    654.1 KB · Views: 41
OP
B

Blackbyrd

Well-known member
Joined
Nov 28, 2020
Messages
1,147
Location
TN
Plan changed a bit, shooting to prime the outside next week. Leaving door jams and trunk tray for another time.

Knocked out a lot of the list, pulled dents, stripped rockers and welded up some trim holes and the passenger wheel well where the qtr skin was done.

Still need to strip the driver rocker and dash pad and get the windshields grooves cleaned out and I'll be ready to prime.

I was pleasantly surprised to find way less issues in the t-top trays than expected. Actually 2 small areas on the passenger side (which has been were all of the problems on this car have been hahaha)

I bought a handheld media blaster as well. I'll use it to treat these areas and try and save as much as I can.
 

Attachments

  • 20250314_153142.jpg
    20250314_153142.jpg
    909.7 KB · Views: 31
  • 20250314_125947.jpg
    20250314_125947.jpg
    1 MB · Views: 30
  • 9c0789f9-8ca9-441e-8fa8-30a1098b4b0a.jpg
    9c0789f9-8ca9-441e-8fa8-30a1098b4b0a.jpg
    844.2 KB · Views: 58
Last edited:
OP
B

Blackbyrd

Well-known member
Joined
Nov 28, 2020
Messages
1,147
Location
TN
So yesterday was a big day!

I busted my **** all week to knock out all the little things left on the list. Welding trim holes, cleaning up the t top install, stripping a few other panels, and a little sand blasting. I had it setup to have my buddy that's an experienced body guy and painter to get it in epoxy primer, and I was still working on stuff Saturday morning and took Friday off and worked the whole day.

I started welding up the bracing to cut the roof off in august of 22..... it saw the sun for the first time in 3 years and came back all dressed in black. Now she matches the rest of them haha.

Even had help from my son and one of his buddies. Brock bailed so fast I couldnt get a Pic haha. The other would have painted the whole car if I let him.
 

Attachments

  • 20250322_173214.jpg
    20250322_173214.jpg
    979.1 KB · Views: 46
  • 20250322_173147.jpg
    20250322_173147.jpg
    865.2 KB · Views: 46
  • 20250322_173131.jpg
    20250322_173131.jpg
    897.7 KB · Views: 47
  • 20250322_173117.jpg
    20250322_173117.jpg
    933.6 KB · Views: 49
  • 20250322_164413.jpg
    20250322_164413.jpg
    1.7 MB · Views: 50
  • 20250322_155547.jpg
    20250322_155547.jpg
    1.3 MB · Views: 52
  • 20250322_155107.jpg
    20250322_155107.jpg
    1.4 MB · Views: 52
  • 20250322_125926.jpg
    20250322_125926.jpg
    1.5 MB · Views: 67
OP
B

Blackbyrd

Well-known member
Joined
Nov 28, 2020
Messages
1,147
Location
TN
Weird how that seems to happen about this time every year!

Inwas getting ready to update the post and i couldn't find mine. Then I saw
the notifications cause you bumped it hahaha.


I did get a chance to finish stripping the trunk pan edge and lip, and also stripped the inside of qtr skin and prep the drop down lips. Not worth taking a pic cause I can't get the angle to see what I did.

So in short mostly prepped and ready to start welding stuff after I drill holes for spot welds.
 

Attachments

  • 20250410_201729.jpg
    20250410_201729.jpg
    674.2 KB · Views: 45
OP
B

Blackbyrd

Well-known member
Joined
Nov 28, 2020
Messages
1,147
Location
TN
I have too much going on...... im trying to put 4 panels that all interact with each other so ultimately I had to fit the tail panel to make sure the others weren't going to interfere with it. This was as good as I could get it solo, but clearly has plenty of room behind it. So now I can do the trunk dropdown, the inner cross brace, and the small panel that joins the qtr and the brace. WhAT a PAIN! The cross brace is prepped, need a debur tool to finish the job. I miss the days of simple patches (remind me i said this when I have to do patches next)

In between all of this i need to change brake pads, and LOF onnthe ZL1, and A LOF on the Byrd.

May seem like I'm complaining, but I'm not I'm just spoiled haha.
 

Attachments

  • 20250424_224015.jpg
    20250424_224015.jpg
    822.9 KB · Views: 44
  • 20250427_154321.jpg
    20250427_154321.jpg
    761.2 KB · Views: 31
  • 20250427_154334.jpg
    20250427_154334.jpg
    703.2 KB · Views: 28
  • 20250427_234617.jpg
    20250427_234617.jpg
    962 KB · Views: 31
  • 20250428_000047.jpg
    20250428_000047.jpg
    827.1 KB · Views: 33

bj383ss

Well-known member
Joined
Sep 29, 2011
Messages
3,166
Location
TX
Nah no complaining you just want to get everything right.

I have diff fluid, trans drain and fill, trans mount, sway bar bushings, manifold gasket, and new trans drain plug for the Camaro all sitting on the bench staring at me. And a new set of rear speakers just arrived as well. :ROFLMAO:

Bret
 
OP
B

Blackbyrd

Well-known member
Joined
Nov 28, 2020
Messages
1,147
Location
TN
Nah no complaining you just want to get everything right.

I have diff fluid, trans drain and fill, trans mount, sway bar bushings, manifold gasket, and new trans drain plug for the Camaro all sitting on the bench staring at me. And a new set of rear speakers just arrived as well. :ROFLMAO:

Bret
Zl1 is ready for a diff service too.... just don't have the parts yet.

Ha @madison069 i definitely need to stay outta trouble!
 
To avoid these ads, REGISTER NOW!
OP
B

Blackbyrd

Well-known member
Joined
Nov 28, 2020
Messages
1,147
Location
TN
Old camaro update-

Trunk dropdown for driver side is welded to trunk, passenger side is welded to the qter, and the joiner panel that bridges the qtr to lower trunks skirt brace is on and finally the trunk brace itself. Loads of spot welds ...........

I left the outer most spot welds cause I need a 2nd set of hands line them up, gotta stretch them into place before you can clamp things down. I canisters to truly fit the tail panel now.

New camaro update-

Longest oil change of my life..... I pulled the drain plug and got out from under it to get the filter ready. I should have stayed under the car because the damn catch pain vapor locked and nearly all of the 10 Qrts drained onto the floor...... I had to partially clean the mess enough so I could get back under the car without laying in it so I could change the filter. Then rolled it out into the driveway so I could finish cleaning. 2 hrs later I finished the task.

Arg!
 

Attachments

  • 20250430_220218.jpg
    20250430_220218.jpg
    1.4 MB · Views: 36
  • 20250504_151628.jpg
    20250504_151628.jpg
    929.1 KB · Views: 29
  • ebe871cb-c2dc-4989-bc3a-4a7edd7d8562.jpg
    ebe871cb-c2dc-4989-bc3a-4a7edd7d8562.jpg
    645.3 KB · Views: 30

Xti04

Well-known member
Joined
Nov 11, 2016
Messages
2,295
Solid top drain pan? I hated those back in the day and overflowed one like that once. I took that pan to Advance recycled the oil and tossed it in their dumpster. Never again.
 
OP
B

Blackbyrd

Well-known member
Joined
Nov 28, 2020
Messages
1,147
Location
TN
Solid top drain pan? I hated those back in the day and overflowed one like that once. I took that pan to Advance recycled the oil and tossed it in their dumpster. Never again.

Yup.... I like them cause the recycling center that handles oil is forever way so i don't worry about it making a mess on the trip.

But after this, I question if there's a better alternative. I popped the breather tab open and unscrewed the center part but didn't remove it entirely...... guess that was my mistake.
 
Last edited:

Xti04

Well-known member
Joined
Nov 11, 2016
Messages
2,295
Yup.... I like them cause the recycling center that handles oil is forever way so i don't worry about it making a mess on the trip.

But after this, I question if there's a better alternative. I pooped the breather tab open and unscrewed the center part but didn't remove it entirely...... guess that was my mistake.
I have the big 3 gallon open top ones and then use old 5 gallon diesel oil buckets to haul my oil off. I am looking for a clear solution and think the 5 gallon fuel jugs that are clear will be my go to moving forward.
 

madison069

Well-known member
Joined
Nov 5, 2010
Messages
4,144
Location
Monroeville, PA
Oh yea, those pans are nice for transporting and even just moving the oil around the shop. I tend to refill the empty 5qt jugs with the used oil to take them to the recycling center. But, if you forget that vent plug and don’t remove the drain plug, you’re screwed…..🤣😂🤣
 
OP
B

Blackbyrd

Well-known member
Joined
Nov 28, 2020
Messages
1,147
Location
TN
Yeah I'm probably gonna look into an alternative hahaha. The amount of curse words used that night....... im glad everyone was asleep.
 

loganb

ALLIANCE MEMBER
Joined
Dec 29, 2011
Messages
5,510
Location
Omaha, NE
But, if you forget that vent plug and don’t remove the drain plug, you’re screwed…..🤣😂🤣

Add me to the list of members who have that pan and have started a drain into a pan with the plug(s) still in place. Last time I at least realized it just before it overflowed onto the floor...I've just gone to dropping a pig mat on the floor under the pan to start now
 
OP
B

Blackbyrd

Well-known member
Joined
Nov 28, 2020
Messages
1,147
Location
TN
Well atleast I'm not alone hahahaha.

I have a feeling I'll be undoing filters first from now on. I'm not taking them somewhere I know that.... I was lazy the year I got my GTO took it to a havoline quick change on top of waiting forever, they started the car and squealed the tires pulling out of the bay. I was polite I paid and said I'd never be back to the attendant. That was over 10 years ago.
 

madison069

Well-known member
Joined
Nov 5, 2010
Messages
4,144
Location
Monroeville, PA
Oh, I’ve done it before. Got in a hurry and forgot the drain plug. As I’m watching the top of the pan fill up I realized what I forgot and started fishing for the plug to pull out. I usually wait to make sure it’s draining now, along with ensure the stream is going to the pain and not being blown away by a fan, done that before….
 

cccoltsicehockey

Well-known member
Joined
Apr 3, 2014
Messages
1,387
Location
Charlotte, NC
Yup.... I like them cause the recycling center that handles oil is forever way so i don't worry about it making a mess on the trip.

But after this, I question if there's a better alternative. I popped the breather tab open and unscrewed the center part but didn't remove it entirely...... guess that was my mistake.

I have the big 3 gallon open top ones and then use old 5 gallon diesel oil buckets to haul my oil off. I am looking for a clear solution and think the 5 gallon fuel jugs that are clear will be my go to moving forward.
I have two of the solid top ones that I use but the caps started leaking over time when transporting to dispose of the old oil. I then would tape them shut but that got annoying. So this is the solution I have selted on which has been working great for a bit over a year now.


I still use the oil pans for changes but I have ripped all covers are the air holes so it can never vapor lock. As soon as I am done with the change it goes into the 5 gal jug.
 

madison069

Well-known member
Joined
Nov 5, 2010
Messages
4,144
Location
Monroeville, PA
My cap on the pan leaked due to the little paper seal was destroyed. I took piece of thin rubber material and cut a circle that fit in the cap perfectly. It now seals up and doesn't leak.

I did burn my oil pan recently. I was draining the oil out of a mower that was just running. I usually tip the mower over and drain the oil out of the oil fill tube instead of sucking the oil out or dealing with the drain plug if it has one. You know how hot that muffler is? hot enough to melt the plastic and form a hole in the top. I was mixing jb-weld that day and had some excess. I just used brake clean to clean the pan surface and started coating the hole with jb-weld. eventually I built up enough of a rim that I was able to close that 1/4" x3/4" hole. Doesn't appear to be leaking to this day.
 
OP
B

Blackbyrd

Well-known member
Joined
Nov 28, 2020
Messages
1,147
Location
TN
Been a few weeks.... life's been beating on me a bit.

So when everything is outta control, I fixate on what I can.

Firebird brakes are still fighting me post abs delete. I did a 2nd bleed session with a friend. Got air out of thr calipers but still have a spongy pedal after start up. I'm starting to think from how I drained the reservoir by disconnecting the lines I may have introduced air into the cylinder? Pedal got better after the 2nd bleed but it's still soft though it did stop the car when slipping clutch out. Considering a bench bleed next.

I also finished my closeout panels for the engine bay, got them all straightened up and cleaned up some i can get them powdercoated.


Now onto the big stuff

Got my tie in panels done, we beat on the tail panel for 4 hours to get everything to line up and succeeded! Primed the inner brace and other items we got to bare metal. Did the final line up and man it came out so good, we ended up using panel bond in the upper corners so that parts gotta cure for a day. The upper trunk corners aren't done yet, there's still some spot welds to finish but its structural done and a car again!
 

Attachments

  • 20250514_155352.jpg
    20250514_155352.jpg
    595.6 KB · Views: 24
  • 20250514_155356.jpg
    20250514_155356.jpg
    814.4 KB · Views: 19
  • 20250517_170857.jpg
    20250517_170857.jpg
    726.6 KB · Views: 19
  • 20250517_170904.jpg
    20250517_170904.jpg
    972.9 KB · Views: 20
  • 20250517_170911.jpg
    20250517_170911.jpg
    827.3 KB · Views: 22
  • 20250517_170918.jpg
    20250517_170918.jpg
    839.7 KB · Views: 33
Last edited:
OP
B

Blackbyrd

Well-known member
Joined
Nov 28, 2020
Messages
1,147
Location
TN
Got to take the zl1 on a little trip to stretch her legs and visit my parents. Unfortunately I have a malfunctioning tpm sensor i tried the relearn but no go. So that's on the back burner

It doesn't look like much, but the tail panel welds are cleaned up and primed, the trunk deck seams are welded in like I wanted (previously they were leaded. Once my buddy gets some free time we will finish shaping the seal groove. What ya don't see is the tail panel and inner brace is fully welded and the driver side trunk drop down is fully welded just need to clean it all up and prime it. Passenger side is 90% the lowest most point is all thats left, but since I did a qtr skin instead of a full replacement theres a groove missing and there's excess material to make the groove on the skin where the drop down meet it. Gonna take some time to make it all fit right and i was gassed after getting under and out from under the car 50 times haha.

In un planned awesome, my wife donated a service cart. She is changing jobs and i bought this for her so now I get it to have it! It's perfect timing cause id been considering getting something to roll around while im working southern less back and forth. Havnt figured out what all I'll put in it yet, but the "service" fluids fit on that bottom shelf very nicely.
 

Attachments

  • 20250525_135736.jpg
    20250525_135736.jpg
    1.5 MB · Views: 24
  • 20250522_144703.jpg
    20250522_144703.jpg
    763 KB · Views: 22
  • 20250526_154009.jpg
    20250526_154009.jpg
    913.6 KB · Views: 20
  • 20250526_154014.jpg
    20250526_154014.jpg
    1.1 MB · Views: 20
  • 20250524_105048.jpg
    20250524_105048.jpg
    1 MB · Views: 23

madison069

Well-known member
Joined
Nov 5, 2010
Messages
4,144
Location
Monroeville, PA
Camaro is looking good! Soon you will be spraying some color!

as for what to keep in the cart, I started keeping tab of all the tools I used for a certain task and been bundling it in a pile. For sure, I would at least keep a full 1/4" socket set and a full set of wrenches in the cart as those would be your most used tools if you are just wanting to keep general tools for auto work.
 
OP
B

Blackbyrd

Well-known member
Joined
Nov 28, 2020
Messages
1,147
Location
TN
Thanks! I've thought about storing some basics in there for sure, like filter wrenches. I've put some of my electronics related stuff in there already.

On the camaro I've debated on where to go next. Im really thinking i want to get the rear suspension setup before getting into the minitub install. Then I could have my rear axle housing powdercoated like I want after the 4 link brackets are on.

I'll probably get everything mechanically fitted and running before I do paint. That way I avoid scratches
 
Last edited:
OP
B

Blackbyrd

Well-known member
Joined
Nov 28, 2020
Messages
1,147
Location
TN
Before.......

20211010_221444.jpg

After.......
20250605_182039.jpg


I've been working on my close out panels and finishing touches in the engine bay for a while now in-between 2nd gen welding sessions. Got them powdercoated last week and installed. Refreshed the airbox with a new coat of satin black (i didn't realize how faded it was!!). Then finally put the engine plaques on the airbox. Show cubes/liters, cylinder heads power ratings at the wheels and of course the namesake "Blackbyrd" from the same guy that did my door badges. I also couldn't resist putting the GM "mark of excellence" on it now that i have it how i want it. I got some black anodized billet plug wire holders and fastened them to the frame leading up to the fender closeouts that hide the coil packs. Letting the paint cure before i stick the airbox lid badge back on.

I debated and still might make them, a set of plates that lay over the frame rails and have the powdercoated to match as opposed to trying to paint everything.

Service cart is in its storage spot, got a mirror to see when the nose of the car when I back in. Wife changed jobs so we cleaned out her office and I got a new water fountain for the basement.

Now 2nd gen progress as of late I've been pretty focused on my firebird.
 

Attachments

  • 20250605_182219.jpg
    20250605_182219.jpg
    878.2 KB · Views: 23
  • 20250605_182304.jpg
    20250605_182304.jpg
    840.2 KB · Views: 24
  • 20250605_182125.jpg
    20250605_182125.jpg
    888.7 KB · Views: 24
  • 20250605_182212.jpg
    20250605_182212.jpg
    1.2 MB · Views: 26
  • 20250605_182028.jpg
    20250605_182028.jpg
    593.2 KB · Views: 30

madison069

Well-known member
Joined
Nov 5, 2010
Messages
4,144
Location
Monroeville, PA
Good idea on the mirror, might have to look into that for my setup!

Firebird is looking good; the closeout panel is a very common mod on the Camaros and firebird it seems.
 
To avoid these ads, REGISTER NOW!
Top Bottom