To avoid these ads, REGISTER NOW!

Blackhawk freewheel

dylanm

New member
Joined
Jan 13, 2023
Messages
4
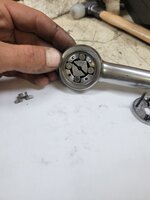
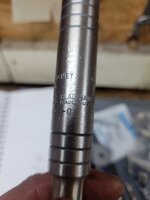
First post here, I recently got a Blackhawk free wheeling ratchet that wouldn't always grab. No amount of cleaning would have fixed it so I used my rotary tool to shave the studs and drive the pins out very carefully. I have barely enough material I could hammer the pins and reuse but will likely make a new set. Three issues I faced were the anvil springs for the conical pins were worn down, deep cleaning and stretching the springs fixed it for now. Issue two was the spring for the direction button. Merely an aesthetic issue but the button was lopsided, stretching the spring end very slightly leveled it and corrected it. Issue three was wear in the ratchet causing slop, took the anvil cage and machined the face a small amount and got things snug but not tight. A quick reassembly and test and it is very good but need the pins set permanently to lock it in and hold things together. I took an approach of do little and keep it as close to original but get it working. I'm second guessing now and wondering if I should go all the way by sanding out scoring and imperfections and either replating it myself or having a shop chrome plate it afterwards. Below are photos any input is appreciated.
1000005318.jpg1000005319.jpg1000005320.jpg1000005321.jpg1000005323.jpg1000005322.jpg
 
To avoid these ads, REGISTER NOW!

Zrxrunner

Well-known member
Joined
Jan 14, 2018
Messages
524
Location
Eastern Iowa
Glad you tried this first! Lol. I have a 49997 1/2 drive thats sruck on tighten. Have you had luck getting it reassembled?
 
OP
D

dylanm

New member
Joined
Jan 13, 2023
Messages
4
I have, but nothing permanent. I had it apart yesterday after work and removed scuffs from the anvil side. Acetone batch after, reassembled and oiled. It comes apart easily once the pins are taken care of. I actually have more material on the pins than I thought and I suspect the pins were stretched initially causing slop and occasional slipping. I think I'll look into getting mine fully restored and replated, it works amazing and is a tool I plan to use and keep. Will keep this updated with the details to go about working on it.
 
To avoid these ads, REGISTER NOW!

thehorse13

Well-known member
Joined
Mar 15, 2015
Messages
3,481
Location
Jefferson County, WV
Welcome.

You're the first person I've seen attempt to fix a Blackhawk free wheel ratchet so bravo to you for taking on this project. The general accepted logic is that they are not serviceable given the unique design.
 
OP
D

dylanm

New member
Joined
Jan 13, 2023
Messages
4
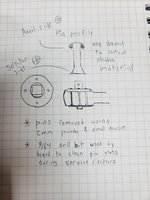
Thought I'd update with more background on disassembly, below is a very crude sketch of how it's designed. Before doing this the ratchet should be soaked in your choice of rust remover to see if that works. The anvil side of the pins are not fully countersunk like the opposite side, this is the side to file down for disassembly. Try to work on the outer diameter of the pin while leaving the center as tall as possible in case the pins need reused. Once you feel you've removed a fair amount of the shoulder you can use a punch and gently tap the pin downward. As you progress the small amount of shoulder material left will begin to fold over if punched and the pin will be able to be driven out. The springs inside are not under high tension so they shouldn't fly out like some ratchets, do keep track of them though. Haven't done a permanent reassembly yet but will update when I do, ratchet is functional when reassembled and could probably be used light duty for testing while fixing it up.
 

Attachments

  • 20250523_210344.jpg
    20250523_210344.jpg
    428.5 KB · Views: 27
OP
D

dylanm

New member
Joined
Jan 13, 2023
Messages
4
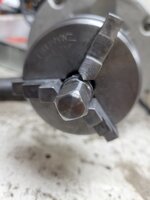
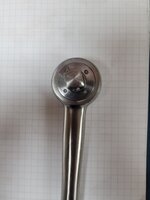
Correction to my last post, the drill bit size that fits the pins is 3/32. Did some cleaning today and got past the chrome on the anvil, anvil cage, and selector side. Scoring and imperfections are starting to clean up. Stamping on the handle is light on the a and c and I'm using a tungsten scribe to dig them out before polishing down and risking the lettering fading. Once things are cleaned up enough I'll call local plating outfits and see about a chrome replate. Anyone know how many passes they did in this era?
 

Attachments

  • 20250526_212304.jpg
    20250526_212304.jpg
    286.8 KB · Views: 13
  • 20250526_221607.jpg
    20250526_221607.jpg
    312.2 KB · Views: 11
  • 20250526_221637.jpg
    20250526_221637.jpg
    382.5 KB · Views: 12
  • 20250526_221722.jpg
    20250526_221722.jpg
    361.1 KB · Views: 12
To avoid these ads, REGISTER NOW!
Top Bottom