To avoid these ads, REGISTER NOW!

Blackhawk round display board

OP
D

don long

Well-known member
Joined
Mar 31, 2012
Messages
8,856
Location
southern california
I started thinking about this project again after redoing this blackhawk display cabinet and thinking about which new project I want to start.
Tonight I pulled out the box of tools and started laying them out to figure out how big the circles need to be.

Blackhawk_roller-2 - Copy (2).jpg

2022-01-27 17.37.33.jpg


Then I opened an excel spreadsheet and started to draw what I think the display might look like from the front and side.
This might be a little challenging

2023-02-01 16.40.23.jpg

It's a start
 
Last edited:
To avoid these ads, REGISTER NOW!
OP
D

don long

Well-known member
Joined
Mar 31, 2012
Messages
8,856
Location
southern california
Awesome project!
OTG
It should go pretty good after I figure it out. What material and how to fasten the tools to the display. The hard part is done I have gathered the tools up for it. Well almost, I'm short a couple of sockets that I may have to borrow from my bomb box lol.
 
OP
D

don long

Well-known member
Joined
Mar 31, 2012
Messages
8,856
Location
southern california
I spent the evening last night pondering as to how to tackle this project and with that on my mind as I retired I mentally worked on the problem all night.
When I got up this morning I couldn't wait to get to the shop and see if the plan that I got while sleeping would work.
I started by taking a piece of veneer that I had left over from the Saloon and started drawing circles on it. With my jig saw I cut a 23" circle out This will be the tool front.

2023-02-02 10.13.24.jpg

Next I picked up a 1/2 sheet of 3/4 plywood and cut a larger circle out of it

2023-02-02 08.33.37.jpg
I beveled the edge of the 3/4 circle. That was a very dusty job so I grabbed my old paint mask and my die grinder with a 36 grit disc and went to town

2023-02-02 12.01.15.jpg

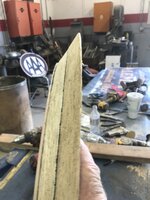
After finishing the 2nd board I decided it was too short of a bevel and the only way to fix that is to cut a 3rd circle a couple inches bigger that the last and bevel that one to match the first one. So the dirty work continued until I was happy with the 2 discs sitting together.
2023-02-02 13.58.12.jpg

With the first disc on the top of the 2 bigger ones it is starting to look like the display. It needs the last piece cut for the back of the display so I picked up more paneling and cut the last circle. It is still in the ruff cut condition while I focus on finishing the center section
I realized that I needed room for the fasteners and tool rods to stick out the rear of the first panel , so I cut the center section out of the second circle.

2023-02-02 14.04.02.jpg

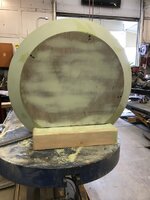
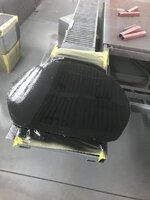
With the center section cut out, I put the 2 larger circles together with screws, then added a coat of bondo to smooth out the wood grain and give that area a slick surface

2023-02-02 14.52.49.jpg
I added the top circle to the project and put a thin coat of bondo on it to smooth it out for the tools to have a smooth background, then added the third ring to get some perspective before cutting the bottom off for the base to fit on and size up just what size the 3rd circle should be.
Then it was time to call it a day

2023-02-02 15.14.30.jpg
 
OP
D

don long

Well-known member
Joined
Mar 31, 2012
Messages
8,856
Location
southern california
It's close, I'd call it good
I agree OTG
So I went after the rest of the structure, now that I have determined the size of this project
I’ve seen people use bondo on wood. I guess it works the same as if on metal?
Yep Shorty
It is wonderful stuff
^^^ Bondo on wood works very well . I use it often for filling wood if it's being painted
You are right Cobbler
I'm coating all the wood on this project because I'm painting it and I want it to look like a trophy when I'm done
I use it to fix door jams
OTG
I've used it to glue down a mantle over a fireplace before. And I used it to repair/ build a broken chair before too.
 
OP
D

don long

Well-known member
Joined
Mar 31, 2012
Messages
8,856
Location
southern california
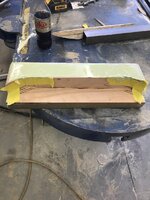
Today was a good day out in the shop. Working on the Nugget display. I took a chunk of 4x6 wood I had laying around and cut off 18" of it for my base. I wanted something larger than a 2x4 for the height and I wanted a couple of inches for the sockets to mount on in front of the tool board so the 4x6 was a good fit. Using my skill saw I cut the groove in the base so the tool board could rest down inside the block
Then I bondoed up the over cuts and rounded off the corners

IMG_1191.JPG

With a lot of massaging I got the tool board to fit nicely into the base

IMG_1192.JPG

IMG_1193.JPG

With the tool board fitting nicely into the base I went after the back board. Cutting it to size and fitting it to the tool board
This was my first attempt

IMG_1194.JPG
I didn't like the way it stopped at the bottom by the base so after some thought I reshaped the lower corners and now it looks better

IMG_1197.JPG

I was a little surprised at the size of this display after it is all together.
I put a 2' level at the base for some size comparison

IMG_1196.JPG

It's time to give this piece some color (tomorrow)
 
OP
D

don long

Well-known member
Joined
Mar 31, 2012
Messages
8,856
Location
southern california
Really coming along!
Thanks guys
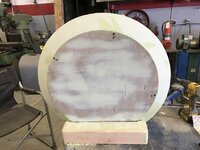
I worked on the tool display today I managed to get primer on all 3 pieces. I put a pretty heavy coat of epoxy primer on the wood so I'll let it set for a couple of days before sanding it to be sure it has cured well.IMG_1200.JPGIMG_1199.JPG

You may have noticed that I filled in the center of the tool board. I thought that I would use a small nut and bolts to mount the tools so I would need room for the nuts behind the thin front board, but after shopping for what I wanted I couldn't get it for about 6 weeks so I opted for screw in hangers and dowels to mount the tools and thought it wise to give the screws amore wood to bite into and deeper holes for the dowels so I put the round piece that I cut out of the second board back into the center. Now there is 1 1/2" of wood to hold the tool brackets.
 

Smokeshow69

Well-known member
Joined
Dec 7, 2012
Messages
8,393
Location
Pacific Northwest
This project is amazing! It makes my feeble plomb sign reproduction attempt look like a lame attempt. It’s always been my motto that if you can’t find one, make one. Fantastic job
 
To avoid these ads, REGISTER NOW!
OP
D

don long

Well-known member
Joined
Mar 31, 2012
Messages
8,856
Location
southern california
This project is amazing! It makes my feeble plomb sign reproduction attempt look like a lame attempt. It’s always been my motto that if you can’t find one, make one. Fantastic job
Smokey
This project is a little out of my wheelhouse. I don't have much experience with working wood.
Thanks for the compliment
 
OP
D

don long

Well-known member
Joined
Mar 31, 2012
Messages
8,856
Location
southern california
pushing forward on this project. After letting the primer dry for a couple of days I was able to give it a final sanding today.
After thinking about the next step I decided to drill the mounting holes for the deep sockets and glue the dowels into the base before painting just in case I had any problems that may need correcting (I was right)
While drilling the holes for the dowels the wood chipped in a couple of places and needed to be filled with bondo before I could paint

2023-02-07 13.46.59.jpg


With that problem solved I added the dowels and glued them in place. 3 pieces on each side are shallow so I had to cut the dowels after they were glued in place.
I put the sockets on the dowels to see how well the spacing went (about 90% I'd say) It will do

2023-02-07 13.45.57.jpg


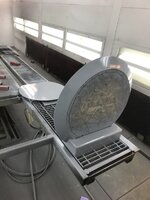
I think that It's ready for paint finally. So into the booth for a nice coat of shinny black paint.

2023-02-07 14.50.49-2.jpg

Thinking ahead just a little. I think that the back side of the unit should be black so I took the back panel and sanded it smooth and gave it a coat of primer on Saturday morning and today sanded and painted the back black while I had paint in my gun.

2023-02-07 14.49.48.jpg

The front of this piece will be painted white for the top ring of the display so I will need to mask off the black when that happens.
 
OP
D

don long

Well-known member
Joined
Mar 31, 2012
Messages
8,856
Location
southern california
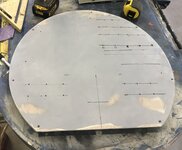
While waiting for paint to dry I grabbed the front piece and after sanding it for the final time, layed out the tool pattern and made marks where the mounting holes need to be. Then drilled small drilled holes in the top plate

2023-02-06 16.18.31.jpg

And as long as I had the drill loaded up for the dowels I poked the holes in the front plate. Thinking that while painting the front plate I would leave the dowels in the holes so they could be painted too then thought "what about the screw heads? I don't want them black against the red plate" So I put them in place in the plate too. Now the plate is ready to paint when the black paint is dry enough to pull out of the booth.

2023-02-07 13.48.40.jpg
 

rharman

Well-known member
Joined
Apr 22, 2012
Messages
8,899
Location
SoCal
Were you using a regular twist drill bit? Maybe a Forstner bit would have been a better choice to avoid the chunking.
 
OP
D

don long

Well-known member
Joined
Mar 31, 2012
Messages
8,856
Location
southern california
Were you using a regular twist drill bit? Maybe a Forstner bit would have been a better choice to avoid the chunking.
Yah I know and the bad part is that I think that I have one in my wood shop across the way but was too lazy to go look for it but I plan on finding it to finish boring the holes into the black piece that will be behind the front face
 
OP
D

don long

Well-known member
Joined
Mar 31, 2012
Messages
8,856
Location
southern california
Pushing the Nugget display closer to the finish line this morning I went ahead and drilled the holes for the dowels through the back plate before painted the front plate
IMG_1231.JPG

With the pegs and screws in place so everything would show red when done I painted the front plate. Late this afternoon the red paint had dried well enough to touch it so I went back to work.
I polked the dowels into the display leaving each one out just 1/2 " the holes were tight enough that I had to drive the dowels in with light hits from my hammer. I layed the display on its back to make the work more stable and I put the sockets on the pegs. Then I went about laying out the handles

IMG_1258.JPG

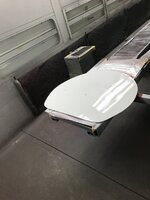
The back board is painted black on the back and white on the front but the white paint on the front is still too wet to handle tonight

IMG_1257.JPG

I see a couple of problems that need to be corrected before I send the display out to be lettered but my work is 95% complete as of tonight
 
Last edited:
OP
D

don long

Well-known member
Joined
Mar 31, 2012
Messages
8,856
Location
southern california
the last time I documented this thread the tool display was almost finished
I put the back panel on and mounted the tools for a final look

IMG_1265.JPG

Then removed the tools and gave the pinstriper a call to have the lettering done on the display
He asked me to wait a few days before I dropped it off so I took the tools off and put them in a box and waited til it was time to drop the display off for the finishing touches.
And this is how it looked when I dropped it off last week

IMG_1266.JPG
 
OP
D

don long

Well-known member
Joined
Mar 31, 2012
Messages
8,856
Location
southern california
Running the clock forward a week.
I got the call to pick up the display so Yesterday I drove about an hour north and picked up the display.

IMG_1433.JPG
Today I started out my morning by reorganizing the entire Blackhawk area to make room for the display.
First I grabbed an empty display cabinet and laid it on it's side to put wheels on it. then I took the blackhawk tool cabinet that I had just finished restoring last month down from the display window that I wanted this display to sit.
Then I took the torpedo tool boxes out of the other display window and put them into the cabinet with the wheels.
I added the 2 porto power setstothe display cabinet and pushed it under the display window where the Nugget display was to sit.
Then I put the tool cabinet into the display window where the torpedos came from. moved the big rolling tool cabinets around a bit and added a couple of small tool trays that I've collected over the past few months and now my blackhawk area looks like this

IMG_1439.JPG

And now I can close the book on this project

Thank you all for the help and encouragement to make this project happen I couldn't be any happier with the results

Don
 

4xdog

Well-known member
Joined
Aug 18, 2012
Messages
5,627
Location
Santa Fe, NM
The Blackhawk display looks amazing, Don! Just amazing.

And your signpainter is brilliant.

Thanks for the chance to follow along --

Don
 
OP
D

don long

Well-known member
Joined
Mar 31, 2012
Messages
8,856
Location
southern california
The Blackhawk display looks amazing, Don! Just amazing.

And your signpainter is brilliant.

Thanks for the chance to follow along --

Don
Thank you 4xdog
I thought that I had lost my sign painter last year. He was struck with some rare disease that affected his hands and legs
He fought it off and 1 year later he's painting again.
Looks very convincing, don! And yes, the signpainter is worth every penny.

(What's that old padlock doing in the Blackhawk display area? Is it marked Blackhawk?)
Thank you Lugnutz
The sign painter only does work for 3 of us now
That lock is just taking up space
Thank you for all the help and encouragement for this project
Don, convertible Chevelle frame in the background?
No Raineman
But very close. It is the frame to my El Camino that I should be working on
Here is that build thread
 

Provincial

Well-known member
Joined
Sep 21, 2011
Messages
6,874
Location
Near Salem, OR
Don, you just missed the chance to send half of GJ on a Snipe Hunt! Unmarked lock that came in a paper envelope printed with the Blackhawk logo but the envelope fell apart when you removed the lock! ;)
 

Shelbylex

Well-known member
Joined
Jan 20, 2018
Messages
3,132
Location
MA
One day I will need to make it to your museum when I visit a relative in SFO! It's amazing!!!
 
To avoid these ads, REGISTER NOW!
Top Bottom