To avoid these ads, REGISTER NOW!

Blackhawk S4 for resto

Benryanuk

Well-known member
Joined
Nov 14, 2016
Messages
58
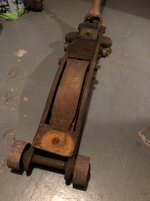
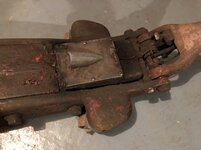
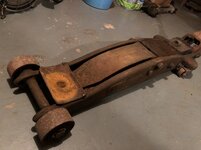
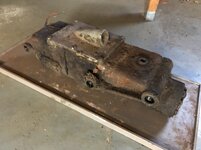
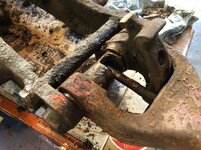
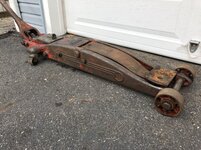
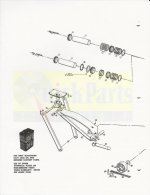
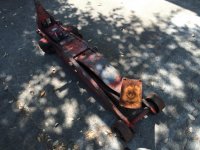
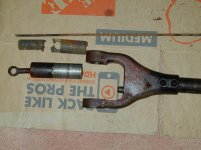
So I picked this up today.. it’s a beast and I’ve no real need for it but it will make an interesting project - a lot of work!

9c8c2a1c1b6e2e5ac91b5eac2285f49d.jpgd3d5e20688678f55ed70f7bf48673664.jpg3aa2ab64f9a38f42d93a59bbb1f4d89f.jpg7c3c2bc120643060297cc24a6535976c.jpg594a22650a3af40045406a5be230a13a.jpg

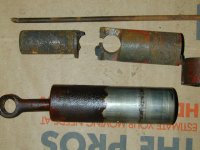
It seems to work well and holds a load without problem.

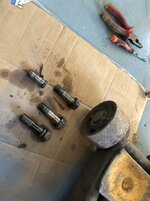
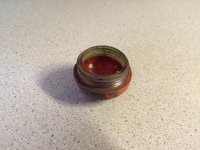
Anyone have a spare lens ;-)


Sent from my iPhone using The Garage Journal mobile app
 

Attachments

  • 9c8c2a1c1b6e2e5ac91b5eac2285f49d.jpg
    9c8c2a1c1b6e2e5ac91b5eac2285f49d.jpg
    283.2 KB · Views: 0
  • 594a22650a3af40045406a5be230a13a.jpg
    594a22650a3af40045406a5be230a13a.jpg
    317.9 KB · Views: 0
  • 7c3c2bc120643060297cc24a6535976c.jpg
    7c3c2bc120643060297cc24a6535976c.jpg
    362.8 KB · Views: 0
  • 3aa2ab64f9a38f42d93a59bbb1f4d89f.jpg
    3aa2ab64f9a38f42d93a59bbb1f4d89f.jpg
    321.7 KB · Views: 0
  • d3d5e20688678f55ed70f7bf48673664.jpg
    d3d5e20688678f55ed70f7bf48673664.jpg
    383.9 KB · Views: 0
To avoid these ads, REGISTER NOW!
OP
B

Benryanuk

Well-known member
Joined
Nov 14, 2016
Messages
58
Started to break down the pieces by taking out the hydraulic unit - this thing is filthy. The jack worked well so I’m not planning to take the unit apart, just change the oil and clean it


Sent from my iPhone using The Garage Journal mobile app
 
OP
B

Benryanuk

Well-known member
Joined
Nov 14, 2016
Messages
58

Attachments

  • 7f3a849452d2b6df5aef2fee189d2a77.jpg
    7f3a849452d2b6df5aef2fee189d2a77.jpg
    398.5 KB · Views: 0
  • 7ef98d61b9ef862f43b68c4ff8da9a85.jpg
    7ef98d61b9ef862f43b68c4ff8da9a85.jpg
    356.6 KB · Views: 0
  • 9c4b4e28a562fcb29e6aff5cbf2d1f89.jpg
    9c4b4e28a562fcb29e6aff5cbf2d1f89.jpg
    474.8 KB · Views: 0
  • ab6f7bcde8875efca9597c13b05bde85.jpg
    ab6f7bcde8875efca9597c13b05bde85.jpg
    543.5 KB · Views: 0
  • 491c0d52cbd5432d532b094f0b0b4fda.jpg
    491c0d52cbd5432d532b094f0b0b4fda.jpg
    438.2 KB · Views: 0
OP
B

Benryanuk

Well-known member
Joined
Nov 14, 2016
Messages
58

Attachments

  • 784c5ede91c593b1f2362284dbe6bb88.jpg
    784c5ede91c593b1f2362284dbe6bb88.jpg
    695 KB · Views: 0
  • a4548aed230fa611e0cf1cfe225abd26.jpg
    a4548aed230fa611e0cf1cfe225abd26.jpg
    540.5 KB · Views: 0
  • 49498406ced266c28dac1ae80270977a.jpg
    49498406ced266c28dac1ae80270977a.jpg
    728.2 KB · Views: 1

thehorse13

Well-known member
Joined
Mar 15, 2015
Messages
3,477
Location
Jefferson County, WV
I did one of those a few years back. They work great and look even better. I've attached a few things that will be useful to you plus a finished product pic of mine.
 

Attachments

  • S-4New.jpg
    S-4New.jpg
    113.2 KB · Views: 93
  • IMG_3748.jpg
    IMG_3748.jpg
    143.2 KB · Views: 132
  • Blackhawk S-4 pg2.jpg
    Blackhawk S-4 pg2.jpg
    56.8 KB · Views: 88
  • Blackhawk S-4 pg3.jpg
    Blackhawk S-4 pg3.jpg
    91 KB · Views: 89
To avoid these ads, REGISTER NOW!

HoldenHR1966

Member
Joined
Nov 4, 2018
Messages
17
Location
Beijing
Where the handle meets the base sometimes the unijoint is broken and needs TIG welding. Getting the broken UNI joint out of the small handle hole is very tricky... Can take hours!

The old blackhawks sometimes have different thickness steel in different sides of the jack.

Getting a KIT online for $200 Australian means getting only about half of the seals that
you actually need. Then it gets interesting finding ones locally to fabricate.

The old blackhawk jacks have a lifting arm that doesn't have internal cross bracing when it gets bent it is worth lazercutting new lifting arm and welding together.

But worse Yet is that Blackhawk during the WAR years pumped out jacks that were welded out of alignment, so they would not work optimally... Have a close look. I designed and lazer cut a new one and welded together with 8 mill plate so its much stronger.... AND most importantly it now has cross bracing, and it lifts straight and not on an angle... Its unbelievable how badly they were made...

Oh and When I said I completely stripped mine apart and remade new parts... I mean completely stripped it apart... Full reconstruction, made now for 2.5 tonnes... not the original 1.5 tonnes.
 

DD T/A

Well-known member
Joined
Aug 30, 2016
Messages
455
Location
North of ▼PL∇MB▼
Where the handle meets the base sometimes the unijoint is broken and needs TIG welding. Getting the broken UNI joint out of the small handle hole is very tricky... Can take hours!

The old blackhawks sometimes have different thickness steel in different sides of the jack.

Getting a KIT online for $200 Australian means getting only about half of the seals that
you actually need. Then it gets interesting finding ones locally to fabricate.

The old blackhawk jacks have a lifting arm that doesn't have internal cross bracing when it gets bent it is worth lazercutting new lifting arm and welding together.

But worse Yet is that Blackhawk during the WAR years pumped out jacks that were welded out of alignment, so they would not work optimally... Have a close look. I designed and lazer cut a new one and welded together with 8 mill plate so its much stronger.... AND most importantly it now has cross bracing, and it lifts straight and not on an angle... Its unbelievable how badly they were made...

Oh and When I said I completely stripped mine apart and remade new parts... I mean completely stripped it apart... Full reconstruction, made now for 2.5 tonnes... not the original 1.5 tonnes.
Do you have any pictures or the new one? specifically the new modifications you made, as a guide for others in the future?

Do you have the drawings for the new parts you made?

I am surprised to hear they were kinda crappy units at certain times. :headscrat
 

Oldtuleguy

Well-known member
Joined
Nov 4, 2017
Messages
10,457
Where the handle meets the base sometimes the unijoint is broken and needs TIG welding. Getting the broken UNI joint out of the small handle hole is very tricky... Can take hours!

The old blackhawks sometimes have different thickness steel in different sides of the jack.

Getting a KIT online for $200 Australian means getting only about half of the seals that
you actually need. Then it gets interesting finding ones locally to fabricate.

The old blackhawk jacks have a lifting arm that doesn't have internal cross bracing when it gets bent it is worth lazercutting new lifting arm and welding together.

But worse Yet is that Blackhawk during the WAR years pumped out jacks that were welded out of alignment, so they would not work optimally... Have a close look. I designed and lazer cut a new one and welded together with 8 mill plate so its much stronger.... AND most importantly it now has cross bracing, and it lifts straight and not on an angle... Its unbelievable how badly they were made...

Oh and When I said I completely stripped mine apart and remade new parts... I mean completely stripped it apart... Full reconstruction, made now for 2.5 tonnes... not the original 1.5 tonnes.


Outstanding:bowdown:
 
OP
B

Benryanuk

Well-known member
Joined
Nov 14, 2016
Messages
58
So I’ve been slowly taking the jack apart for cleaning, repairs where needed and finally paint. The hydraulics seem fine so I’m leaving the unit alone - apart from replacing the gasket and oil. Unfortunately the cover plate is bent and I’m struggling to straighten it.. any ideas or tips to help with that?

2b9aee46ae620eb25291014c4c7a1e4b.jpg

ddef43d63187dc5eb240456ba55ebc8d.jpg


Sent from my iPhone using The Garage Journal mobile app
 

Attachments

  • 2b9aee46ae620eb25291014c4c7a1e4b.jpg
    2b9aee46ae620eb25291014c4c7a1e4b.jpg
    440.9 KB · Views: 1
  • ddef43d63187dc5eb240456ba55ebc8d.jpg
    ddef43d63187dc5eb240456ba55ebc8d.jpg
    590.9 KB · Views: 1

HoldenHR1966

Member
Joined
Nov 4, 2018
Messages
17
Location
Beijing
1. Straightening out the Cover plate should be fairly straightforward. Use a couple of blocks of wood either side to prevent Hammer impact marks.
2. The top of the light mechanism is also bent in the photo. I might be tempted to heat it a little and gently using pliers move the ring holder for the lens back into shape.
3. The front wheel axle has blind pins through it from the frame going halfway through the axle. It is worthwhile to remove these.
4. Check the lifting arm that it has not bent.
5. Consider welding small square pieces of steel plate into the underside of the lifting arm. This has a cross bracing effect to strengthen the jack considerably.
6. If you are going to remove the lifting arm, gently using grinder remove the outer peening from the shafts leaving as much depth as you can as you will have to MIG Weld a 'tag' on later to secure the shafts onto the outer frame.
7. I did include photos of my work and technical drawings in an earlier post called incorrectly "blackjack" instead of blackhawk jack.
 

twertsy

Well-known member
Joined
Jan 5, 2014
Messages
6,726
Location
Reedville, VA
I think Todd was talking about making the lenses at one point.
Busy as he is though I don`t know.
I need one too and a switch.

Apologies Steve et al, I just saw this. While it's true, I do in fact have a lens, I cannot get it off the jack and am afraid to break it by putting too much pressure on it. I'm sure it's brittle as hell.

I'd welcome any ideas??
 

davekp

Member
Joined
Jul 28, 2017
Messages
6
Just picked up a S4 in pretty sad shape. Very rusted up. Anyway, I'm going to try to get it working. Right now the issue I' m having is I can't get the handle out of the Yoke. Have been soaking with Kroil and applying heat- no luck so far. I will need a jack handle shaft, part # 72, Pump Plunger, part #16 and a jack handle control rod, Part # 59.

Any and all help much appreciated!
Thanks!!!!!
Dave
 

gilbo

Well-known member
Joined
Feb 1, 2010
Messages
716
Just picked up a S4 in pretty sad shape. Very rusted up. Anyway, I'm going to try to get it working. Right now the issue I' m having is I can't get the handle out of the Yoke. Have been soaking with Kroil and applying heat- no luck so far. I will need a jack handle shaft, part # 72, Pump Plunger, part #16 and a jack handle control rod, Part # 59.

Any and all help much appreciated!
Thanks!!!!!
Dave


:needpics:

I ran the jack handle yoke through electrolysis first.
Then I clamped the jack handle yoke (56) to a vise, then used the pipe wrench to get loose.

I've been back burner rebuilding my S4, everything is torn down and painted except jack handle, after that I'll start rebuilding the pump, seal kit is here. Hopefully in the next few weeks (probably turn into few more months)
 
Last edited:

notlob

Well-known member
Joined
Aug 19, 2013
Messages
1,384
Location
norcal
Apologies Steve et al, I just saw this. While it's true, I do in fact have a lens, I cannot get it off the jack and am afraid to break it by putting too much pressure on it. I'm sure it's brittle as hell.

I'd welcome any ideas??

I have an S4 lens (with about 5 coats of paint), in the resto queue with my S4. If anyone would like measurements, pics, etc. in order to try to have some made, send me a PM.
 

Attachments

  • IMG_1664r.jpg
    IMG_1664r.jpg
    149.4 KB · Views: 48
  • IMG_1669.jpg
    IMG_1669.jpg
    147.6 KB · Views: 49
  • IMG_1670.jpg
    IMG_1670.jpg
    150 KB · Views: 45

davekp

Member
Joined
Jul 28, 2017
Messages
6
:needpics:

I ran the jack handle yoke through electrolysis first.
Then I clamped the jack handle yoke (56) to a vise, then used the pipe wrench to get loose.

I've been back burner rebuilding my S4, everything is torn down and painted except jack handle, after that I'll start rebuilding the pump, seal kit is here. Hopefully in the next few weeks (probably turn into few more months)
Will try electrolysis on the yoke.
 

Attachments

  • DSCN0597.jpg
    DSCN0597.jpg
    149.7 KB · Views: 24
  • DSCN0596.jpg
    DSCN0596.jpg
    148.4 KB · Views: 23
OP
B

Benryanuk

Well-known member
Joined
Nov 14, 2016
Messages
58
I dry fitted mine back together.. still lots to do but it’s too cold at the moment and I won’t be able to paint and finish until the weathers warmer. I didn’t want it hanging around in pieces :)

Really back breaking cleaning this up.. the grease, mud, oil and grim was thick and not much shifted it.

618a141d7b0a28a5253563ca87811a0d.jpg


9e49a5de705a7068434ef61571852a70.jpg


Sent from my iPhone using The Garage Journal mobile app
 

gilbo

Well-known member
Joined
Feb 1, 2010
Messages
716
I dry fitted mine back together.. still lots to do but it’s too cold at the moment and I won’t be able to paint and finish until the weathers warmer. I didn’t want it hanging around in pieces :)

Really back breaking cleaning this up.. the grease, mud, oil and grim was thick and not much shifted it.


Sent from my iPhone using The Garage Journal mobile app

Benryanuk did you rebuild the entire power unit????
 
OP
B

Benryanuk

Well-known member
Joined
Nov 14, 2016
Messages
58
Benryanuk did you rebuild the entire power unit????


I didn’t rebuild the power unit, just cleaned out the old oil and gunk and filled it with fresh oil and made a new cork gasket. It doesn’t leak down so I’m confident the seals are good for now.


Sent from my iPhone using The Garage Journal mobile app
 
Last edited:

gilbo

Well-known member
Joined
Feb 1, 2010
Messages
716
Lucky you, mine was leaking down, yea that oil was nasty. Why did you replace it with a cork gasket. This gasket is way way better.


CCS_4656-L.jpg


Yes that is what I found when I removed the cover
 
Last edited:
To avoid these ads, REGISTER NOW!
Top Bottom