To avoid these ads, REGISTER NOW!

Blackhawke DP-514 chuck removal

lookin4fun79

Member
Joined
Oct 13, 2018
Messages
8
Location
back of the house
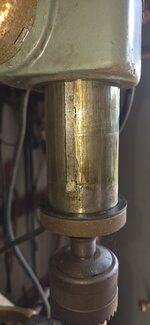
Update with more pics. No luck with collars and wedges, so far. Still not certain, thinking this may be threaded on with keeper bolt. Going to attempt to turn press upside-down later to see inside chuck better.1000014771.jpg


1000014296.jpg1000014292.jpg

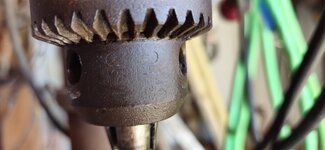
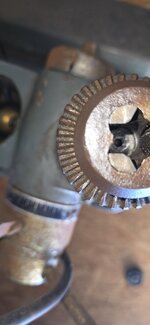
Updated with more pics: Anyone have any idea of how to remove chuck to replace on this unit? I don't believe there is a retainer bolt inside chuck, they're isn't a taper to remove chuck. It's threaded (unfortunately don't have pic of threads showing) it appears to be a fine thread or metric. I'm needing to replace as this one doesn't close below 1/4".1000014593.jpg
 

Attachments

  • 1000014296.jpg
    1000014296.jpg
    280.8 KB · Views: 71
  • 20240712_174553.jpg
    20240712_174553.jpg
    366.6 KB · Views: 6
  • 20240712_174604.jpg
    20240712_174604.jpg
    443 KB · Views: 7
  • 20240712_174519.jpg
    20240712_174519.jpg
    452.5 KB · Views: 7
  • 1000014770.jpg
    1000014770.jpg
    341.5 KB · Views: 0
Last edited:
To avoid these ads, REGISTER NOW!

RTM

Well-known member
Joined
May 13, 2019
Messages
13,134
Location
SF Bay Area
Left Handed Threads?

Can't quite see enough to offer any intelligent answers yet

Here is all of GJ's threads with Blackhawke drill press references, maybe that will help (have not looked, my meeting got busy)


This one has drawings, might help, this appears to have the weird collar (there are several other threads on removing drill chucks with collars)

Or better yet, more DP intelligent people will show up soon, and save you the searching.
 
OP
L

lookin4fun79

Member
Joined
Oct 13, 2018
Messages
8
Location
back of the house
Left Handed Threads?

Can't quite see enough to offer any intelligent answers yet

Here is all of GJ's threads with Blackhawke drill press references, maybe that will help (have not looked, my meeting got busy)


This one has drawings, might help, this appears to have the weird collar (there are several other threads on removing drill chucks with collars)

Or better yet, more DP intelligent people will show up soon, and save you the searching.
I was looking at most of the search result find and didn't see one disassembled like mine appears. Will keep searching, and hopefully the added pics will help.
 
  • Like
Reactions: RTM

tool_scrounge

Well-known member
Joined
Jul 20, 2010
Messages
4,181
Location
Southern California
it looks like they copied the old Atlas/Craftsman drill press design from the late 1930s that had a separate threaded collar to help remove the chuck. You could screw down on the chuck and use mechanical advantage to unseat it from the spindle taper. Unfortunately it looks like the collar has been lost.
 

tool_scrounge

Well-known member
Joined
Jul 20, 2010
Messages
4,181
Location
Southern California
You want one of each of these OF THE APPROPRIATE SIZE to get the chuck off of the tapered spindle. Having no dimensions of the thread OD and shoulder to chuck distance, I cannot give specifics.

1720834477192.png
1720834256128.gif
 
OP
L

lookin4fun79

Member
Joined
Oct 13, 2018
Messages
8
Location
back of the house
You want one of each of these OF THE APPROPRIATE SIZE to get the chuck off of the tapered spindle. Having no dimensions of the thread OD and shoulder to chuck distance, I cannot give specifics.

1720834477192.png
1720834256128.gif
So it's tapered not threaded? I have split collars and couple forks and small wedges. Just place them on top of chuck to separate from spindle?
 

tool_scrounge

Well-known member
Joined
Jul 20, 2010
Messages
4,181
Location
Southern California
So it's tapered not threaded? I have split collars and couple forks and small wedges. Just place them on top of chuck to separate from spindle?
Pretty much just that. The collar should rest against the shoulder since I suspect the forces to unseat the rusty taper interface may be high.

I highly recommend applying a few drops of Kriol to the chuck / spindle interface over a few days before attempting the chuck removal.

If this does not work, one alternate removal method is to full open the chuck jaws and then drill and tap the chuck body for a large fine threaded bolt. The goal is to tap the chuck and NOT the spindle taper. Then screw in an appropriate greased bolt with will force the chuck off of the spindle thread. If you cannot fully thread the chuck body, grind down the threads on the end of the bolt as required.
 
To avoid these ads, REGISTER NOW!

RTM

Well-known member
Joined
May 13, 2019
Messages
13,134
Location
SF Bay Area
You want one of each of these OF THE APPROPRIATE SIZE to get the chuck off of the tapered spindle. Having no dimensions of the thread OD and shoulder to chuck distance, I cannot give specifics.

1720834477192.png
1720834256128.gif
Do you think applying the split collar will give enough resistance to use the wedges? Or maybe put two in there to reach up to the shoulder above the threaded section to allow more oomph? Just asking uneducated questions based on how much PITA others have had with these chucks.
 

tool_scrounge

Well-known member
Joined
Jul 20, 2010
Messages
4,181
Location
Southern California
Do you think applying the split collar will give enough resistance to use the wedges? Or maybe put two in there to reach up to the shoulder above the threaded section to allow more oomph? Just asking uneducated questions based on how much PITA others have had with these chucks.
the collar(s) need to be touching the shoulder to provide enough support for the wedges.
 
  • Like
Reactions: RTM

Whitworth

Well-known member
Joined
Dec 26, 2011
Messages
2,087
You really need to hammer on those wedges to get them to work. Looking at the rust doesn't make me optimistic.

Remove the spindle, drill a hole thru the chuck body (dead center along the axis) until the spindle tip is revealed. Then drive the spindle off with a pin punch.
 
OP
L

lookin4fun79

Member
Joined
Oct 13, 2018
Messages
8
Location
back of the house
Pretty much just that. The collar should rest against the shoulder since I suspect the forces to unseat the rusty taper interface may be high.

I highly recommend applying a few drops of Kriol to the chuck / spindle interface over a few days before attempting the chuck removal.

If this does not work, one alternate removal method is to full open the chuck jaws and then drill and tap the chuck body for a large fine threaded bolt. The goal is to tap the chuck and NOT the spindle taper. Then screw in an appropriate greased bolt with will force the chuck off of the spindle thread. If you cannot fully thread the chuck body, grind down the threads on the end of the bolt as required.
So basically creating a jack bolt for the chuck removal. I will soak everything over the next week and attempt removal next weekend.
 

tool_scrounge

Well-known member
Joined
Jul 20, 2010
Messages
4,181
Location
Southern California
You really need to hammer on those wedges to get them to work. Looking at the rust doesn't make me optimistic.

Remove the spindle, drill a hole thru the chuck body (dead center along the axis) until the spindle tip is revealed. Then drive the spindle off with a pin punch.
That would work too.

I have heard a variation where they drill a precise hole in the drill chuck and carefully fill the cavity with heavy grease, probably using a syringe? They then insert a close fitting steel tooling pin and smack that with a hammer.

I must be lucky. After a few day of being primed with Kroil, the wedges always worked. I usually put the spindle assy with wedges in a large arbor or hydraulic press.
 
To avoid these ads, REGISTER NOW!
Top Bottom