To avoid these ads, REGISTER NOW!

Blacksmithing Projects Journal

DoghouseForge

Well-known member
Joined
May 11, 2013
Messages
374
Location
Lakeland, Fl
Hello Garage Journal! :)


I started this post on my Jeep forum in the off topic section and the guys have really enjoyed it. If this is something the Garage Journal crew would like to see more of please let me know. I have a few post I could easily transfer to get everyone caught up, and would contiue to post new projects as I accomplish them.

Truthfuly, this forum would be a much better audience for this type of thread. So if there is any interest I could start with the basics and we could move up to making whatever ideas people come up with...

Just F.Y.I. ---I am horrible! with spelling so please use your "Phonics" skills to keep up. I will try to get spell check to work on this forum but in the meantime...


Here is the first post as copied from the existing thread:

March 23, 2013

Anyway, I had some down time at a horse show today because of a really long rain delay and thought I would work on a project that had been suggested to me by a friends wife.

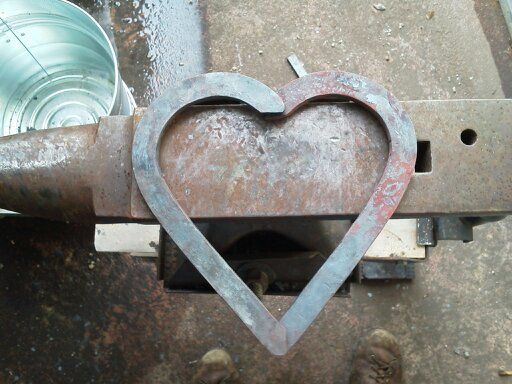
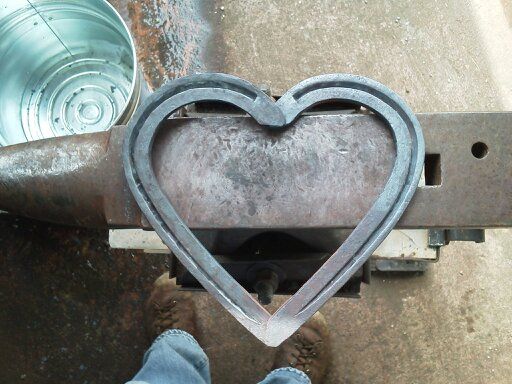
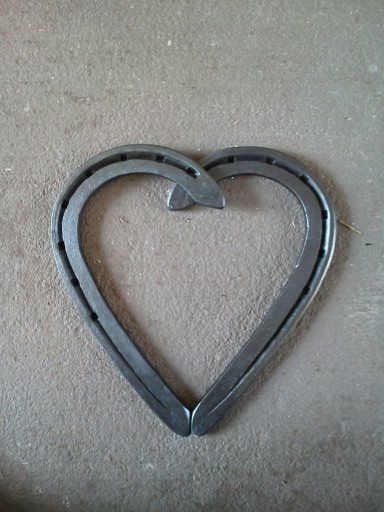
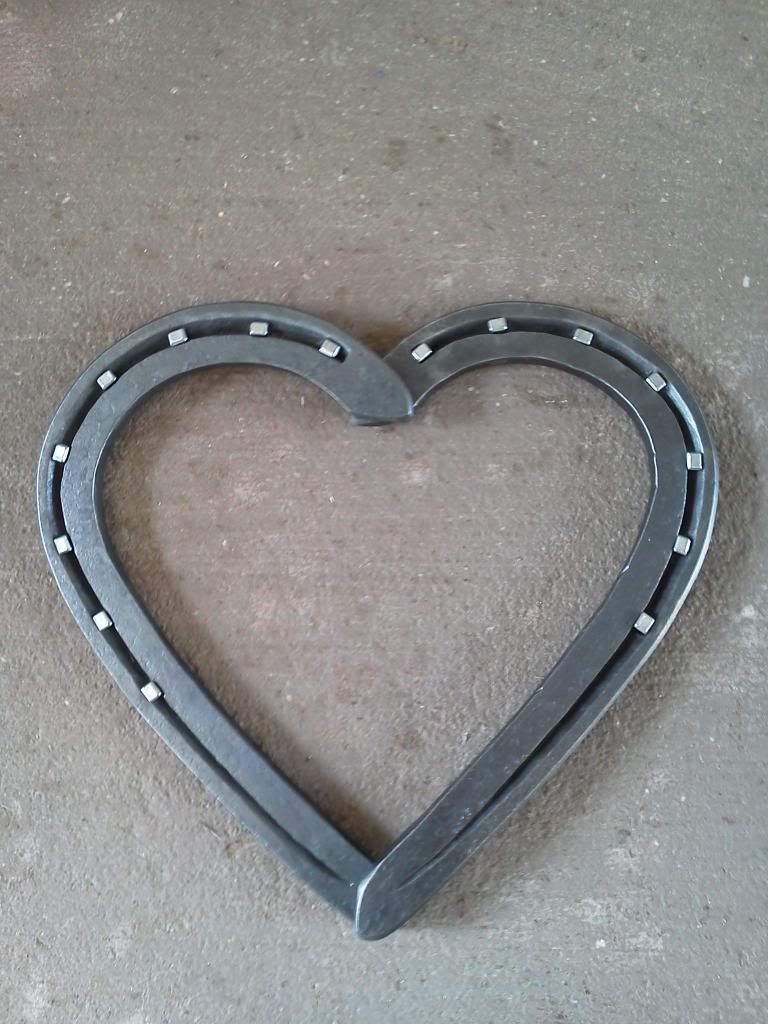
The requested project was two horseshoes that came together to form a heart.. I thought that was a cool idea but decided to do it a little differently than just lapping two horseshoes over one another.


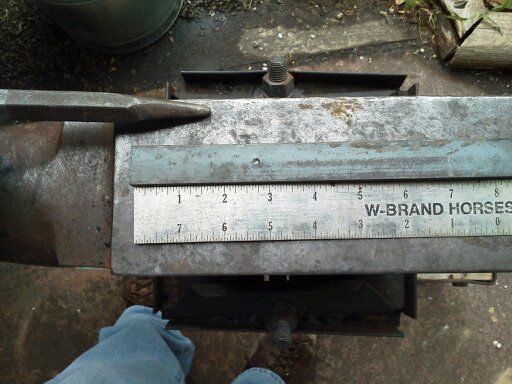
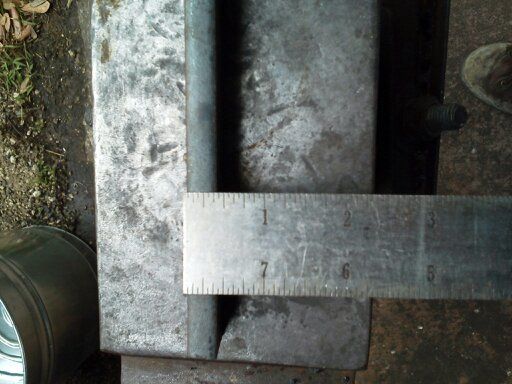
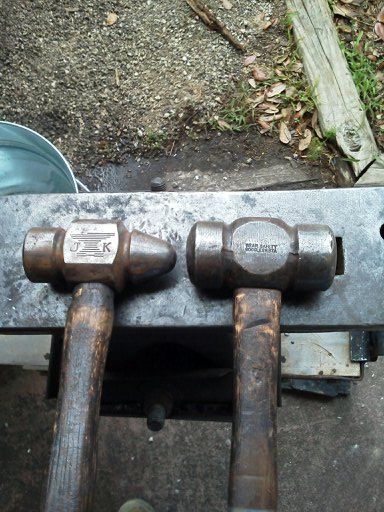
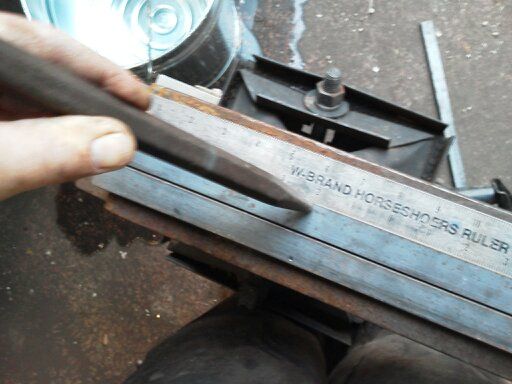
Started with 2 even pieces of staright bar stock 14"long x 3/8"thickx 7/8"wide
1364043498628_zps8dbb7c6a.jpg


Next I marked reference points on each so i could begin my turning process in the same place on each side piece of steel. Hopefully setting me up to have a symetrical heart.
1364043499942_zpscf7d5fcb.jpg


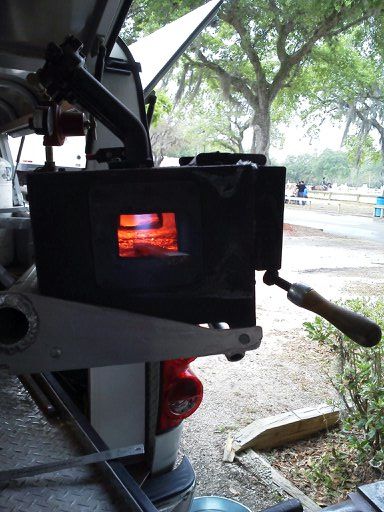
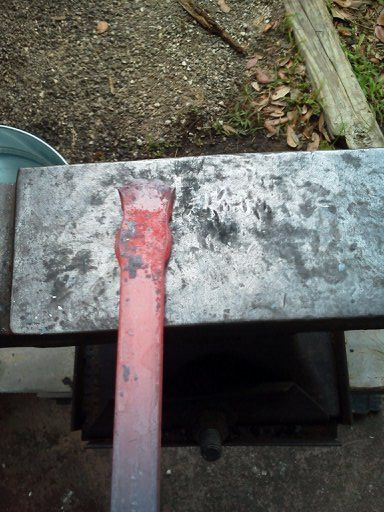
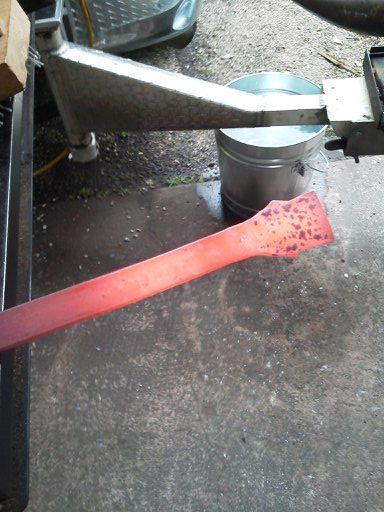
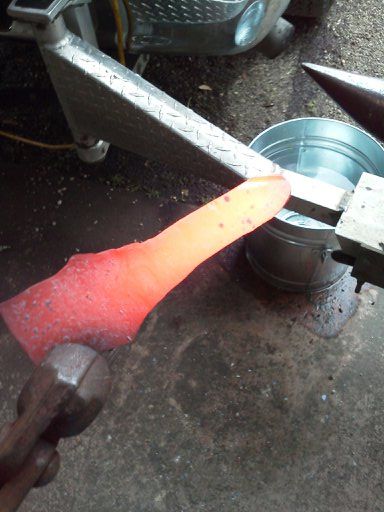
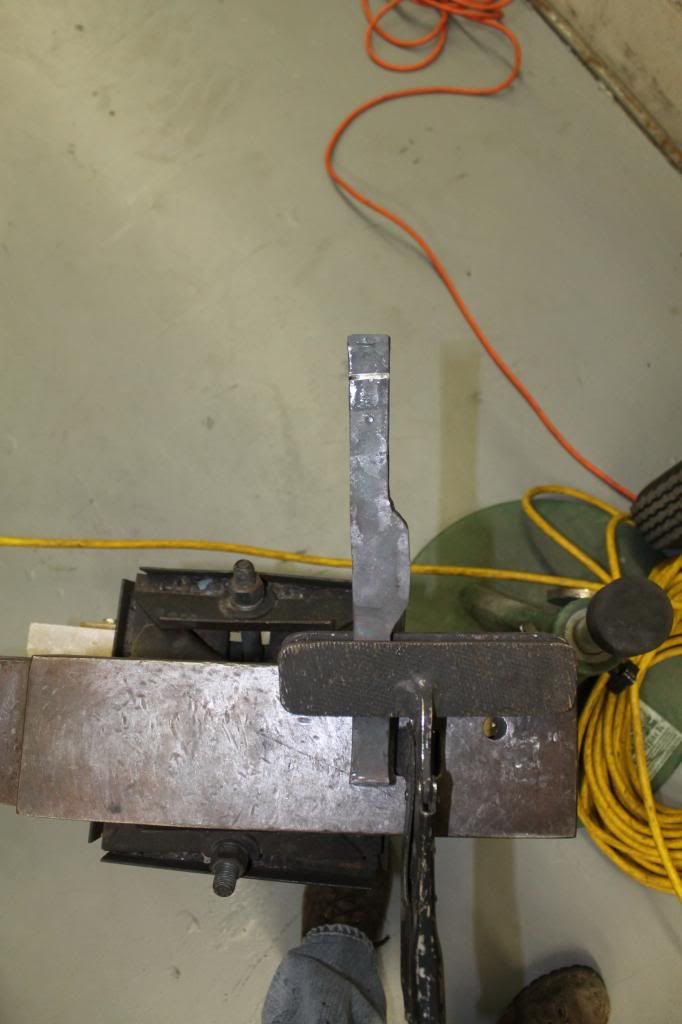
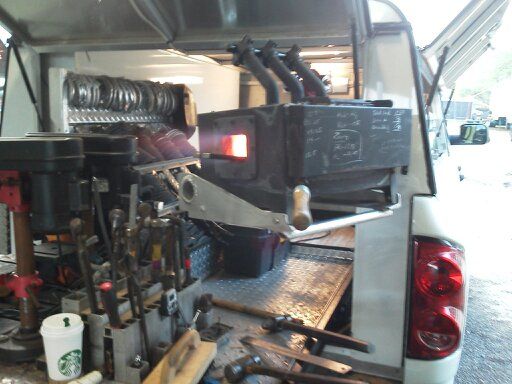
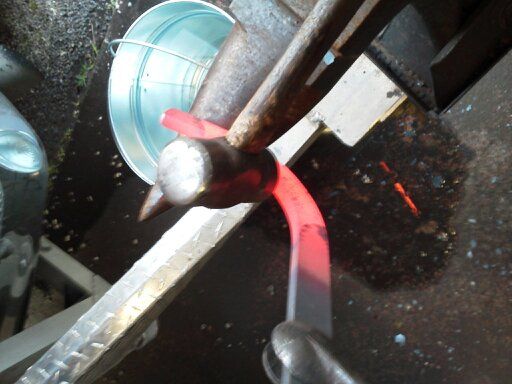
Then the steel is put in the forge , careful to only heat the side that you want to work on...this prevents movement that your dont want somewhere else.
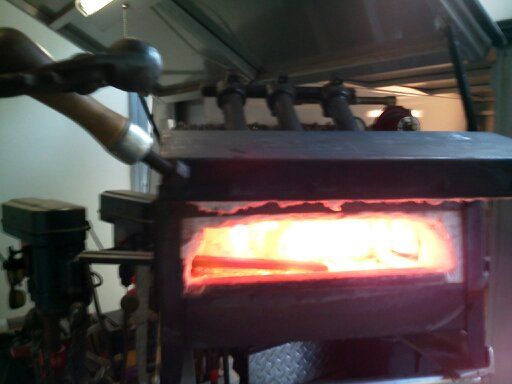
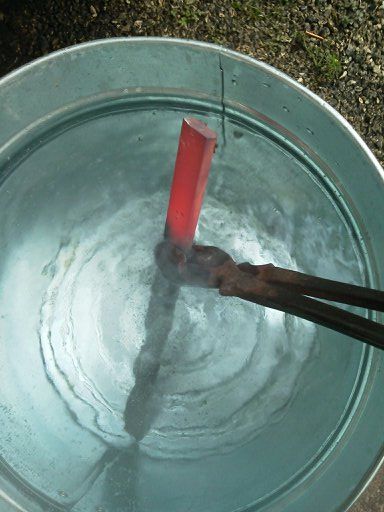
1364043502231_zps89155d7a.jpg

1364043501245_zpse6215c52.jpg

its hot!

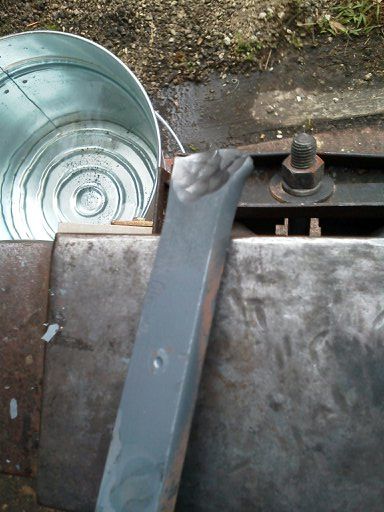
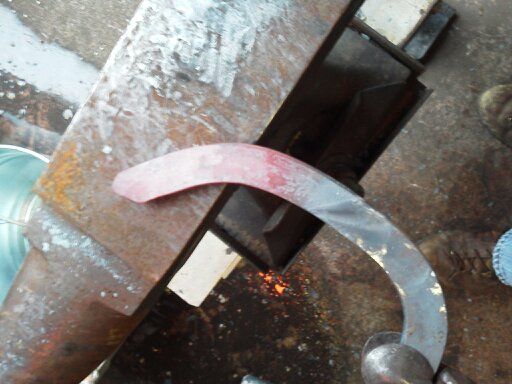
Notice that only the part of the shoe im going to work is red hot.
1364043508622_zps32598374.jpg


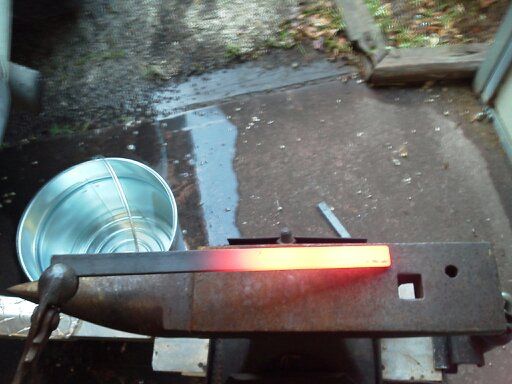
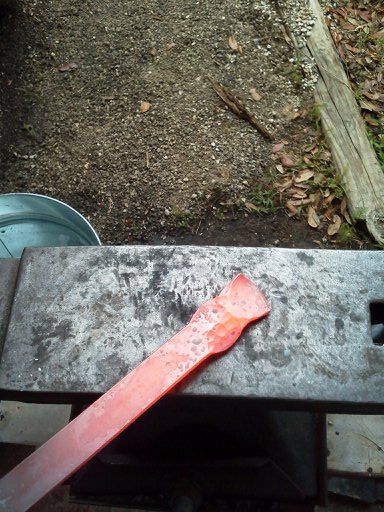
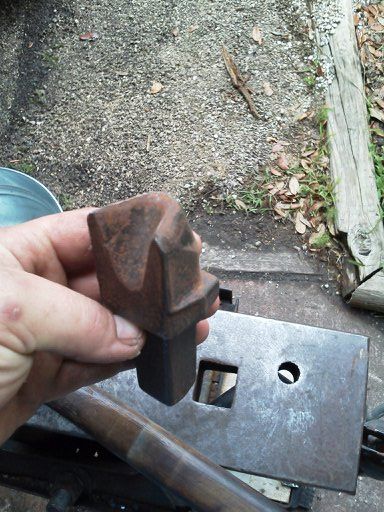
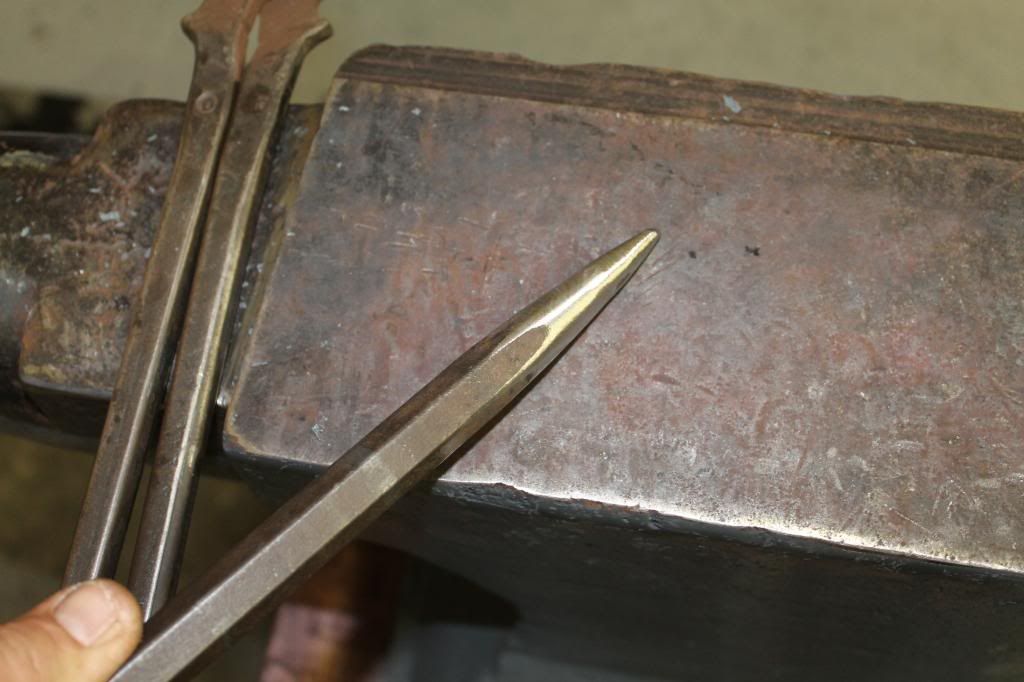
To begin the turn you strike into the steel creating a "U" this is also called "breaking the back" If you go directly to the horn to set your radious the steel will buck and you wont be able to turn it with a fluid radious.
1364043516133_zps2c9d136d.jpg


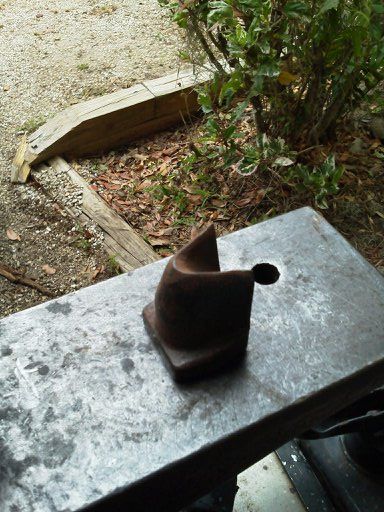
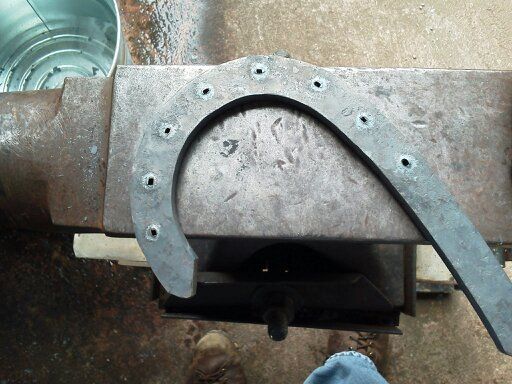
now you can set the radious with the horn. take note of where you set it so you can use the same radious on the second piece. notice the mark/dot is right in the turns origin and pressed up against the horn to hold the radius.
1364043511021_zps53cdc4bf.jpg


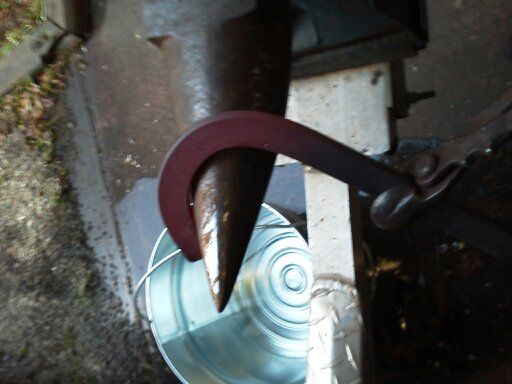
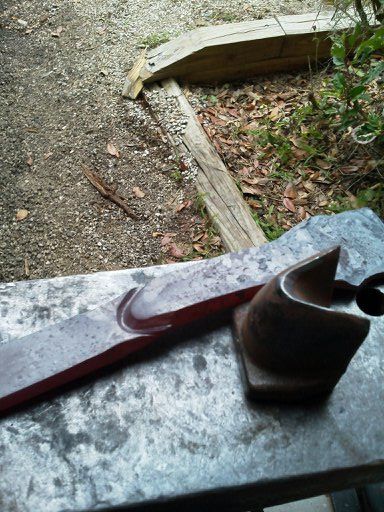
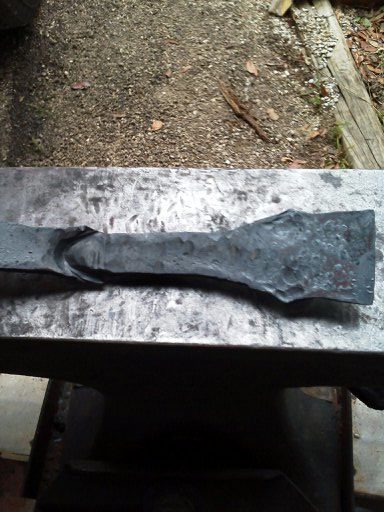
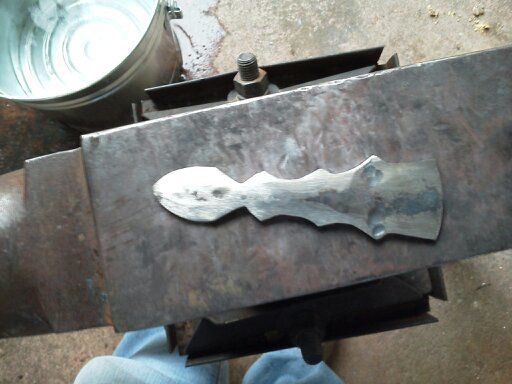
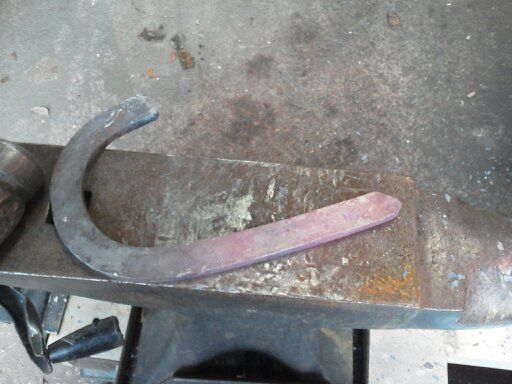
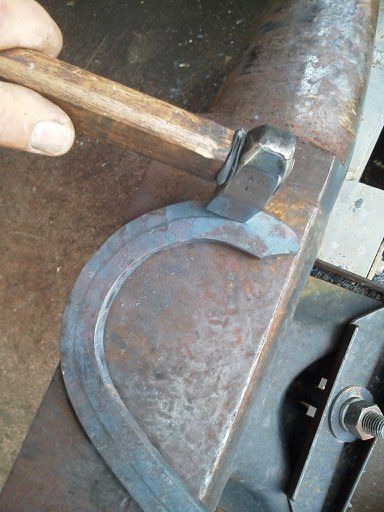
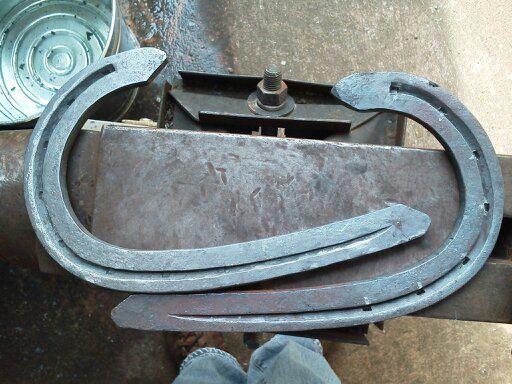
I turned both sides and checked for symetry, them i layed them like I was visualizing the design to be and fine tuned the radious to get the shape i wanted.
1364043527129_zps18404dfc.jpg


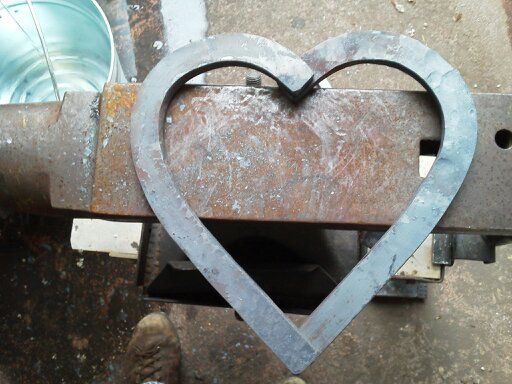
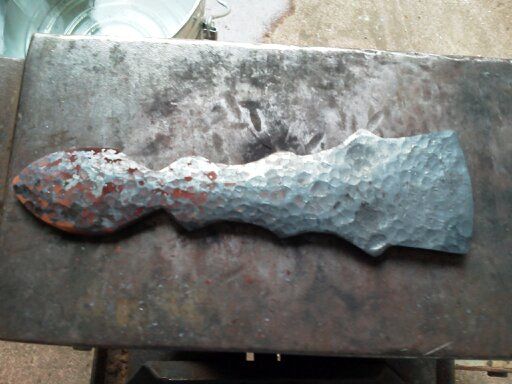
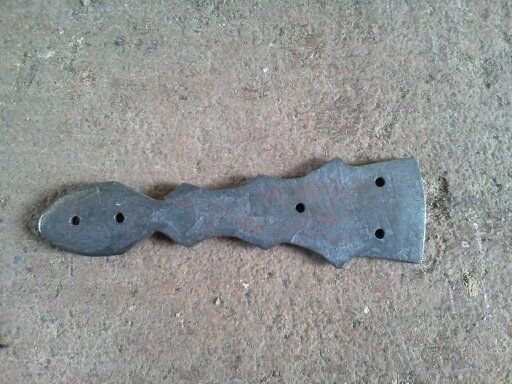
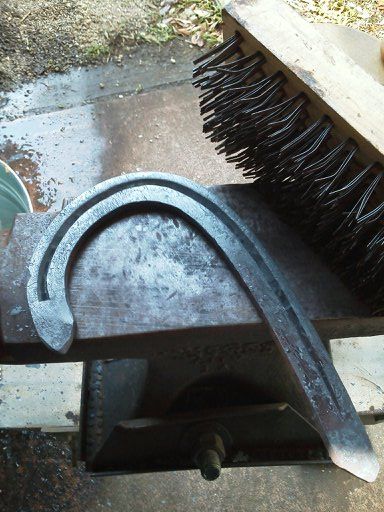
Now we have the start of a heart.. but his isnt enough detail to call it done yet.

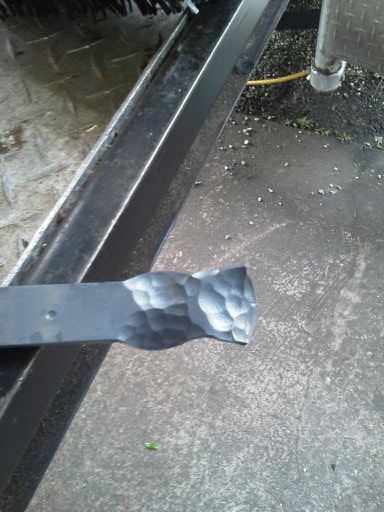
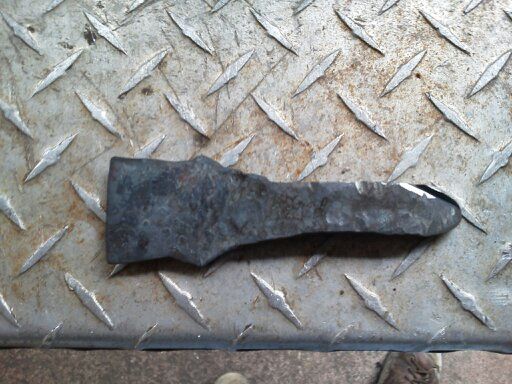
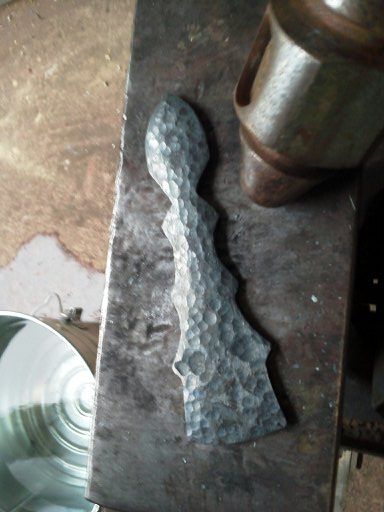
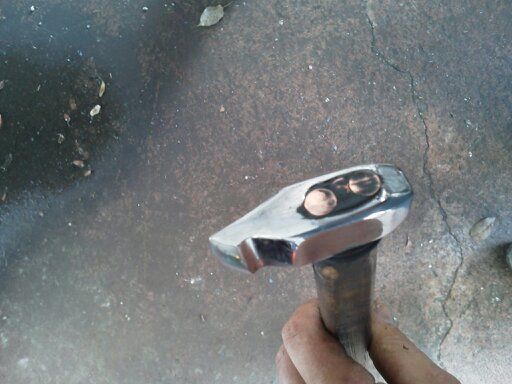
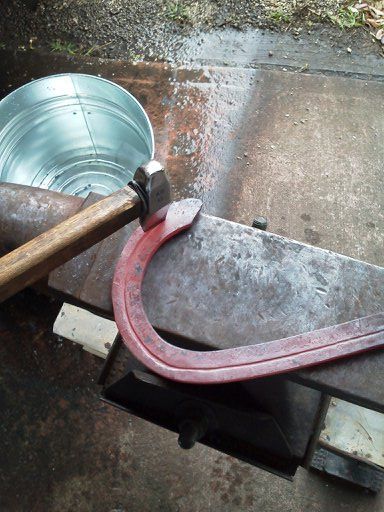
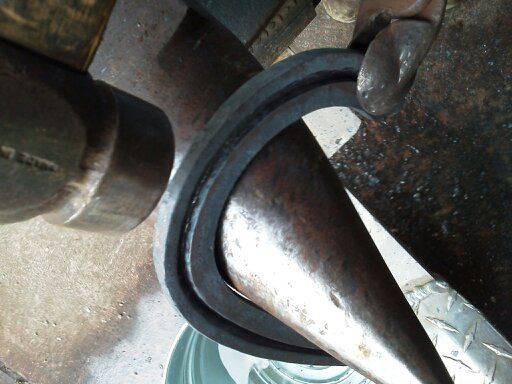
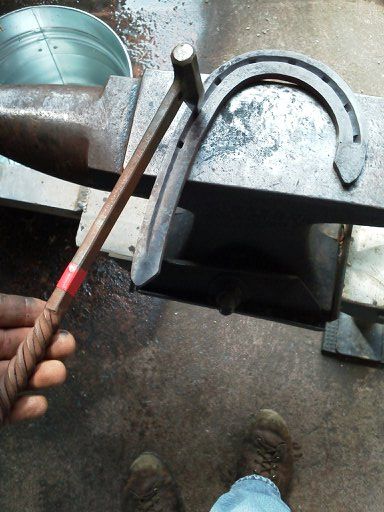
Horse shoes have heels forged into them. Even though this will obviously not be going on a horse I wanted it to have the same landmarks as a horseshoe. so I forged heels into all four edges.

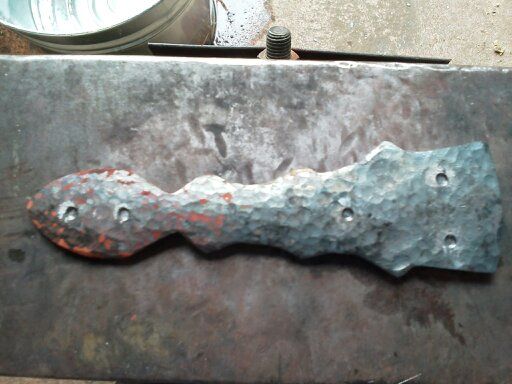
Heels are formed by driving the hammer into the edge of the shoe. Not drawing it away. Those are two different hammer strokes. I could get more specific about in a different demonstarion. Basicly driving is packing of material into itself and drawing is pulling material away from itself.
1364043538259_zps241cd4fb.jpg


1364043539967_zps9a4568a1.jpg


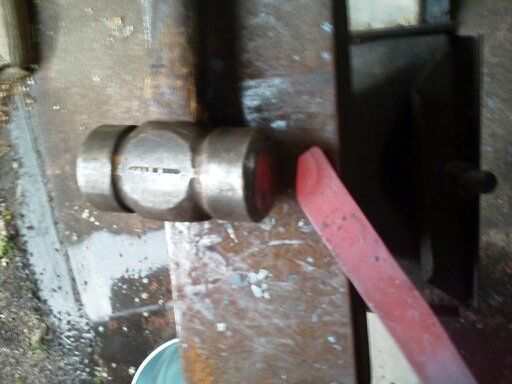
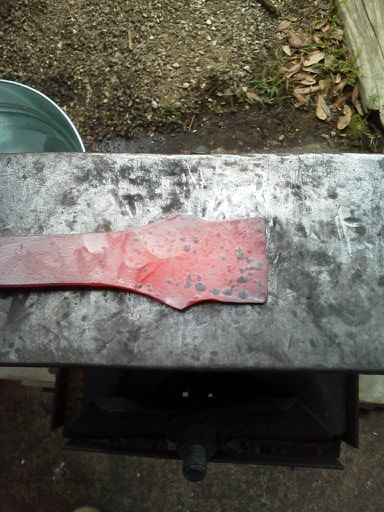
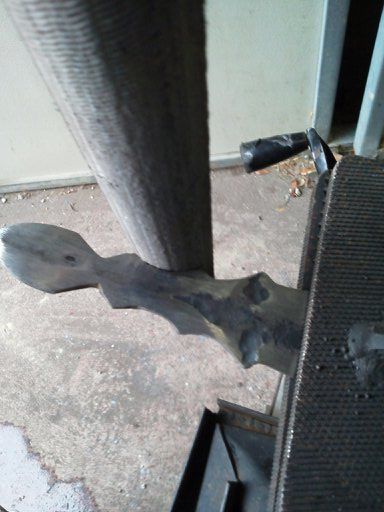
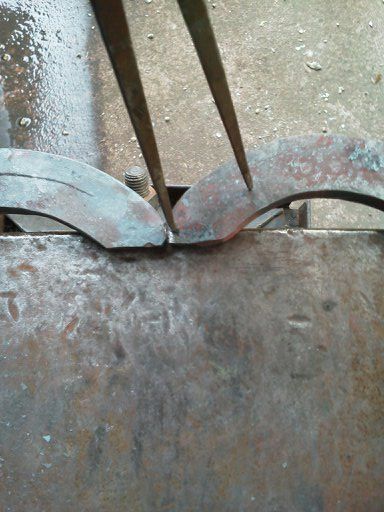
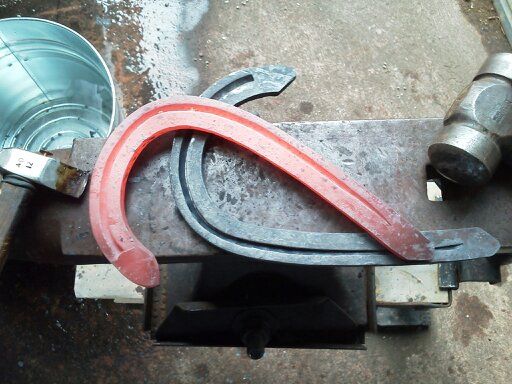
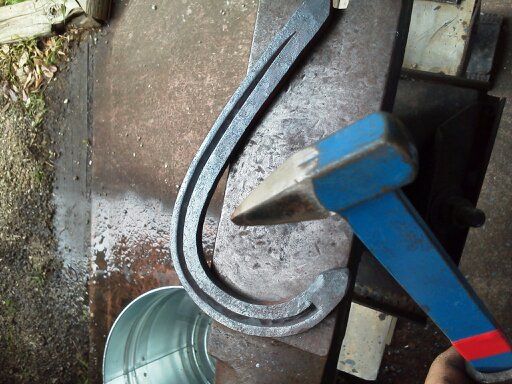
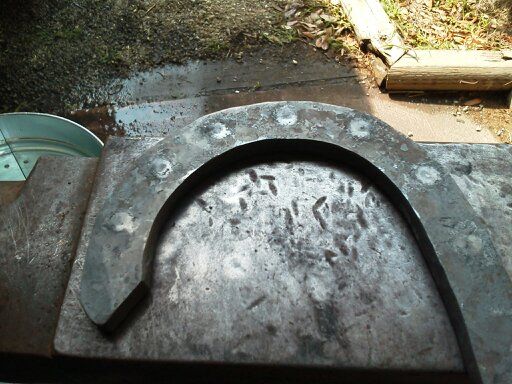
Notice in the above picture that the packing has upset my straight branch so I need to straighten it back out before I continue
1364043540458_zps920ffc62.jpg


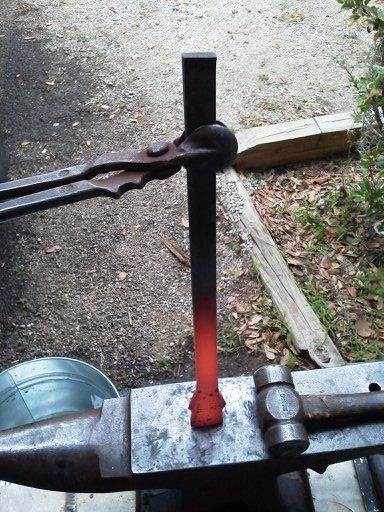
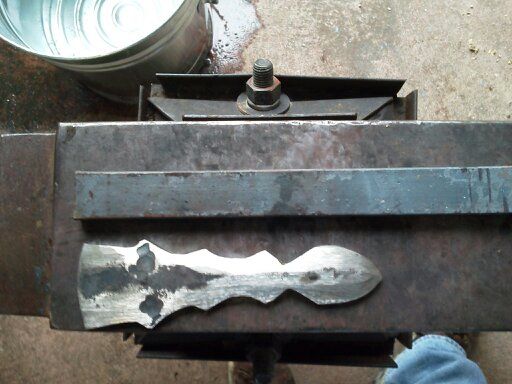
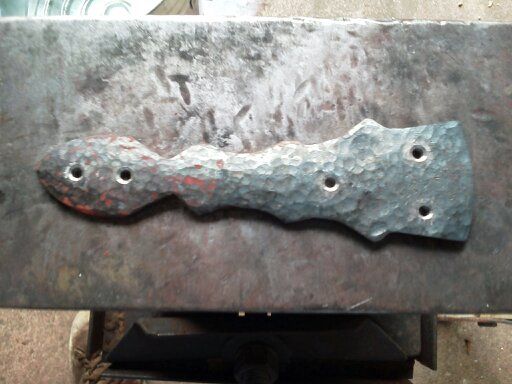
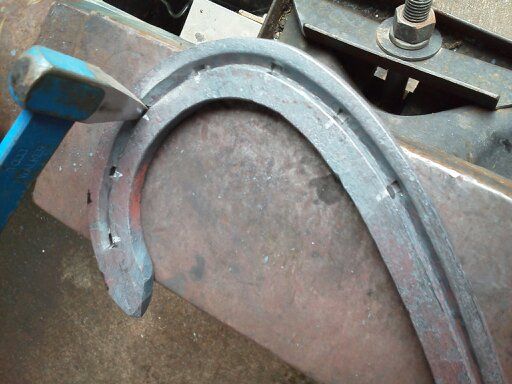
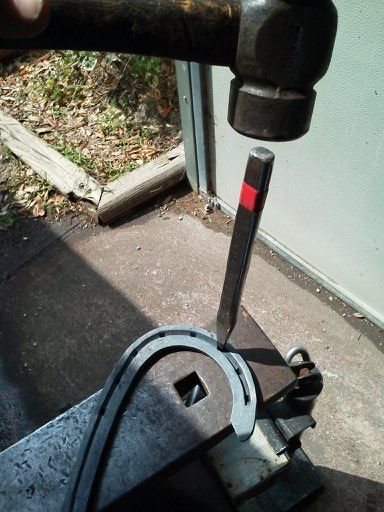
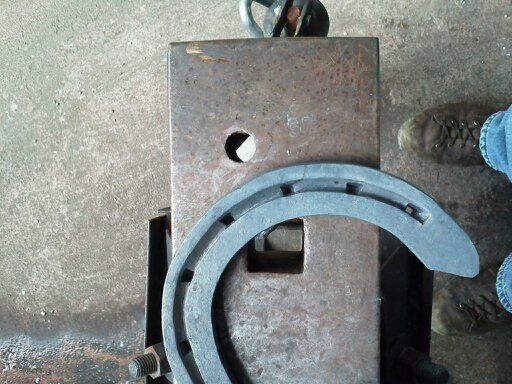
After finishing all four heels I have to recheck the two pieces and reheat to make adjustments. these were forged at two different heat levels which is why one moved further than the other.
1364043541086_zpsaaab039a.jpg


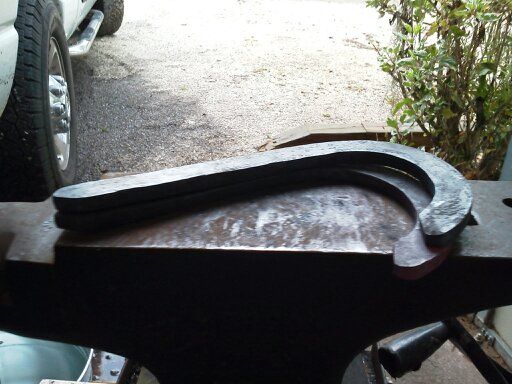
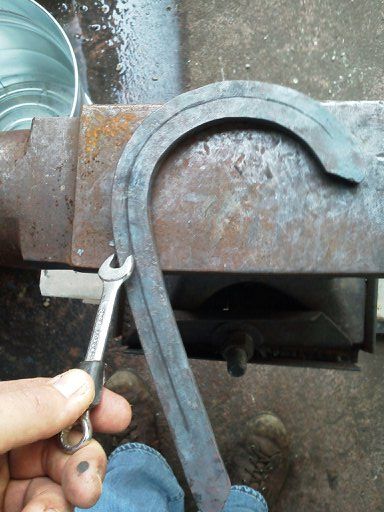
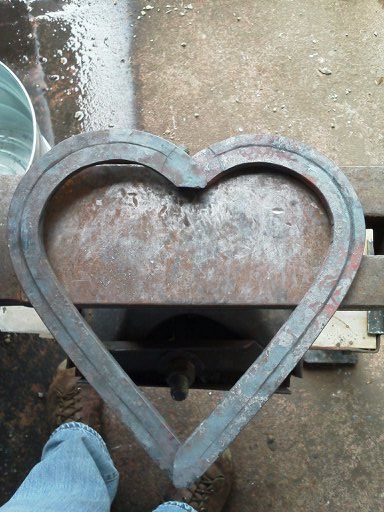
Not gonna pass a skills test for identical but pretty close...
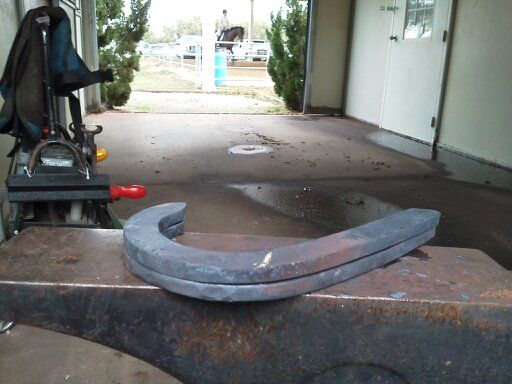
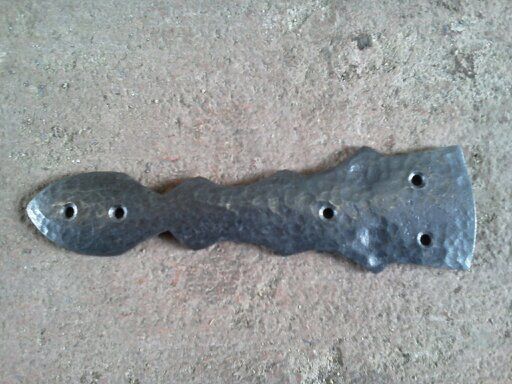
1364043542071_zpsf4256207.jpg


recheck for design

1364047557256_zps9eed2214.jpg


end of part 1 of 2 for first post....
 
To avoid these ads, REGISTER NOW!
OP
D

DoghouseForge

Well-known member
Joined
May 11, 2013
Messages
374
Location
Lakeland, Fl
Part 2 of 2


If you're happy move on to the fuller. The fuller is a tool that lays the creases you find in most horse shoes. Its used to make a groove that the nail head can rest insdie and also provided and ridge for traction. this is a fuller
1364058526940_zpsf9aad156.jpg


before you go thumping on it you need to map out some references to follow. I use the calipers and a wrench to score out the path i want to run and the start and end locations. the wrench is a cool trick because you can lock one side on the side of the shoe and the other side can drag the top. the bigger the wrench th further in your mark will be...
then you mark the steel lightly to set a groove to follow once you get the steel hot nd your mark dissapears.

1364058526081_zps7dee3a20.jpg


1364058524797_zpsd392fe95.jpg


1364058527270_zpsa665751b.jpg


check your layout again and make sure the lines are what you want because once you start running you cant go back
1364058526584_zps16f41e98.jpg


you want an orange heat to run you fuller in. To hot and you'll cut through the steel...
1364058529407_zps5d1c09d4.jpg


1364058528562_zps2486f9bb.jpg


Exmple of forgeing heat and black heat
1364058530745_zpsb67a5207.jpg


running the fuller is something that you develop a feel for and you can actually get it finished in two or three passes. I was taking pictures so i had to run over it several times
check your design again. I didnt like that one side stoped short at the bottm so I will fix that later
1364058532862_zpsd3f103c1.jpg


after you fuller you have "displaced" metal so you need to hemm your branches to push it all back together. you do that at a black heat and walk the radious of the horn with your hammer.
1364058531310_zpsdd133a61.jpg


Next you need to punch the nail holes. This is done with a fore punch, a drift punch, and a pritchel...
forepunch:
1364058533409_zpsdb923087.jpg


use the calipers again to establish a uniform distance between holes and mark out the locations lightly
1364058534370_zps9dd4951c.jpg


mark both out and throw them in the fire. You want a barely yellow heat for this next step.
1364058534937_zpsed5bd82a.jpg


getting close!
You run the drift punch to "drift the hole into the tapper of your pritchel. All of you stamping tools are "tuned" together the fuller and the forepuch are the same size, the drift is the same size as the bottom half of the fore punch head and the pritchel is the size of the tip of the fore punch. This allows you to blend the nail hole to match the contour of the nails head for a seamles fit.
1364058537795_zpsc188c9ca.jpg


finally you pritchel, you will know you are ready to pritchel when you flip your shoe over and see your "frog eyes" developed
1364058535443_zps62b52050.jpg


you pritchel at a very low heat. you want a clean shear through the nail hole and if its to hot is tears away instead.

you would nornally have one hand on the pritchel but i had to hold the camera
1364058537435_zpsc4344238.jpg


Flip the shoe and clean up the trash
1364058535937_zps1ed8ebf2.jpg


re-run your fuller to unify the sight line
1364058536834_zps55c0f7a7.jpg


Do any final shape adjustments and then put the shoes in the fire. You want them to get fairly hot so you can flatten and brush them.
Flattening is literally overlapping hammer blows that level and equal out the shoes thickness.. (you forgot there were 3 deminsions to worry about....) not as easy to maintain as you think...
then you block brush, and more block brush and more block brus untill you have removed all the slag and scale
1364058531887_zpsb97ebcc9.jpg


So the final result has been brushed and oiled with hoof packing. Its an oil based material that you use to treat different issues within a sore foot but at the right temp the oils will soak into the warm pours of the metal and give a great finish.

Here is the end results. I liked three different designs and all you have to do is pic you fav and spot weld the back to hold it together

#1 as designed
1364058510470_zps67108e18.jpg


#2 slight overlap and different heels
1364058512455_zps84c7161a.jpg


#3 my favorite, with the heads of the nails cut to fit in the heart
IMG_20130323_134949_zps4551ffb5.jpg


So... truned out pretty cool, would make a nice picture frame if you got a piece of glass cut or cool just like that.

If you thought this was fun and not a terrible waste of your time let me know and ill find something else to make with different techniques involved.

Thanks
JP
 

kazlx

Well-known member
Joined
Oct 30, 2012
Messages
2,851
Location
Tustin, CA
I love blacksmith stuff. Definitely want to learn more. I love seeing projects. I've seen some amazing stuff done with very basic tools. Details on the forge?
 

NASTYZEN

Well-known member
Joined
Jun 11, 2010
Messages
2,823
Location
St-Colomban,Que. Canada
Excellent! A real Farrier on here, great idea. Thank's for posting and please keep on doing so.:thumbup: Every time I play with blacksmithing, I find it fun and relaxing work.
Oh yeah, welcome to the G.J.!!
 

CARS

Well-known member
Joined
Jan 19, 2011
Messages
535
Location
New Ulm, MN
Subscribed!!!

I love watching blacksmiths. If I was closer to one of the guilds I would join in a heartbeat. Someday :beer:
 
OP
D

DoghouseForge

Well-known member
Joined
May 11, 2013
Messages
374
Location
Lakeland, Fl
Wow, ok...great to see such a good response. I appreciate the enthusiasm!

Ill trasnsfer another one of the existing posts over when the kiddo goes down for her nap. Being mothers day, I am on duty...:thumbup:


I love blacksmith stuff. Definitely want to learn more. I love seeing projects. I've seen some amazing stuff done with very basic tools. Details on the forge?

The Forge is a "N.C. tools "Whisper Low Boy"" , Its built for horseshoeing competition forging. Its heat recovery and welding heat times are really fast. This isnt super important for general blacksmithing but when your competing and have only 30 min remaining to make a pair of specialty horseshoes that take 40 min to make, the speed of heat recovery and turn around is necessary to compete sucessfully. I use to run a smaller forge in the truck but when I rebuilt the rig I used one of the two 3 bunner contest forges I had in it instead. Seems silly and overkill, but it saves me time during my daily horseshoeing work. Every minute saved is a minute you can use for yourself or dedicate to more work... If I work on 30 pairs of shoes in a week, and save 2 minutes on each pair in forge heat recovery; then I have an extra hour per week that I can shoe another horse, trim 4 horses, or take a hour lunch break in the resturants A.C. :rolleyes:

If anyone decides to buy a set up to try and work on any of this stuff the links below will be your best bet as far as forges go. I would'nt recommend jumping into full on coal or coke fire set ups untill you really decide this is something you want to pursue...

Wisper momma:
Definatly the best value for the money.
http://www.centaurforge.com/NC-Whis...-Page-for-full-details/productinfo/NCMOMMAOE/
MommaOE3_zps11b191e8.jpg


Whisper Deluxe:
another option:
http://www.nctoolco.com/forges_whisper_deluxe.html


Wisper Low Boy Link :

http://www.centaurforge.com/NC-Whis...e-Page-for-full-details/productinfo/NCLOWBOY/
thCAZBYL85_zps78f47aaa.jpg


http://www.nctoolco.com/forges_nc_whisper_low_boy.html

I can put together a start up basics kit if anyone would like. Just let me know and I ll make a post for it.

Ok, thanks again and I will try to get the "Tomahawk Project" loaded up some time this afternoon. Im almost finished with a knife building post, and a post on building a turning jig for twisted hooks and stuff. They should be finished over the next couple weeks.

JP
 
Last edited:
OP
D

DoghouseForge

Well-known member
Joined
May 11, 2013
Messages
374
Location
Lakeland, Fl
I want to say again a Big! thanks for all the compliments.

I will be honest that I will probably not be able to post multiple projects back to back but being that these were already posted the copy and paste technique is a lot easier to do and faster than the original layouts and photo transfers. So, here is a post on replicating antique wrought iron, and a post on making a tomahawk from bar stock.

Enjoy and please let me know what you think! Any project ideas or tips from experiences I dont have will be greatly appreciated.

March 17, 2013:

Forging replicated antique wrought iron strapping:

So.. This isnt a display of precision, its is a totally improvised experiment in how to create an affect and stlyized design idea.

The back story: my 10 year old nephew is obsessed with pirates and my sister in law asked if there was any way we could work together on a treasure chest for his birthday. Shes going to find an antique trunk and I said I would work out the hammered strappings, lock plate, and hinges. So today I made a test strapping piece to test some ideas.

Unlike the previous post, I switched gears alot and had to adapt to what the metal was showing me in order to reach the result I wanted.

So here is my experiment on making antique hammered strapping out of new bar stock....

I had to do a little math so that i can recreate this if it works, so I wanted the total lenght to be around 4"long . The tickness of the bar stock is 3/8" and i want to end up at 1/8'' thick. So in theory I should gain a 1/4" of length for every inch that decrease in thickness from 3/8" to 1/8". I tend to be heavy when im drawing metal and get more than I technically should so I subtrcted 1/2" from my measurement. If i was short I can alwys draw out the length later. -(i ended up doing this because it needed to be longer)
1364135444432_zpsa76d0c83.jpg

1364135448754_zps3cc7fdf9.jpg


forge was set at a medium heat for today because the material was going to be made thinner and you dont want to scald it or burn it up.
1364135453891_zps671a3960.jpg


I heated a much longer piece to make working the material easier at the beginning
1364135456198_zpsd95f753b.jpg


Im only concerned about the last 4" of heat so I quenched off the unnecessary section
1364135457316_zps8bf53857.jpg


todays Im going to use two different hammers one is a rounding hammer and one is a clipping or cone hammer...
1364135460968_zps75a5cdb0.jpg

1364135460355_zps623a4886.jpg


I wanted a hammered look so i began by chipping and moving metal around into the shape I had in my mind
1364135458897_zpsff98f523.jpg


1364135461407_zps0467ea3a.jpg


1364135459321_zpscf5eee54.jpg


Unfortunately this was not working like i wanted. I had to abandon the hammered look and try to obtain my shape first and then return for the finish after.


I switched to the rounding hammer and used the radious of the top of the anvils horn and the round side of the hammer to forge this hourglass starting shape
1364135462134_zpsaba9c747.jpg


then i switched to the face of the anvil and the flat side of the hammer to drive the shape further into the middle and out from the center of stock. This worked well but I wasnt able to keep the flare at the base like i was planning on so I again had to figure out how to get the metal back where i wanted it without wrecking what i was happy with.
1364135463958_zps7f00160c.jpg


I decided to "bump" the flare into the rear of the strap. To do this you hit the top of the working stock with the base pushed hard on the face of the anvil. The anvil actually pushes material into the steel and the hammer pushes from the top. Its a common way to increase the density of a metal. as an example, you would do this to the toe of a horseshoe in order to give the point of greatest wear more density to outlast the less used areas...
1364135465856_zpsc179c23a.jpg


much better and cleaner
1364135467940_zpsf640d9b6.jpg


I was now happy with the rear section of the strap and needed to rid myself of the long shaft so I could shape the front.
this is a hot cut, its used to cut heels in horseshoes. truthfully we dont use them anymore because they are messy and hard to keep from damaging. Your suposed to use a brass hammer so you dont damage the cutting edge but Im a risk taker! : )
1364135481069_zps109d8db4.jpg

1364135481461_zpscfe646f0.jpg


pretty self explanitory on how it works
1364135481983_zps5c0b1429.jpg

lay it on top and drive it home
1364135482407_zps4b1e265b.jpg


I choose to use the hot cut because it would give me the curved and pointed shape at the tip of the strap without me having to wreck everything to achieve it through forging.
here's the cut section hot and ready to be drawn down
1364135482941_zps5447fb02.jpg

1364135483322_zpse508d38a.jpg

1364135484087_zpsf3129208.jpg


end or part 1 of 2
 
OP
D

DoghouseForge

Well-known member
Joined
May 11, 2013
Messages
374
Location
Lakeland, Fl
part 2 of 2

ok.. i am very sorry but i apparently didnt take a photo of the drawn out section.
in the next few pics if you simply remove my forging and filed areas it was the same deminsion from the top of the blown out ridges to the hot cuts tip.


So in order to get the classic treasure chest roll to the strapping I used the horns radious to set my curves and then a **** ton of elbow power too "half round file", and "hot rasp" the shape into a finish. Hot rasping is filing the steel at an orange heat. It kinda melts away rather than grinding away. When the heat goes down you can clean up the edges.

half round file
1364136059073_zps4e1c5260.jpg

1364136057185_zpsb039aa6b.jpg


finished shape. pretty much exactly what I was thinking when i imagined it...
1364136054371_zpsa1ff362f.jpg


a quick look back to remind myself that despite the headache I had actually gotten my results
before and after
1364136055300_zps9815ead1.jpg


i used the tip of the cone hammer and layed in my hammer marks...
1364136366340_zps7a56f520.jpg


I thought it looked a little to lunar landscape and not enough antique pitted steel so I used the half round file and smoothed it back out a bit
1364138094634_zps6acea348.jpg


went back over it again and it was closer, still not there but better
1364138095526_zps1bd5a7ed.jpg


I decided to mark out the screw holes and punch starting holes into it. A drill press will bounce around all over the place on an uneven surface like that so the center punch just makes it easier.
1364138092446_zps345bf50c.jpg


drilled out and ready for final finsih work
1364138093603_zps759725d7.jpg


I took a nice even heat and worked all the sharpe edges with the cone hammer. I took my time, reheated when needed and basicly softend the entire piece. this step really made a difference for me.
1364138094008_zps09351479.jpg


here it is brushed and brushed again with a little! oil rub to help the finish
1364139322137_zpsd940ae62.jpg


back side, i guess i didnt mention this. the front is rounded for astethics but the back has to stay flat so you can attach it evenly. basicly achieved this by only working on one side and light hammer blows to the rear during the softening heats.
1364139648323_zps3a9bb573.jpg


Finished idea on some wood at the house , I think it will definitly work for the treasure chest. Now I just have to make 7 more, lol, and a set of hinges...
IMG_3327_zpsf337922b.jpg


So next time i will be in my new shop and will have my helper take picks. I think if everyone is okay with the idea i will start with some terminolgy and application of those terms. Kinda set a baseline so in future post when i mention something or a technique you can refer to it as the glossary of terms in a way...

Im going to say this and i do mean it, but... please realize that not everything will be possible and it will take time to get through them all , but... if you would like to see something made let me know and ill try. If i havent made it before we can try it together. maybe it will work maybe not, but we will definatly learn something.

Thanks again, hopefully pirate treasure chest art isnt to juvenile for everyone. truth is... this was way harder for me to do than the heart project. ; )

JP
 
OP
D

DoghouseForge

Well-known member
Joined
May 11, 2013
Messages
374
Location
Lakeland, Fl
March 31 , 2013

Tomahawk:


This post is pretty big because of all the steps involved in this project. Because of this I have divided it into three sections.
1. Stock prep and bumping
2. Blade forging and handle hole sourcing.
3. Finish and handling


So it was requested that a tomahawk be forged, and I made my first attempt at such a project last night.


I am a farrier, and not a decorative or tool making specialty blacksmith; so in order to achieve the result I was after my process needed to fit my skills, availble tools, and most of all metal stock deminsion restrictions.

These limitations provide a great chance to demonstrate one of the key forging principles...BUMPING or Packing of metal. Bumping is when you compact a section of metal into itself to achieve a greater density of metal in that givin area. My stock selection isnt large enough to have a 1.5" square stock section just lying about so I needed to create sections thick enough to be forged or punched with my largest availble stock option, 3/8x7/8. 3/8" isnt thick enough to punch the mandrel through in order to make your handles hole without tearing. Its also not thick enough to draw out a wide or long enough blade surface. As the blacksmith it is my job to realize these shortcomings and try to prepare for them.

To Begin I layed out my reference marks. I started with a 13" section of stock. I marked the center and 1.5" off each side. When Im done "bumping" I want the total section length to be 10". To accomplish that Im going to bump/pack 3" of material into the area between my to 1.5" marks. This should widen and thicken the area enough to punch the handles source hole without thinning out the metal to the point of tearing.
easter2013024_zps7ebc93ff.jpg


Notice I have heated the stock and cooled the areas outside of my marks. This will cause only the heated areas to pack while the others stay as they are.
easter2013029_zps60aa1740.jpg

easter2013026_zps3023171d.jpg


The mass has begun to increase in the center area
easter2013028_zps0dd59ca8.jpg


To check you progress simply measure the length and that will tell you how much more mass to move
easter2013030_zps55f30982.jpg


The center section is really starting to grow. I keep it clean by constantly hammering any escaped metal back int the party. Another issue you run into is the stock "snakes", and you have to straighten it back out constantly. If its at all crooked you will not pack the mass equally and will blow out off center.
easter2013036_zpsdd608e17.jpg

easter2013038_zps7157fc18.jpg


First bumping section accomplished! Check the math and see what your results were. Unfortunatly I didint get as much thickness as I has hoped. The width was great but punching the hole later will be cutting it close...
easter2013046_zps9558de1a.jpg


Remember the starting points 3/8"x7/8" so it has grown to 5/8th and 1.25" .
easter2013049_zpse9ba36b3.jpg

easter2013050_zps15502cc3.jpg

easter2013047_zps2499c34f.jpg

easter2013051_zpsd8035a5b.jpg


Now we nedd to pack the blade side into a thicker section. This puts more steel into the availible pot when I start pulling it out to forge the blade. I cut the damaged 1'' of the end. Then decided that I want an overall length of 2" to draw from. In order to thicken it I packed 1" into the blades section.

easter2013052_zps3689ce2a.jpg

easter2013053_zps72f22110.jpg

easter2013054_zps491b75c4.jpg

easter2013055_zpsba0735d0.jpg


added 1/8" of thickness as well
easter2013057_zps87e6609a.jpg


Now its ready to begin its transformation into something other than hammered metal
notice the width vary and the rough shape is in the steel. I now hope that there is enough material in "reserve" to for the shape in my head
easter2013058_zps89d6a099.jpg


Gratuitous photo of the forge in prime form, Bumping takes some heat and some time !
easter2013035_zps02376175.jpg


This is the end of section #1 , next is the sourcing and blade forging.


JP
 
OP
D

DoghouseForge

Well-known member
Joined
May 11, 2013
Messages
374
Location
Lakeland, Fl
Blade forging and sourcing the handle hole

The source hole needs to be dead center of stock and needs be widend through different madnrels/punches from thinest to thickest. This packs the metal as it is pushed away from center stock and should keep it from tearing.

I punched a center mark to begin the hole
easter2013063_zps7837e214.jpg


I used an old punch that was damaged beyond tuning and ground it into a "somewhat" round punch
easter2013067_zpsb61a2dee.jpg


Next I took and old tong rein and cut it to make the next size mandrel
easter2013070_zps5eddcade.jpg


This was an awesome moment!
easter2013069_zps8e797959.jpg


I stopped the hole sourcing temporarily so I could rough forge the blade. I didnt want to thin the handle hole area enough that a missed blow while forming the blade would ruin the project.

To forge the blade I heated to a good heat level and worked the hammer with HARD! overlapping blows from the center outward.
easter2013072_zps071cca2d.jpg

easter2013076_zps38d7fe0b.jpg


I used the side of the anvils face to help guide the clean top and bottom ridges.

With the blade roughly formed I cleaned up my center punch so it could be the final mandrel
easter2013074_zps339609c2.jpg


This was a scary moment. I realized at this point that 3" wasnt enough bumping and I probably needed close to 4". It worked and didnt tear but this was definatly my least successfull part of the project. Learn as you go....My mentor always said...among other things...."lifes a nasty teacher because she gives the quiz first and the lesson after" ... case in point.
easter2013079_zps00bae6b4.jpg


I cut the rear section down and put the whole piece in the forge. The next couple heats were to clean up the lines, forge out the "death Spike" ; ) , and set the blades defined starting points.

easter2013082_zps7b9b6fc1.jpg

easter2013088_zpsa5c8776c.jpg

easter2013089_zps7411b058.jpg


Roughly finished
easter2013091_zps44cf49c9.jpg


About 20 min with the files cleaned up the shape enough to call it a "tomahack" lol, NOw I just needed to do the final brush work,

easter2013090_zps5380fb0c.jpg


Heat , brush, cool, brush, repeat....
easter2013095_zpsc8418dfa.jpg

easter2013096_zpsd39dd72f.jpg

easter2013097_zps9d02b5e4.jpg


Thats the end of section #2

Ready to be sharpend, tuned, and handled


Gratuitous shop pic including the Jeep
easter2013027_zps274b0317.jpg


Thanks

JP
 
OP
D

DoghouseForge

Well-known member
Joined
May 11, 2013
Messages
374
Location
Lakeland, Fl
Finish and handling

I used the 320 grit belt to put a nice sharp edge on both the blade and the death spike

easter2013098_zpsba9c16f9.jpg


For a handle I used an old fuller handle. I cut the oval tip off and files in the new shape for the "tomahack" head
Then drove it on and used to the file to clean up the rest of the splinters and snags
easter2013094_zpsfc9484f3.jpg

easter2013100_zpsda41bbef.jpg

easter2013103_zps1c6885af.jpg


Next was "seasoning the handle" , this is a process I do to most all my hammers and its simple and crazy effective. Seasoning is when you lightly burn the handle and the sand away the char to what I guarentee you will be the smoothest finish you have ever felt. Its amazing for hand tools because it drasticly reduces the blister issue that a rough or poly'd handle causes.

To begin I but the whole thing in the forge and get a good char on it. At this point the forge had been running for a couple hours so it didnt take long.
easter2013105_zps8d7bc8c0.jpg


easter2013106_zps3c042b6f.jpg


Now sand it untill the chalky carbon had been removed. Doesnt take very long...
easter2013107_zpse9f44bc2.jpg


nice and smooth
easter2013108_zps801cccf1.jpg


I used the buffer to re tune the cutting edge and claen any char soot off of the head.
easter2013110_zpse104ca8e.jpg


Then of course I had to test it out.... LOL ... ; )

Works!
easter2013111_zps31a0b036.jpg


So its not horrible...If i made another one I could probably make this one look like scap, but Im tired and the weekend is over so maybe another day. Untill I make a better replacement this little baby is going on the awards shelf. From straight stock to this was a really cool project I want to remeber!

Looks good with the compitition shoes and old blacksmith/farrier books.

easter2013115_zpsc6ca6b1f.jpg


easter2013121_zpsfb5ba70f.jpg


Thanks for checking it out and I hope everyone has a great week!

As mentioned before if anyone is interested in a forging tools start up list or has any request just let me know.


JP
 

BD1

Well-known member
Joined
Mar 18, 2007
Messages
4,602
Location
north side
TRULY AWESOME ! That is amazing. I wish you didn't show this. This could be ANOTHER bad habit for me to start. Thanks for sharing.
Now your gonna have to start a beginner thread.
Neighbor had all the blacksmith goodies. Even the ''tall cones''. His setup was awesome. He died and his wife had it forever. She mention to a relative she's thinking of getting rid of the ''junk''. Well some dude came over and took all. Even had a trip hammer and the largest anvil i ever saw. At least 3 feet long and 400 or 500 pounds. He gave her a few bucks to help her out. Must have been 50 tongs at least. She tells me about it AFTER it is gone. I asked her , wouldn't you wanna get screwed by a friend instead of a stranger?
It was really sad. She then asked me about the rest of the husbands goodies.
 

oldgoaly

Well-known member
Joined
Apr 3, 2006
Messages
395
Location
Shiloh, Il
Thank you for posting your work it certainly shows the craftsmanship of the person swinging the hammer! Looking forward to seeing more!
 
OP
D

DoghouseForge

Well-known member
Joined
May 11, 2013
Messages
374
Location
Lakeland, Fl
Wow dude. Cool stuff. So what's the deal with the forges? Do they run off propane?

yes, I use a 40 lb tank in my work rig. It gets very heavy use running the 3 burrner and last 3 to 4 weeks.

In the shop I use two standard 20lb tanks. I just switch them and fill the empty so I always have a second tank on hand... depending on how and what you are building the 20lb tanks last long enough to make having an 80lb shop tank more of a pain than a benifit.

A good tip for propane is when you need to fill the tank go to a place that sells propane for RV uses and large fill outfits(truck stops). If you buy an exchange tank from one of the cages it will have 3.5 gal in it, but the max fill for a 20lb tank is 4.5 gal. So when you get it filled you get an extra gallon and at 3$ / gal its about $13.50 for a full fill. The exchange is say??? $19-$23 depending on where you do it and your getting a gallon less.

Thanks again for all the compliments!

I will have the knife building post transfered soon. I went to "WoodCraft" this morning in between appointments and picked up some beautiful exotic wood selections for the handles. So as soon as I get them finished Ill put up the post.

Im really enoying the different post on this forum!What a great find!

Thanks

JP
 
To avoid these ads, REGISTER NOW!

kazlx

Well-known member
Joined
Oct 30, 2012
Messages
2,851
Location
Tustin, CA
Are those forges that you linked to basically ready to run right out of the box or is there other stuff that needs to be added? I have seen the DIY kits with coal and other ****, but that seems like way too much of a pain, especially to run in my place. I'll have to look around for an anvil.
 

Tamper84

Well-known member
Joined
Mar 10, 2012
Messages
310
Location
Clarington Ohio
Awesome work!!! I used to ride with a farrier. I have complete respect for what you do!!! I did it for about six months, then the guy disappeared lol. Oh well. How about a picture of your truck? Is it a slide in or a custom body?

Thanks,
Chris
 
OP
D

DoghouseForge

Well-known member
Joined
May 11, 2013
Messages
374
Location
Lakeland, Fl
Are those forges that you linked to basically ready to run right out of the box or is there other stuff that needs to be added? I have seen the DIY kits with coal and other ****, but that seems like way too much of a pain, especially to run in my place. I'll have to look around for an anvil.

Yep, unpack it, put the venturies on with like 6 ... 1/2" bolts , attach the injector tube and twist in the push button ignition (yes it has a push button start, LOL) . Hook up you gas and turn it on. It takes about 5 minutes to set it up and includes everything. They ae extremely efficient and dont actually need a huge space to operate. My truck is an example...

Ill put together a basic start up kit and include some good value anvils, tongs, and basic punches etc..

JP
 
OP
D

DoghouseForge

Well-known member
Joined
May 11, 2013
Messages
374
Location
Lakeland, Fl
Awesome work!!! I used to ride with a farrier. I have complete respect for what you do!!! I did it for about six months, then the guy disappeared lol. Oh well. How about a picture of your truck? Is it a slide in or a custom body?

Thanks,
Chris

Farriers have a nack for disappearing, dont ask me why, I couldnt tell you. I think alot of guys make a bunch of money and say "screw it. Im moving to alaska and going fishing..." when the money runs out the come back ,shoe for a while, and disappear again.

I will post some pics of the truck at some point. I havent navigated the forum enough to know if they belong here or in another section... to answer your question though its an aluminium slide out table, aluminium anvil swing out, and a forge swing out. Garth style aluminium shoe rack, drill presses, baldor grinder with 10"wheel, welder, slide out vise, tap gun, belt sander, buffer, and a side tool cabinet for supplies and such. All inside an aluminium body. when its closed you would have no clue that there is a small shop inside it. I call it my transformer. ;)

Thanks

JP
 

Southernbuild

Well-known member
Joined
Aug 25, 2012
Messages
402
Location
North MS
I'll be watching this, Blacksmithing is something I've always wanted to gear up for and try. I'd also like to see pics of your truck setup.
 
OP
D

DoghouseForge

Well-known member
Joined
May 11, 2013
Messages
374
Location
Lakeland, Fl
The truck pics can go here for now. This isnt really blacksmith projct related so when I find a better place I will move them. Maybe I could start a thread on work rigs? Im sure there are a few guys around here with some pretty special trucks.

So...

2009 Dodge 3500 - Laramie, 6.7 cummins turbo, 6 speed auto trans.

The internals were constructed by Kodiak Bodies. They are a division of Georgia Farrier Supply.
Here is a link to there website - http://www.georgiafarriersupply.com

(is worth a look,... seems like alot! of you guys could build this stuff)

delivery day!


closed up-


loaded and working...


The State Fair Grounds Equestrian center Farrier Barn


anyway, thats my Farrier work rig. It gets 22-26mpg on the highway and averages 19mpg combined city/highway. Not horrible and way better than it used to get pulling my old trailer. I think I averaged 13mpg back then. So if your on the fence about upgrading your work rig. Consider that I paid for the improvements to my truck in less than a year with fuel savings alone.

now that I bashed my old trailer i feel guilty...
Gratuitous trailer photo -

DONT EVER LET ANYONE TELL YOU THAT A 6X10 ISNT BIG ENOUGH FOR A NICEWORK SHOP!


Ill try to get the start up list up by this weekend and hopefully will have finished Knife forging post as well.

Thanks

JP
 

kazlx

Well-known member
Joined
Oct 30, 2012
Messages
2,851
Location
Tustin, CA
This is so rad. The forge looks like a good way to heat treat steel too. I've made some dies on my lathe that I want to harden. Looks like I'll have to add it to the list.
 

zuk123

Well-known member
Joined
Mar 25, 2012
Messages
957
Location
Houston TX via Chicago, Phoenix, LA, and San Diego
Great posts!

GJ is pretty loose about what you want to post up in your own thread. I'm not a moderator, but some of the best threads on this site are mostly tied together by the guy who started it, and what HE wants to do, and not a strict adherence to any thread title. Many folks will split off (or double post) stuff that could stand on its own or would add value to another related thread. Some guys don't want to clutter up a special purpose thread... Others just want one place to put all their posts. Mostly, it's whatever works for you and keeps you interested in posting.

The only absolute rule is no politics or religion. Being abusive toward people will get you bounced or thread deleted too, but that is extremely rare. GJ is one of the friendliest, most helpful, and decent places on the web.

Thanks for contributing to the knowledge and community!

zuk
 
OP
D

DoghouseForge

Well-known member
Joined
May 11, 2013
Messages
374
Location
Lakeland, Fl
Lets make some knives!


I decided it was time to tackle a project I have wanted to do for quite some time. It was requested that I make a sword, but I unfortunately don’t have the resources to pull off that project yet. So, Instead I made a couple knives from some used rasp. The intention was to make two 8” Chefs Knives that would be good enough to put into daily service in our home kitchen.
Like every other first attempt, I made some mistakes, and had to alter my plan mid-way through. Instead of two kitchen knives I made one kitchen knife and one hunting knife. LOL
The reason will be explained further in the post.

A farrier’s rasp is a great resource for knife making because they are made from a good grade, high carbon tool steel. The exact number/name of the steel I can’t say, but when you hammer this stuff you can feel how hard and dense it is compared to mild steel.


The tang was making holding them difficult so I cut them off and got a nice straight edge for the tongs to bit on.


I heated the side I wanted to forge and began overlapping blows, walking down the rasp to form the shape of the blades tapered point.


When I think of a cool knife shape it always has the “kick back”. There is probably an actual term for it, but its where the top of the blade ***** in before the tip.


So you’re probably asking yourself why didn’t he just cut the shape out of the rasp and grind it down?
With a smooth piece of tool steel you could do that, but the rasp has teeth that have to be flattened otherwise the blade would have bumps and ridges in it. If you forge the teeth carefully and lay them all in the same direction the pattern it creates is really cool!

Another reason I forged it is that grinding tool steel takes a long time. It took hours! To grind down what I left, let alone if I had the whole thickness to contend with. So instead I forged out the blade into the thickness I wanted.


It’s important to try and keep it the general shape you started with because when you lay out the pattern to be cut out, the curves will be in the right direction and you won’t be short.


I marked out the pattern and used the cutting wheel to rough the shape out.


Then I used the big Baldor to get everything tightened back up.


The blade had a tendency to warp under the slightest heat so it’s important that before you commit to your final shape that you carefully level the blade.


This would have been aided greatly by a tool called a “flatter hammer” but I unfortunately don’t have one.

It’s at this point that you will discover why the first knife gets turned into a hunting knife. I wasn’t paying attention and I cut out the wrong side of the handle. ;(


Instead of pitching it I cut the correct side back as well and decided to make a inserted tang hunting knife.


However, The second knife did not receive the same carelessness and I managed a pretty cool full tang handle. Complete with contours for the palm and thumb.


Here are some photos to show the before and after. The blades have been roughly ground at this point but still a long way from finishing.


Meet Mr. Belt Sander: - I found this guy for $25 on Craig’s list and then promptly spent another $50 on various grit belts. LOL
Without this tool or something similar I personally wouldn’t try to take on this project.


Handling the hunting Knife:

So I had a spare hammer handle in the rig and decided to use it as the starting point for the handle.


The tang on the blade was cut down to the same depth as the drill bit used to bore out the hole.
I made several pilot holes in the center of the handle and then turned on the “ H.M.M. or Human Milling Machine” ; working the bit across the groove until I had it evenly bored out.


Check the fit:


I didn’t like the way the blade sat on top of the handle so I used the finish file to notch out a catch for the lower portion of the blade.

 
OP
D

DoghouseForge

Well-known member
Joined
May 11, 2013
Messages
374
Location
Lakeland, Fl
I used a firm setting adhesive to fix the tang into the handle. Epoxy would be best but I didn’t have any on Saturday so this worked fine. Pretty self-explanatory, filled it up with adhesive, dropped in the blade , and kept the excess from getting everywhere with a towel.


while we let that cure...


Tempering the Kitchen knife blade:

The hunting knife is a “shelf sitter”. It was my rough draft but it turned out decent enough that tossing it seemed like a waste. The kitchen knife on the other hand I need to be useable and in turn it needs to be able to be sharpened. In its current state the blade is way too hard and brittle due to the hot/cold influxes it received during the forging process.
Tempering is complicated. I truthfully know almost nothing about the specifics. The basic idea is you have heated and cooled the molecules in the steel rapidly. When you quench the hot steel it condenses and the molecules are left ridged and compacted. This process is referred to as the hardening stage.
Tempering is when you bring the steel up to a certain heat slowly and then cool it off slowly. Every steel has specific tolerances for tempering, but since I don’t actually know what steel this is none of that information is very useful. A generic tempering would have to do. LOL :)

So I heated the forge without the knife inside it and then shut it off. It’s still plenty hot in there for a long time after so your essentially “baking” the blade and letting it cool completely naturally inside the forge.


Since this took a while I went back to the hunting knifes handling job.

I thought it looked a bit too generic so I used the half round file and carved out what the handles vison looked like in my head. It took a little while but it made a ton of difference.


The tempering was done at this point and it actually turned out pretty nice. The colors indicate what temperature the steel was brought up to. The higher it was heated the more hardness is removed. Again I don’t know the specifics but the blue areas were heated to around 600deg.F and the lighter golden areas indicate around 400deg.F. Ideally you would be evenly heated….


So buy the end of Saturday I had the Kitchen Knifes blade forged, cut, roughly ground, and tempered. The Hunting knife was forged, cut, ground, and had a basic handle.


The plain hickory color wasn’t very appealing so I did a fire treatment and then sanded back through it to give it a weathered look.


OP
D

DoghouseForge

Well-known member
Joined
May 11, 2013
Messages
374
Location
Lakeland, Fl
So Sunday was kind of tough because of a lot of starting and stopping, but I managed to get finished with the kitchen knife and get both knives polished up to 600 grit. I wanted to go up to 1000 grit but decided that the quality of the job didn’t merit the time it takes to polish to that level. I’ll go that far when I am totally happy with the blades finish.


To begin the handling I cut two strips of oak and used the grinder to scroll in the front section.


I ran into a problem immediately…the blade narrows so to follow the contour and run the scrolled section down and into the blade seamlessly I had to sand down the handle side in order to make a “reverse wedge”. This worked pretty well. If I had a planer it could have been more precise but it worked for today.


I stopped Saturday evening and grabbed some gel epoxy to set the handle with. I used the vice to get the best contact possible. The vices teeth would have damaged the handle so I put several layers of duct tape over it to smooth out the process.


The epoxy set up for almost two hours before I got back to the project.


The next step was pretty easy. Just grind away the overlapping wood until it matches the shape of the tang.


I wanted to add a couple of safety rivets to the handle. The epoxy is what holds the knife together but the rivets will catch and hold the blade if the epoxy were to fail. It would hold long enough for you to realize something was wrong and stop using the knife.

I used copper rivets, and the drill press to get the holes through the tool steel. It is a slow process because of how hard the steel is.


The rivits were set in epoxy as well and the excess was ground flush to the handle.


The last step was to polish out and sharpen the blades.
This took a very long time. Repetitious passes across the belt sander working my way up in belt grits. For the 400 and 600 grit wet sanding I used a sanding sponge with the paper around it and finished it by hand.


ANOTHER MISTAKE!
The darn carbon from the steel mixed with the water from the sanding and created a dye. My grand plan was to sand down the handle and finish it with Danish oil or teak oil. The stains looked really bad so I decided to do the same fire treatment that was used for the hunting knife. It was a disappointing moment but it turned out pretty good in the end.
So lesson learned. Next time I will finish the blade before I handle. Luckily this was just oak, and not an expensive exotic wood handle…


So the long and short of the rest of the day was polishing when I had a minute, and working the rest.


For my first knives I couldn’t be happier. They are sharp enough to shave the hair off my arm and functionally useful.
My biggest disappointment is in the blades, the forging marks drive me crazy. I know better…I was excited and forgot to brush the slag off the steel before I went to work on it. The slag pops loose and then gets driven back into the blade causing the divots that are left… oh well; I know the solution and will do it better next time.


Thanks for checking it out!

I hope this was enjoyable and mildly informative.

JP
 
OP
D

DoghouseForge

Well-known member
Joined
May 11, 2013
Messages
374
Location
Lakeland, Fl
This is an update to the previous post. I wasnt happy with the results so i repeated the project...

I decided to try another go at the process to see if i could do a better job.

Anyway, same process as before, but I took great care in keeping the steel clean at all times and finished the polishing all the way up to 2500grit wet sand. The buffer took it the rest of the way and I couldnt be happier. I rememberd not to handle it untill after i polished it this time and got some brass rod for the rivits instead of copper.

So here she is!


Stopped at WoodCraft and picked up some beautiful exotic hard woods to build the handles out of. For this project I used the purple heart. The others are zebra wood, Paduke, and Bloodwood.


The blades came out so much cleaner...


Thanks for checking it out.

I havent forgotten the start up tools basics post and will work on the this weekend...

Currently , Im working on a turning jig for making hooks and scroll designs. The hope is to have it refined enough to be able to replicate things and produce alot of the same design. Ive seen some nice ones on ebay but Im trying to make mine out of recylcled materials like 1" railroad plate, tie spikes, and scrap round tubing...guess time will tell!

JP
 
Last edited:
OP
D

DoghouseForge

Well-known member
Joined
May 11, 2013
Messages
374
Location
Lakeland, Fl
When I originally posted this on the other forum one of the members asked a realy good question. I think its important that it be availble here as well because I was'nt detailed enough in my original explanation.

Thanks

JP

Strode182 said:
Nice work, JP! Very cool.

Why do you say tempering takes the hardness out of it? This confuses me....


When I say it softens the metal I'm talking about changing how tightly the carbon molecules are packed into the steel.

When the steel is heated and quenched quickly the molecules shrink together super tight. In turn making the density of the steel greater. The more density the harder and ridged the steel becomes. Is weird but steel actually becomes brittle in this hardened state. If you were to hit the blade on a hard surface it would break. Usually its a clean snap. This happens because there is no flexibility in the super hardened state.

When you temper the steel the heat level is brought up to a lower temperature and ideally maintained there for a set length of time. The higher the heat level and the longer the saturation time the softer the steel should become. If I knew what the steels number/carbon density was I could research and find out the suggested length of time and the correct temperature to bake the blade to get the ideal flexibility and softness.
When its heated the molecules relax and spread out. The expansion lowers the density and allows the steel to have some flexibility instead of being totally ridged.
Because the temp is brought down over a long period of time there is not shock to the molecules and they stay expanded.
Flexibility in a knife is important for the obvious reason that as you cut an object or strike an object the force is transferred to the blade and it needs to have some absorption ability.
The softness becomes important when your trying to sharpen the blade. I'm pretty sure my wife isn't gonna let me keep a belt sander on the kitchen counter so the steel needs to be soft enough to let the knife hone put the edge back on it when needed.
Keep in mind I'm using the word soft but its still very hard. Just files away easily instead of being so dense it requires high grit and rpm's to sharpen.

I hope this helped.

As I said before, metallurgy is a science and takes alot of patience to get correct.

:)
 

Wingnut65

Well-known member
Joined
Apr 21, 2010
Messages
3,170
Location
Tampa Bay, FL
Subscribed. Awesome work you do. I love the knives, hinge and heart. Your talent shows well. :thumbup:

I play architect in real life and in our ALF projects, we use wrought iron railing on the central stair and balcony. I know each picket is not hand made, but getting it all together takes a lot of work.
 

Attachments

  • Stair 1.jpg
    Stair 1.jpg
    42.9 KB · Views: 63
  • DSC01140.jpg
    DSC01140.jpg
    52.5 KB · Views: 56

54FordPanel

Well-known member
Joined
Aug 7, 2009
Messages
5,711
Location
Fort 54, Littleton, Co
Awesome work, JP. The explanation of tempering is along the lines I understand.

I have another question: What's with the word "Farrier"? What is that, like "Fairy+Warrior"? ;)

Shouldn't it be more manly, something like "IronBender"?
 

Lippyp

Well-known member
Joined
Jun 26, 2006
Messages
6,720
Location
Shropshire, UK
Awesome work, JP. The explanation of tempering is along the lines I understand.

I have another question: What's with the word "Farrier"? What is that, like "Fairy+Warrior"? ;)

Shouldn't it be more manly, something like "IronBender"?

A Farrier shoes horses, a blacksmith is more generic and tends to refer to someone that makes objects from iron/steel rather than shoeing horses. A farrier certainly in the UK needs to understand the anatomy of horses feet and the training is different. Smoe blacksmiths were also farriers and vice versa bu there is a difference.

There was also the whitesmith who worked in light metals like tin and pewter making stuff like pots and pans.

I hope to have my coal forge set up later this year as soon as I build another addition to the tin shed where its going so I can move the trailer and mowers etc out of there.

It's going in here


my anvil


not got a decent photo of my forge and I still need to build the hood and chimney.
 
OP
D

DoghouseForge

Well-known member
Joined
May 11, 2013
Messages
374
Location
Lakeland, Fl
Awesome work, JP. The explanation of tempering is along the lines I understand.

I have another question: What's with the word "Farrier"? What is that, like "Fairy+Warrior"? ;)

Shouldn't it be more manly, something like "IronBender"?

I agree! its a strange word for todays times...

When you say to someone "Im a Farrier" they say, "what?". You then have to follow with the statement "I shoe Horses"...That is either heard incorrectly and they respond with "YOU SHOOT HORSES?!?!" , or they enqire about how many professional horesshoe players there are in the U.S.... On more than one occasion I have gotten "so thats what a ferry boat driver is called" ...I guess "ferry boat Captain" was taken....??? :lol:

It comes from the latin word "ferrum" which means "Iron", and is linked with the latin word "ferrārius" to get "blacksmith" ...

You have probably heard the term "Ferrarius metals" before....

As mentioned above the blacksmith primarily delt with Iron and got the name blacksmith because Iron was refered to as the "black" metal. In old England/France many blacksmiths began to specialize in shoeing horses and they began refering to them in the latin slang as "Ferriers".
Other specialty names such as whitesmith, silversmith, and goldsmith refered to a person with different specialties. Blacksmiths were known for working their metal hot while a whitesmith generaly worked their metals cold...silversmiths and goldsmiths are often linked together but actually have very different techniques involving their craft..

Anyway thats where it comes from...so a few hundred years ago the word "Ferrier" was about as manly as you could get since it was basicly saying
"IronBender" ! ;)

but... now days we dont use latin so instead I will be forever cursed to be the man who "shoots horses and drives a slow moving boat"....:lol:


JP

also...witha handle like "The Gypsy" I would expect nothing less than for you to admire the portable shop over the work. ;)
 
OP
D

DoghouseForge

Well-known member
Joined
May 11, 2013
Messages
374
Location
Lakeland, Fl
Nice to hear form you 'Lippy P"

Glad to see a fellow "hammer head" on the forums.

I llook forward to seeing your forge! and the double horn is a great anvil.
Super Rare!

get it cleand up a bit and you'll be ready to rock...

JP
 
To avoid these ads, REGISTER NOW!
Top Bottom