To avoid these ads, REGISTER NOW!

Blast Cabinet Improvement

Jeff Ivers

Well-known member
Joined
Apr 9, 2010
Messages
2,555
Location
Oklahoma
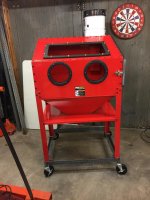
I have one of those red blast cabinets (like many of you) I picked up used off Craig's List. I use it a lot and can't seem to live without it, but have always been frustrated with the visibility issues. I run a swirl pot and vacuum to take care of dust issues. I have disposable vinyl over the viewing glass and the glass for the light opening. It seems I am always stopping to clean the vinyl or replace it as necessary. Even with that, I seem to enjoy only a few minutes where I can actually see what I am doing.

Today I did something about it.
24 inch LED light.JPG
I went to my local Ace hardware and purchased this 24" LED light that puts out 2000 lumens.
LED vs original light.JPG
This picture shows the LED light on the bottom vs the original T8 pair.
blast cab before.jpg
This is the view I had before I started.
blast cabinet after.JPG
This is the view after replacing the light.
blast cabinet after, new vinyl.JPG
This is the view after replacing the light and the protective vinyl.

I have actually used the blaster for a couple of hours now and can still see what I am doing!
 
To avoid these ads, REGISTER NOW!

crkleve

Well-known member
Joined
Sep 2, 2015
Messages
99
Location
North Central Iowa
I like the additional light. Good job!

On your cabinet... how is the dust outside the cabinet? I have one and plan to rebuild/seal it much better than it is now as I get too much dust in my entire garage when I use it. Have you experienced this issue?
 
OP
J

Jeff Ivers

Well-known member
Joined
Apr 9, 2010
Messages
2,555
Location
Oklahoma
My light is inside the cabinet. I have not noticed any dust problems outside the cabinet. The vacuum I use has a very fine HEPA filter and a drywall dust bag.
 
OP
J

Jeff Ivers

Well-known member
Joined
Apr 9, 2010
Messages
2,555
Location
Oklahoma
I have used my blast cabinet a lot during the last 5 years. Alas, it is in need of some rehab and upgrades.

I have always assumed it was a HF unit (based on appearance) until I started disassembling it.
blast cabinet 4 r.jpg
blast cabinet 5 r.jpg
Front and back outside appearance.
blast cabinet 9 r.jpg
The baffle over the rear port is closed at the top.
blast cabinet 10 r - left rear corn.jpg
The corners of the main cabinet are welded together.
blast cabinet 14 r.jpg
The bin is welded together.
blast cabinet 19 r.jpg
This is the double siphon tube.

Ok, the reasons for the tear down:
1 - I previously doubled the interior light to 2000 lumen, but still had to pause about every thirty minutes to wipe dirt off the vinyl protecting the glass over the light and viewing window.
2 - I would like more interior height.
3 - Replacing the vinyl protecting the light and viewing window is getting increasingly more difficult (as I age) because of the long reach to get to both the top and bottom of the machine screws at the same time,
4 - I have really never liked the shelf that acts as a brace for the legs.
5 - I don't like the way the previous owner attached casters.
6 - Periodically the siphon tube clogs up - more on this later.

Can anybody identify the brand of cabinet I have?
 

csp

Well-known member
Joined
Mar 23, 2010
Messages
5,719
Location
Franktown, CO
Ditch the vinyl and use a piece of single pane glass on the inside. You get get a 24x36 piece at Lowes for less than $10 and have them cut it into three pieces of 24x12 for free.

You're having to wipe dust off because the vacuum isn't sufficient.

I'm guessing that you have an older version of the HF or some other brand that comes out of the same factory. Not sure what difference it makes.
 

coljar

Well-known member
Joined
Sep 26, 2010
Messages
6,243
Location
Belpre, Ohio
I have the single flood on the inside of my 960 Tip scatblaster which is not adequate and have been meaning to upgrade to an LED setup.
 

islandkent

Well-known member
Joined
Jan 29, 2009
Messages
281
Location
PEI,Canada
Ditch the vinyl x2. My glass has quite a few hours on it. Still great. I primarily use glass beads. So not too aggressive. Agree with the vacuum statement also. Try closing off you intake air a little. Yes I find visibility is the key to a good job blasting. The less shadows the better. More light certainly helps. I have three lights in my cabinet. One in each upper corner pointing down. And one right between the gloves pointing at what I'm blasting. No shadow what so ever.
 
OP
J

Jeff Ivers

Well-known member
Joined
Apr 9, 2010
Messages
2,555
Location
Oklahoma
Ditch the vinyl and use a piece of single pane glass on the inside. You get get a 24x36 piece at Lowes for less than $10 and have them cut it into three pieces of 24x12 for free.

You're having to wipe dust off because the vacuum isn't sufficient.

I'm guessing that you have an older version of the HF or some other brand that comes out of the same factory. Not sure what difference it makes.

Are you talking about adding a piece of glass to shield the glass that is already there or just treating the glass as a disposable item?

How much vacuum is needed?

With regards the model, it is just a matter of curiosity. Wondering if this is a really old version of the HF that shows design changes that were subsequently made to sell them cheaper or if this was a totally different brand.
 
OP
J

Jeff Ivers

Well-known member
Joined
Apr 9, 2010
Messages
2,555
Location
Oklahoma
With regards the lighting, I have seen some cabinets using floods on the inside of the cabinet. I have some concern that I would find those to be in the way, although I did order a flood holder and LED flood to try if I continue to not be happy with my new upgrade.

About 5 years ago, I installed this:
24 inch LED light.jpg
This doubled my light to 2000 lumens and helped a lot.
For this go around, I ordered a pair of lights that will double me to almost 4000 lumens.
blast cabinet 20 r.jpg
In order to mount the new lights, I installed some 3/4 inch aluminum channel upside down using the original light mounting holes. Then I could attach the mounting clips for the new lights to the channel.
blast cabinet 23 r.jpg
The new lights mounted up and wired. I could see where these lights might work well attached to the inside of the cabinet if you have a cabinet without the separate light box.
 

islandkent

Well-known member
Joined
Jan 29, 2009
Messages
281
Location
PEI,Canada
Yes ditch that stick on protectant film. I put the glass on the business side of the media. I just got my cabinet in Dec of 2019 so I still have my plexi glass insert and i put that on the outside side of the cabinet to protect my glass. I have quite a few hours on my little cabinet and just did my first "service" on her a couple of weeks ago. New gloves, put new tape in the inside corners of my "slope" system and replaced a led light. And just flipped my glass rough side out. I found that once the glass got etched it did have a tendency to catch a bit of dust. Not bad though. Still great seeing. Hence I did not replace it yet.


Wow lots of those led lights on those strips. Would be really bright in there. Yes I see that you have the light box on her. Ever think about putting a glass barrier on the light box. Glass just seems to be more durable.
 
Last edited:

American Locomotive

Well-known member
Joined
Jan 8, 2017
Messages
10,943
Location
Rhode Island
We ended up putting a bunch of those stick-on LED light strips around the inside of our "red" cabinet. All around the window to help reduce shadows. They've been working out great.
 

csp

Well-known member
Joined
Mar 23, 2010
Messages
5,719
Location
Franktown, CO
Are you talking about adding a piece of glass to shield the glass that is already there or just treating the glass as a disposable item?

Use the single pane glass instead of the vinyl. It becomes the sacrificial piece under the existing double pane.

How much vacuum is needed?

You'll have to experiment with yours to find out. The guy that runs Tacoma company has gauges you can add to see the efficiency. Might be worth a call to talk to him.
 
OP
J

Jeff Ivers

Well-known member
Joined
Apr 9, 2010
Messages
2,555
Location
Oklahoma
Yes ditch that stick on protectant film. I put the glass on the business side of the media. I just got my cabinet in Dec of 2019 so I still have my plexi glass insert and i put that on the outside side of the cabinet to protect my glass. I have quite a few hours on my little cabinet and just did my first "service" on her a couple of weeks ago. New gloves, put new tape in the inside corners of my "slope" system and replaced a led light. And just flipped my glass rough side out. I found that once the glass got etched it did have a tendency to catch a bit of dust. Not bad though. Still great seeing. Hence I did not replace it yet.


Wow lots of those led lights on those strips. Would be really bright in there. Yes I see that you have the light box on her. Ever think about putting a glass barrier on the light box. Glass just seems to be more durable.

Yes, I have always had a glass barrier below the lights. It came with the cabinet and is about 1/4 inch thick. Per recommendations from years ago, I have had vinyl taped to the inside of the cabinet side of the glass to prevent the glass from etching, as I believed the etching would reduce the light.

blast cabinet 15 r.jpg
This is a pic of the glass with the attached piece of vinyl that has been on there for over a year.
blast cabinet 16 r.jpg
This is a pic of the glass with the vinyl removed. You can see that at one time the vinyl was undersized and resulted in some etching of the glass and the reduction in light transmittal.
 
OP
J

Jeff Ivers

Well-known member
Joined
Apr 9, 2010
Messages
2,555
Location
Oklahoma
I mentioned earlier that I would elaborate on the clogged siphon tube. Overall, I have been relatively pleased with the stock blast gun and feed system. I have rarely experienced any surging. And, that occurred when I forgot to empty the water separator upstream from the cabinet. I have had periodic clogs of the siphon tube. When they occur, I drain the cabinet of all media which I then run thru a screen filter before reusing the media. What I find caught in the screen are flakes of rust, paint or powder coat that have blasted off. I also sometimes find string of caulk. I blow compressed air backwards thru the gun nozzle to clear the clog.
blast cabinet 21 r.jpg
blast cabinet 22 r.jpg
The above 2 pics show remnants of what appears to be silicon caulk applied by the previous owner.

I have watched a number of videos and read a number of posts where people recommend caulking the interior corners of the cabinet and bin. Why? When the seams are welded, can there possibly be that much leakage? If one has a vacuum attached and is maintaining negative cabinet pressure, would not the flow of air be into the cabinet from any leaks and then out the vacuum? If the seams are bolted together, should not the sealant be placed between the pieces before bolting them together?

At this time, I plan to remove these caulk remnants and not replace them. If seam sealing is an issue, I am thinking metallic duct tape on the outside of the cabinet would be far more effective and less troublesome. What say others?

I have ordered an Eastwood kit with a foot pedal and new gun and built a siphon valve that I will be using in the future. I like the idea of foot control and the new gun and valve have larger opening that I hope will accommodate the occasional flakes.
blast cabinet 1 r.jpg
blast cabinet 2 r.jpg
blast cabinet 3 r.jpg
 
Last edited:

csp

Well-known member
Joined
Mar 23, 2010
Messages
5,719
Location
Franktown, CO
I have watched a number of videos and read a number of posts where people recommend caulking the interior corners of the cabinet and bin. Why?

Because you're reading about cabinets that aren't welded together.

If the seams are bolted together, should not the sealant be placed between the pieces before bolting them together?

No, because the cabinet has to be loosely assembled with all of the pieces in place if you want a square cabinet assembly. I suppose you could caulk first, but it's going to be messy putting it all together. It's easier to fully assemble, tighten all the fasteners, and then caulk the joints.

And even with negative pressure if you point the gun towards a panel joint it's going to force some media to possibly pass through the joint. These cheapie cabinets come with foam tape to "prevent" leakage, but it doesn't do a good job.
 

islandkent

Well-known member
Joined
Jan 29, 2009
Messages
281
Location
PEI,Canada
That's the reason I used 3-M doubled sided tape. The same stuff for holding on car trim. Can't beat 3-M. A little thicker than the tape that came with the cabinet. The 3-M is about twice the thickness of the supplied tape. I cleaned all the surfaces that were to be taped with some rubbing alcohol for better adhesion. And yes, be dam good and sure you have the pieces in the right spot. The 3-m stuff is not very forgiving. You can wiggle the pieces into place if they are just lightly touching. But once you press them together... Good luck.
I assembled the cabinet and funnel on my kitchen table and then brought them out to the shop for final assembly. Yes I have a great wife. She did buy my cabinet for my X-mas gift. I just took my time and it came out perfect. The only spot that has a bit of leakage is on the bottom hatch area.
 
To avoid these ads, REGISTER NOW!
OP
J

Jeff Ivers

Well-known member
Joined
Apr 9, 2010
Messages
2,555
Location
Oklahoma
Because you're reading about cabinets that aren't welded together.


No, because the cabinet has to be loosely assembled with all of the pieces in place if you want a square cabinet assembly. I suppose you could caulk first, but it's going to be messy putting it all together. It's easier to fully assemble, tighten all the fasteners, and then caulk the joints.

And even with negative pressure if you point the gun towards a panel joint it's going to force some media to possibly pass through the joint. These cheapie cabinets come with foam tape to "prevent" leakage, but it doesn't do a good job.


Some of the videos were definitely bolt together bins/cabinets. Some were not clear. I am trying to make sure those reading this thread know that just because it looks like an HF cabinet it may not be or may have quite different construction. I cannot think of a reason to apply silicon caulk to the inside of the joints of a welded cabinet. Can you?

I do want everyone reading to know that based on 6 to 7 years of experience with this cabinet, the silicon applied to painted metal does flake off, get into the media and clog the siphon tube. Might justify a different solution, even if applying caulk in those corners is easier.
 
OP
J

Jeff Ivers

Well-known member
Joined
Apr 9, 2010
Messages
2,555
Location
Oklahoma
Jeff how about a reference to the siphon assembly modification! thanks

I'll try to show more on this as I assemble the cabinet. I have been diverted off my blast cabinet by a failed dishwasher.

In the mean time, this siphon valve was assembled by me after reviewing a number of videos and posts by others that had done the same thing. There are companies that will sell you a siphon valve for $60 to $70. I have about $20 in this one plus a few plumbing bits I already had. The down part of the assembly is a 1" ****** followed by a 1" to 3/4" reduction Tee followed by another 1" ****** and a 1" female cap. Inserted into the side of the down assembly are a 3/4" ******, a 3/4" to 1/2" reduction Tee, a 1/2" ball valve and a couple of brass bits to adapt to the 1/2" i.d. tubing that goes to the blast gun.
 
OP
J

Jeff Ivers

Well-known member
Joined
Apr 9, 2010
Messages
2,555
Location
Oklahoma
That's the reason I used 3-M doubled sided tape. The same stuff for holding on car trim. Can't beat 3-M. A little thicker than the tape that came with the cabinet. The 3-M is about twice the thickness of the supplied tape. I cleaned all the surfaces that were to be taped with some rubbing alcohol for better adhesion. And yes, be dam good and sure you have the pieces in the right spot. The 3-m stuff is not very forgiving. You can wiggle the pieces into place if they are just lightly touching. But once you press them together... Good luck.
I assembled the cabinet and funnel on my kitchen table and then brought them out to the shop for final assembly. Yes I have a great wife. She did buy my cabinet for my X-mas gift. I just took my time and it came out perfect. The only spot that has a bit of leakage is on the bottom hatch area.

That 3-M tape sounds like a good idea.
 

csp

Well-known member
Joined
Mar 23, 2010
Messages
5,719
Location
Franktown, CO
Some of the videos were definitely bolt together bins/cabinets. Some were not clear. I am trying to make sure those reading this thread know that just because it looks like an HF cabinet it may not be or may have quite different construction. I cannot think of a reason to apply silicon caulk to the inside of the joints of a welded cabinet. Can you?

Yes it's entirely possible that there are others out there. I can't think of any reason why anyone would assume that they are all HF, nor can I think of any reason why anyone would assume that a fully welded joint, or a corner made on a sheetmetal brake (sides and back one piece of sheetmetal) would have silicon caulk applied. This would be why I felt it safe to assume that anything you saw where caulk was being applied is very likely a bolt together joint. No, there is no reason for caulk on a joint that it truly solid metal for the entire length of the corner.

BTW, roof & flashing sealant is a lot more durable than silicone caulk. It takes longer to set up, but is tough as nails.

bugnut: a couple of photos of my homemade metering valve
 

Attachments

  • IMG_4614[1].jpg
    IMG_4614[1].jpg
    115.1 KB · Views: 176
  • IMG_4615[1].jpg
    IMG_4615[1].jpg
    107.3 KB · Views: 153
Last edited:
OP
J

Jeff Ivers

Well-known member
Joined
Apr 9, 2010
Messages
2,555
Location
Oklahoma
I was able to get back to work on the blast cabinet for a while today.
blast cabinet 30 r.jpg
Years ago, when restoring my Bowser gas pump, I placed the volumizer into the cabinet to clean it up. It was too heavy for the cabinet as shown here.

blast cabinet 25 r.jpg
blast cabinet 27 r.jpg
One of my goals is to increase the workable height in the cabinet. I had watched a video of someone doing this by slipping the side channels off the screen, cutting the screen down and then reinstalling the shortened side channels. That did not work for me. It turned out the side channels were spot welded in the corners. The screen seems a bit week to me as well, so I will have to figure out what to do about this.

blast cabinet 31 r.jpg
This is the hopper after sanding lightly with 220 grit, wiping down and then applying rust converter to the bare spots. It is interesting to note the wear pattern on the paint.

blast cabinet 32 r.jpg
I believe this will work for me as reinforcement for the screen.
 

islandkent

Well-known member
Joined
Jan 29, 2009
Messages
281
Location
PEI,Canada
That looks like it will do the trick. I did that mod to get more height in the cabinet. Seems to be working out good so far for me. Heaviest thing I blasted so far was a original 340 cast center dome. Mind you I wasn't throwing it around in there.
Jeff did you ever think to cut back those little stubs on your new "screen" or would that be too low to be comfortable? Just thinking those stubs just might bend on you or wear on the inner cabinet walls maybe causing holes? Wouldn't it give you more support if you cut back to those other cross bracing. Know what I mean?? Just saying.
 

atch

Well-known member
Joined
Apr 4, 2006
Messages
842
Location
Columbia, Missouri
...Just thinking those stubs just might bend on you or wear on the inner cabinet walls maybe causing holes? Wouldn't it give you more support if you cut back to those other cross bracing. Know what I mean?? Just saying.
If you think that might be a problem maybe you could weld strips of 1/8" x 1/2" flat stock, or 1/2" square stock, or 1/2" angle iron underneath so that these small (possibly sharp) points won't be in direct contact with the cabinet walls.
 

csp

Well-known member
Joined
Mar 23, 2010
Messages
5,719
Location
Franktown, CO
That did not work for me. It turned out the side channels were spot welded in the corners.

Cut the spot welds out. You're going to have to cut at least one end off of that piece that's welded anyhow as they will need to be shorter to drop further down.
 

zippyslug31

Well-known member
Joined
Jul 11, 2017
Messages
207
Location
Central Oregon
I ended up cutting my screen down and then realized that I'd also have to cut down my underlying support assembly too. It was a little fiddly, but well worth the extra bit of time.

I should add that I carefully tack welded the sub frame thingy once I had it cut to size (low amps... it's crazy thin!). Basic red Rustoleum spray bomb is a very close match to the OEM color, too. Passes close enough to factory finish.
 
Last edited:
OP
J

Jeff Ivers

Well-known member
Joined
Apr 9, 2010
Messages
2,555
Location
Oklahoma
That looks like it will do the trick. I did that mod to get more height in the cabinet. Seems to be working out good so far for me. Heaviest thing I blasted so far was a original 340 cast center dome. Mind you I wasn't throwing it around in there.
Jeff did you ever think to cut back those little stubs on your new "screen" or would that be too low to be comfortable? Just thinking those stubs just might bend on you or wear on the inner cabinet walls maybe causing holes? Wouldn't it give you more support if you cut back to those other cross bracing. Know what I mean?? Just saying.

Very good point concerning the stubs. I took that picture when I had just cut it down to size for trial fit. I have since added cross pieces to eliminate the stubs. I'll post a pic later.

If you think that might be a problem maybe you could weld strips of 1/8" x 1/2" flat stock, or 1/2" square stock, or 1/2" angle iron underneath so that these small (possibly sharp) points won't be in direct contact with the cabinet walls.

That would have worked, but I decided to try more 1/4 inch rod.

Cut the spot welds out. You're going to have to cut at least one end off of that piece that's welded anyhow as they will need to be shorter to drop further down.

I did drill out some of the spot welds. The problem is that before I did that I had already cut the perimeter pieces to the size I thought I needed. I have kinda butchered the assembly and may be looking for a replacement.

I ended up cutting my screen down and then realized that I'd also have to cut down my underlying support assembly too. It was a little fiddly, but well worth the extra bit of time.

I should add that I carefully tack welded the sub frame thingy once I had it cut to size (low amps... it's crazy thin!). Basic red Rustoleum spray bomb is a very close match to the OEM color, too. Passes close enough to factory finish.

My underlying support was already bent up which is why I am leaning to using this welded rod assembly.
 
OP
J

Jeff Ivers

Well-known member
Joined
Apr 9, 2010
Messages
2,555
Location
Oklahoma
Yesterday, I cut apart the support assembly that sandwiches between the hopper and the cabinet. Since I am lowering the screen 3" into the hopper, the center of this support needed to go. I decided to keep the perimeter of the support as I believe it will continue to provide some needed strength and sealing assistance.
blast cabinet 33 r.jpg
This shows where I decided to make the cut.
blast cabinet 34 r.jpg
This shows the expected fit on the hopper.

I am trying to find a replacement for the sealant strip that goes on both sides of this support, since I damaged it a bit while cleaning up my cuts. If I can't find replacement, I may just add some RTV (red gasket silicon).
 

csp

Well-known member
Joined
Mar 23, 2010
Messages
5,719
Location
Franktown, CO
Every big box hardware/lumber store sells adhesive weatherstrip in varying widths and thicknesses. It's better stuff than the makers of these cheaper blast cabinets use.
 

metalmagpie

Well-known member
Joined
Nov 1, 2011
Messages
796
Location
Seattle
I used to have a little old HF cabinet. It had very thin gauge sheet metal on top and the dreaded vinyl window. The top rippled and looked (to me) **** ugly.

I removed the vinyl window. I made 3 pieces of sheet metal "angle" and welded them on around the rectangular opening. That stiffened the top, made it planar, and allowed me to slide in a piece of double-strength glass.

viewport.jpg


I got a bunch of thin polycarbonate sheets cut to the size of my glass at Tap Plastics. They were like a buck apiece. In use I'd tape one to my glass and slide in the glass.

It was to me a far more satisfactory viewport after the modifications.

metalmagpie
 
Joined
Jul 19, 2020
Messages
11
Location
Home
That 3-M tape sounds like a good idea.
There are different types...the white or black VHB (very high bond) foam based tape is more commonly found. It is not as resistant to blasting as the 3M grey which is a denser material (and I think referred to as XHB: Extremely High Bond).
 
OP
J

Jeff Ivers

Well-known member
Joined
Apr 9, 2010
Messages
2,555
Location
Oklahoma
The original air inlet looked like this on the rear of the cabinet.
blast cabinet 7 r.jpg
I am going to turn this into the outlet. The plastic bit I have to plug a hose into was just a wee bit undersized, so I needed a bit of a shim.
blast cabinet 40 r.jpg
The plastic bit won't get attached until I have repainted the back of the cabinet, but here is where it will go.
blast cabinet 41 r.jpg
The old air outlet will become the air inlet and I decided to follow other's recommendations to create a baffle for it on the inside of the cabinet.
blast cabinet 35 r.jpg
A cheap WM aluminum pan. Cut 1" off the end then used the vise and a hammer and anvil to flatten the rolled edge.
blast cabinet 37 r.jpg
Test fit and mounting holes drilled for installation after painting.
blast cabinet 38 r.jpg
I have painted the interior and exterior of the media bin, finished and painted the support for the screen, and painted the support frame that goes between the bin and the cabinet. I found appropriate new weatherstrip on Amazon.
blast cabinet 39 r.jpg
 
Last edited:
To avoid these ads, REGISTER NOW!
Top Bottom