islandkent
Well-known member
Well done Jeff! Only goes to reason you would not want to blast right towards your vacuum exhaust. The support turned out great! Nice fresh paint. Not for long. lol
What's left??
What's left??


Well done Jeff! Only goes to reason you would not want to blast right towards your vacuum exhaust. The support turned out great! Nice fresh paint. Not for long. lol
What's left??
Hey Jeff I used the KISS method "keep it simple stupid" I made a bottom shelf out of 2x4's for the frame between the legs and mounted a piece of 3/4 inch plywood on it for the shelf. Then mounted my castors to this frame. Real heavy duty. I just finished by wrapping the showing edge of the 2x4's with black gorilla/duct tape for a nice finished look. Looks better than paint with out the mess. And then I just cut a piece of black rubber runner rug to cover the shelf. Real clean appearance in my opinion, and didn't break the bank. Here is a pic of the finished shelf.
The white piece of tape on the leg reminds me where the locking castors are. One on the back one in the front. Getting old you know. lol
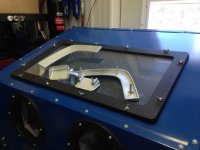
For my window install and easy access to the back part of the cabinet I used the generic you tube up grade. I installed those thread inserts and then used some little wing nuts for tooless accessibility. You know what I mean. Real simple and fast. I did have to buy the rivet kit though. Not a bad purchase. I have been using that tool on several occasions where a blind nut is desired.


Now your talking Jeff! The rails turned out great! Make a nice solid shelf. Yeah get that vacuum back there. The cross draft will help with visibility for sure. Wont be long now. How ironic using a grinder to clean up that bracing on your blast cabinet! lol
Done yet? Done yet? lol


How does the stud for the wingnut on the air filter connect to the pvc?


I always thought that the round port in the back was the "exhaust" or what not, Not an air inlet, Because quite frankly the amount of dust and **** that comes out of this port lays an eighth inch of dust on everything in my garage for every 5-10 minutes of use. I tried stuffing rags up the rectangular port from the inside and more rags from the outside but to no avail. Still lays a ton of dust on everything. I thought since you have it connected to a monster air compressor, the air would be coming in via the nozzle and out that port. (to sort of equalize the pressure inside vs outside. If I put the cap on it that the cabinet came with, it just blows it off, thats how I concluded that was the "exhaust" port.
So when you put that air filter on the drain elbow, do you get an excessive amount of dust/glass/or whatever you have in your sand blaster at the time, stuck and clogging that filter or if its pulling air in, it should be dirty on the outside of it vs. the inside.
Maybe I have my cabinet setup wrong.
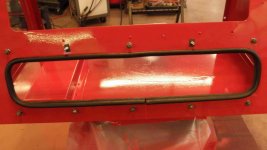
I too have the glass problem as well and mine, the glass has been etched and is really "Foggy" and therefore the fluorescent light is not very bright due to the glass being so etched and now obstructed. Some video I saw the guy put a little flood light inside the cabinet in the far back corner, and at some point the light bulb will fail, and just change it and call it a day. Get 6 months to a year per bulb and call it cost of doing business
Thanks for all this information, this is fantastic @!!!!
Jennifur