To avoid these ads, REGISTER NOW!

Blocking off wall gap pole barn

RunsDeep

Member
Joined
May 15, 2016
Messages
17
Location
Virginia
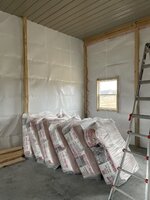
I have a newly constructed 30x40 pole barn. I spray foamed the walls with closed cell and I’m laying a white faced vapor barrier on top. For the ceiling I have vapor barrier, then sheet metal that matches the siding. 20x3 sheets. I also have R30 roll batt insulation after the ceiling is up.

My question is, being that the roof has vented overhangs and a roof vent, there is also a large gap when looking up the walls. I assume this is for people that 2x4 frame in walls which I am not due to a tighter budget. How should I go about closing off these gaps?

Also, with roll batt insulation on the roof, payed between the trusses which are 48” OC do I need the styrofoam vent guards that many use with blown in insulation? Or can I staple or glue down unfaced insulation to hold it in place?

I attached pictures. Thank you!

My main concern is over the gap, pictured with the arrow.
 

Attachments

  • 4BDB3932-2D0F-44BC-8EF8-FEB68001E89E.jpeg
    4BDB3932-2D0F-44BC-8EF8-FEB68001E89E.jpeg
    673.8 KB · Views: 102
  • 55CC8B4E-785E-4F80-A527-23066DCDA2DC.jpeg
    55CC8B4E-785E-4F80-A527-23066DCDA2DC.jpeg
    833.4 KB · Views: 109
  • E32F0AB9-F8E5-49B0-B3A2-27323ADFEB5D.jpeg
    E32F0AB9-F8E5-49B0-B3A2-27323ADFEB5D.jpeg
    1 MB · Views: 108
To avoid these ads, REGISTER NOW!

Hank11

Well-known member
Joined
Aug 19, 2019
Messages
1,151
Location
Tennessee
Get a ladder and make a picture at the level of the bottom of the trusses. I think you can add some plywood strips or 1X boards to the trusses to make a channel for the soffit venting.
 

jack stand

Well-known member
Joined
Feb 29, 2012
Messages
3,335
Location
Lakes Region Maine
Stuff it full of r-19 fg or cut and fit some rigid foam into this space.
Are you finishing the walls or is the white poly it?
Are you done insulting with the 1"1/2 +/- spray foam?
 
OP
R

RunsDeep

Member
Joined
May 15, 2016
Messages
17
Location
Virginia
The single bubble white faced is it for now, I’m gonna add horizontal studs over the areas I stapled to the existing horizontal studs. I know there are better ways of going about finishing the garage, I mainly want it to get functional for the 12,000 lb lift I’m putting in to start getting some ROI on the barn.

I was thinking, where that gap is in the wall, I could cut down 2x6” boards and screw them through the exposed 2x6 beam then construction adhesive the other 3 edges therefore creating a seal as well as making it more rigid, even tho it won’t be baring any weight. That way it’ll be flush and appear more “finished”.

As for the insulation, is it not possible to construction adhesive the last 1-2 ft section of roll batt around the outer edges and then just leave the ridge vents open to do their job?

Thanks! I’m 25 and new to all this. Learning as I go! Use all the info I can gather off this forum.
 
OP
R

RunsDeep

Member
Joined
May 15, 2016
Messages
17
Location
Virginia
Get a ladder and make a picture at the level of the bottom of the trusses. I think you can add some plywood strips or 1X boards to the trusses to make a channel for the soffit venting.
I just closed up for the day, didn’t see the reply. I will get a pic sometime tomorrow night
 

jack stand

Well-known member
Joined
Feb 29, 2012
Messages
3,335
Location
Lakes Region Maine
The single bubble white faced is it for now, I’m gonna add horizontal studs over the areas I stapled to the existing horizontal studs. I know there are better ways of going about finishing the garage, I mainly want it to get functional for the 12,000 lb lift I’m putting in to start getting some ROI on the barn.

I was thinking, where that gap is in the wall, I could cut down 2x6” boards and screw them through the exposed 2x6 beam then construction adhesive the other 3 edges therefore creating a seal as well as making it more rigid, even tho it won’t be baring any weight. That way it’ll be flush and appear more “finished”.

As for the insulation, is it not possible to construction adhesive the last 1-2 ft section of roll batt around the outer edges and then just leave the ridge vents open to do their job?

Thanks! I’m 25 and new to all this. Learning as I go! Use all the info I can gather off this forum.
Your posts are 5 1/2", that's how wide that gap is. It's also the thickness of R-19 fiberglass insulation. Buy a roll of R-19 (for 24" framing), measure between the posts, cut fg to length, then cut in half long ways. It should friction fit inside the beam.
 

jack stand

Well-known member
Joined
Feb 29, 2012
Messages
3,335
Location
Lakes Region Maine
Then when you're ready to finish the wall's you'll want to frame vertically with 2x4's. You'll need to nail down a treated (green PT) "plate" to the concrete with the inside edge FLUSH with the posts inside face. Then a 2x4 long (tall) enough to attach to the inside of that inner 2x10 (estimated) beam. You'll be yanking the insulation back out to trim it around your new studs. I'd recommend you use 16" stud spacing.
This will allow your electric, air lines, etc. to be fastened to the face of the existing horizontal wall girts....
Insulate an additional r-13 in the new wall...
and provide a continuous un interrupted wall surface.
Come back and check with us before you start this "phase 2".
There's something called your "layout" that needs to be discussed. 👍
25 and you got a shop! Good on you and your head is screwed on the right way!
 
OP
R

RunsDeep

Member
Joined
May 15, 2016
Messages
17
Location
Virginia
Your posts are 5 1/2", that's how wide that gap is. It's also the thickness of R-19 fiberglass insulation. Buy a roll of R-19 (for 24" framing), measure between the posts, cut fg to length, then cut in half long ways. It should friction fit inside the beam.
That’s a great, cost effective way to go about it. Thank you I’m gonna take that idea. Probably only need one R19 unfaced roll at the 40ft length.

And yes, much farther down the road I will for sure finish the walls. I wasn’t planning on the concrete and backfill being as much as it was, have to temporarily cut corners in some areas in the mean time.

Really appreciate it!
 
To avoid these ads, REGISTER NOW!
OP
R

RunsDeep

Member
Joined
May 15, 2016
Messages
17
Location
Virginia
Metal ceiling is up, most of the electrical boxes are hooked up. I’m ready for mounting the garage door hangers back up. My plan is to buy 1” metal spacers and 4ft of angle brackets with the holes and 3” lag bolts.

I plan on cutting the angle brackets down to 2 1’ sections and 1 2’section. Mounting them to the base of the truss through the steel with 3” 3/8 lag bolts and spacer to keep the bracket suspended off the ribs of the metal.

Does this sound like the correct approach?
FD47B8DF-C8A2-4E47-A7CF-2BDC8D88F57A.jpeg904B72E8-F937-4542-9352-0F07282D2CC3.jpeg
Also, as for the attic access, I have a low roof so I would have to make the access towards the center of the building… My plan for that is to mark a 4x4’ section in between the second rear most truss and the last truss then cut it out with my angle grinder. I then plan to frame it in above the metal with 2x4’s then cover the top with a sheet of 1/2” plywood with insulation stapled to it. That way to gain access I just have to slide it out of the way, might put some kind of metal handle on the plywood to ease removal while on a ladder.

Any better way to approach these 2 tasks? Thank you!
 

Attachments

  • 3858E17E-B6CD-48D4-B132-064A830D57A9.jpeg
    3858E17E-B6CD-48D4-B132-064A830D57A9.jpeg
    632.9 KB · Views: 36

jack stand

Well-known member
Joined
Feb 29, 2012
Messages
3,335
Location
Lakes Region Maine
It sounds about right, is your ceiling metal screwed directly to the 1 1/2" wide bottom of the trusses?
I wouldn't use lags, get some of the modern "structural screws". There much better and you won't twist the head off of them like a little 1/4" lag. Anything bigger might not be great in the 1 1/2" dimension possibly splitting it IF you don't hit it directly in the center. That's going to be hard with the metal on unless you're positive the the metal screws you installed are spot on.
They'll have these structural screws at the big blue and orange box stores.
GRK RRS series, Simpson is another and there's others that I can't remember.
A handy spacer is a 5/4 deck board.
 
OP
R

RunsDeep

Member
Joined
May 15, 2016
Messages
17
Location
Virginia
It sounds about right, is your ceiling metal screwed directly to the 1 1/2" wide bottom of the trusses?
I wouldn't use lags, get some of the modern "structural screws". There much better and you won't twist the head off of them like a little 1/4" lag. Anything bigger might not be great in the 1 1/2" dimension possibly splitting it IF you don't hit it directly in the center. That's going to be hard with the metal on unless you're positive the the metal screws you installed are spot on.
They'll have these structural screws at the big blue and orange box stores.
GRK RRS series, Simpson is another and there's others that I can't remember.
A handy spacer is a 5/4 deck board.
Yeah, the ceiling is screwed to the bottom of the trusses, I marked the location of the trusses on my headboard with painters tape, I plan to run a tight string from each header board that way I can get the structural screws dead center. I’ll look for some 1/4” structural screws when I pick up the angle bracket. Thanks!

My original plan was to cut holes in the metal ceiling and run the existing brackets through the steel and put them in the previous holes on the truss… although that would be difficult while crouched in the attic. I also don’t think that it would come out very clean.
 

durk_2007

Well-known member
Joined
May 31, 2019
Messages
58
Location
GB Kansas
As for the attic access, frame it 1" larger per side than the hole in the steel then get some more steel to screw to the plywood "door". Make sure to cut the door liner so that the corrugations line up with the ceiling so they fall together and make a tighter seal than just the plywood
 

racecougar

Well-known member
Joined
Jan 26, 2021
Messages
5,065
Location
Missouri
A handy spacer is a 5/4 deck board.

That's what I used for my tracks. Super simple.

IMG_4962.JPG


As for the attic access, frame it 1" larger per side than the hole in the steel then get some more steel to screw to the plywood "door". Make sure to cut the door liner so that the corrugations line up with the ceiling so they fall together and make a tighter seal than just the plywood
Did this as well. You can see the hatch next to the louvers for the whole house fan in the photo above.
 
To avoid these ads, REGISTER NOW!
Top Bottom